We are often required to deploy OpenShift clusters in fully disconnected environments in industries such as government, defense, telecom, healthcare, and financial services. In this case, you must mirror, control, and install everything internally. Red Hat OpenShift provides the tools, but the process is complex because you must secure and configure registries, mirror images, and prepare multiple configuration files.
A single missed step or version mismatch can derail the installation, forcing hours of troubleshooting. For consultants delivering production deployments, these challenges mean extra effort, manual troubleshooting, and frustration that distract from adding real value for the customer. For solution architects running POCs, this means valuable time is spent just getting a cluster running instead of showcasing OpenShift to the waiting customer.
This article introduces aba, a new tool designed to simplify OpenShift installations in air-gapped (fully disconnected) environments.
A better path forward
What if instead of reinventing the wheel, you could start with everything you need in one place? Imagine having a single install bundle that contains everything you need. This install bundle would include the install images, all matching CLI install files, the registry setup, and the automation needed to generate the configuration files required to install OpenShift in an air-gapped environment (tested, repeatable, and ready to go).
This install bundle ensures:
- No more last-minute scrambles to find missing container images.
- No more fragile, one-off scripts that only work on one person’s laptop.
- No more wasted time repeatedly rebuilding the same environment.
You could arrive on the remote site, unpack your install bundle, and get the cluster running with confidence. This would leave you with more time and mental bandwidth to focus on what really matters—showing the customer how OpenShift can transform their business.
Tested in practice
The good news is that a solution already exists. Standing on the shoulders of the agent-based installer project, we created aba, a new tool (pronounced A-B-A).
Aba is designed to make OpenShift installation in disconnected environments faster, simpler, and more reliable. It automates the heavy lifting by setting up a registry, mirroring images, and generating the required configuration files. It packages everything into a pre-tested install bundle that you can bring into any air-gapped environment with confidence.
Our customers and partners have already tried and tested this tool, proving its value in real-world scenarios where time, accuracy, and reliability are critical. Aba is for anyone who needs to get OpenShift up and running quickly in a disconnected environment.
Key features of aba:
- End-to-end automation: Minimizes the time from cluster planning to a working OpenShift environment.
- Built-in best practices: So users start with a secure, production-ready baseline instead of reinventing the wheel.
- Pre-created and tested install bundles ready for download.
- Automatic registry setup and image synchronization for OpenShift releases and curated sets of operators (odf/ocpv/mesh3/ai etc).
- Catalog sources supported: redhat-operator, certified-operator, redhat-marketplace, and community-operator
- Supports three types of environments: Fully disconnected (air-gapped), partially connected and connected (proxy or direct, no mirror registry required).
- Customization: Automatically generates install-config.yaml and agent-config.yaml files, which you can still edit for advanced customization.
- Supports VLANs & Network interface bonding: You don’t have to manually piece together YAML configurations.
- Any topology: Single node (SNO), compact, or standard.
- Day 2 Operator Hub configuration/integration to enable extending the platform.
- Day 2 OpenShift update service (OSUS) installation and integration to streamline platform upgrades.
- Day 2 Network time protocol (NTP) configuration to ensure all cluster nodes maintain accurate time.
- Workflows: Bare-metal or VM (vCenter or ESXi) workflows.
- Compatibility: oc-mirror v2 compatible
- Arm64: This has also been tested.
- Graceful cluster shutdown and startup: This feature is great for lab environments.
- Repeatable workflows: Eliminate ad-hoc processes and reduce manual errors.
Figure 1 explains the flow of aba and how it works, showing these main choices:
- Fully disconnected (air-gapped)
- Partially disconnected
- Connected installation (without a mirror registry)
- Installation on VMware or bare-metal
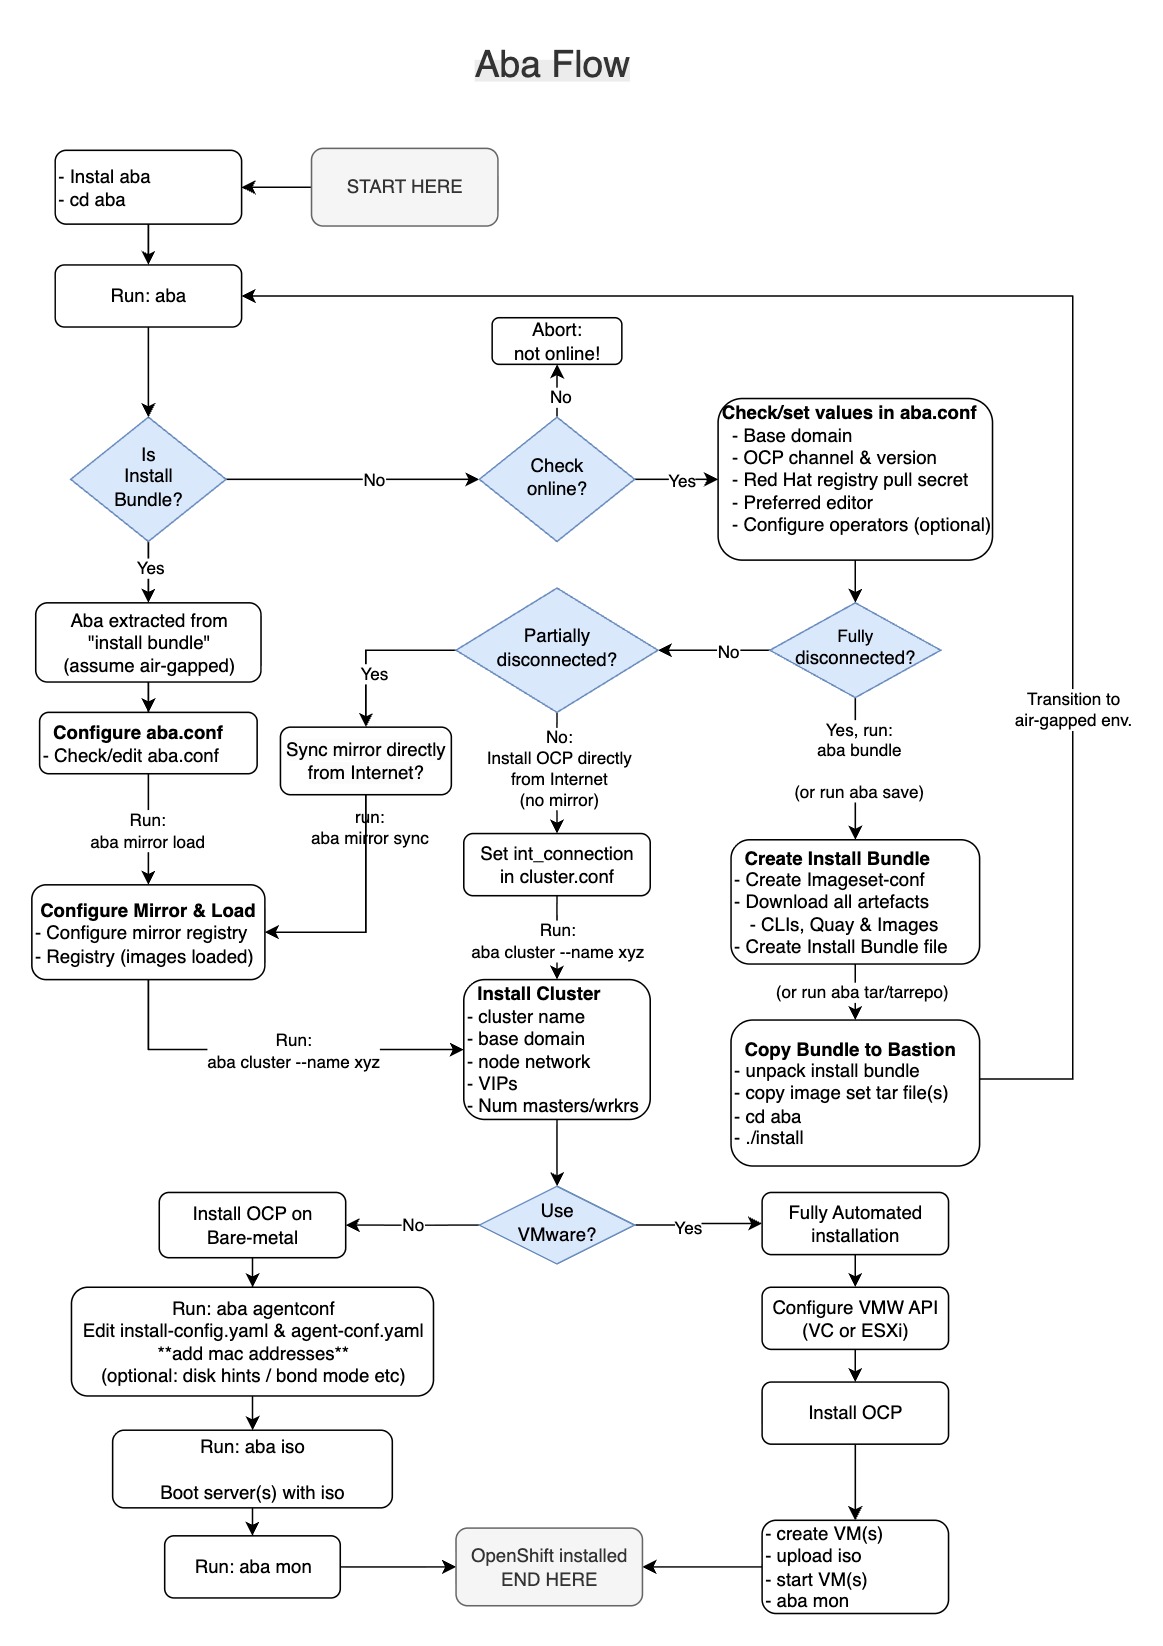
If you run aba, which is interactive mode, you will make use of this workflow.
Fully disconnected aba workflow
Here's an example of how to install OpenShift in a completely disconnected (air-gapped) environment using one of the provided install bundles.
Step 1: Prepare your bastion and install aba
Download an install bundle. You may need to request access with your Google account. Then transfer it into your fully disconnected (air-gapped) environment. You can use a USB stick or other portable media. In our example, we will use the install bundle 4.19.12-ocpv which contains everything needed to install Red Hat OpenShift, Red Hat OpenShift Data Foundation, and Red Hat OpenShift Virtualization.
In your disconnected environment, begin with a bastion host running RHEL 8 or 9 installed with the following RPM packages. If you do not have those RPM packages installed, aba will attempt to install them using dnf. If dnf is not configured in your disconnected environment, you’ll need to install the packages manually (e.g., from a DVD or another source).
jq make python3-jinja2 python3-pyyaml ncurses which file hostname diffutils podman bind-utils nmstate net-tools skopeo openssl coreos-installer httpd
Once the bastion is ready, unpack the install bundle into a directory with a large amount of disk space (e.g., 300 GB or more). Then, install aba.
cd 4.19.12-ocpv     # cd into the install bundle directory you transferred into your environment.
./VERIFY.sh         # It is important to verify the integrety of the files after copying.
./UNPACK.sh ~       # Extract the aba install bundle, with all the required files, to your $HOME dir (~).
cd ~/aba            # Change to the aba directory.
./install           # Install aba
aba                 # Shows the content of the install bundle and next steps.
Note: After unpacking the install bundle, you must change the network settings (domain, machine_network, dns_servers, etc) in the aba.conf file to match your disconnected environment and network.
Step 2: Install your mirror registry
Next, aba will install, configure, and load the mirror registry for Red Hat OpenShift as follows:
Install mirror registry for Red Hat OpenShift.
Load the platform and operator images from the bundle’s image set archive into the mirror registry.
Configure the registry authentication credentials.
This process can take 10 - 20 minutes or longer, so be sure you have enough disk space before starting.
The following command installs the mirror registry on the local host, referenced by the given hostname, and pushes all images from the image set archive file to the mirror:
aba load --mirror-hostname registry.example.com --retry
Aba can also install the image registry on a remote host (see aba load --help) or make use of an existing registry (see the README.md file for more).
After pushing all images into your mirror registry, you can now install OpenShift.
Step 3: Install OpenShift
To install OpenShift, create a cluster directory first. For example, consider a cluster named mycluster using the standard OpenShift topology with three control plane nodes and three worker nodes. The first control plane (master) node is assigned the static IP address 10.0.1.100. The remaining nodes receive IP addresses sequentially, starting from 10.0.1.101.
aba cluster --name mycluster --type standard --starting-ip 10.0.1.100 --step cluster.conf
Aba creates a directory named mycluster. Change into the mycluster directory and open the file cluster.conf to adjust any necessary settings. There are instructions available for each setting.
Review these common values: api_vip, ingress_vip, starting_ip, ports, vlan, num_masters, and num_workers. Pay special attention to ports, as this defines the machine network interface(s) the nodes will use to connect to the container registry.
If the ports value lists multiple network interfaces, aba will configure bonding between them and apply VLANs if you specify a vlan ID.
Ensure the correct DNS A records exist for the API and APPS endpoints. You can read more about the required configuration in aba's readme file.
Now, generate the agent-based configuration files: install-config.yaml and agent-config.yaml. To ensure agent-config.yaml is complete, you need to add the MAC addresses of the network ports you intend to use.
You can either manually edit the agent-config.yaml file or create a separate file named macs.conf that lists the MAC addresses of all the servers and ports you plan to use. Begin by listing the MAC addresses for each control plane node, followed by those for each worker node.
For our example, list six MAC addresses: the top three for the control plane nodes and the bottom three for the worker nodes. Aba will automatically insert these MAC addresses into the agent-config.yaml for you, as shown in the following example.
cd mycluster              # cd into the cluster directory
cat > macs.conf <<END     # Use any tool you prefer to write *your node's MAC addresses*
F8:BC:12:34:AB:A8         # to the file: macs.conf
F8:BC:12:AB:A1:33         # Note: These addresses are just an example. Remember to use your own!
F8:BC:12:2A:BA:CC
F8:BC:12:33:0A:BA
F8:BC:12:4C:AB:A0
F8:BC:12:AB:AC:FF
END
aba agentconf             # Generate the agent-config files
At this stage, you can review the generated files: install-config.yaml and agent-config.yaml. Ensure the MAC addresses have been properly inserted into the agent-config.yaml file. If not, fix the problem and recreate the file by running: rm -f agent-config.yaml && aba agent-config.yaml.
Note: You can manually edit the generated configuration files to add disk hints, adjust network interface names, or change bond modes, for example. However, once you modify the automatically generated install-config.yaml or agent-config.yaml files, you take ownership of them. Aba will no longer update these files automatically, unless you delete them and let aba recreate them.
Generate the ISO file (agent-based), used to boot your servers.
aba iso # Writes ISO file to *iso-agent-based* directory
Boot all your servers using the generated ISO file with your preferred method. For example, mount the ISO via the server’s BMC interface or burn it to a USB stick and boot from there. All of these methods have been used with success.
Then, monitor the installation with the following command: aba mon.
Should the OpenShift installation fail, go to the Troubleshooting.md file for help.
Note: You can run aba ssh to log into the first node to troubleshoot the agent-based installation process. If ssh fails, you can go to the server's console and troubleshoot from there. After fixing the problem, you have to re-generate the agent configuration files, the ISO file, or both. Run aba clean and then run aba agentconf again.
After completing bootstrapping, use aba cmd in a different terminal to output the status of the cluster operators.
After the successful installation, aba mon will output a message similar to the following:
The cluster has been successfully installed!
To access the cluster as the system:admin user when using 'oc', run
    export KUBECONFIG=/home/steve/aba/mycluster/iso-agent-based/auth/kubeconfig
Access the OpenShift web-console here: https://console-openshift-console.apps.mycluster.example.com
Login to the console with user: "kubeadmin", and password: "AAAAA-BBBBB-AAAAA-xyxyx"
Run '. <(aba shell)' to access the cluster using the kubeconfig file (auth certs), or
Run '. <(aba login)' to log into the cluster using the 'kubeadmin' password.
Run 'aba day2' to connect this cluster's OperatorHub to your mirror registry (run after adding any operators to your mirror).
Run 'aba day2-osus' to configure the OpenShift Update Service.
Run 'aba day2-ntp' to configure NTP on this cluster.
Run 'aba info' to see this information again.
Run 'aba -h' or 'aba help' for more.
From this point, you can authenticate with your cluster and access the console using the kubeadmin password provided. Additional recommended steps include configuring NTP, OperatorHub, and the OpenShift update service.
Day 2 operations
Now your OpenShift cluster is ready for use. You can upgrade it by synchronizing the latest images into your mirror registry and activating the upgrade via the OpenShift console as usual.
Recommended day 2 operations:
- Configure OperatorHub in your cluster by running:
aba day2. - Configure the OpenShift Update Service by running:
aba day2-osus. - Set up NTP by running:
aba day2-ntpand waiting for all nodes to restart.
Upgrade your cluster:
- Unpack your install bundle onto a connected workstation.
- Edit the image set configuration file
aba/mirror/save/imageset-config-save.yamlto add more images for cluster upgrade. - Re-run
aba saveto download the new images into a new mirror archive file (e.g.aba/mirror/save/mirror_000001.tar). - Copy the mirror archive file into the same directory in your internal bastion.
- Run
aba loadon the bastion to push the new images into your mirror registry. - If new operators were pushed to the mirror registry, run
aba day2again. - Upgrade OpenShift in the usual way.
Learn more about Day 2 operations in the readme file.
Create custom install bundles
In addition to the provided installation bundles, you can also create custom install bundles containing only the images you require for your use-case. The following is an example of how to create your own install bundle for the OpenShift Virtualization use-case:
aba bundle \
    --pull-secret "~/.pull-secret.json" \
    --channel stable \
    --version latest \
    --op-sets ocp odf ocpv \
    --ops web-terminal devworkspace-operator \
    --platform bm \
    --force \
    --out - | split -b 10G - /path/to/large/portable/media/ocp_bundle_
This will create several 10 GB archive chunks you can unpack in your disconnected environment (bastion) by running: cat ocp_bundle_* | tar xvf -.
Use the aba bundle -h command for more information.
Other notable features
Aba works with or without a private mirror registry. By setting the int_connection value in cluster.conf to either proxy or direct, clusters can install directly from Red Hat’s public image registries.
When the platform parameter in aba.conf is set to vmw, aba can automatically provision the required VMs via vCenter or ESXi, which is ideal for lab environments, demos, and workshops.
What's next
If you’ve ever been caught in the frustrating cycle of trying to get OpenShift up and running in an air-gapped environment, now you know it doesn’t have to be that way. With aba, you can skip the pain and move straight to delivering value.
Interestingly, Red Hat has recently developed a related project for disconnected OpenShift Virtualization, featuring guided, opinionated workflows and pre-configured operators to simplify deployment. I’m looking forward to seeing how that project develops. In contrast, aba follows the standard CLI-based Red Hat install workflow, leveraging a mirror registry—either automatically provisioned or reused from an existing setup—offering flexibility across a wide range of OpenShift environments and deployment scenarios.
The aba tool is an open source project (upstream only), not supported by Red Hat. Red Hat does support all the artifacts that it generates and the underlying tools. Check out the Aba project. No software is perfect. Thus, Red Hat welcomes contributions to the Aba project. Whether you’re filing an issue, suggesting an improvement via our Slack channel or GitHub Discussions, or adding documentation or code, you’re helping to strengthen a tool that can help others.
Last updated: December 15, 2025