The Visual Studio (VS) Code IDE is one of the most-used platforms for JavaScript, C#, and Python developers and is quickly becoming one of the top three tooling environments at Red Hat. VS Code is highly customizable and offers a healthy and growing marketplace for extensions of all types and technologies, including an extension for Yeoman. In this article, I'll explain how to get started using the updated extension that works with latest versions of VS Code.
Yeoman, as you might remember from my previous article (Jump start Camel projects with the new Yeoman-based project generator), describes itself as “…a generic scaffolding system allowing the creation of any kind of app. It allows for rapidly getting started on new projects and streamlines the maintenance of existing projects.” In an agnostic way, Yeoman lets users piece together entire projects or just parts.
We have used Yeoman not only for creating our own Camel project generator but also for scaffolding new VS Code extensions. Red Hat and Apache Camel developers have created quite a few extensions recently, including the Language Support for Java(™) by Red Hat, the Project Initializer by Red Hat, and Language Support for Apache Camel.
Unfortunately, the existing VS Code extension for Yeoman has not been updated since mid-2017 and stopped working properly with the latest IDE sometime in 2018. To remedy that situation, we decided to create a fork and update it. The new VS Code Yeoman project is just in the beginning stages, but it already includes the fix so that it now works in the latest versions of VS Code.
Requirements
Using the VS Code Yeoman extension requires a few items to already be present and installed on the system, including Node.js, NPM, and Yeoman. The VS Code documentation offers great pointers for ensuring that these are set up in your VS Code instance (see “Additional Components” in the SETUP guide).
Yeoman has its own marketplace of generators from which to choose, including our own Camel project generator. For details about installing and running the Camel-project generator, again see the “Jump start Camel projects with the new yeoman-based project generator” article.
Installing the VS Code Yeoman extension
We have published a preview version of the updated VS Code Yeoman extension in the VS Code Marketplace and you can find it listed here.
To install the extension in your VS Code instance, bring up the Extensions view by clicking on the Extensions icon in the Activity Bar on the side of VS Code or the View: Extensions command (Ctrl+Shift+X). In the marketplace text box, type yo, then look for the yo extension published by Camel Tooling (version 0.9.5 at this time) and click its Install button. When the installation is complete, reload your workbench, and the tool will be ready to use!
Using the Yeoman extension
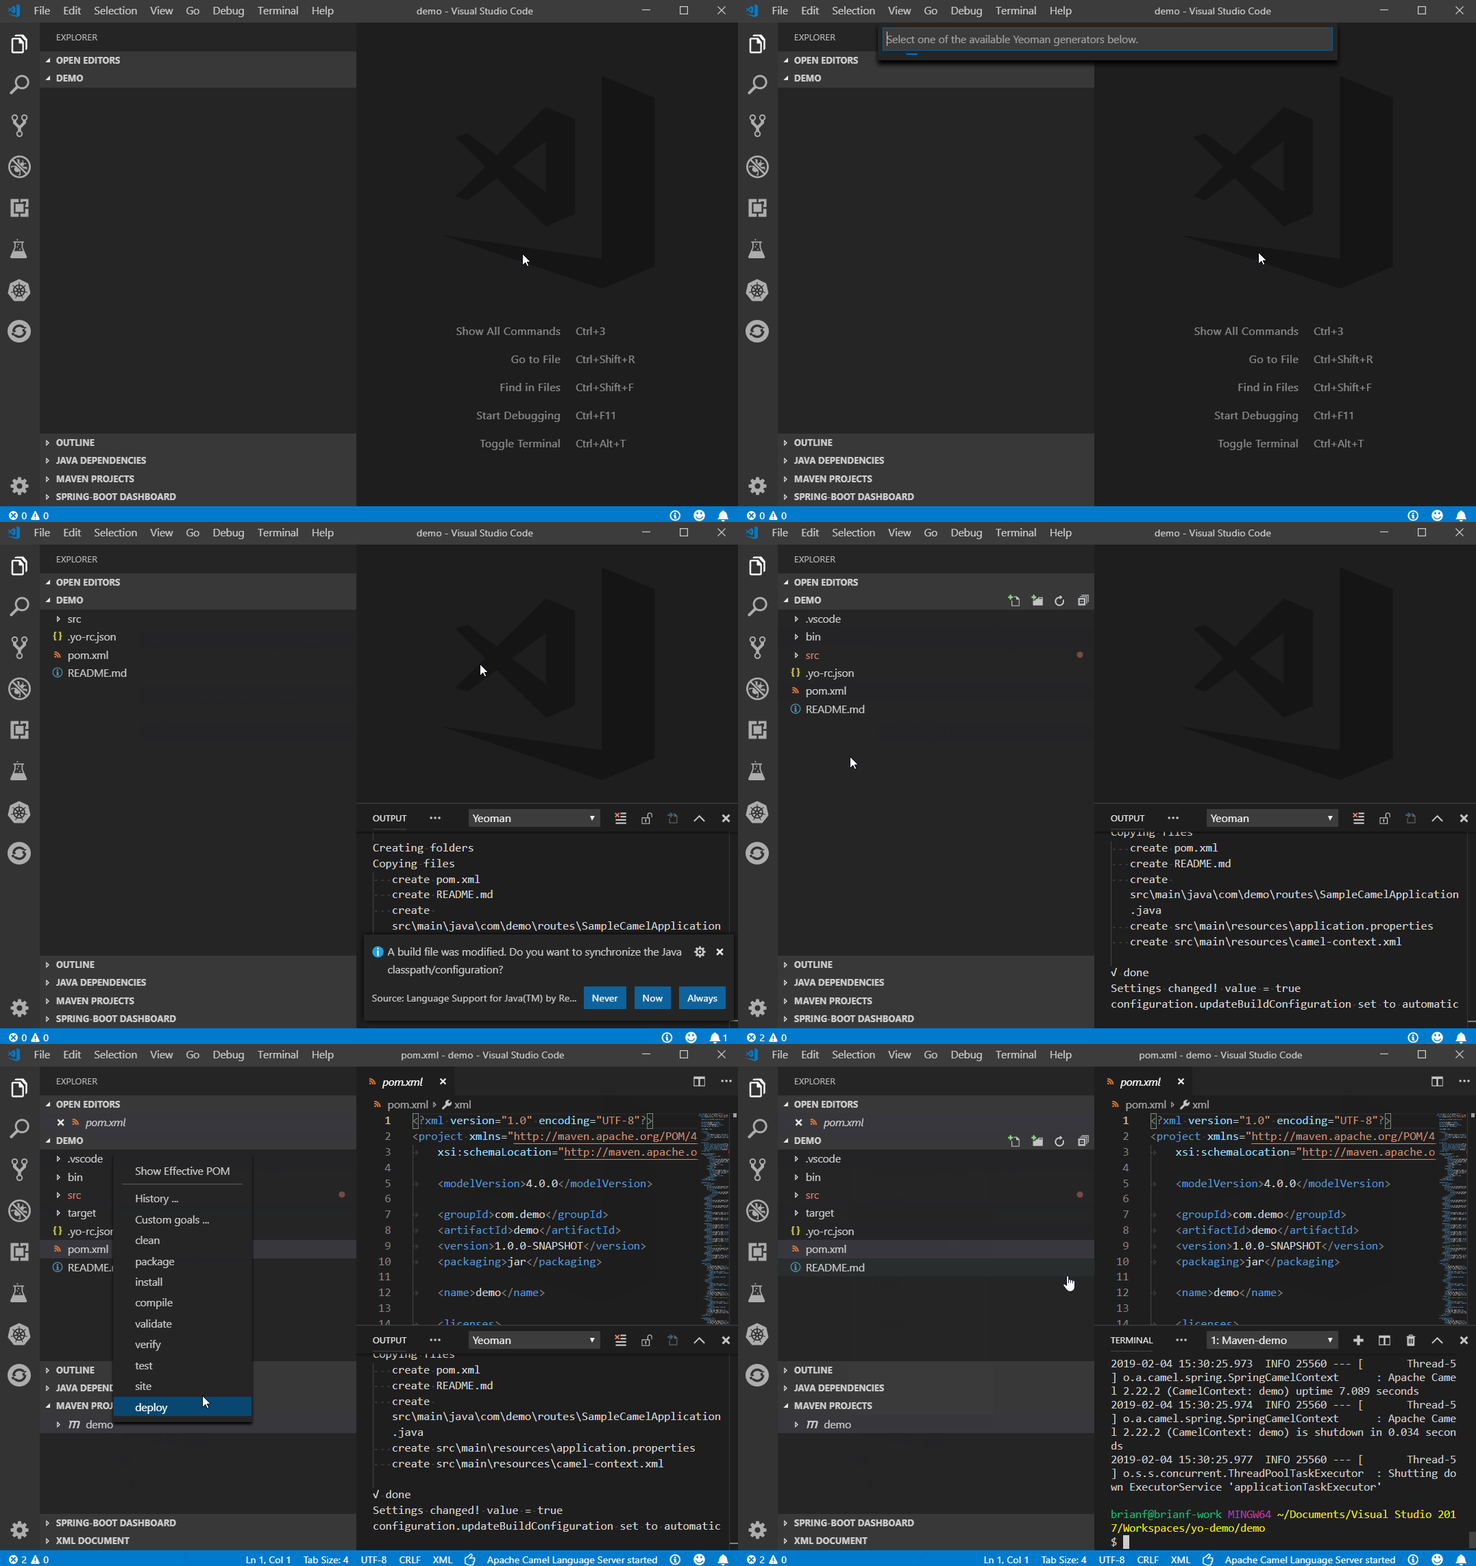
Inside VS Code, press Ctrl+Shift+P to bring up the Command Palette and type yeoman. When you hit Enter, you will be presented with a list of Yeoman generators that are installed and available for use. Once you select a generator, answer each question as it prompts to complete the process.
For example, to use the camel-project generator:
- Create a directory for your new Camel project.
- Open VS Code and open the directory (File->Open Folder).
- Press Ctrl+Shift+P to open the Command Palette and type
yeoman. - Select the camel-project generator (mouse click may be required).
- Follow the prompts. Enter text to override the default values and press Enter.
- Project Name (defaults to the name of the directory)
- Camel version (defaults to 2.22.2)
- Camel DSL (type
spring-boot) - Package name (defaults to “com.” + name of directory, but you may need to change it to be a valid Java-style package name)
When you are done, your directory will be populated with all necessary project files for a Mavenized Camel Spring Boot project that launches a simple timer.
You can open a terminal window and type mvn install spring-boot:run to run the project locally. Or you can install the “Maven for Java” extension to execute a maven command through the Maven Projects sidebar:
- With the Maven for Java extension installed and populated (it should build the project once the Camel generator completes creating the artifacts), right-click on the root project POM and select Custom Goals.
- Type
spring-boot:runand press Enter.
Your new Camel project should run in a new terminal window and eventually show log messages with a timer running at regular intervals.
Below is an example of the whole process:

Future
This was an interesting project to dive into, and I hope to work on it further. Going forward, we would like to improve the Yeoman extension in several places, including offering better prompts for the Camel project generator (and others) as a drop-down list, improving validation in the Command Palette input box, and potentially installing new Yeoman generators directly. However, getting a working extension is the first step!
For more information about the VS Code Yeoman extension itself, check out the GitHub project page.
For more information about the Camel project generator, check out the NPMJS page.
Also see the Red Hat Fuse page.
Last updated: March 22, 2019