Have you tried the Red Hat Enterprise Linux 8 (RHEL8) Beta yet? Read on to learn how to stand up a LAMP stack on top of RHEL8 Beta quickly, and play around with new features built into the operating system.
A LAMP stack is made up out of four main components, and some glue. The first main component in a LAMP stack is Linux. In my example, I’m using Red Hat Enterprise Linux 8 Beta for that, which gives me a secure operating system, a modern programming environment, and user-friendly set of tools to control it.
As for the web server, traditionally the “A” in LAMP stood for Apache, but in RHEL8 Beta we actually have options here. We ship Apache httpd with RHEL8 Beta, but we also ship NGINX. Because I’m a little bit traditional here, I’ll opt for Apache.
In RHEL8 Beta, Apache ships as an AppStream, which, among other things, allow us to provide content with varying life cycles. With AppStreams, we can, for example, ship multiple versions of Python, and add new versions of programming environments outside of the normal RHEL release cadence.
Installing Apache on RHEL8 as easy as it was on earlier versions of RHEL. Run:
$ sudo yum -y install httpd
(You are using sudo, right? If you didn't set your user ID to be an Administrator during installation, see How to enable sudo on Red Hat Enterprise Linux.)
This command will enable the Apache 2.4 AppStream and install the httpd package, including its default dependencies.
To start this newly installed web server and make sure it will automatically be started after a reboot, I’ll need to run:
$ sudo systemctl enable --now httpd
And, as I’ll want my server to be reachable over the network, I’ll need to open up ports 80 and 443 on my system. We can do that from the Web Console in RHEL8 (see the DevNation video at the end of this article for a demo), but for now, let’s just use the command-line tools provided with RHEL8 Beta. They are quite easy:
$ sudo firewall-cmd --add-service=http --add-service=https
$ sudo firewall-cmd --add-service=http --add-service=https --permanent
That’s it. The first command opened up ports 80 and 443 right now, and the second command made sure that after a reboot or firewall restart, the ports will still be open.
Now for the database part. Again, traditionally, the “M” in LAMP stood for MySQL; however, nowadays, it can also mean MariaDB, MongoDB, or even PostgreSQL. You can see what databases RHEL8 Beta ships with by running:
sudo yum module list
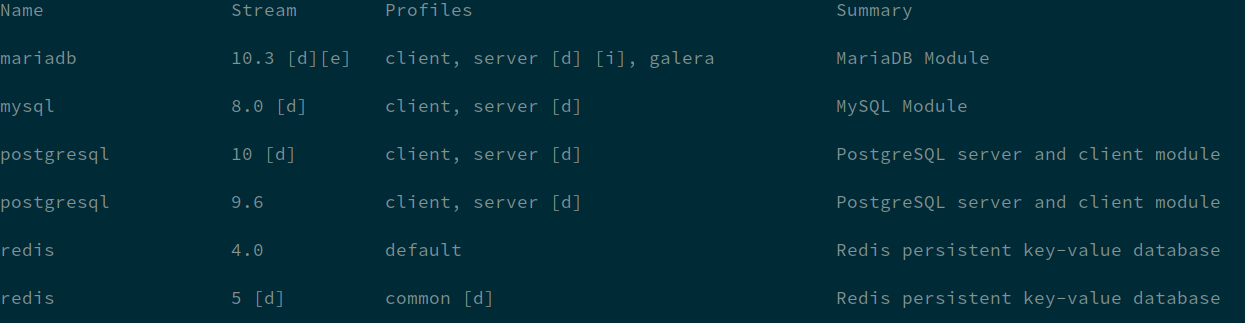
(I’ve stripped the non-database AppStreams from the output for brevity.)
As you can see, MongoDB is not an option for RHEL8 Beta. You can read the RHEL8 Beta release notes for a little background on why that is. What we do have, though, is MySQL 8, MariaDB 10.3, PostgreSQL 9.6 and 10, and Redis 4 and 5. That’s a lot to choose from! (Do not assume the final product will ship with all of these versions, however. After all, we are looking at beta software.)
I want to build a fairly traditional LAMP stack here, so I’ll opt for MariaDB, which is a drop-in replacement for MySQL. I want to install a database server, so the default profile (‘server’, indicated by the [d] in the output above) will work for me. If I have only wanted the client bits, I could have installed the client profile, saving me a bit of disk space.
For now, however, I’ll run:
$ sudo yum -y module install mariadb
By the way, a standard yum -y install mariadb-server will work just as well.
A database that’s not running is of little use, so let’s start it with:
$ sudo systemctl enable --now mariadb
I don’t need to open firewall ports, because my web server and database server run on the same machine. If you have separate machines for Apache and MariaDB, though, you’ll need to add the MySQL service to the firewall, using the firewall-cmd command I showed above. You’ll also need to tune the SELinux policy to allow Apache to make network connections to a database (safety first!), by running:
$ sudo setsebool -P httpd_can_network_connect_db on
Finally, because I have taken my lessons around security to heart, I’ll run the mysql_secure_installation script:
$ sudo mysql_secure_installation
We are almost there. I have a proper Linux machine, I have my web server, and I have my database server. What’s still missing is a programming environment, and some glue. Let’s see, what programming environments do I have available?
$ sudo yum module list
I’ll not show the whole output again here, but we have PHP, we have Python in two major versions, we have Ruby, and a plethora of other options. Traditional LAMP means PHP for me though, so that’s what I’ll be installing today. One simple command should that care of it:
$ sudo yum -y module install php
Two final steps remain. First of all, some glue. In order to enable connecting to the MariaDB database from my PHP pages, I need to install a tiny library:
$ sudo yum -y install php-mysqlnd
Now, as the final step, I’ll restart Apache to pick up my newly installed PHP and the PHP MySQL library:
$ sudo systemctl restart httpd
That’s it, we are done. We can go into /var/www/html and drop a PHP application in it and everything should work.
A few weeks back, Burr Sutter hosted me on DevNation Live, and we recorded an overview of RHEL8 Beta from a developer point of view. We covered installing and using programming environments, managing your development systems, and much more. Interested? Watch the video:
https://www.youtube.com/watch?v=4DiLdgtcavo
I hope this is helpful. Let me know what you think in the comments or on Twitter: @MaximBurgerhout
Last updated: May 30, 2022
