 At Red Hat Mobile we understand the need for a flexible product that enables our customers to integrate with the tools they need to build their current and future applications. Our position as a leading contributor to the Kubernetes project ensures that the Red Hat OpenShift Container Platform offers this tremendous flexibility to customers and end users.
Red Hat Mobile also supports highly flexible integrations to a range of 3rd party services and products. In this article, we’ll demonstrate how Red Hat Mobile v4 and OpenShift v3 enable customers to rapidly deploy and secure their mobile applications by integrating with a third party product provided by Intercede. We’ll be using Intercede’s RapID product to enable two-way TLS (often referred to as Client Certificate Authentication or CCA) for our mobile application.
A demo of the steps described in this article is available to view here:
<!-- !RapID Demo -->
About Intercede RapID:
Many organizations are concerned that passwords are no longer secure enough, particularly in the light of increasing legislation globally on Data Protection and Strong Authentication. Intercede's RapID certificates can be integrated with an application's HTTPS server to implement two-way TLS. Their RapID SDKs then facilitate certificate collection and management on a device to establish valid TLS sessions with the application server. In addition to strong authentication, the client certificate can be utilized to “sign” blocks of data, a prerequisite for Blockchain type applications.
Prerequisites
We’ll need the following software to perform the steps outlined in this post:
- macOS with Xcode installed (The guide will also work for Android with minor tweaks)
- Node.js v8.x
- Git
- OpenSSL
- OpenShift CLI v3.7.x
- Docker v17.x
We’ll also need access to:
- An Intercede account with RapID (rapidportal.intercede.com) enabled and some licenses available.
- An OpenShift v3 instance with Red Hat Mobile v4.x installed.
This post assumes a reasonable degree of familiarity with Red Hat Mobile, OpenShift, and related technologies.
Overview
The core steps required in adding RapID to our Red Hat Mobile 4.x application are as follows:
- Configure two-way TLS on an HTTP server.
- Place the two-way TLS server between our Cloud Application (a Node.js application) and Client Application (a mobile application).
- Add the RapID SDK to our Client Application.
- Update the login flow in our application to integrate with RapID.
An architecture diagram by Intercede is provided below to better illustrate this:
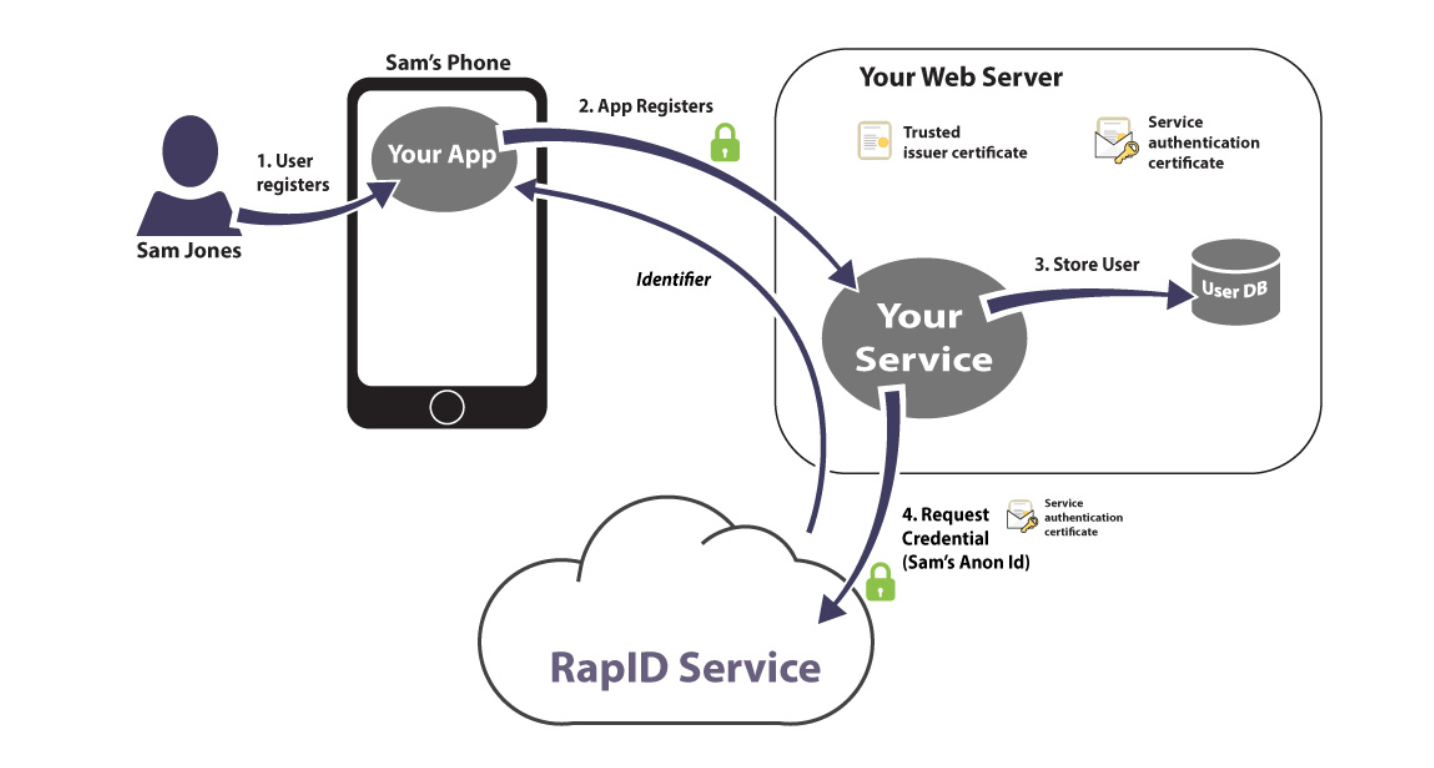
During registration or initial login to the backend, the mobile client will use the RapID SDK to request a certificate from the RapID Certificate Authority with an identifier provided by our application backend. If this request for a certificate is successful the RapID SDK will store the resulting certificate in the device keychain and will protect it using either a fingerprint or PIN. Subsequent HTTPS requests to the mobile backend will require this certificate to be presented to authenticate with the service.
Putting this together with Red Hat Mobile on OpenShift results in the following architecture:

Creating an Application on Red Hat Mobile
In this example, we’ll start with a new application, but these steps are also valid if you’d like to integrate Intercede’s RapID with an existing mobile application deployed using Red Hat Mobile v4.x.
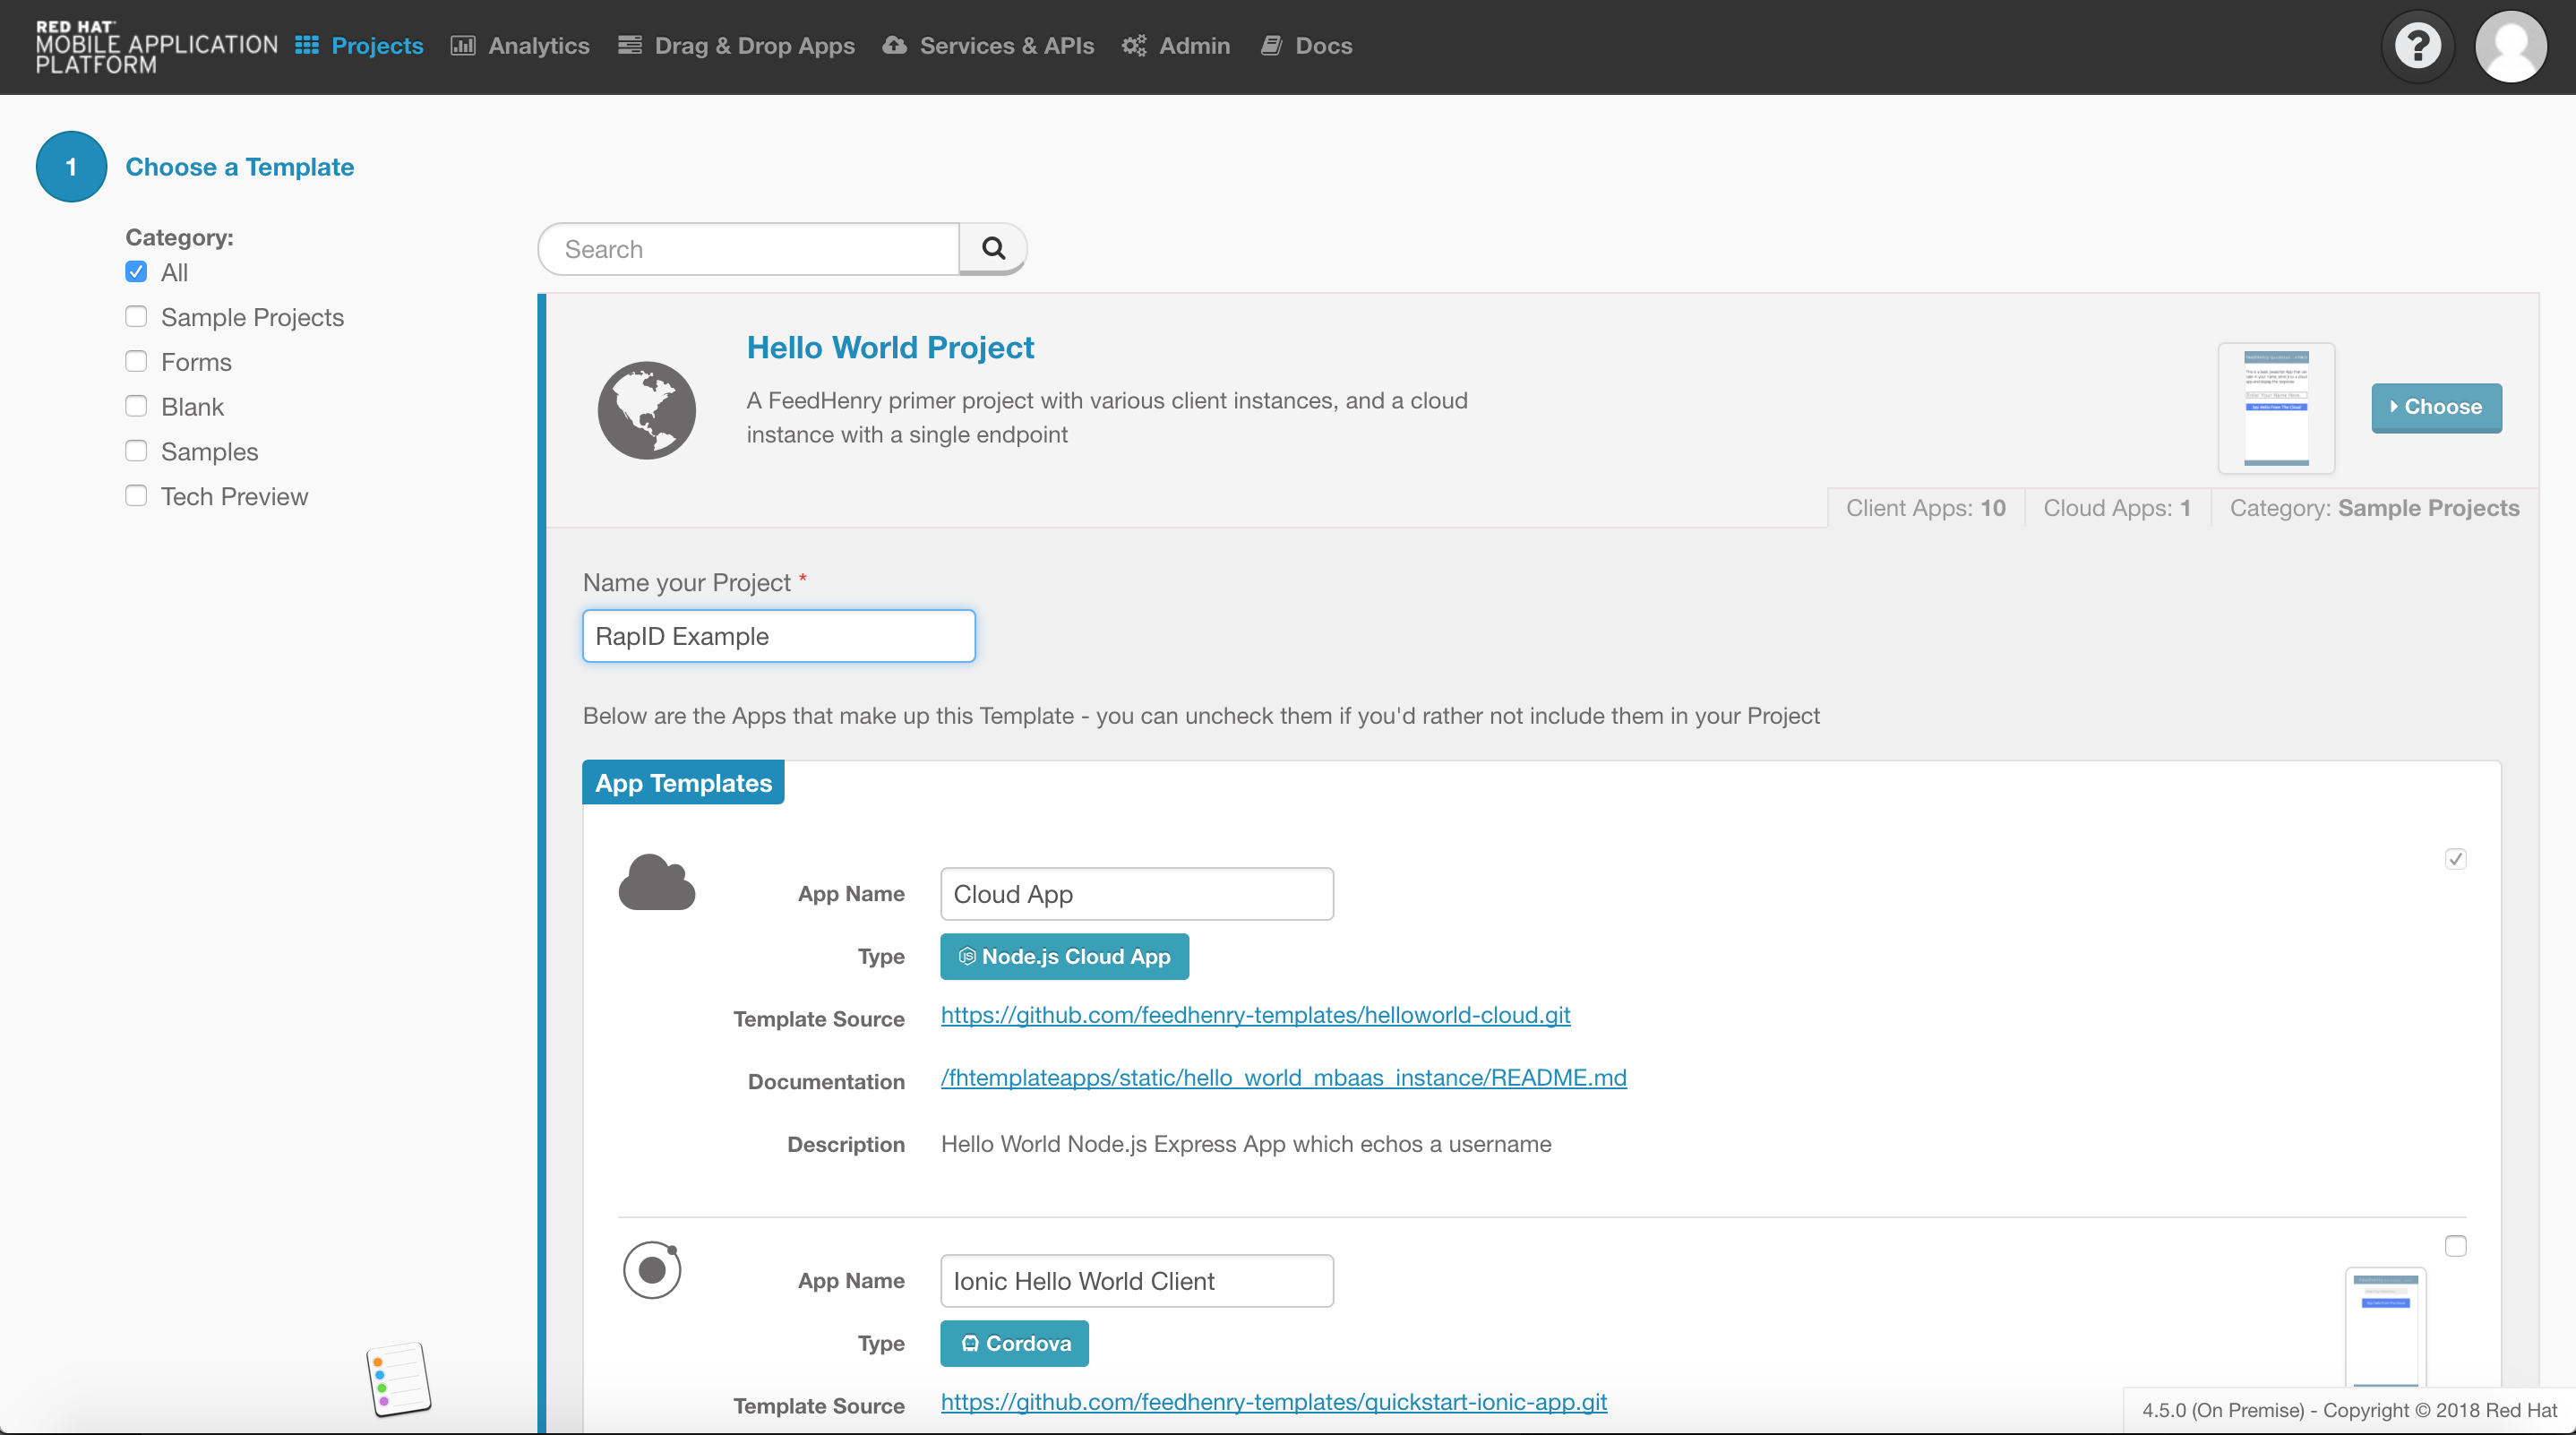
To create a new application navigate to the Projects page of the Red Hat Mobile Application Platform Studio and click the “New Project” button in the top left. On the following screen choose the “Hello World” project template, enter a name, and ensure the checkbox next to the Cordova icon is checked before clicking create:
After the creation process is complete ensure the Cloud Application of the project is deployed. We can deploy the application from the Deploy section of the Cloud Application view:

Add a Login Route
Now that we’ve created a project in Red Hat Mobile let’s add a login route to the Cloud Application portion of that project. Here’s the code we’ll be using:
app.post('/auth/login', parser, (req, res, next) => {
  const username = req.body.username;
  const password = req.body.password;

  users.validateCredentials(username, password)
  // Once a user is validated we get their anonymous ID
  // In our case this will be a UUID, but it can be another
  // unique value generated using your own technique
  .then((valid) => {
    if (valid) {
      return users.getAnonymousId(username);
    } else {
      throw new Error('authentication failed');
    }
  })
  // The anonymous ID is an indentifier we'll share with
  // RapID that identifies this user uniquely for us both
  // sends a POST to /rapid/credentials of the RapID server
  .then((anonId) => rapId.requestIdentity(anonId))
  // RapID returns a RequestID that we return to the device
  // The device uses this to retrieve an SSL certificate
  // directly from the RapID service using the mobile SDK
  .then((requestId) => {
    res.json({
      requestId: requestId
    });
  })
  // Internal server error or a login failure. Real world
  // applications would handle this more explicitly to
  // determine the exact error type and respond accordingly
  .catch((e) => next(e));
});
There’s quite a bit going on here, so let’s break it down piece by piece:
- app.post - Define a login endpoint in our Node.js express application.
- users.validateCredentials - Verify that the given username and password are correct.
- users.getAnonymousId - If the user is authenticated successfully (i.e. valid is truthy), then we’ll generate an anonymous ID for that user, or use a previously generated value associated with their account.
- rapId.requestIdentity - Request an /identity/ for our user. We pass RapID the anonymous ID we generated as a shared identifier for the user.
- res.json - Pass the requestId from the identity request response to the mobile device that made the login call
This flow is explained in greater detail by Intercede in their documentation, so be sure to head over to their RapID documentation for a thorough explanation of the overall architecture.
The code in the rapId module is an abstraction around the Intercede REST endpoint POST /rapid/credentials for the sake of brevity. Think of the users module as a typical abstraction in a backend for interaction with a users database table or API.
Add an API Endpoint
Now we have a login route in our Cloud Application, but we still need to create an API endpoint that we’ll secure using RapID. Since our application created from the template already has an endpoint defined under /hello let’s just change that so it looks as follows in the application.js file:
app.use('/api/hello', require('./lib/hello')())
This nests our route under the /api path. We’ve done this so that we can easily secure specific pieces of our application using RapID while leaving others exposed. For the purposes of this blog post we’ll be securing only requests to /api.
Getting Credentials for our Apache Server
Intercede provides instructions for configuring various HTTP servers, but we’ll be covering only Apache HTTPD in this blog post and will, therefore, present a modified version of their Apache HTTPD configuration guide.
Note: All the files generated in these steps should be stored in the same working directory
Using the OpenSSL commands below we’re going to generate a self-signed certificate for our server. When prompted for a password, leave it empty and press enter. When prompted for a “Common Name”, use the Applications => Route entry from the OpenShift UI but drop the HTTPS protocol prefix; e.g. nodejs-cloudappdevezqll-rhmap-rhmap-development.127.0.0.1.nip.io was used for our example application:
$ openssl genrsa -des3 -passout pass:x -out server.pass.key 2048

$ openssl rsa -passin pass:x -in server.pass.key -out server.key

$ rm server.pass.key

$ openssl req -new -key server.key -out server.csr

$ openssl x509 -req -days 365 -in server.csr -signkey server.key -out server.crt
Next, we need to get our trusted issuer certificate file from RapID. This couldn’t be easier; just head over to the RapID portal and download it from the `Server Credentials` section. Once it is downloaded rename it to trusted-ca.cer.

Creating our Apache Server Image
We will use Apache HTTPD as a reverse proxy between clients and our Node.js Cloud Application. This reverse proxy is the layer at which the Intercede RapID certificates will be deployed to ensure clients are providing their own certificates to verify their identity when accessing our API endpoints.
Since we’re deploying this application on OpenShift we need to run Apache in a container, so let’s get started by creating a dockerfile. The dockerfile provides docker with instructions on how our image should be built.
Here’s what our dockerfile will look like:
FROM registry.access.redhat.com/rhscl/httpd-24-rhel7

# Don't want to see the default welcome page...
RUN rm /etc/httpd/conf.d/welcome.conf

# These can be generated using OpenSSL
# Details here: rapidportal.intercede.com/docs/RapID/reference_apache/
COPY server.crt /opt/app-root/ssl/server.crt
COPY server.key /opt/app-root/ssl/server.key
# You must download this from the RapID Portal
COPY trusted-ca.cer /opt/app-root/ssl/trusted-ca.cer

# Use our custom config instead of the default one
COPY conf/httpd.conf /opt/rh/httpd24/root/etc/httpd/conf/httpd.conf

# Use our own www content instead of the defaults
COPY ./www /opt/rh/httpd24/root/var/www/html

# Inform docker that we'll be exposing services on these ports
EXPOSE 8080
EXPOSE 8443

# The service name (host) and port of our node.js application
# These can be overwritten from the OpenShift Console or during the creation

ENV RHMAP_HOST 'http://nodejs-cloudappdevezqll.rhmap-rhmap-development.svc'
ENV RHMAP_PORT '8001'
The FROM statement tells docker that we’d like to create an image using Red Hat’s official httpd image that’s based on Red Hat Enterprise Linux (RHEL). The COPY statements instruct docker to copy our certificates, keys, and www content to the specified paths in the resulting image - we’ll see these again when we create our Apache `httpd.conf` configuration file. The EXPOSE statements inform the docker that services will be exposed on those ports.
Our complete httpd.conf file is available here, but we’ll point out the important pieces in the following paragraphs.
We need to configure the server to listen on 8443 and 8080 for HTTPS and HTTP respectively using the following lines:
Listen 8080
Listen 8443
Next, we need to define our settings for our TLS/SSL connections. We did so by placing the following configuration at the end of the `httpd.conf`.
<IfModule ssl_module>
    <VirtualHost _default_:8443>
        ServerAdmin evan.shortiss@redhat.com
        SSLEngine on
        SSLCertificateFile      /opt/app-root/ssl/server.crt
        SSLCertificateKeyFile   /opt/app-root/ssl/server.key
        SSLCACertificateFile    /opt/app-root/ssl/trusted-ca.cer
        SSLCertificateChainFile /opt/app-root/ssl/trusted-ca.cer

        # Any inbound requests to /api will be authenticated using two way TLS/SSL
        <Location /api/*>
            AllowMethods GET POST OPTIONS
            SSLVerifyClient require
            SSLOptions +ExportCertData +StdEnvVars +OptRenegotiate
            RequestHeader set SSL_CLIENT_CERT "%{SSL_CLIENT_CERT}s"
            ProxyPass ${RHMAP_HOST}:${RHMAP_PORT}
        </Location>

        # All other traffic will be forwarded to the application
        <Location />
            AllowMethods GET POST OPTIONS
            ProxyPass ${RHMAP_HOST}:${RHMAP_PORT}/
        </Location>
    </VirtualHost>
</IfModule>
Here’s a brief explanation of the file paths it’s referencing and what they are:
- server.crt - Certificate we generated with OpenSSL
- server.key - Key we generated with OpenSSL
- trusted-ca.cer - Trusted certificate authority file we downloaded from the RapID portal
The following configuration dictates that any incoming request to a route nested under the /api endpoint will be protected using two-way TLS; e.g. http://my-route.openshift.com/api/orders are secured using two-way TLS. If the client doesn’t present a valid certificate when accessing these routes then the request will be rejected with a TLS error. If a valid certificate is presented then the request will be proxied to our internal service (the Cloud Application) at http://nodejs-cloudappdevezqll.rhmap-rhmap-development.svc:8001.
Finally, create a www/ folder and place an index.html inside with the following content:
<!doctype html>
<html>
    <title>RapID Sample Page</title>

    <body>
        <h2>RapID Sample Page</h2>
        <p>If you're seeing this then the RapID sample server is configured correctly</p>
    </body>
</html>
We can test our image out by running the following commands:
$ docker build -t rapid-proxy .
$ docker run -dit --name rapid-proxy -e RHMAP_HOST=http://nodejs-cloudappdevezqll.rhmap-rhmap-development.svc -e RHMAP_PORT='8001' -v "$PWD/www":/usr/local/apache2/htdocs/ -p 8443:8443 -p 8080:80 rapid-proxy
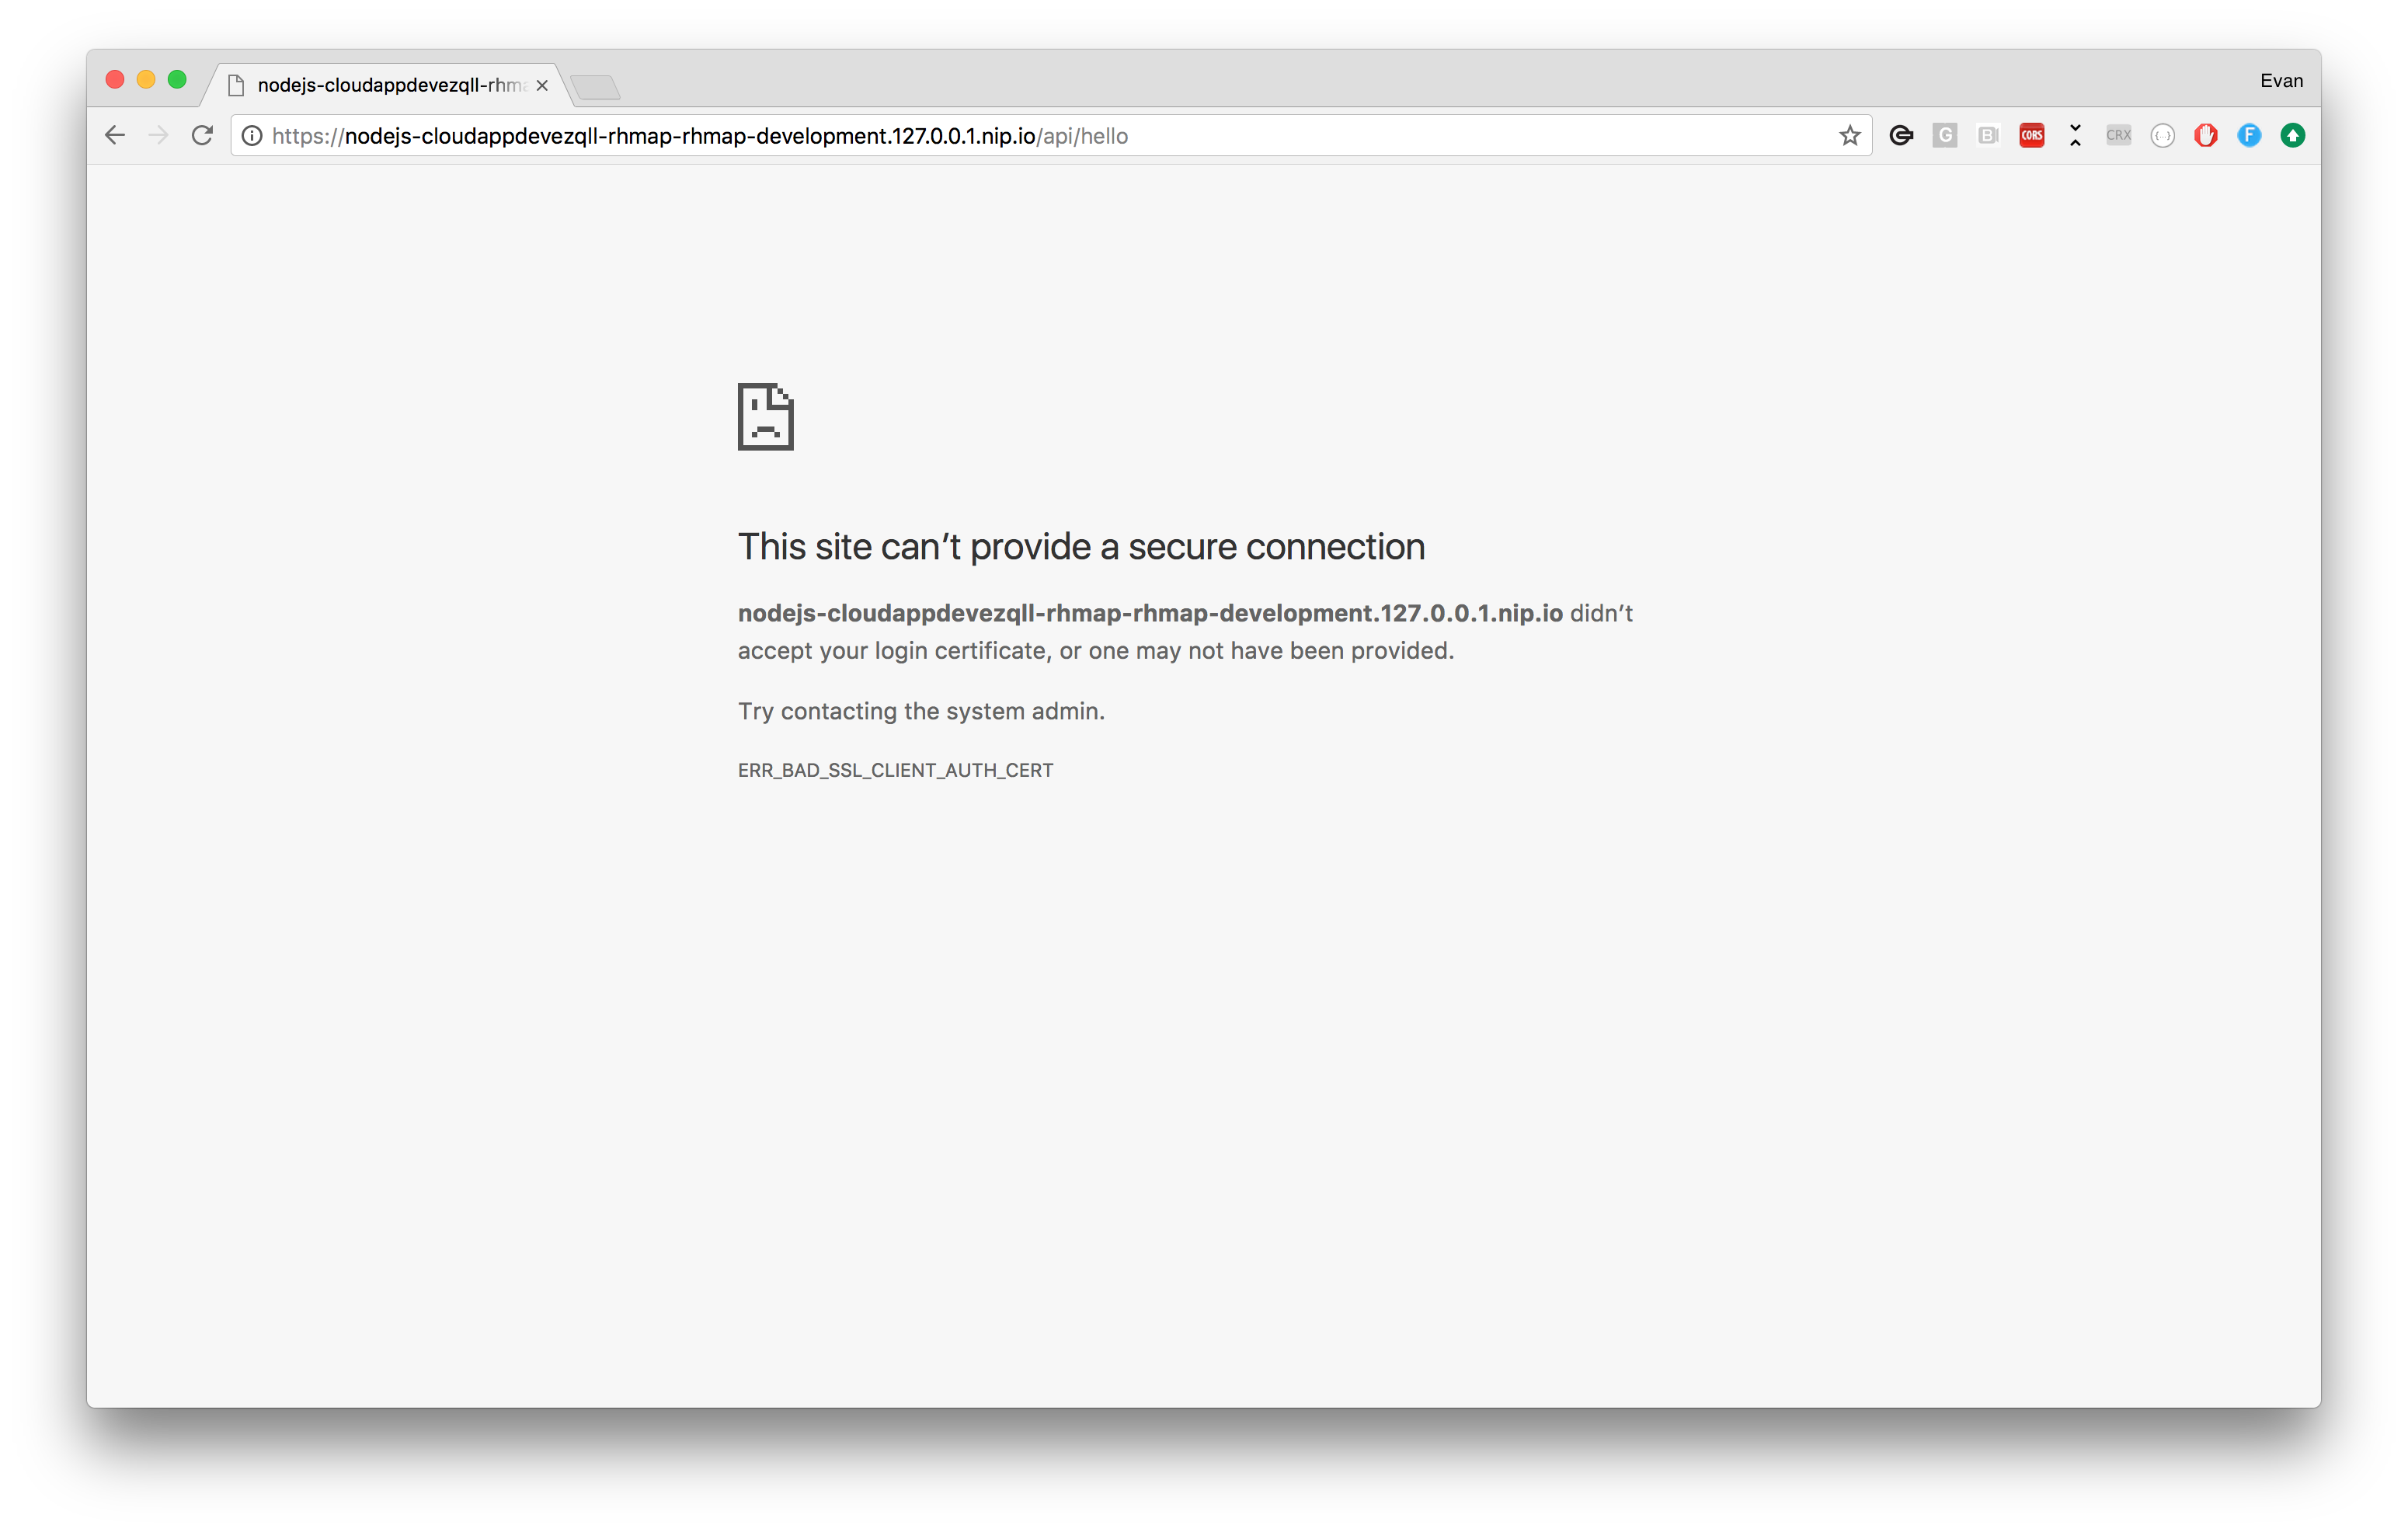
Navigating to http://localhost:8080 or https://localhost:8443 should load up the index.html we just created, but navigating to https://localhost:8443/api/test will fail with an SSL error. We can see that Google Chrome reports that the server expected a valid certificate but we couldn’t provide one:

If the server isn’t behaving as described, then take the ID that was printed by the docker run command earlier and pass it to docker logs to check for errors. Upon discovering the source of errors, make the required edits, stop and remove the image using the commands below, and then run the previous docker build and run commands again:
$ docker stop rapid-proxy
$ docker rm rapid-proxy
$ docker rmi rapid-proxy
Deploying Our Image on OpenShift
For the purposes of this post, we’ll assume that the container registry on our OpenShift instance is accessible via a public route; we have the required privileges to create an Image Stream; and we have permission to push the images to OpenShift’s internal registry.
Login using the OpenShift CLI, authenticate against the internal image registry, tag the image, and push the image tag to our registry using the following commands:
$ oc login $OSD_URL

# Set this to your OSD username
$ OC_USER=evanshortiss
# Get a login token to access the docker registry on OpenShift
$ TOKEN=$(oc whoami -t)

# The name of the project where our app is deployed
$ PROJECT_ID=rhmap-rhmap-development

# Get our docker registry url
$ REGISTRY_URL=$(oc get routes -n default | grep docker-registry | awk '{print $2}')

# Login to the openshift docker registry using
$ docker login $REGISTRY_URL -u $OC_USER -p $TOKEN

# Tag and push your image to OpenShift's registry
$ docker tag rapid-proxy $REGISTRY_URL/$PROJECT_ID/rapid-proxy
$ docker push $REGISTRY_URL/$PROJECT_ID/rapid-proxy
In the OpenShift UI we should now be seeing both of our Image Streams: the Cloud Application and our RapID proxy image:

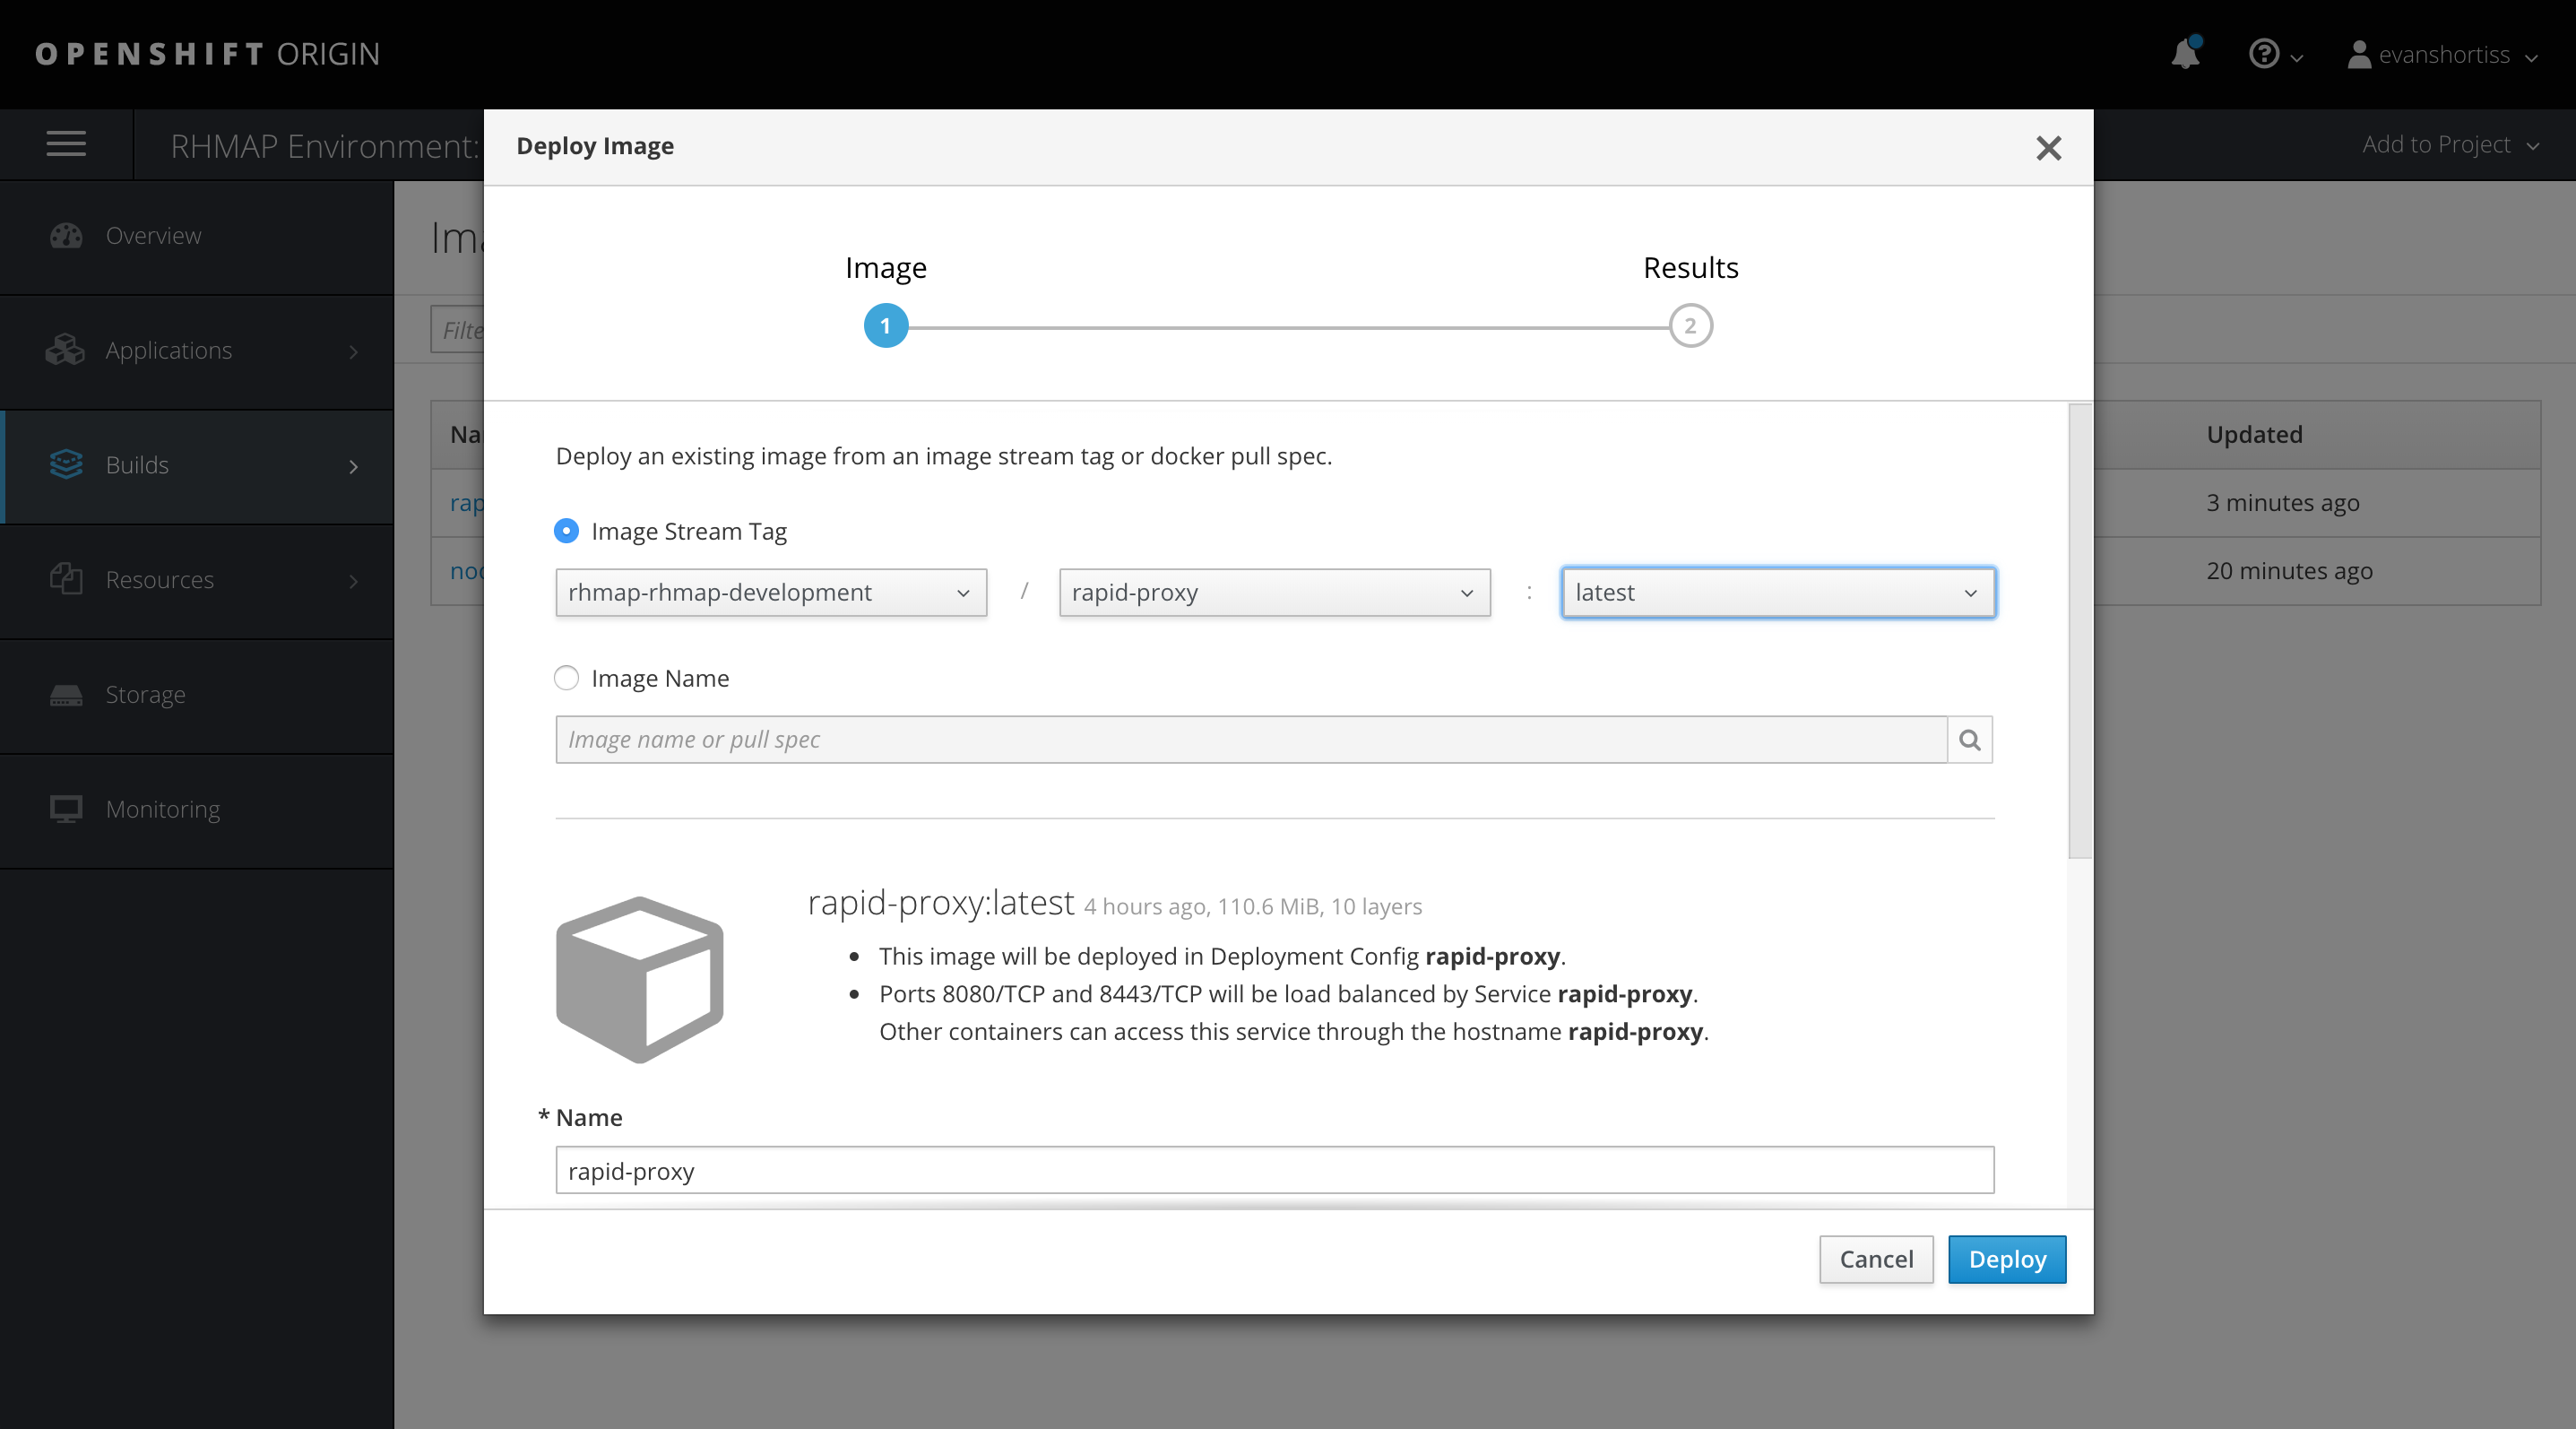
Deploy the RapID Proxy image we created by clicking Add to Project => Deploy Image and choosing the values shown:
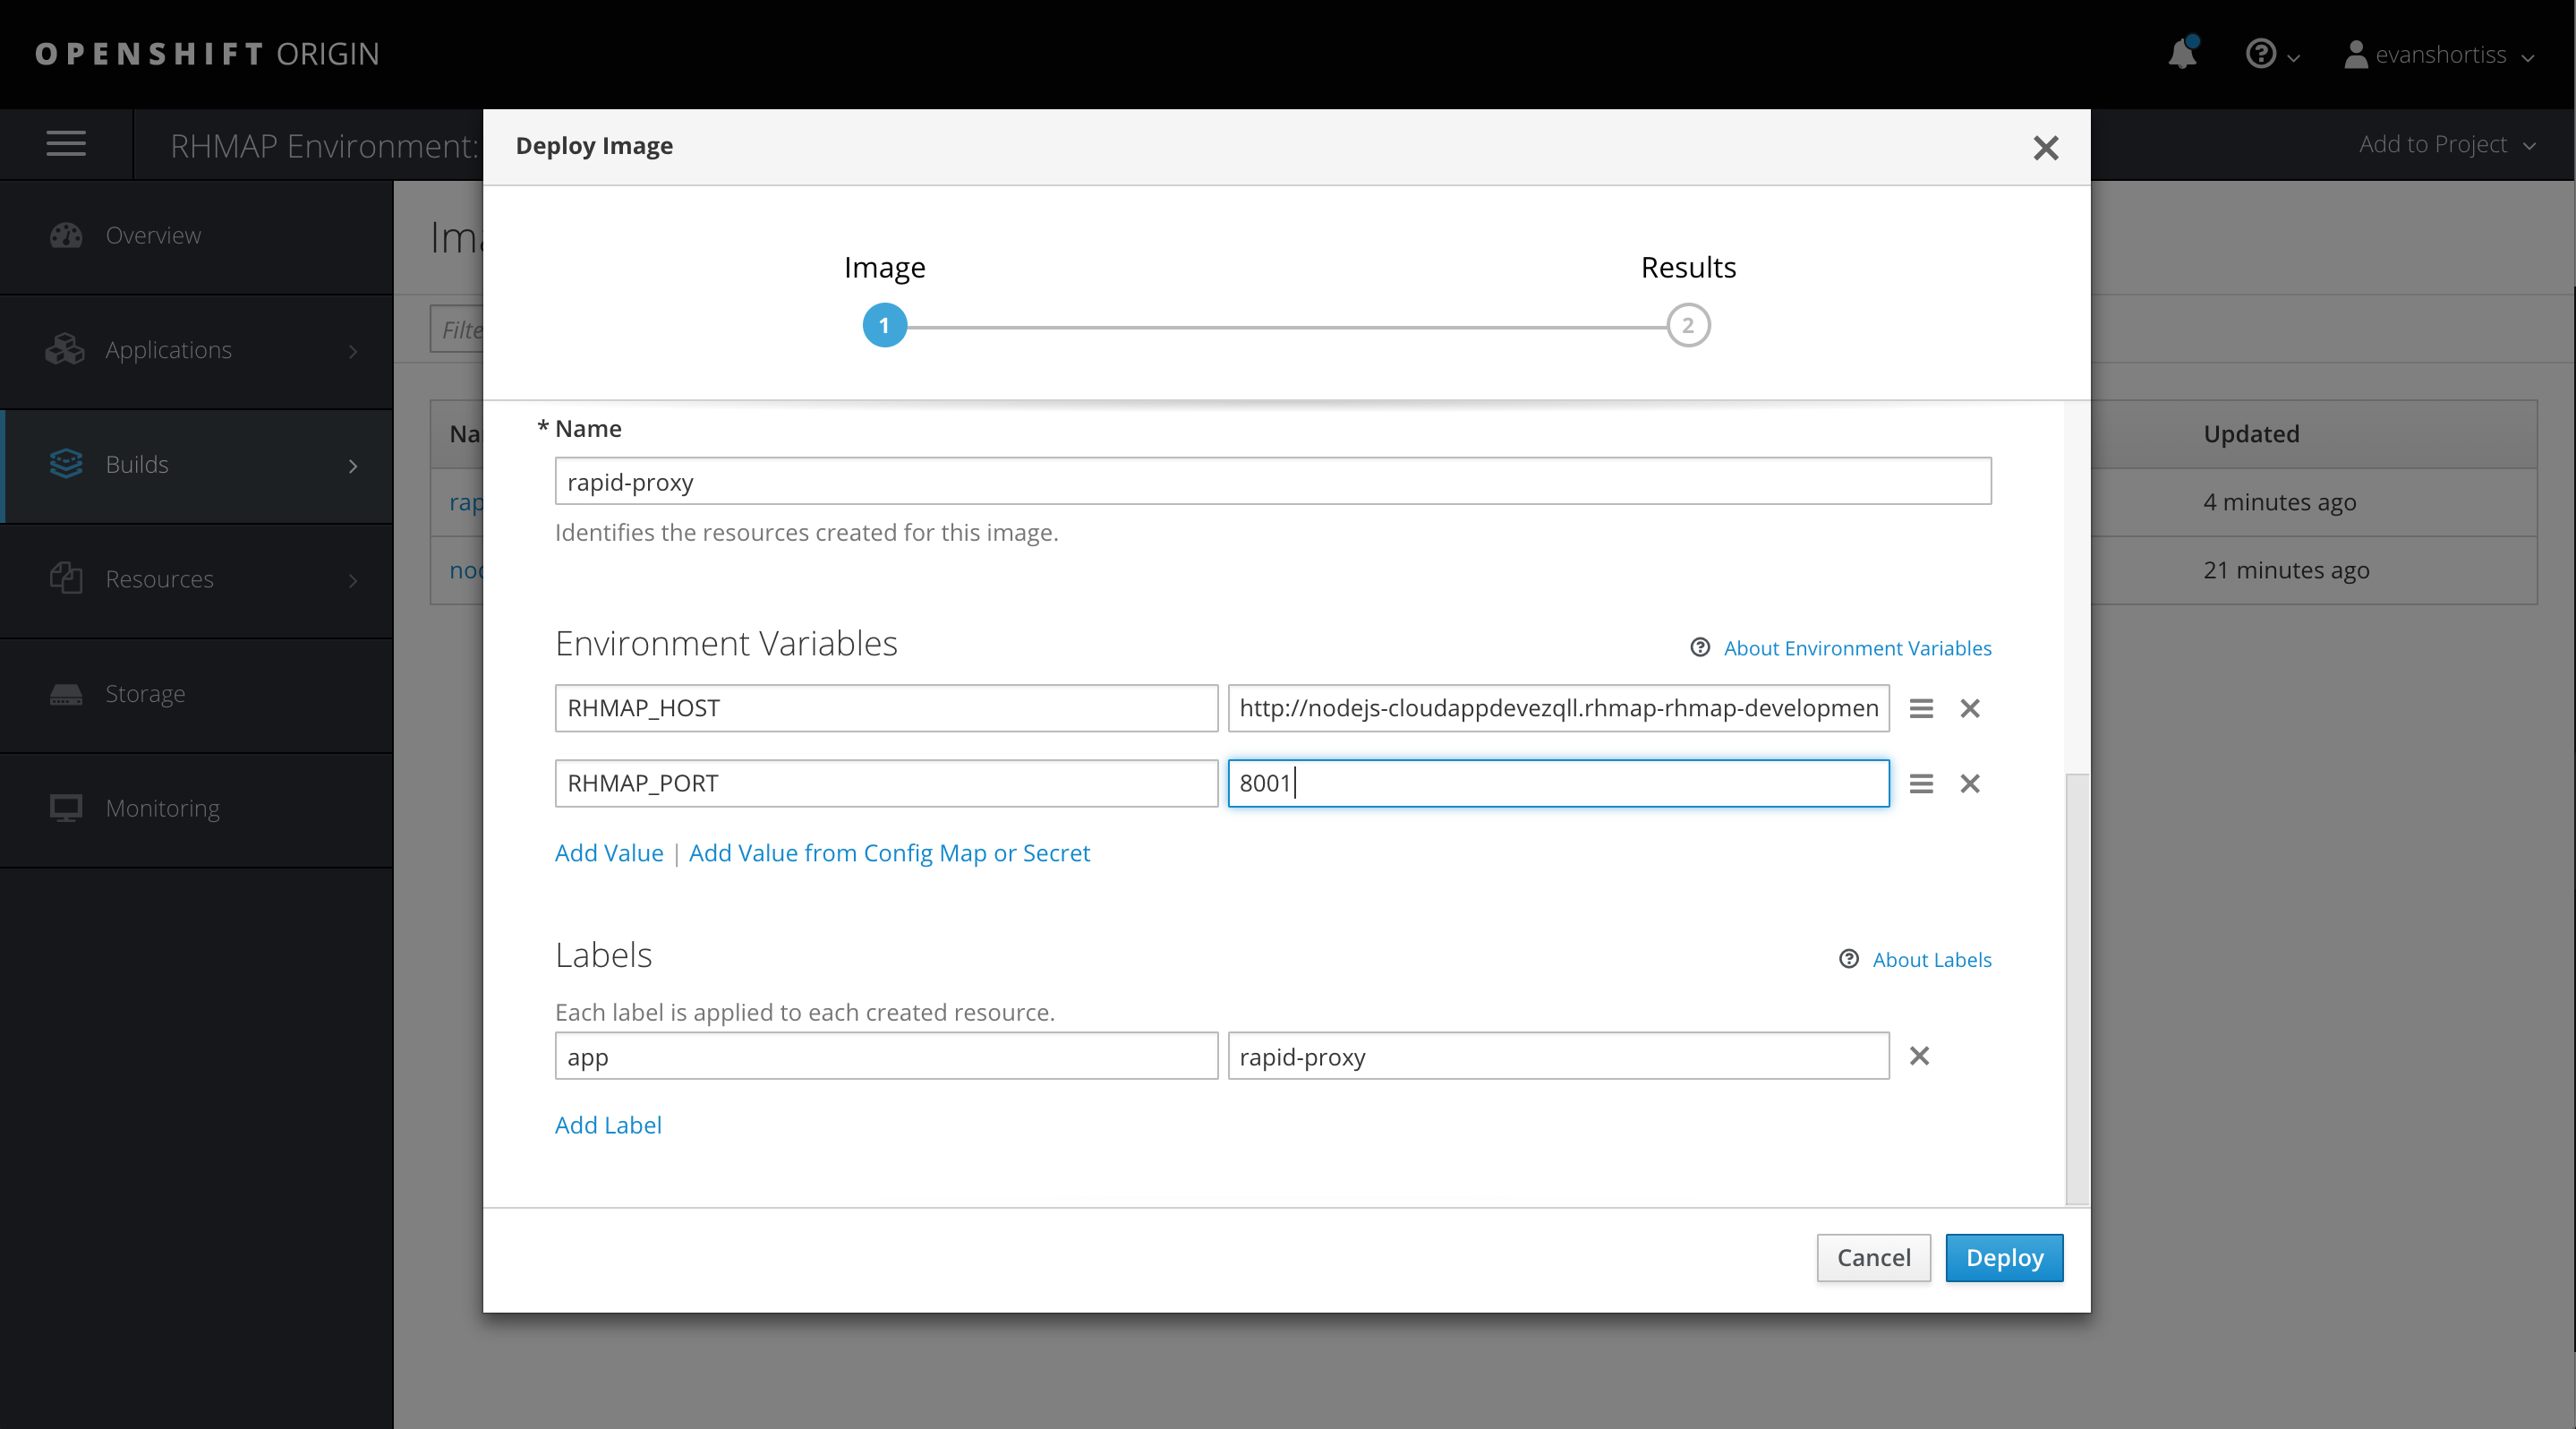
Next, we’ll need to enter the RHMAP_HOST and RHMAP_PORT environment variables. The port will be 8080 or 8001, but we’ll need to find the hostname. This hostname is used by the OpenShift SDN and is available in the Project that corresponds to our development environment and the application of that project:
For example, I created and deployed my application in the development environment so I navigated to the corresponding project in the OpenShift UI and then opened Applications => Services from the side menu to view my Service that I created from Red Hat Mobile. It’ll be easy to spot the Service since the name is formatted as “nodejs-cloudappABCD”, where ”ABCD” is the last 4 characters of the Cloud Application ID.
Finally, navigate to Applications => Routes and choose the route corresponding to our Cloud Application. Choose Actions => Edit in the top right and modify the following:
- Change the Service field to rapid-proxy.
- Change the Target Port to 8443.
- Ensure Secure route is checked.
- Set TLS Termination to Passthrough.
- Set Insecure Traffic to None.
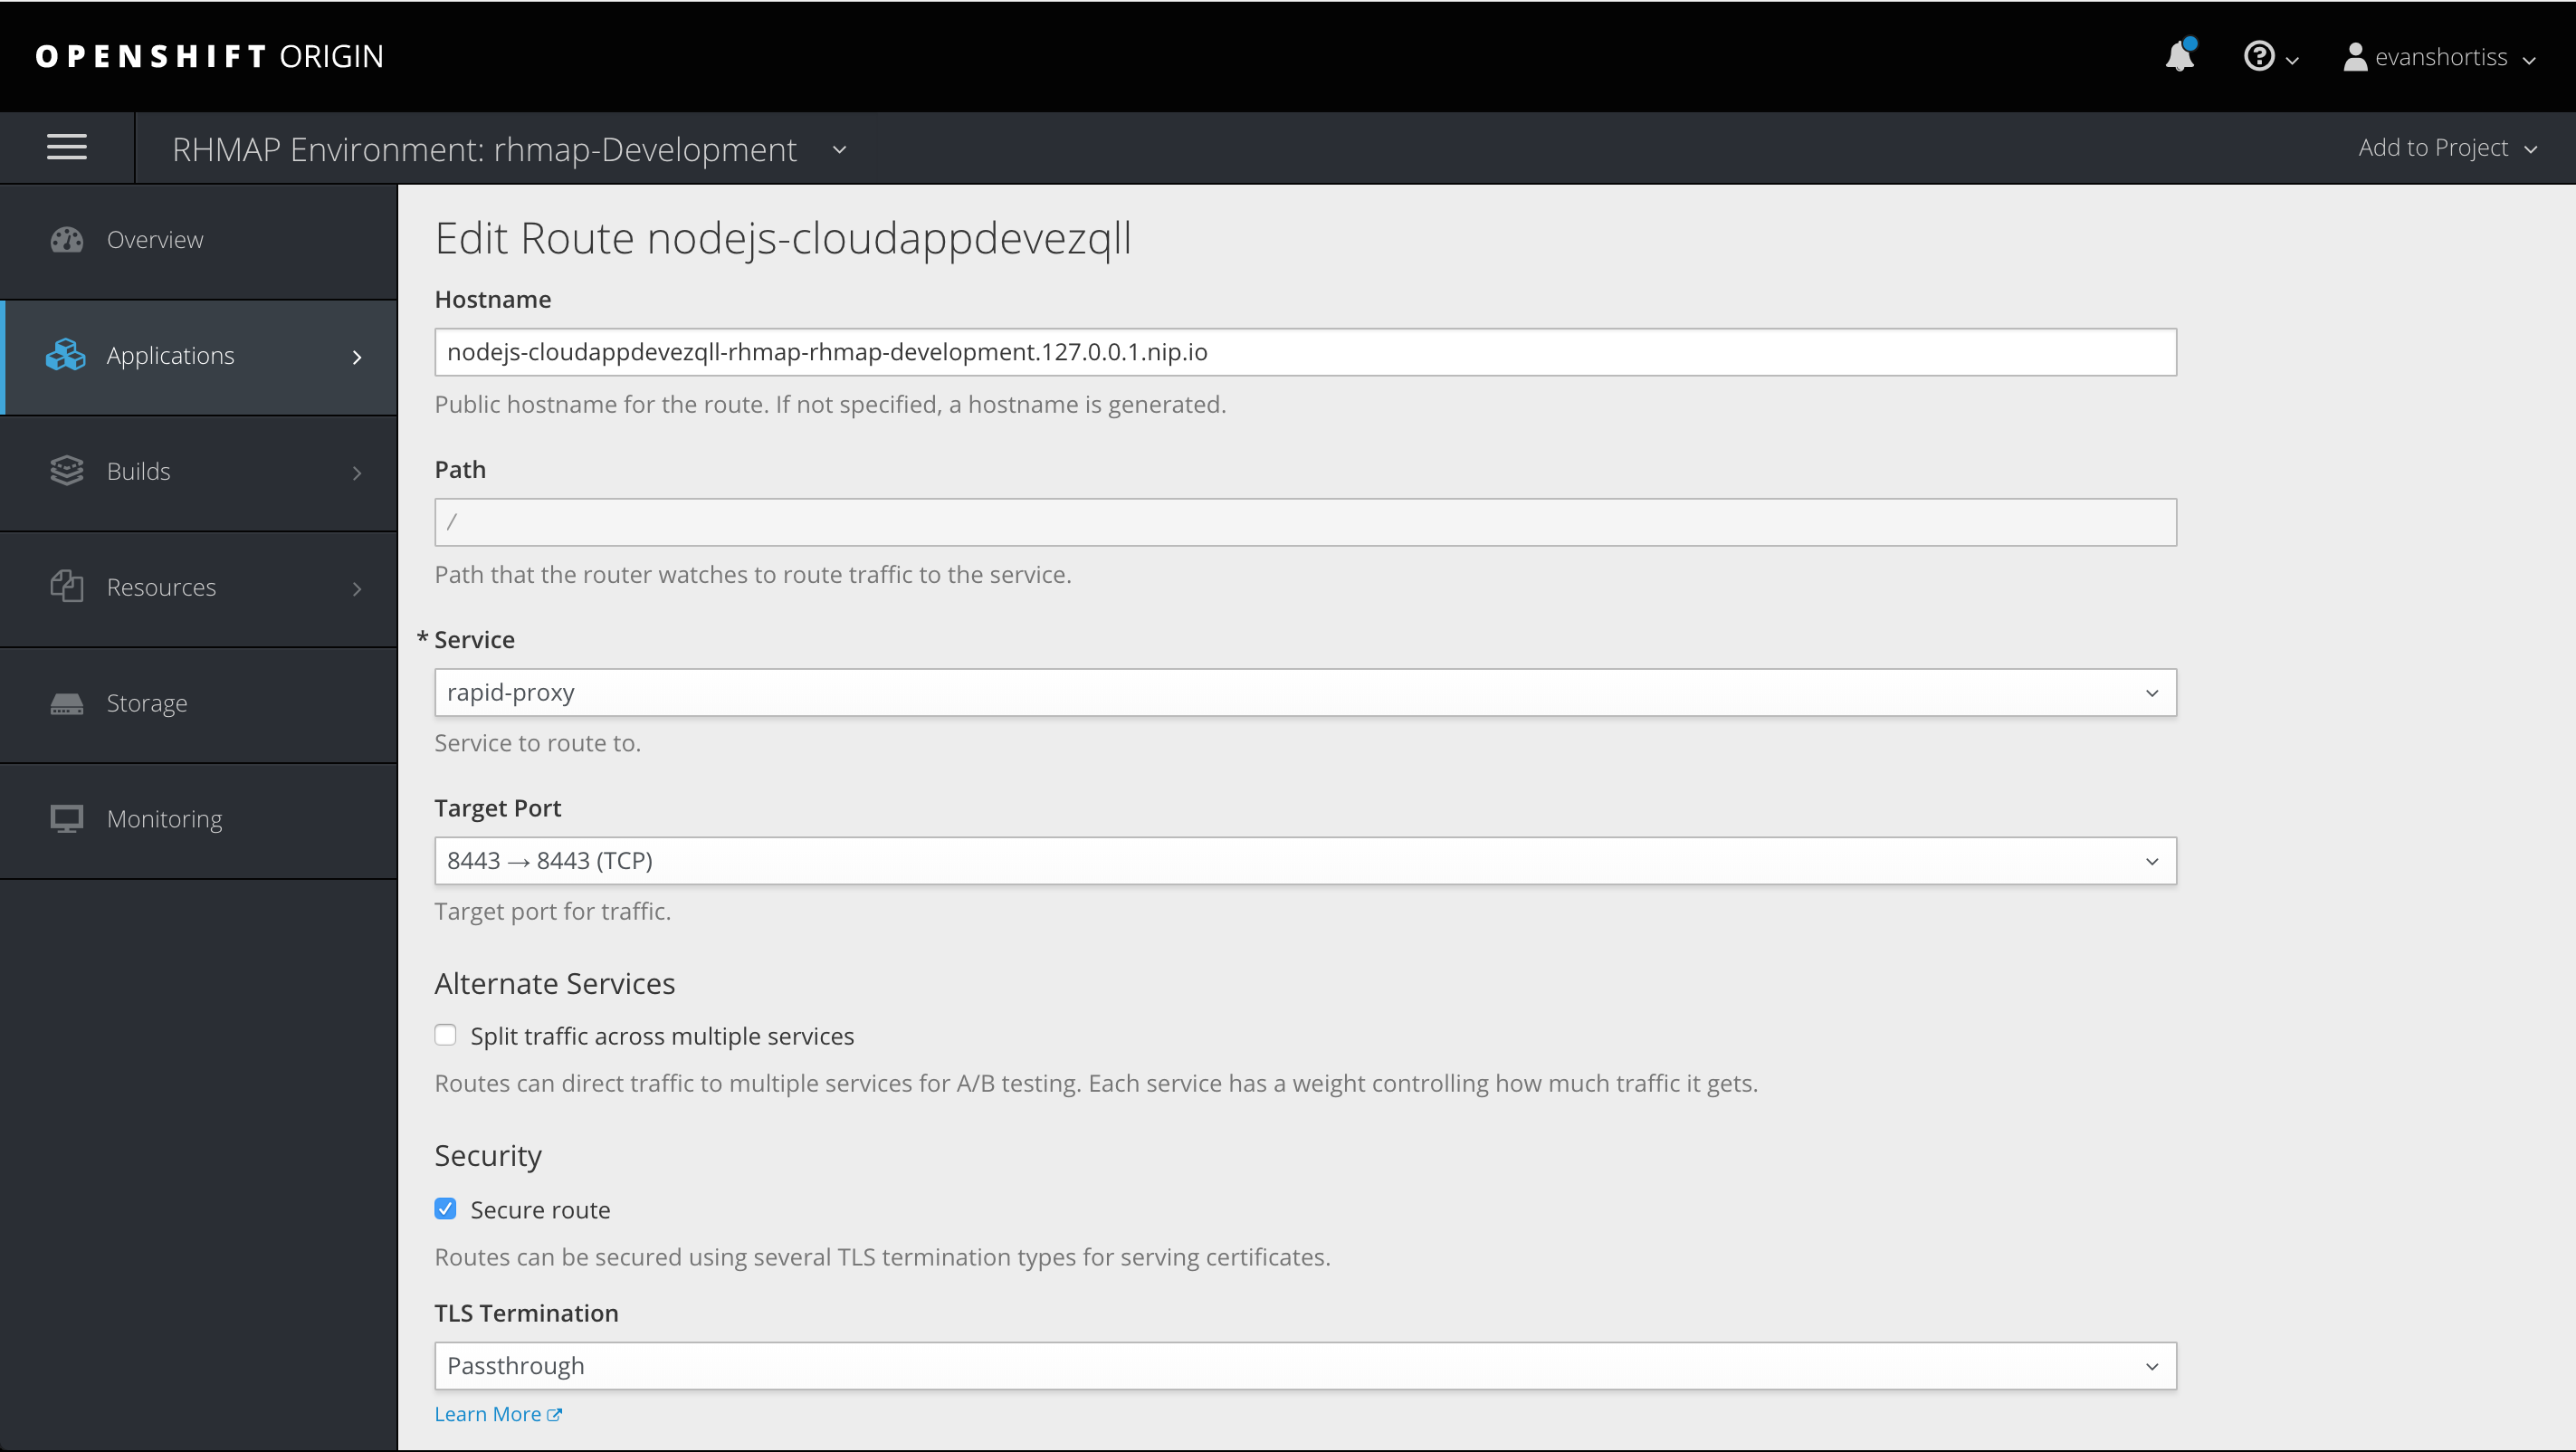
What we’ve done here is modify the public route of our Cloud Application so that it now routes traffic via the Apache HTTPD instance and also delegates the HTTPS session management to it.
Once this is complete we can verify that our traffic is being passed through the Apache HTTPD service by opening the URL of our Cloud Application. The result should be the bad SSL certificate error we saw when testing the image locally earlier:
We can verify our login is unrestricted by sending a request to it using our favorite HTTP client. For example, I verified I was able to login using cURL like so:
$ URL=https://nodejs-cloudappdevezqll-rhmap-rhmap-development.127.0.0.1.nip.io/auth/login

$ JSON='{"username":"eshortis@redhat.com","password":"redhat2018"}'

$ curl -k -X POST -H "content-type: application/json" --data $JSON $URL
{"requestId":"1d228803-5f3e-47a2-b496-0f66fb7dde38"}
This demonstrates that our `/auth/login` endpoint is accessible and retrieving a RequestID from the RapID service that can be returned to a Client Application to retrieve an SSL certificate from the RapID service.
Client Application Configuration
Both Intercede and Red Hat Mobile offer SDKs for development in native and hybrid environments for iOS and Android. In this section, I’ll be demonstrating how we can use these Cordova SDKs to secure a hybrid application.
Clone the project locally, and install the project dependencies using the following commands:
$ npm i -g cordova@6
$ git clone $GIT_URL client-hybrid
$ cd client-hybrid
$ npm install
We’ll need to add the Intercede plugin to our project, so let’s do so now by using the following command; you’ll need to download the RapID Cordova SDK from Intercede before you can issue this command. Here are the values I’ve used:
$ cordova plugin add $PATH_TO_SDK --variable RAPID_ACCESS_GROUP_IDENTIFIER="com.eshortis.rapiddemo" --variable RAPID_WHITE_LIST="https://nodejs-cloudappdevezqll-rhmap-rhmap-development.127.0.0.1.nip.io"
The values provided above are placeholders that you should replace with values of your own. Here’s a brief explanation of each variable:
- RAPID_ACCESS_GROUP_IDENTIFIER - The identifier used for storing credentials in the iOS Keychain.
- RAPID_WHITE_LIST - A list of URLs that we will be securing with two-way TLS.
Finally, we’ll need to add a login component and some JavaScript that implements the login and fetches the client certificates using the RapID SDK. Rather than paste it all here I’ve created two GitHub Gists containing the code:
Once we’ve copied the content of those two files into the respective files in our local repository, open the project in Xcode and verify that the Keychain Sharing option is enabled under Capabilities for our application and that the correct access group has been populated as shown:

Start the application by pressing the run button or using the ⌘+R shortcut. Once the application starts, we need to take the slightly unintuitive step of closing it using the iPhone’s Home button. Once the application has closed, click and drag the server.crt file we generated using OpenSSL onto the iPhone; in a production application this would not be necessary since we would use certificates signed by a trusted certificate authority.
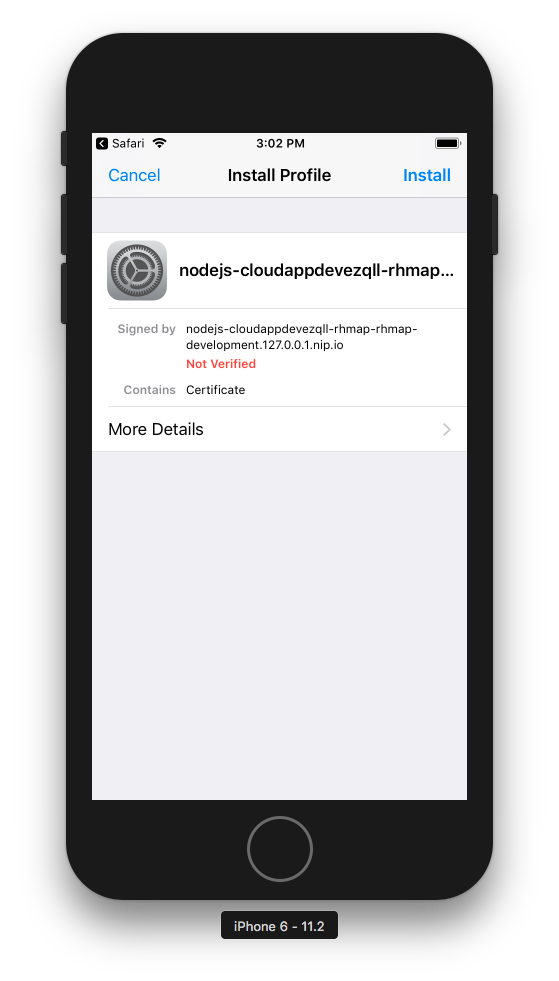
Following this, we’ll need to navigate to the Settings application and choose General => About => Certificate Trust Settings and enable the Full Trust For Root Certificates for the certificate we just installed:

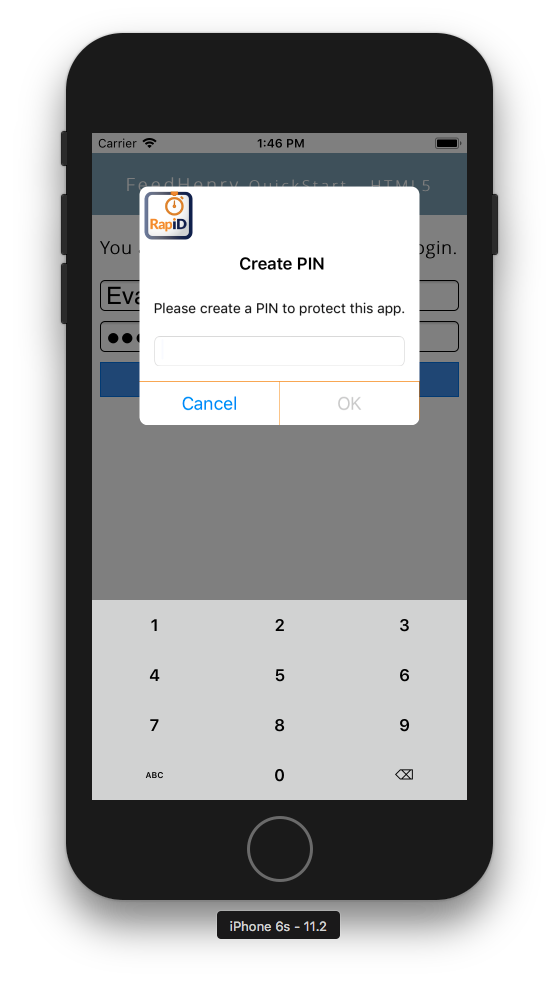
Now, restart the application and enter a username and password. The Cloud function from the Red Hat Mobile SDK is used to send our credentials to the backend /auth/login endpoint. After a successful login the application will use the returned `requestId` from the login response to request the matching SSL certificate from RapID. Once the certificate is fetched using the RapID SDK we enter a PIN to secure it:
After our PIN and SSL certificate are stored in the device Keychain, we’re ready to hit our /api/hello endpoint. Enter a name in the field presented and press the “Say Hello From the Cloud” button. This will invoke the sendRequestEx function of the RapID SDK with our arguments and perform an HTTPS request that’s secured using two-way TLS and fetch our “Hello World” response from the Node.js application running on Red Hat Mobile Application platform:

Conclusion
We’ve successfully integrated Intercede’s RapID solution to our application and achieved the following:
- A two-way TLS to block requests from unknown devices to our JSON API.
- An embedded a certificate in the device keychain that can be shared by any applications we develop.
- The ability to improve the user experience by using the RapID certificate and SDK to authenticate users in other applications.
