In this blog entry, I want to introduce a "different" way to work with OpenShift. In the typical way to deploy a Pod to OpenShift, we have available a set of very useful objects we have build/image configurations. This takes the pain from us by hiding the details about image construction but, sometimes we just want to see some code running in the cloud. Or we want to see if our service/application is able to interact with nearby services or we have some code but we don't want to use a git repo just yet. To solve that problem, I will show the concept of InitContainers, and how by being a little bit creative we achieve some cool stuff like deploying our code inside a running container.
Getting Started
This guide is dependent upon you having access to an OpenShift installation or you have installed OpenShift on your local machine using Minishift or using oc cluster up.
Once you have access to login.
oc login <your-url>
Configuring Our Workspace
Once you have OpenShift up and running, and you have logged in, the next step is to create a project:
oc new-project my-project
Image
We need to get a Node.js configured with the tools that we need to work, to import it we need an ImageStream object that will grab our images and make it accessible to our project.
oc import-image cvr-node:latest --from=docker.io/cvaldezr/nodejs --confirm
This will grab this image cvaldezr/nodejs based in the mhart/alpine image this includes Node, NPM, Nodemon, and all necessary tools to build native plugins, the image is just 89MB so it will deploy very fast.
Template
Next, we need to grab a template definition for the Pod, I will later explain in more detail the structure.
curl -o pod.yml https://gist.githubusercontent.com/cesarvr/2dedd0bb912be441aa98b67e1ac4bcc6/raw/2cf75a5512014fd40086375d5a46c81940c53fc8/pod.yml
Once you get this file, you need to modify line 12 an add the URL for your image, you can get the URL by doing:
oc get is #<DOCKER REPO is the url we need to copy>
This is how the template will look like, as you can see it's nice and short:
https://gist.github.com/cesarvr/2dedd0bb912be441aa98b67e1ac4bcc6
The next thing to do is to create our Pod using our template.
oc create -f pod.yml
To check the state we can use this command.
oc get pods
We should see that the creation was successful, if not, just make sure that the template has the right image URL from your ImageStream, and you have permission to pull it into your project.
Writing some code
Now is the fun part let's write a small hello world server application in the Node.js.
const express = require('express')
const app = express()
app.get('/', (req, res) => res.send('Hello World!!!'))
app.listen(8080, () => console.log('Example app listening on port 8080!'))
Save this file as app.js, go to the package.json and set your "main" property, the template configuration as you will see is looking for that property to locate and execute the entry point of your application, you can change and improve it to fulfill your needs.
{
  "name": "hello",
  "version": "1.0.0",
  "description": "",
  "main": "app.js",
  "scripts": {
  "test": "echo \"Error: no test specified\"exit 1",
  "start": "node app.js"
},
  "author": "",
  "license": "GPL",
  "dependencies": {
    "express": "^4.16.2"
  }
}
Install the dependencies using npm install express --save , only for registering the dependency in our package.json.
Deploy
First, we need to send the files to our Pod, in my case it's named node-dev. you can use oc get podscheck the name of yours.
oc rsync -c folder . node-dev:app/
Expose our Pod.
oc expose pod node-dev --port=8080
oc expose service node-dev
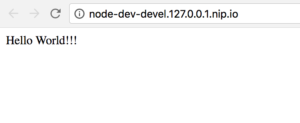
Now visit your newly created service.
oc get route -o wide
node-dev-devel.127.0.0.1.nip.io
Modification
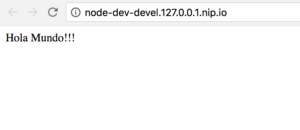
Now let's change something.
const express = require('express') const app = express()app.get('/', (req, res) => res.send('Hola Mundo!!!'))app.listen(8080, () => console.log('Example app listening on port 8080!'))
After doing the modification go to your console and write.
oc rsync . node-dev:app/
Now do a refresh in your browser.
Observe that in our case, we are not using the -c folder, this is because we are now targeting the runtime container, will explain this in more detail later.
Live Demo
This is just a small video demonstrating the process and synchronizing the files with the Pod.
What just happened
To explain what happen let's take a quick look at the template.
apiVersion: v1
kind: Pod
metadata:
name: node-dev
labels:
app: node-js-dev
Here, we define the name and label of our pod, nothing particularly interesting.
Our Node.js Runtime Container
spec: containers:- name: nodejs image: 172.30.1.1:5000/devel/cvr-node command: ['/bin/sh', '-c'] args: - cd /app/; echo folder:$PWD; npm install; nodemon $(node -e "console.log(require('./package.json').main)")volumeMounts: - mountPath: /app name: app-volume - mountPath: /.npm name: npm-cache ports: - containerPort: 8080
This is the main Pod, as you can see is using the image we imported early with oc import-image. I also have included some startup Pod commands sh -c that will run some shell commands using args , basically, it goes to the app/ folder run npm install and start nodemon, but if we just do this and publish an image it will crash instantly because nodemon won't be able to find anything, if we just have a way to wait until we have some files in our mount point we can avoid an infinite crash loop.
A Solution using InitContainer
So the Pods object has this amazing capability, called InitContainers, that means you can have a container to do some initialization work for you, this can be extremely useful in cases when you want a running lightweight container and a big full of compiling tools needed. E.g., if you want an InitContainer with all the compiling/building tools and then a runtime container with just a very minimalistic container with just the essentials to run.
 initContainers: # This is the init container will wait until app/ folder is in sync.
- name: folder
image: busybox
command: ['/bin/sh', '-c']
args: ['until [ "$(ls -A ./app/)" ]; do echo "waiting for user to push..."; sleep 2; done']
volumeMounts:
- mountPath: /app
name: app-volume
This is what our InitContainer looks like, I just pick a very small image Busybox, and run a little script to stop the Pod execution in the PodInit state.

If you are curious you can get the logs of this Pod by doing oc logs -c folder node-dev -f you will see this trace "waiting for user to push..." every two seconds, then when you run oc rsync -c folder . node-dev:app/, you are synchronizing with the InitContainer and by doing this, the condition until [ "$(ls -A ./app/)" ]; won't be true anymore and it will terminate the sh command associated with InitContainer.

Conclusion
I have had a lot of fun trying to look for creative ways to use Openshift/Kubernetes, so I hope you can find the template useful and you can adjust it to your own use case or even better improve on it. Also, I did this using Node.js since I use the language in my everyday work, but I don't see any problem to implement this in Java. It would be cool that the runtime container is just a JVM waiting for EAR's, WAR (maybe I'm a little bit outdated) in some directory and hot deploy it every time the filesystem changes, and so on, that would be very cool.
Also, I want to add that this approach is not horizontal scale friendly, or basically you need to push code to each Pod because in this example I was just using the container's filesystem. You can overcome this limitation by setting the file system to a PVC (Persistent Volume Claim) and then share it across your containers, there are some challenges but I think it can work, but that's for another post.
For more info on InitContainers.
Whether you are new to Containers or have experience, downloading this cheat sheet can assist you when encountering tasks you haven’t done lately.
Last updated: October 21, 2022