Redhat Developers  Logo
  • AI

    Get started with AI

    • Red Hat AI
      Accelerate the development and deployment of enterprise AI solutions.
    • AI learning hub
      Explore learning materials and tools, organized by task.
    • AI interactive demos
      Click through scenarios with Red Hat AI, including training LLMs and more.
    • AI/ML learning paths
      Expand your OpenShift AI knowledge using these learning resources.
    • AI quickstarts
      Focused AI use cases designed for fast deployment on Red Hat AI platforms.
    • No-cost AI training
      Foundational Red Hat AI training.

    Featured resources

    • OpenShift AI learning
    • Open source AI for developers
    • AI product application development
    • Open source-powered AI/ML for hybrid cloud
    • AI and Node.js cheat sheet

    Red Hat AI Factory with NVIDIA

    • Red Hat AI Factory with NVIDIA is a co-engineered, enterprise-grade AI solution for building, deploying, and managing AI at scale across hybrid cloud environments.
    • Explore the solution
  • Learn

    Self-guided

    • Documentation
      Find answers, get step-by-step guidance, and learn how to use Red Hat products.
    • Learning paths
      Explore curated walkthroughs for common development tasks.
    • Guided learning
      Receive custom learning paths powered by our AI assistant.
    • See all learning

    Hands-on

    • Developer Sandbox
      Spin up Red Hat's products and technologies without setup or configuration.
    • Interactive labs
      Learn by doing in these hands-on, browser-based experiences.
    • Interactive demos
      Click through product features in these guided tours.

    Browse by topic

    • AI/ML
    • Automation
    • Java
    • Kubernetes
    • Linux
    • See all topics

    Training & certifications

    • Courses and exams
    • Certifications
    • Skills assessments
    • Red Hat Academy
    • Learning subscription
    • Explore training
  • Build

    Get started

    • Red Hat build of Podman Desktop
      A downloadable, local development hub to experiment with our products and builds.
    • Developer Sandbox
      Spin up Red Hat's products and technologies without setup or configuration.

    Download products

    • Access product downloads to start building and testing right away.
    • Red Hat Enterprise Linux
    • Red Hat AI
    • Red Hat OpenShift
    • Red Hat Ansible Automation Platform
    • See all products

    Featured

    • Red Hat build of OpenJDK
    • Red Hat JBoss Enterprise Application Platform
    • Red Hat OpenShift Dev Spaces
    • Red Hat Developer Toolset

    References

    • E-books
    • Documentation
    • Cheat sheets
    • Architecture center
  • Community

    Get involved

    • Events
    • Live AI events
    • Red Hat Summit
    • Red Hat Accelerators
    • Community discussions

    Follow along

    • Articles & blogs
    • Developer newsletter
    • Videos
    • Github

    Get help

    • Customer service
    • Customer support
    • Regional contacts
    • Find a partner

    Join the Red Hat Developer program

    • Download Red Hat products and project builds, access support documentation, learning content, and more.
    • Explore the benefits

Getting started with OpenShift Java S2I

February 23, 2017
Thomas Qvarnström
Related topics:
ContainersJavaKubernetesMicroservices
Related products:
Red Hat OpenShift Container Platform

    Introduction

    The OpenShift Java S2I image, which allows you to automatically build and deploy your Java microservices, has just been released and is now publicly available. This article describes how to get started with the Java S2I container image, but first, let’s discuss why having a Java S2I image is so important.

    Why Java S2I?

    The Java S2I image enables developers to automatically build, deploy and run java applications on demand, in OpenShift Container Platform, by simply specifying the location of their application source code or compiled java binaries. In many cases, these java applications are bootable “fat jars” that include an embedded version of an application server and other frameworks. An example of such open source projects is Spring Boot, Eclipse Vert.x, and WildFly Swarm. Having a common Java S2I image that is designed specifically for OpenShift makes the development of bootable fat jars easier by including a number of useful features such as:

    • Simple yet flexible: The Java S2I image can handle complex build structures, but default it will assume that the JAR to run will be available in the /target directory after a successful build. If that is not the case you can use the environment variable ARTIFACT_DIR. Also if a build produces multiple JAR files (which is the case in the Eclipse Vert.x example used later in this article) then it’s possible to specify which JAR file to run using the environment variable JAVA_APP_JAR. However, in most cases, all you have to do is to point directly at you source repository and the Java S2I image will work.
    • Automatic JVM memory configuration: In OpenShift, resources may be limited by quotas, etc. If such a limitation is in place, the Java S2I image will automatically adopt the JVM memory settings so that the JVM doesn’t use more memory than it’s allowed to use which in turns helps to avoid OutOfMemory exceptions. This feature is enabled by default but can be disabled by setting a fixed value for the heap using -Xmx in the environment variable JAVA_OPTIONS.
    • Expose JMX statistics via Jolokia: By default, the Java S2I image will enable Jolokia which exposes JMX statistics and operations via HTTP. This enables more detailed monitoring capabilities of applications. This feature is enabled by default but can be disabled by setting the environment variable AB_JOLOKIA_OFF to true.
    • Reduce the container image size: To keep the size of the container image to a minimum it’s possible to have the Java S2I image delete any maven repo data before building the final image. This feature is disabled by default to support incremental builds. To enable the removal of maven artifacts from the final container image set the environment variable MAVEN_CLEAR_REPO to true.

    Getting started with Java S2I

    Below are step-by-step instructions that exemplify one way to use the Java S2I image.

    1. Create a new project or use an existing one.

    oc new-project myproject


    2. Before we start using the Java S2I image we need to tell OpenShift how to find it. This is done by creating an image stream. I’ve created an image stream definition here that you can download and use. To add the image stream to your project run the following command:

    oc create -f openjdk-s2i-imagestream.json


    3. Open the openshift console and navigate to the project you created and click on Add to Project.

    4. In the Browse Catalog window type openjdk in the search field.

    Browse Catalog window

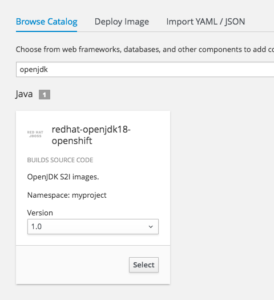
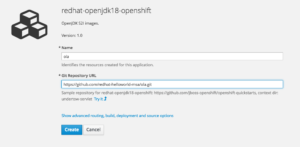
    5. Click select and give the application a name and point to a git repo containing the application source code.

    For a WildFly Swarm example you can use:
    https://github.com/redhat-helloworld-msa/hola.git [1]

    For an Eclipse Vert.x example you can use:
    https://github.com/redhat-helloworld-msa/aloha.git [2]

    For a Spring Boot example you can use:
    https://github.com/redhat-helloworld-msa/ola.git

    6. Wait for the build to finish and click on the route (the URL in the upper right corner of the dashboard).

    7. For the WildFly example application, the swagger console should now be displayed.

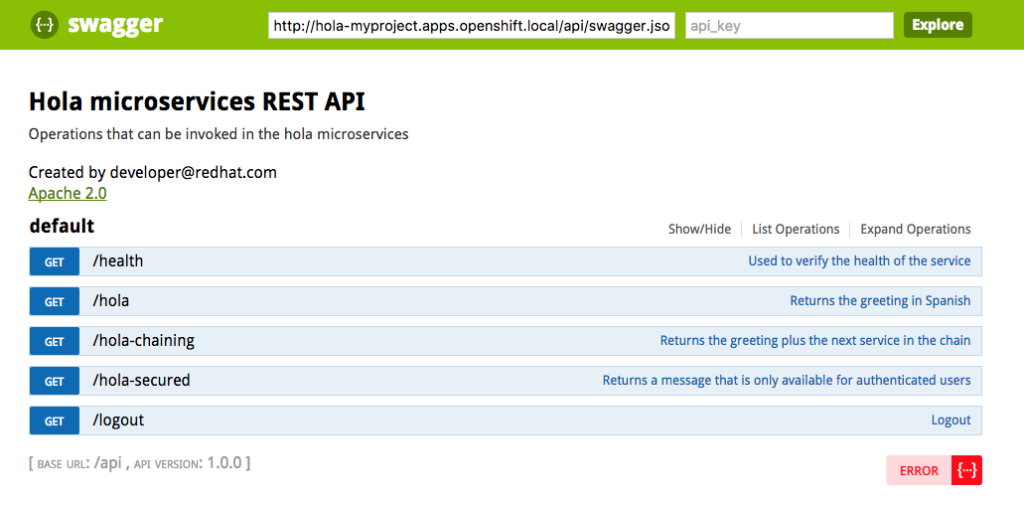
    8. Try adding /api/hola to the address bar (or /api/ola for the Spring Boot example) and the outcome should be similar to the picture below.

    9. DONE

    I hope you have enjoyed this getting started with Java S2I guide.

    [1]=Please note that because of a known issue with WildFly Swarm and Jolokia you should also click on Show advanced … and add an environment variable to the Deployment Configuration with name AB_JOLOKIA_OFF and value true.

    [2]=The example project for Eclipse Vert.x produces two JAR files so we need to tell the Java S2I image which one to use by clicking on Show advanced … and add an environment variable to the Deployment Configuration with name JAVA_APP_JAR and value aloha-fat.jar.

    Last updated: August 20, 2023

    Recent Posts

    • Protect data offloaded to GPU-accelerated environments with OpenShift sandboxed containers

    • Case study: Measuring energy efficiency on the x64 platform

    • How to prevent AI inference stack silent failures

    • Preventing GPU waste: A guide to JIT checkpointing with Kubeflow Trainer on OpenShift AI

    • How to manage TLS certificates used by OpenShift GitOps operator

    Red Hat Developers logo LinkedIn YouTube Twitter Facebook

    Platforms

    • Red Hat AI
    • Red Hat Enterprise Linux
    • Red Hat OpenShift
    • Red Hat Ansible Automation Platform
    • See all products

    Build

    • Developer Sandbox
    • Developer tools
    • Interactive tutorials
    • API catalog

    Quicklinks

    • Learning resources
    • E-books
    • Cheat sheets
    • Blog
    • Events
    • Newsletter

    Communicate

    • About us
    • Contact sales
    • Find a partner
    • Report a website issue
    • Site status dashboard
    • Report a security problem

    RED HAT DEVELOPER

    Build here. Go anywhere.

    We serve the builders. The problem solvers who create careers with code.

    Join us if you’re a developer, software engineer, web designer, front-end designer, UX designer, computer scientist, architect, tester, product manager, project manager or team lead.

    Sign me up

    Red Hat legal and privacy links

    • About Red Hat
    • Jobs
    • Events
    • Locations
    • Contact Red Hat
    • Red Hat Blog
    • Inclusion at Red Hat
    • Cool Stuff Store
    • Red Hat Summit
    © 2026 Red Hat

    Red Hat legal and privacy links

    • Privacy statement
    • Terms of use
    • All policies and guidelines
    • Digital accessibility

    Chat Support

    Please log in with your Red Hat account to access chat support.