The CDK 2.3 version has added the newest OpenShift Container Platform 3.3, allowing us to make use of the Jenkins Pipeline builds as well a special route configuration, which enables A/B deployments. In this post, I will show you how to achieve that configuration using a microservice application.
Preparation steps
Once CDK 2.3 is up and running in our environment, we need to make an additional configuration to enable the Jenkins pipeline builds. Since it is an experimental feature, it is not enabled by default in OCP 3.3 so we need that configuration to make use of it.
First, we need to ssh to the CDK Virtual Machine with the following command (assuming your current directory is CDK_HOME/components/rhel/rhel-ose):
$ vagrant ssh
This will connect to your CDK Virtual Machine through SSH. There we need to edit the file /var/lib/openshift/openshift.local.config/master/master-config.yaml and set the following parameters:
jenkinsPipelineConfig:
autoProvisionEnabled: true
parameters: null
serviceName: jenkins
templateName: jenkins-ephemeral
templateNamespace: openshift
This configuration will:
- Enable Jenkins pipelines builds in your CDK environment
- Set Openshift to look for a template called jenkins-ephemeral inside openshift project
- Inspect for a Service name called jenkins to trigger the builds
In case you want to use the persistent jenkins template, just change the templateName attribute to jenkins-persistent.
After that, we need to update the jenkins-ephemeral template. The bundled template has an outdated template version so we need to update it. Just run the following commands to update the template:
$ oc login https://10.1.2.2:8443 -u admin -p admin
$ oc replace -f https://raw.githubusercontent.com/openshift/openshift-ansible/master/roles/openshift_examples/files/examples/v1.4/quickstart-templates/jenkins-ephemeral-template.json -n openshift
At last, if you want to show the Pipelines menu item in the Web Console, you must add this feature by changing the Web console. To do that, create a new file inside /var/lib/openshift/openshift.local.config/master called pipelines.js and add the following content:
window.OPENSHIFT_CONSTANTS.ENABLE_TECH_PREVIEW_FEATURE.pipelines = true;
Then, open /var/lib/openshift/openshift.local.config/master/master-config.yaml file again and add the following content:
assetConfig:
....
extensionScripts:
- /var/lib/openshift/openshift.local.config/master/pipelines.js
Finally, restart openshift service:
$ sudo systemctl restart openshift
After that, you can access https://10.1.2.2:8443 and you will find the Builds > Pipelines menu.
Creating the demo application
For demo purposes, I will use the following GitHub repository:
https://github.com/redhat-developer-demos/kubernetes-lab
There you will find a Node.js application called frontend, which will be used to create the Jenkins pipeline builds. First, let's create a project called demo:
$ oc new-project demo
Now we will create the new application using the nodejs:0.10 builder image using that GitHub repository. Note that since this repo has 3 applications in it, we must refer the context dir for the frontend app:
$ oc new-app nodejs:0.10~https://github.com/redhat-developer-demos/kubernetes-lab --context-dir=frontend
After that, a build will be triggered automatically. As the build is running, let us take a look at the demo project in the Web Console. You will see that a service called kubernetes-lab is created but we know that frontend is a Web Application and it requires a URL to access it, which is not created yet. To create a route to access the application externally, just run this command:
$ oc expose svc/kubernetes-lab
In addition, you will see the application URL in the Web Console. After the build is finished, a deployment will be triggered and when the pod is ready, you can access the application. Don't worry about the error messages in it, as we are deploying a microservices application and to work properly it requires the other microservices to be deployed too. For this demo, I will skip the other microservices deployment.
Jenkins Pipeline
Now we have the frontend application up and running, we need to add a new build to define the jenkins pipeline. The following command will create a file called frontend-pipeline.json containing the BuildConfig definition:
$ cat > frontend-pipeline.json<<EOF
{
"kind": "BuildConfig",
"apiVersion": "v1",
"metadata": {
"name": "frontend-pipeline"
},
"spec": {
"triggers": [
{
"type": "GitHub",
"github": {
"secret": "secret101"
}
},
{
"type": "Generic",
"generic": {
"secret": "secret101"
}
}
],
"runPolicy": "Serial",
"strategy": {
"type": "JenkinsPipeline",
"jenkinsPipelineStrategy": {
"jenkinsfile": "node('maven') { \n stage 'build'\n openshiftBuild(buildConfig: 'kubernetes-lab', showBuildLogs: 'true')\n stage 'deploy'\n openshiftVerifyDeployment(deploymentConfig: 'kubernetes-lab')\n}"
}
}
}
}
EOF
After that, create the new BuildConfig:
$ oc create -f frontend-pipeline.json
After you create the new BuildConfig, automatically a Jenkins instance will be provisioned in your demo project. After the jenkins pod becomes ready, access the jenkins URL (the provided username is admin with password admin) and you will see a new pipeline called frontend-pipeline. Go to Builds > Pipelines and the frontend-pipeline is listed. Click on Start Pipeline and Jenkins will start the pipeline.
You can check Jenkins console output by clicking on View Log link below the build number. This pipeline is a simple pipeline in which will:
- Trigger the BuildConfig called kubernetes-lab, which already knows how to build the Node.js application.
- Verify if the DeploymentConfig called kubernetes-lab will be deployed successfully.
In addition, this concludes our Jenkins pipeline builds. In the next section, we will improve it by using A/B routes to make a new deployment.
A/B Deployments
Now we have a simple pipeline running in our demo project, we will improve the deployment to make use of A/B Deployments. You can achieve that with a new special configuration in the Route object.
First, let's check all Service objects we have with the following command:
$ oc get svc
You will find 3 Service objects: jenkins, jenkins-jnlp, and kubernetes-lab. This last one is what we need to use for this demo. Let's make a copy of this service by running:
$ oc get -o yaml svc/kubernetes-lab > kubernetes-lab.yaml
This will output the content of the Service object and will redirect to the kubernetes-lab.yaml file. Now let's edit the file to have this content:
apiVersion: v1
kind: Service
metadata:
annotations:
openshift.io/generated-by: OpenShiftNewApp
labels:
app: kubernetes-lab
name: kubernetes-lab-a
namespace: demo
resourceVersion: "119352"
selfLink: /api/v1/namespaces/demo/services/kubernetes-lab-a
spec:
ports:
- name: 8080-tcp
port: 8080
protocol: TCP
targetPort: 8080
selector:
app: kubernetes-lab
sessionAffinity: ClientIP
type: ClusterIP
In this content it will:
- Create a new Service object with name kubernetes-lab-a
- Set the Service sessionAffinity to ClientIP. This way all clients that access this service first will always be served by this Service
Create the new Service object:
$ oc create -f kubernetes-lab.yaml
Now edit the kubernetes-lab.yaml again and change all occurrences of kubernetes-lab-a to kubernetes-lab-b and run oc create command again.
3 Service objects serve the frontend application:
$ oc delete svc/kubernetes-lab
But wait! Removing this service the URL can't reach the application. So, after removing the kubernetes-lab Service let's edit the kubernetes-lab Route:
$ oc edit route/kubernetes-lab
The new Route must have this content:
apiVersion: v1
kind: Route
metadata:
annotations:
openshift.io/host.generated: "true"
creationTimestamp: 2017-01-05T13:43:56Z
labels:
app: kubernetes-lab
name: kubernetes-lab
namespace: demo
resourceVersion: "120937"
selfLink: /oapi/v1/namespaces/demo/routes/kubernetes-lab
uid: 00ec6230-d34d-11e6-a3c9-525400b723df
spec:
alternateBackends:
- kind: Service
name: kubernetes-lab-b
weight: 25
host: kubernetes-lab-demo.rhel-cdk.10.1.2.2.xip.io
port:
targetPort: 8080-tcp
to:
kind: Service
name: kubernetes-lab-a
weight: 75
status:
ingress:
- conditions:
- lastTransitionTime: 2017-01-05T13:43:56Z
status: "True"
type: Admitted
host: kubernetes-lab-demo.rhel-cdk.10.1.2.2.xip.io
routerName: router
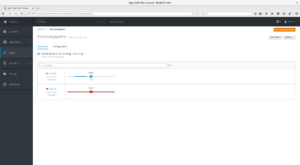
In the spec > to attribute, we set the new Service named kubernetes-lab-a. Also, we added the spec -> alternateBackends attribute to add the kubernetes-lab-b Service. This configuration will:
- Set the main Service being exposed by the Route to kubernetes-lab-a and Setting its weight to 75
- Set an alternate Service to kubernetes-lab-b with weight 25
The weight attribute can have a value from 1 to 256, but in this configuration, we are setting 75 and 25 to have its weights set as a percentage. This means we have 75% of the application traffic being served by kubernetes-lab-a and 25% served by kubernetes-lab-b.
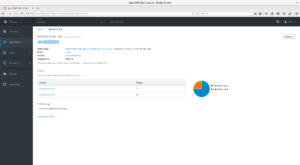
Now we have our new A/B Route configured! However, as we can see in our Project dashboard, both Service objects are pointing to the same DeploymentConfig kubernetes-lab. To have them pointing to different Deployments, let's first create a new one:
$ oc get -o yaml dc/kubernetes-lab > kubernetes-lab-dc.yaml
$ sed -i -e 's/deploymentconfig: kubernetes-lab/deploymentconfig: kubernetes-lab-b/g' kubernetes-lab-dc.yaml
$ oc patch svc/kubernetes-lab-b -p '{"spec":{"selector":{"app": "kubernetes-lab", "deploymentconfig": "kubernetes-lab-b"}}}'
$ oc patch svc/kubernetes-lab-a -p '{"spec":{"selector":{"app": "kubernetes-lab", "deploymentconfig": "kubernetes-lab"}}}'
After that, edit your frontend-pipeline to use the following jenkinsfile content:
node('maven') {
stage 'build'
openshiftBuild(buildConfig: 'kubernetes-lab', showBuildLogs: 'true')
stage 'deploy to B'
openshiftDeploy(deploymentConfig: 'kubernetes-lab-b')
stage 'deploy to A'
input message: 'proceed/abort', ok: 'proceed'
openshiftDeploy(deploymentConfig: 'kubernetes-lab')
}
This new pipeline will:
- Trigger the build in kubernetes-lab BuildConfig object
- After build success, trigger a deployment in kubernetes-lab-b DeploymentConfig
- After that, it will wait for a manual input (check jenkins logs after the pipeline reach this stage) and it 'proceed' is selected, trigger the deployment in kubernetes-lab DeplloymentConfig
This concludes our Jenkins pipeline build using A/B Deployments. Post a comment if you have any questions.
Last updated: January 16, 2017