![]()

Starting from Developer Toolset 4.0 we have added the Eclipse PyDev tooling for writing and debugging Python applications. This article aims to give new users a whirlwind tour of some of the key features.
Installing and Configuring
PyDev is installed by default when you install the IDE component of DTS 4.0:
$ sudo yum install devtoolset-4-ide
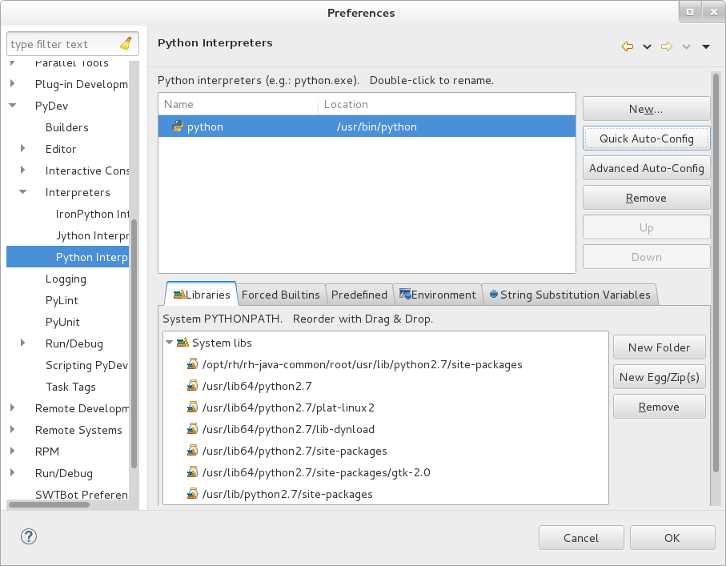
Once you've launched Eclipse, the first thing you need to do is configure an interpreter to use. Open the preferences dialog by choosing "Preferences" from the "Window" menu, then navigate to the "PyDev -> Interpreters -> Python Interpreter" preference node. Simply hit the "Quick Auto-Config" button to automatically discover and configure the first Python interpreter that is encountered in your PATH.
It's worth knowing that not only does PyDev work well with the default version of Python that ships with RHEL, it also works with the Python Software Collections. For example, if you'd like to work with Python 3 then you can also install the rh-python34 software collection:
$ sudo yum install rh-python3
And then to use the version of Python from this Software Collection with PyDev, you must start Eclipse with the relevant collection enabled by using the special scl command:
$ scl enable devtoolset-4 rh-python34 eclipse
Now when you configure the interpreter in the preferences, hitting the "Quick Auto-Config" button will automatically discover and configure the Python interpreter from the rh-python34 collection. Hitting the "Advanced Auto-Config" button will allow you choose which interpreter to configure out of all the possible interpreters installed on your system.

Your First Python Program
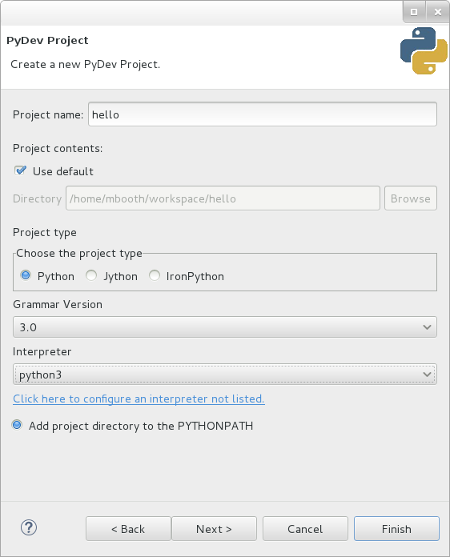
Creating a new Python project is done by choosing "New... Project" from the "File" menu. Select the "PyDev -> PyDev Project" type to create a simple Python project. Here you can choose which version of the Python grammar you'd like to use and which of the interpreters you configured earlier you'd like to use, before hitting the "Finish" button.
In this case, I've chosen to use Python 3 syntax with the Python interpreter from the rh-python34 collection, but they can be changed later if I change my mind:
When prompted, it's a good idea to choose to switch to the "PyDev Perspective" since this perspective contains PyDev-specific views, menus and short-cuts.
At this point we are ready to start creating modules and writing some code. To create a new module, right-click on the project in the "PyDev Package Explorer" and choose "New... PyDev Module." Here you can enter the module name and package name and once you hit the "Finish" you will be given a choice of templates on which to base your new module, choose a module type to generate a module with some boilerplate code or choose "<Empty>" to simply create an empty Python module.
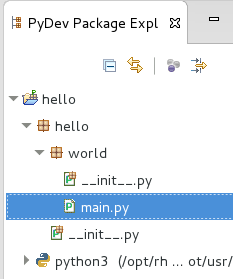
If you entered a dotted package name when creating your module then PyDev will automatically create all the nested package hierarchy needed for your module, if it does not already exist. For example, add a new module main in the package hello.world will result in the following project layout:
Let's add some code to the newly created main module:
'''
 Created on 10 Nov 2015
 @author: mbooth
'''

def mats_add(a,b):
    c = a + b
    return c

if __name__ == '__main__':
    print(mats_add(5, 10))
Since we created a Python 3 project, we obviously have to treat print as a function and surround its arguments with parentheses. If we wished to use Python 2.x syntax, we'd have to change the project's interpreter settings by right-clicking the project in the "PyDev Package Explorer", choosing "Properties" and changing the settings found in the "PyDev - Interpreter" section.
To run the program, right-click the module in the "PyDev Package Explorer" that contains the main function and choose "Run As... Python Run." A console view will appear to display the results of running the program.
Debugging
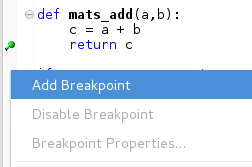
It's easy to start debugging your program. To add breakpoints, right-click in the code-editor margin and choose "Add Breakpoint" from the context menu. A green spot will appear in the margin to indicate the location of your breakpoint:
To debug the program, right-click the module in the "PyDev Package Explorer" that contains the main function and this time choose the "Debug As... Python Run" option from the context menu. This will run the program with the debugger attached. Again, when prompted it is a good idea to switch perspective to access all the debugging-specific views, menus and short-cuts.
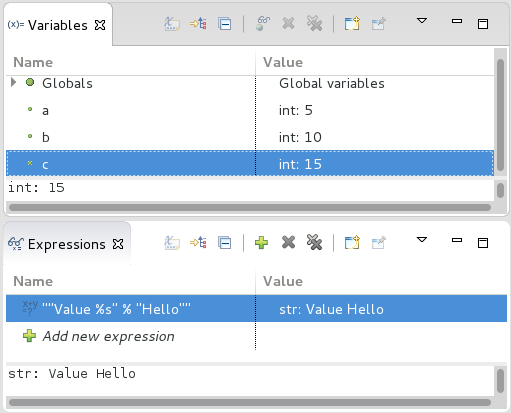
When the program halts at a breakpoint, you are able to view and modify variables in the "Variables" view or configure watch expressions in the "Expressions" view so you can monitor values while you step through the execution of the program:
Other Cool Features
Code Completion and Analysis
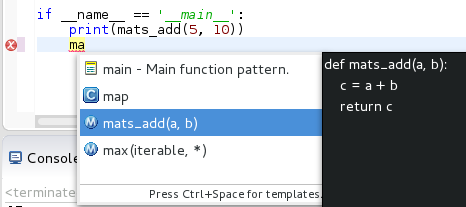
The PyDev code editor features a code-completion feature that shows a list of boilerplate patterns and tokens found in the project's pythonpath for you to choose from. It will automatically add an import for the module that contains the desired token when selected. The code completion will appear automatically, but can also be summoned manually by typing "Ctrl + Space."
The PyDev code editor is also able to do some kinds of analysis of your code too, such as detecting unused variables and imports, duplicate function signatures and checking PEP8 conformance. These options can be configured in the preferences.
PyDev Console
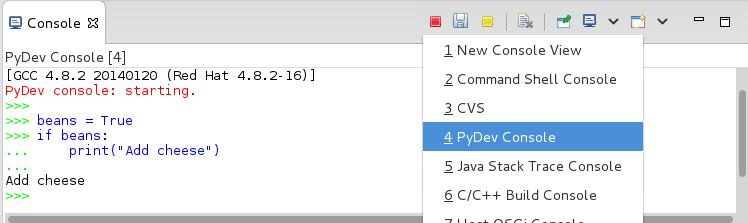
From the console view, if you hit the "Open Console" drop-down menu and choose "PyDev Console" then you get access to full Python REPL inside Eclipse, where you can use a Python interpreter interactively like you would if you invoked python directly from the terminal. You even get the same code-completion features as you do in the PyDev code editor described above:
Django Support
It's possible to work on Django-based projects with PyDev by selecting "PyDev Django Project" when creating a new project. In order to run and debug Django projects, it is necessary to install Django from the Extra Packages for Enterprise Linux (EPEL) repository. For RHEL 7:
$ sudo yum install https://dl.fedoraproject.org/pub/epel/epel-release-latest-7.noarch.rpm
$ sudo yum install python-django
PyUnit Integration
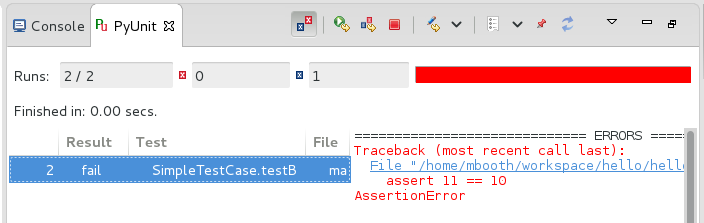
If your project has unit tests, then you can also execute those within PyDev by right-clicking the module in the "PyDev Package Explorer" that contains the the tests and choosing the "Run As... Python unit-test" option from the context menu. The "PyUnit" view will show a report of the test run, including details of any failures and exactly where the failures occurred: