Red Hat OpenShift Lightspeed is an integrated assistant within the Red Hat OpenShift web console designed to improve user efficiency. It streamlines operations and enables users to quickly access information about Red Hat OpenShift Container Platform and its various components, aiding in troubleshooting and simplifying management.
Integrating OpenShift Lightspeed with locally served large language models (LLMs) via Red Hat OpenShift AI offers significant benefits over relying on external APIs. This approach helps keep sensitive data internal and reduce operational costs. It also gives you greater control over performance and model customization.
This blog demonstrates the practical steps involved in integrating OpenShift Lightspeed with an LLM that is actively serving inference within Red Hat OpenShift AI. By following along, you will gain a clear understanding of how to connect these tools to use a locally inferenced model for enhanced assistance within your OpenShift environment.
Prerequisites
Before you begin, ensure you have the following prerequisites in place:
- An OpenShift cluster (4.17 or later)
- The OpenShift AI operator (2.19 or later)
- S3-compatible object storage (for this blog, I used Red Hat OpenShift Data Foundation)
- The AWS command-line interface (CLI)
- 1 GPU node (I used a g6.4xlarge instance type powered by an NVIDIA L4 GPU)
Model upload
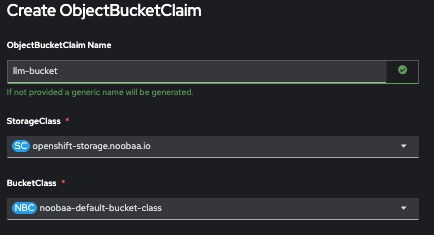
To store the model and make it accessible for serving in OpenShift AI, you first need an S3-compatible object storage back end. In OpenShift environments, OpenShift Data Foundation provides a seamless way to provision S3-compatible object storage. Using the OpenShift Data Foundation console, you can create an ObjectBucketClaim to automatically provision a backing bucket and generate access credentials (including AWS_ACCESS_KEY_ID and AWS_SECRET_ACCESS_KEY). See Figure 1.
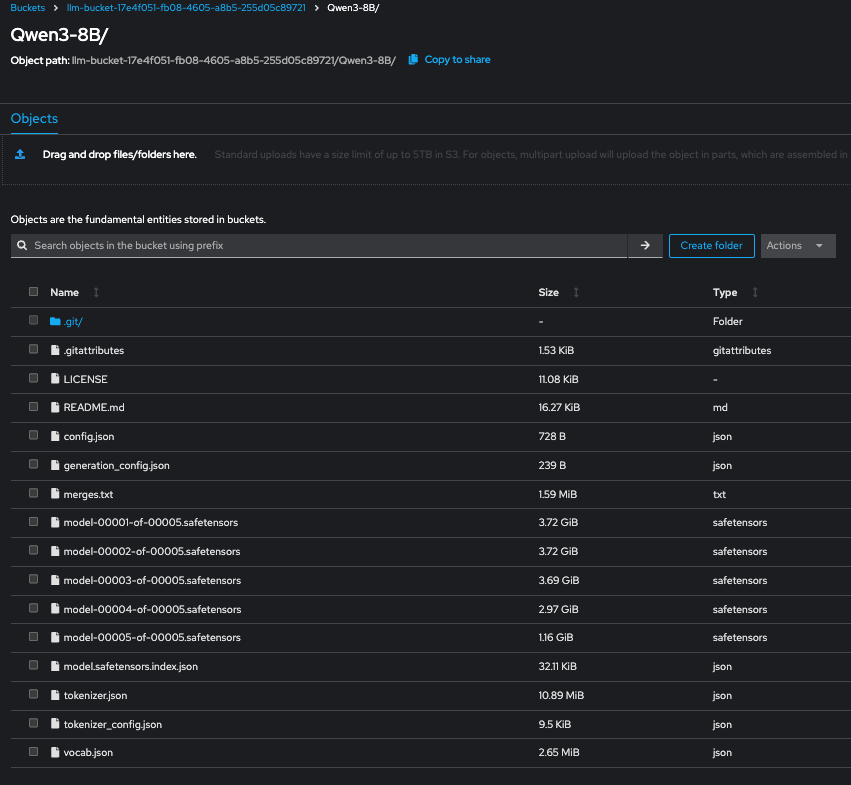
Once your S3 bucket is ready, you can clone a pre-trained model from Hugging Face. Here I used the Qwen3-8B model:
git clone https://huggingface.co/Qwen/Qwen3-8BNext, use the AWS CLI to upload the model to the S3 bucket. Configure an AWS profile with the credentials provided by the ObjectBucketClaim. Point the --endpoint-url to the S3 route URL that can be retrieved in the OpenShift storage namespace. Here's the command used to upload the model:
aws s3 sync --profile \ --endpoint-url \/ ./\ s3://\/\/This command recursively uploads the model files from your local directory to the specified path inside the S3 bucket (see Figure 2). Once uploaded, the model is ready to be referenced by your OpenShift AI ServingRuntime or pipeline workflow.
Model deployment
Once your model is uploaded to an S3 bucket, you can reference it within OpenShift AI to serve it. This process involves these key steps: creating a connection to the S3 bucket and then configuring the model deployment.
1. Create a connection to your S3 bucket
Connections link your OpenShift AI project to external data sources like S3. This allows your workbenches and models to access data without needing to embed credentials directly into your code.
To create a connection:
- From the OpenShift AI dashboard, navigate to Data Science Projects.
- Select your project and go to the Connections tab.
- Click Add connection.
- Choose S3 compatible object storage as the connection type.
- Complete the form with your details. For this example, you would use:
- Connection Name:
llm-bucket-connection - Access Key and Secret Key: Use your S3 credentials
- Endpoint:
http://s3.openshift-storage.svc - Region:
us-east-2 - Bucket:
llm-bucket-17e4f051-fb08-4605-a8b5-255d05c89721
- Connection Name:
- Click Add connection.
Once created, the connection will be available for use in your workbenches and when configuring model servers.
2. Configure and deploy the model
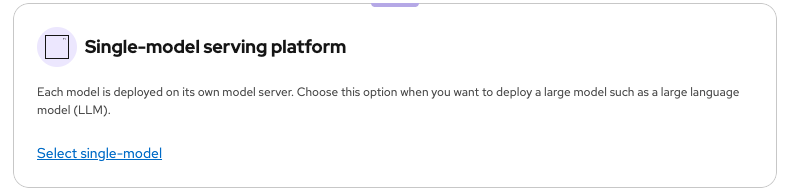
The recommended deployment method for large models is the single-model serving platform (Figure 3), where each model gets its own dedicated server.
To deploy your model:
- Go to Models → Model Deployments.
- Click Deploy Model.
- Fill out the form with the following details:
- Model deployment name: Qwen3-8B
- Runtime: vLLM NVIDIA GPU Serving Runtime
- Deployment mode: Standard (this uses Kubernetes resources with fewer dependencies)
- Number of replicas: 1
- Model server size (see Figure 4): Custom

The Model server size arguments in term of CPU/Mem might need to be adjusted based on your hardware limits:
- Accelerator:
nvidia-gpu-node - Model route: Select Make deployed models available through an external route and Require Token Authentication.
- Source model location:
- Existing connection:
llm-bucket-connection - Path:
Qwen3-8B/
- Existing connection:
- Additional server runtime arguments:
--max-model-len=6144: Determines how much information the model can process at once.--enable-auto-tool-choice: Enables the model to automatically decide which tool to use, if any, based on the user's request.--tool-call-parser=granite: Specifies the parser for interpreting the model's output when it calls a tool.
Once you've populated all the details, click Deploy. After a few minutes, you'll see a green checkmark under the Status column, indicating a successful deployment (Figure 5).

Once your model is deployed, you'll need to retrieve the necessary details to interact with it:
- Navigate to your deployed model: Data science projects → LLMs → Models
- Select Internal and external endpoints details. This displays both the internal and external URLs for your model (Figure 6).
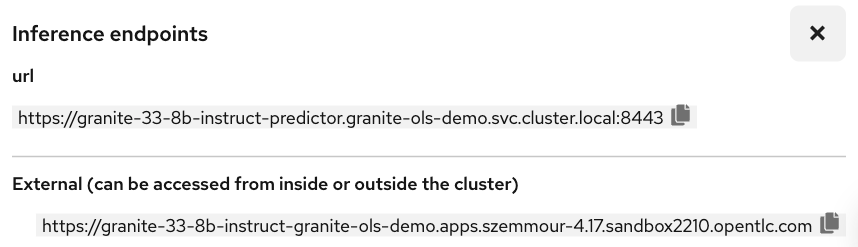
You'll use the internal URL to allow OpenShift Lightspeed to interact with the deployed model.
To get the token secret, click the drop-down menu next to the model's name. This secret is required for authentication and is used along with the internal URL to make requests to the model.
OpenShift Lightspeed
Create a secret in the openshift-lightspeed namespace. This secret stores the API token needed for OpenShift Lightspeed to authenticate with and access the model.
oc create secret generic credentials \
  --namespace openshift-lightspeed \
  --from-literal=apitoken='<API_TOKEN>' \
  --type=Opaque
Create the customer resource OLSConfig, which is used by the OpenShift Lightspeed operator to configure the assistant's behavior, including which LLM to use.
apiVersion: ols.openshift.io/v1alpha1
kind: OLSConfig
metadata:
name: cluster
spec:
llm:
providers:
- name: red_hat_openshift_ai
type: rhoai_vllm
url: https://qwen3-8b-predictor.llms.svc.cluster.local:8443/v1
credentialsSecretRef:
name: credentials
models:
- name: qwen3-8b
ols:
defaultProvider: red_hat_openshift_ai
defaultModel: qwen3-8b
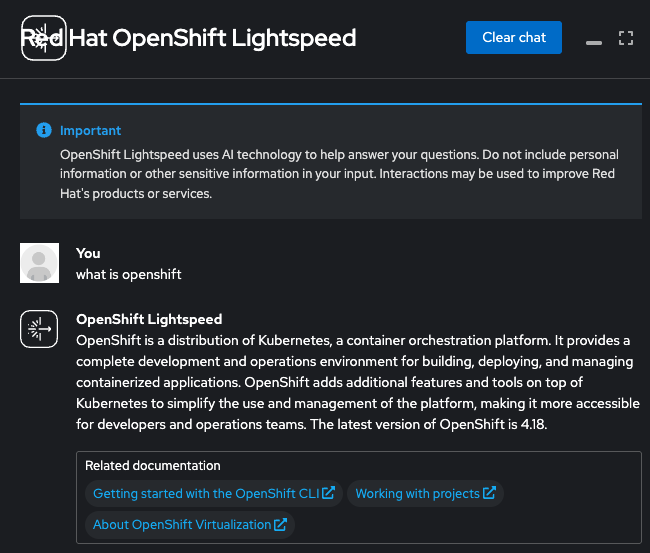
logLevel: INFOOnce the OLSConfig object is applied, you can start interacting with the OpenShift Lightspeed chatbot located in the OpenShift console, as shown in Figure 7.
Enable cluster interaction for OpenShift Lightspeed
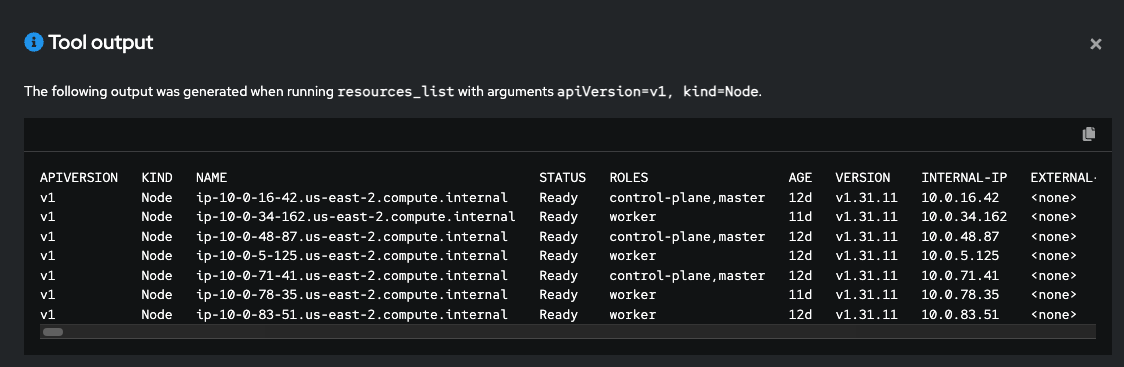
OpenShift Lightspeed uses a LLM to answer user questions. You can significantly improve the accuracy of these responses by enabling cluster interaction, a feature that enriches the model's knowledge with real-time information from your clusters.
When you enable this feature, it installs a Model Context Protocol (MCP) server. This server standardizes how applications provide context to an LLM, granting the OpenShift Lightspeed service read access to your cluster's API. This allows the LLM to gather the necessary context to provide highly specific and relevant responses tailored to your environment.
Choosing the right model
The effectiveness of MCP tool calling is highly dependent on the LLM itself. An LLM's ability to effectively select and use a tool is a key factor in its performance. Generally, larger models with more parameters are better at this. If you use a smaller model, you may notice degraded performance in tool selection or other aspects of cluster interaction, as these models may struggle to correctly select the appropriate tool and interpret the information provided by the MCP server.
The Berkeley Function-Calling Leaderboard's agentic evaluation highlights that the Qwen3-8B model delivers good tool-calling performance relative to its size. This makes it an ideal choice for showcasing the cluster interaction feature, especially in environments with limited GPU resources.
Note
Cluster interaction is a Technology Preview feature as of this writing.
How to enable cluster interaction
To enable cluster interaction, you need to set the introspectionEnabled parameter to true. You can do this by running the following command in your terminal:
oc patch olsconfig cluster --type=json -p='[{"op": "add", "path": "/spec/ols/introspectionEnabled", "value": true}]' -n openshift-lightspeedAfter running this command, the OpenShift Lightspeed pods will restart. Once they are in a Running state, you can begin using this feature to get real-time details about your cluster, as shown in Figures 8 and 9.

Conclusion
This blog showcased a practical example of how to leverage generative AI in a way that is tailored and cost-effective for organizations. By connecting Red Hat OpenShift Lightspeed with a locally served large language model in OpenShift environment, you can create an intelligent assistant that helps streamline your work and address key enterprise concerns around data privacy and operational costs. This approach gives you greater control over model performance and customization while using organizations' private infrastructure.