In my previous article, we explored the chaos of decentralized microservices and how a service mesh acts as a modern, unified platform to bring order to the network. We unraveled the core concepts, from the role of the sidecar proxy to the central authority of the control plane, and established why Red Hat OpenShift Service Mesh 3 is a powerful solution for today's complex architectures. Beyond its single-cluster capabilities, the most significant advancement in OpenShift Service Mesh 3 is its streamlined and robust support for a multicluster topology, which transforms a collection of independent clusters into a single, cohesive application network.
Why build a multicluster mesh?
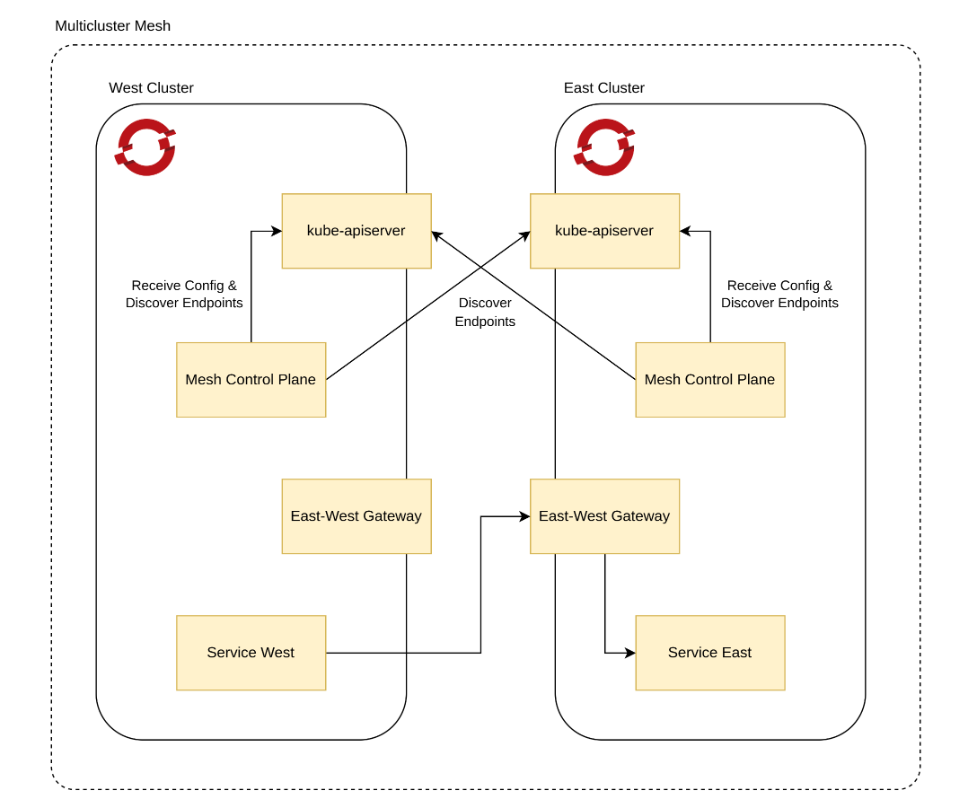
A service mesh goes beyond securing and managing communication within a cluster. It can connect different clusters across different networks, regions, or even cloud providers. The secret to this lies in dedicated gateways, specialized proxies that sit at the edge of each cluster's mesh. These gateways serve as secure bridges, allowing a service in one cluster to discover and communicate with a service in another, even if they are on completely different physical networks. The service mesh manages this inter-cluster communication automatically, extending its unified security and traffic management policies across your entire application portfolio. This level of seamless, secure interconnectivity is what transforms a collection of independent clusters into a single, cohesive, and resilient application network.
Multicluster topologies are an essential strategy for organizations with distributed systems, especially those seeking enhanced scalability, fault tolerance, and regional redundancy. This architectural approach builds a foundation for true resilience by effectively erasing the network boundaries between clusters. This means a service in one cluster can discover and communicate with another using its standard DNS name as if it were local, an abstraction that provides a pathway to limitless scalability beyond the confines of any single cluster.
This seamless connectivity enables powerful high-availability patterns, such as running services in an "active-active” topology with live replicas distributed across multiple clusters. Consequently, if a service instance or an entire cluster suffers an outage, the mesh can gracefully redirect traffic to healthy environments, providing seamless failover at the workload level and ensuring continuity.
Ready to see how it all comes together? This guide provides a step-by-step process to create the multicluster architecture shown in Figure 1, using two clusters we'll call “East” and “West.” Let's dive in.
Prerequisites
Before you begin, ensure the following are in place:
- You have access to two Red Hat OpenShift Container Platform clusters with external load balancer support.
- The OpenShift Service Mesh 3 operator is installed on all clusters that comprise the mesh.
- OpenSSL installed locally.
- You have a user with a cluster-admin role.
- The istioctl command-line tool installed.
- An Istio Container Network Interface (CNI) resource exists in an istio-cni project.
Step 1: Create certificates
You'll start by creating the necessary certificates to establish a shared trust domain between your clusters. This process involves creating a shared root certificate authority (CA) and then an intermediate CA for each cluster.
Create the root CA certificate
- First, generate the root certificate and its key. Share this root certificate across both clusters to ensure they trust each other.
Create a key for the root certificate:
openssl genrsa -out root-key.pem 4096Create a certificate signing request (CSR) using a configuration file named
root-ca.conf:openssl req -sha256 -new -key root-key.pem \ -config root-ca.conf \ -out root-cert.csrCreate a shared root certificate:
openssl x509 -req -sha256 -days 3650 \
 -signkey root-key.pem \
 -extensions req_ext -extfile root-ca.conf \
 -in root-cert.csr \
 -out root-cert.pem
Create the intermediate CA certificate for the East cluster
Create a directory named
east:mkdir eastCreate a key for the intermediate certificate:
openssl genrsa -out east/ca-key.pem 4096Create a configuration file named
intermediate.confin theeast/directory, and then create a certificate signing request:openssl req -new -config east/intermediate.conf \ -key east/ca-key.pem \ -out east/cluster-ca.csrCreate the intermediate CA certificate:
openssl x509 -req -sha256 -days 3650 \
 -CA root-cert.pem \
 -CAkey root-key.pem -CAcreateserial \
 -extensions req_ext -extfile east/intermediate.conf \
 -in east/cluster-ca.csr \
 -out east/ca-cert.pem
Create a certificate chain by combining the intermediate and root CA certificates:
cat east/ca-cert.pem root-cert.pem > east/cert-chain.pem && cp root-cert.pem east
Create the intermediate CA certificate for the West cluster
For the West cluster, repeat the exact same process, but use the west directory for all commands.
Step 2: Apply certificates to the clusters
Apply the generated certificates to each cluster to establish a secure multicluster topology.
Apply to the East cluster:
Log in to the East cluster and set the environment variable for its
occontext:oc login -u https://<east_cluster_api_server_url> export CTX_CLUSTER1=$(oc config current-context)Create the
istio-systemproject and label its namespace to usenetwork1:oc get project istio-system --context "${CTX_CLUSTER1}" || oc new-project istio-system --context "${CTX_CLUSTER1}" oc --context "${CTX_CLUSTER1}" label namespace istio-system topology.istio.io/network=network1Create a secret named
cacertsusing the certificate files from theeastdirectory:oc get secret -n istio-system --context "${CTX_CLUSTER1}" cacerts || oc create secret generic cacerts -n istio-system --context "${CTX_CLUSTER1}" \ --from-file=east/ca-cert.pem \ --from-file=east/ca-key.pem \ --from-file=east/root-cert.pem \ --from-file=east/cert-chain.pem
Apply to West cluster:
- Log in to the West cluster, set the context to
CTX_CLUSTER2, and create theistio-systemproject, just as you did for the East cluster. - Label the
istio-systemnamespace to usenetwork2. Create the
cacertssecret using the certificate files from thewestdirectory:oc get secret -n istio-system --context "${CTX_CLUSTER2}" cacerts || oc create secret generic cacerts -n istio-system --context "${CTX_CLUSTER2}" \ --from-file=west/ca-cert.pem \ --from-file=west/ca-key.pem \ --from-file=west/root-cert.pem \ --from-file=west/cert-chain.pem
Step 3: Install a multiprimary multinetwork mesh
With the certificates applied, you can now install Istio on each cluster to create the mesh. Set the ISTIO_VERSION environment variable:
export ISTIO_VERSION=<your istioctl version>Install Istio on the East cluster
Create an Istio resource, setting the
clusterNametocluster1and the network tonetwork1:cat <<EOF | oc --context "${CTX_CLUSTER1}" apply -f - apiVersion: sailoperator.io/v1alpha1 kind: Istio metadata: name: default spec: version: v${ISTIO_VERSION} namespace: istio-system values: global: meshID: mesh1 multiCluster: clusterName: cluster1 network: network1 EOFWait for the control plane to be ready.
oc --context "${CTX_CLUSTER1}" wait --for condition=Ready istio/default --timeout=3mCreate an East-West gateway and expose services through the gateway:
oc --context "${CTX_CLUSTER1}" apply -f https://raw.githubusercontent.com/istio-ecosystem/sail-operator/main/docs/deployment-models/resources/east-west-gateway-net1.yaml
oc --context "${CTX_CLUSTER1}" apply -n istio-system -f https://raw.githubusercontent.com/istio-ecosystem/sail-operator/main/docs/deployment-models/resources/expose-services.yaml
Install Istio on the West cluster
Create an Istio resource, but this time set the
clusterNametocluster2and the network tonetwork2:cat <<EOF | oc --context "${CTX_CLUSTER2}" apply -f - apiVersion: sailoperator.io/v1alpha1 kind: Istio metadata: name: default spec: version: v${ISTIO_VERSION} namespace: istio-system values: global: meshID: mesh1 multiCluster: clusterName: cluster2 network: network2 EOFWait for the control plane to be ready, then apply the
east-west-gateway-net2.yamlandexpose-services.yamlfiles:oc --context "${CTX_CLUSTER2}" apply -f https://raw.githubusercontent.com/istio-ecosystem/sail-operator/main/docs/deployment-models/resources/east-west-gateway-net2.yaml oc --context "${CTX_CLUSTER2}" apply -n istio-system -f https://raw.githubusercontent.com/istio-ecosystem/sail-operator/main/docs/deployment-models/resources/expose-services.yaml
Step 4: Connect the clusters
To allow the control planes to discover services in other clusters, you need to create a remote secret on each cluster that provides access to the other cluster's API server.
Install the remote secret on East cluster for the West cluster
Create a service account for the East cluster and add the
cluster-readerrole to it:oc --context="${CTX_CLUSTER1}" create serviceaccount istio-reader-service-account -n istio-system oc --context="${CTX_CLUSTER1}" adm policy add-cluster-role-to-user cluster-reader -z istio-reader-service-account -n istio-systemUse
istioctlto create and apply the remote secret. This command retrieves the necessary secret from the West cluster's context and applies it to the East cluster's context:istioctl create-remote-secret \ --context="${CTX_CLUSTER2}" \ --create-service-account=false \ --name=cluster2 | \ oc --context="${CTX_CLUSTER1}" apply -f -
Install the remote secret on the West cluster for the East cluster
Repeat the same process on the West cluster. Create a service account, add the cluster-reader role, and then use istioctl to retrieve the secret from the East cluster and apply it to the West cluster:
istioctl create-remote-secret \
- context="${CTX_CLUSTER1}" \
- create-service-account=false \
- name=cluster1 | \
oc - context="${CTX_CLUSTER2}" apply -f -
Step 5: Verify the multicluster topology
The sleep and helloworld applications are simple, sample services used to demonstrate and test the service mesh functionality. We'll use them to verify that traffic is flowing correctly between clusters.
The helloworld application is a web service deployed in two different versions, v1 and v2, to verify that traffic is correctly distributed across the mesh.
The sleep application is a utility service that acts as a client, used to send curl requests to the helloworld service from within the mesh. Its purpose is to simulate a service consumer and provide a point to execute commands.
Deploy the sample applications on the East cluster:
Create a sample project and label its namespace to enable sidecar injection:
oc --context "${CTX_CLUSTER1}" get project sample || oc --context="${CTX_CLUSTER1}" new-project sample
oc --context="${CTX_CLUSTER1}" label namespace sample istio-injection=enabled
Create the helloworld service, and deploy the helloworld(v1) and sleep applications:
oc --context="${CTX_CLUSTER1}" apply -f https://raw.githubusercontent.com/openshift-service-mesh/istio/release-1.24/samples/helloworld/helloworld.yaml -l service=helloworld -n sample
oc --context="${CTX_CLUSTER1}" apply -f https://raw.githubusercontent.com/openshift-service-mesh/istio/release-1.24/samples/helloworld/helloworld.yaml -l version=v1 -n sample
oc --context="${CTX_CLUSTER1}" apply -f https://raw.githubusercontent.com/openshift-service-mesh/istio/release-1.24/samples/sleep/sleep.yaml -n sample
Wait for the sleep application to be ready:
oc --context="${CTX_CLUSTER1}" wait --for condition=available -n sample deployment/sleep
Deploy the sample applications on the West cluster:
Repeat the same process on the West cluster. Create a sample project, label it for sidecar injection, create the helloworld service, and deploy the helloworld(v2) and sleep applications. Wait for them to be ready.
Step 6: Verify traffic flows
Now, let's test the traffic to see if services from one cluster can reach services on the other.
From the sleep pod on the East cluster, send 10 requests to the helloworld service. The command will execute a
curlto the helloworld service within the sample namespace:for i in {0..9}; do \ oc --context="${CTX_CLUSTER1}" exec -n sample deploy/sleep -c sleep -- curl -sS helloworld.sample:5000/hello; \ DoneIf you configured your mesh correctly, you should see responses from both
version: v1andversion: v2of the service, confirming that traffic is routed across the clusters.From the sleep pod on the West cluster, repeat the test by sending 10 requests to the helloworld service:
for i in {0..9}; do \
 oc --context="${CTX_CLUSTER2}" exec -n sample deploy/sleep -c sleep -- curl -sS helloworld.sample:5000/hello; \
Done
You should see responses from both versions again, confirming bi-directional traffic flow.
Real-world scenarios and best practices
By following the steps in this guide, you have successfully built a multicluster, multinetwork service mesh. You've seen how to connect distinct OpenShift clusters and create a single, unified application network that provides seamless and secure communication between services. But when you apply it to solve complex, real-world challenges and harden it for production use, the true power of this architecture shines.
To transition this architecture from a tutorial to a production environment, you can build on these concepts with the following robust, automated solutions.
- Automated certificate management: Manually creating certificates with OpenSSL is suitable for a lab but does not scale and introduces security risks. In production, you should replace this with an automated Certificate Authority (CA) management system like HashiCorp Vault or
cert-managerto handle the issuance and rotation of all intermediate CAs for your clusters. - Secure gateway exposure: The east-west gateways are exposed using a standard LoadBalancer service. In production, you must harden this exposure by implementing strict firewall rules or cloud network security groups to ensure that a gateway in one cluster can only be reached by the gateways from other trusted clusters in the mesh.
- Automation with GitOps: A production setup should be managed using a GitOps workflow with tools like Argo CD or Red Hat OpenShift GitOps. All the Istio custom resources, secrets, and gateway configurations demonstrated in this guide should be stored declaratively in a Git repository to ensure an auditable, consistent, and automated deployment process.
