As AI agents become more capable, developers need a reliable way to connect them to real-world data and tools. The Model Context Protocol (MCP) provides a standardized approach to enable this connection, making AI systems more useful, secure, and scalable. In this article, we'll create a simple MCP server and build a tool that fetches weather data for a specified location.
What is Model Context Protocol (MCP)?
The Model Context Protocol (MCP) is an open standard that enables developers to create secure, bi-directional connections between data sources and AI-driven applications. Think of MCP servers as smart adapters that allow your large language models (LLMs) to reach beyond their internal knowledge base and interact with the internet, databases, APIs, and much more.
The Model Context Protocol enhances LLMs by enabling them to go beyond generalized responses. An LLM using the MCP standard can call functions, fetch data, and perform actions by communicating with an external MCP server that exposes those capabilities. These include:
- Tools: Functions that the model can call (for example,
lookup_customer_by_email). - Resources: Structured data a model can reference (for example, product catalog, user records).
- Prompt templates: Pre-written prompts the system can use to guide model behavior (for example,
Summarize this customer’s sentiment history).

Figure 2 illustrates a typical MCP client and server exchange. The client first requests information about the server’s capabilities. The client then sends commands or queries, and the server processes these requests and responds accordingly. This enables seamless interaction between AI agents and external tools.

Now that you have a basic understanding of MCP, it's time to get hands-on. We will build an MCP server that connects to the Open-Meteo API to provide real-time weather data and forecasts. The Open-Meteo API is easy to configure with query parameters and doesn't require an API key, making it ideal for integrating with language models.
Prerequisites
To follow along, you will need the following:
- A code editor like Visual Studio Code (VS Code).
- A programming language to work with in VS Code. We’ll use Python for this example, but you could use another programming language like Node.js/TypeScript, Java, or Go.
uv, a Rust-based Python package manager.
Download uv
For macOS via Homebrew:
brew install uvFor Windows via Winget:
winget install --id=astral-sh.uv -eRefer to the uv documentation for full installation instructions.
Set up the Python development environment
To get started, open your code editor and navigate to the folder where you want to create your project. Then, follow these steps:
Create a new folder for your project called
mcp-server-weather. You can do this directly in your code editor or by running the following command in the terminal:mkdir mcp-server-weatherNavigate to the folder you just created:
cd mcp-server-weatherInitiate a new
uvproject as follows:uv initCreate a virtual environment with
uv:uv venvNote: We created a virtual environment here to provide a clean, isolated space for working on our MCP server. This ensures dependencies don’t interfere with the global Python environment.
Start the virtual environment:
source .venv/bin/activateInstall the Python MCP SDK with the CLI extension and additional Python dependencies in the virtual environment:
uv add “mcp[cli]” httpx
Note: The mcp-cli package requires Python 3.10 or later.
Building the weather MCP server
For your convenience, the complete code used throughout this blog is available in a single GitHub repository. Feel free to explore, clone, or reference it as you follow along or build your own MCP projects.
Scaffold out our code
The following is the boilerplate code for the MCP server we will be using in this example. We will start by adding this scaffolding to our code:
import json
from typing import Any
import httpx
from mcp.server.fastmcp import FastMCP
#Initialize FastMCP server
mcp = FastMCP("weather")
### The rest of our code goes between here....
### ... and here.
if __name__ == "__main__":
   #Initialize and run the server
   mcp.run(transport='stdio')
This setup introduces strong typing for better code reliability, adds the httpx client for making web requests, and includes the FastMCP class to help us quickly build MCP servers. It also runs the MCP server over standard input/output (stdio), which is the expected communication method for most MCP clients.
Note: While running the MCP server over stdio works well for local development, production setups typically use HTTP to host the server remotely. This allows agents to connect over the network, making the system more scalable, flexible, and suitable for real-world applications.
Constants and helper functions
In this setup, constants are used to store fixed values that remain unchanged throughout the program. For example, OPENMETEO_API_BASE holds the base URL for the Open-Meteo API and USER_AGENT stores the user agent string. Defining them as constants makes your code easier to maintain because if you ever need to update these values, you only have to do it in one place.
We also make use of helper functions, which are small, reusable functions that handle specific tasks. The make_openmeteo_request function is a great example. It is responsible for sending API requests to Open-Meteo and managing any errors that might occur. By isolating this logic, the main code stays clean, readable, and focused on its core purpose.
Note: All the code examples from this point forward should be placed inside the section marked earlier as: The rest of our code goes between here... and ...and here. This is where the main logic of our MCP server will live, so make sure to insert the following code within that block.
Here is the code for the constants and helper functions we will use:
# Constants
OPENMETEO_API_BASE = "https://api.open-meteo.com/v1"
USER_AGENT = "weather-app/1.0"
# Helper function to make a request to the Open-Meteo API
async def make_openmeteo_request(url: str) -> dict[str, Any] | None:
   """Make a request to the Open-Meteo API with proper error handling."""
   headers = {
       "User-Agent": USER_AGENT,
       "Accept": "application/json"
   }
   async with httpx.AsyncClient() as client:
       try:
           response = await client.get(url, headers=headers, timeout=30.0)
           response.raise_for_status()
           return response.json()
       except Exception:
           return None
Create a get_forecast tool
The Open-Weather API offers a /forecast endpoint that lets you retrieve both current weather conditions and hourly forecasts for any location, simply by providing its latitude and longitude. You can also include optional parameters to customize the type and amount of weather data you want, making it a flexible tool for a variety of applications.
To enable the language model to automatically request data from the API and potentially allow the MCP server to act on that data, each API interaction is best exposed as a tool. This approach keeps the server modular and makes it easier for the LLM to trigger specific actions in a clear and structured way.
We’ll build a tool that requests the current weather using the Python SDK as follows:
@mcp.tool()
async def get_current_weather(latitude: float, longitude: float) -> str:
"""Get current weather for a location.
Args:
latitude: Latitude of the location
longitude: Longitude of the location
"""
url = f"{OPENMETEO_API_BASE}/forecast?latitude={latitude}&longitude={longitude}¤t=temperature_2m,is_day,showers,cloud_cover,wind_speed_10m,wind_direction_10m,pressure_msl,snowfall,precipitation,relative_humidity_2m,apparent_temperature,rain,weather_code,surface_pressure,wind_gusts_10m"
data = await make_openmeteo_request(url)
if not data:
return '{"error": "Unable to fetch current weather data for this location."}'
return json.dumps(data)Spin up and test the MCP server
The MCP server is now fully functional and ready to test using the MCP Inspector, which is an interactive developer tool for testing and debugging MCP servers. We will use the MCP Inspector to test our MCP server; here’s how to do it:
Start your MCP server in developer mode in your terminal by running:
mcp dev server.pyNote: We are using developer mode because it runs locally on your computer and it’s great for quick testing and debugging.
The output should look something like this:
Starting MCP inspector...
⚙️ Proxy server listening on localhost:6277
🔑 Session token: 95a1198f988fd782d244b404c2796ace3cc408489345bedae74cadd45c7c6002
   Use this token to authenticate requests or set DANGEROUSLY_OMIT_AUTH=true to disable auth
🚀 MCP Inspector is up and running at:
   http://localhost:6274/?MCP_PROXY_AUTH_TOKEN=95a1198f988fd782d244b404c2796ace3cc408489345bedae74cadd45c7c6002
The MCP Inspector is now running locally and should automatically open in our browser. If it does not launch on its own, you can manually open it by clicking the link displayed in your terminal.
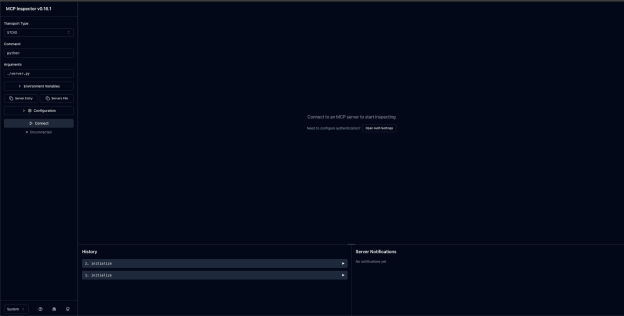
The MCP Inspector dashboard on our browser should look like Figure 3.

Figure 3: The MCP Inspector dashboard. Click the Connect button on the left side of the screen. This links it to our running MCP server, enabling interaction and testing. After, we will see a small green circle next to the word Connected, highlighted in Figure 4.
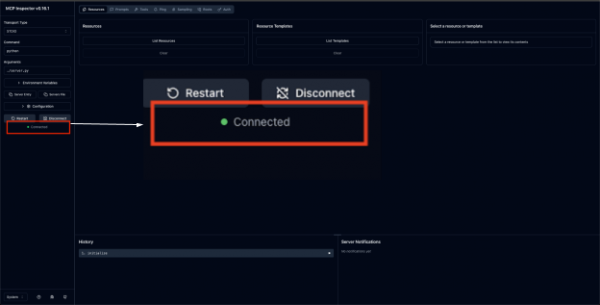
Figure 4: MCP Inspector connected dashboard. Select the Tools tab on the top of the screen, marked in Figure 5.
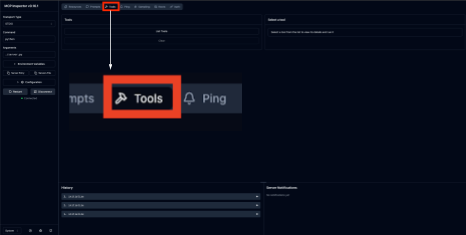
Figure 5: Navigate to the Tools tab. You should see a tool called
get_current_weather. We will use this tool to get the current weather data as a JSON object.- Select the
get_current_weathertool. - Input the latitude and longitude (e.g.,
35.773575, 78.67601) respectively. Fun fact: the latitude and longitude used here pinpoints to the Red Hat’s corporate headquarters in Raleigh, North Carolina, USA. - Then, click the Run Tool button.
These steps are shown in Figure 6.
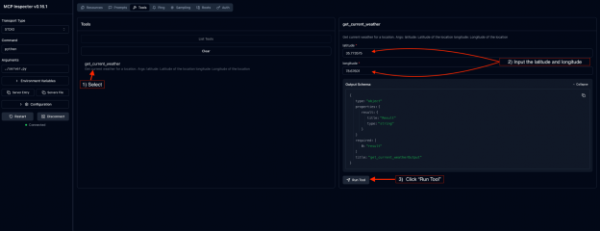
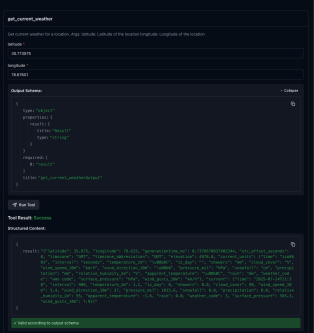
Figure 6: MCP Inspector Tools tab. - Select the
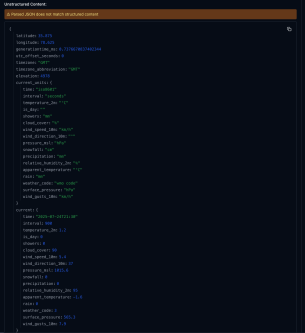
Now, under Tool Result, you should see the JSON object with the weather data of Raleigh, North Carolina as shown in Figures 7 and 8.

Figure 7: MCP Inspector Tool Result showing the top portion of a JSON object with weather data. 
Figure 7: MCP Inspector Tool Result showing the top portion of a JSON object with weather data.


Extending your MCP server with new tools
Just like that, we’ve not only built our first MCP server but also created a tool—get_current_weather—that retrieves the current weather for a given location using the Open-Meteo API.
Starting with a single tool helps us understand the basics of setting up and running an MCP server. Because we only defined the get_current_weather tool when building our MCP servers in our code, that’s all you’ll see here. However, now I want you to challenge yourself by adding more tools to build on top of your MCP server.
Here’s an idea to get you started. The get_location tool uses the Open-Meteo Geocoding API to perform more accurate location searches. To do this:
- Open your project in VS Code: Launch your code editor and open the project folder where your MCP server code is located.
- Define new tools: In your
server.pyfile (or whichever file contains your MCP server), define each new tool as a function. Use the@mcp.tool()decorator to register it as an MCP tool. - Implement the tool logic: Inside each function, implement the desired functionality. Follow the same structure we used for the
get_current_weathertool. For example, you might create aget_locationtool to perform more accurate location searches. - Test with the MCP Inspector: Once your new tools are defined, launch the MCP Inspector to test them. Make sure each tool behaves as expected and returns accurate results.
Agentic capabilities in real-world AI
In this blog, we only scratched the surface of MCP to build a solid understanding of what it is and how it works. However, the real power of MCP shines when it's connected to a language model framework like Llama Stack, which works seamlessly with inference providers such as vLLM.
Llama Stack acts as an orchestration layer that manages tool usage, context, and retrieval, while vLLM efficiently handles high-throughput inference. When we plug our MCP server into this stack, we give the model the ability to call real-world tools like our weather-fetching example on demand, without writing custom wrappers or server logic each time. This modular approach makes it easier to build advanced, tool-using AI agents with minimal boilerplate and strong reliability.
Conclusion
As we wrap up this blog, I encourage you to think about how MCP can evolve in your own workflows. Whether you're building personal AI assistants, automating back-end tasks, or connecting models to external data sources, MCP provides a clean and scalable foundation.
Now that you've built your first MCP server and tool, the next step is yours—expand it, experiment with new APIs, or plug it into a larger stack. The future of AI is interactive, tool-driven, and grounded in protocols like MCP.
If you want to learn more about MCP servers and the future of agentic AI, I strongly recommend watching the following videos:
