In the first article of this blog series, How to integrate vLLM inference into your macOS and iOS apps, I presented a business use case for integrating a finely tuned large language model (LLM), served by vLLM, with a chatbot that can run on macOS and iOS. That article introduced multiple options for connecting to vLLM's inference capabilities, including low-level HTTP communications with URLSession, general-purpose networking with Alamofire, and purpose-built libraries like SwiftOpenAI, MacPaw/OpenAI, and the llama-stack-client-swift SDK.
In this article, I'll dive into the practical steps (and source code) for building a chatbot that communicates with a Llama Stack server using the Llama Stack Swift SDK. The Llama Stack server will ultimately communicate with vLLM to provide inference for the generative AI model.
Looking ahead
In future articles, I'll cover how to directly connect the chatbot to vLLM or a Llama Stack server using OpenAI-compatible APIs. Multiple connection methods and open source projects will be presented and embedded in the shared code repository.
Chatbot functionality
You've likely already interacted with a few chatbots, and I'm betting the functionality you experienced was more extensive than the sample code provided with this article. I've deliberately favored simplification over completeness in the sample code, and focused on AI functionality that allows the user to:
- Define and use multiple servers, plus allow the application user to choose which one to work with at a given time.
- Specify what API to use per server: Use Llama Stack or OpenAI APIs when sending a request (prompt) for model inference.
- Submit inference requests and handle responses, as well as see the history of interactions with the model.
Functional capabilities that are deliberately left out of the sample code but you should consider when building a full-featured chatbot include:
- System prompts allow the chatbot to send messages to the inference engine that will influence responses to user requests.
- Multimodal interaction allows users to interact with the model using text, images, and voice input when available.
- User feedback handling accepts user feedback to inference responses that can be used to help tune the model.
- Conversation history allows users to have long-running “conversations” with models and even potentially return to previous conversations for more interaction.
Get the sample source code set up
A balance also had to be struck between code completeness and simplification when it came to the SwiftUI user interface implementation and use of SwiftData for persistent storage. I think it's important to show how to use AI-specific code within a reasonable user interface, so I've provided a fair amount of code that focuses on how the application runs.
To quickly facilitate this article's learning objectives, sample source code is available in a GitHub repository. To get started with that code, you'll need to clone it onto your macOS computer that also has Xcode 16.3 or greater on it. We'll use Xcode to review, edit, and compile the code.
Here are the steps to follow to clone the repository using Xcode so you can start using the project:
- Make sure you have set your source code control preferences in Xcode
- Select the Clone Git Repository option of the startup dialog for XCode, or the Integrate → Clone… menu option.
- In the dialog box that appears, enter
https://github.com/RichNasz/vLLMSwiftApp.gitinto the search bar that appears at the top of the dialog box - In the file dialog that appears next, choose the folder you want to clone the repository into.
Once the cloning process is complete, a new project will open and immediately start building the code. Stop the build using the Product → Stop menu option in Xcode. Once that is done, check the following items to make sure you get a clean build.
Note
You need to have your Apple developer account set up in Xcode so that projects you work on can be signed and run on physical devices like your macOS computer. You can create a free Apple Developer account for this or use an existing account.
- First, make sure your developer account is set via Xcode Settings… → Accounts.
- Select the
vLLMSwiftAppin the project navigator, and then set the values in the Signing & capabilities section of thevLLMSwiftApptarget.- Select the check box for Automatically manage signing.
- Set the team to your personal team.
- Choose a unique bundle identifier for your build.

Once you have verified the critical items identified above, go ahead and clean the build folder using the Product → Clean Build Folder… menu option. Then start a new build using the Product → Build menu option. The initial build will take a while to complete since all package dependencies must be downloaded (such as llama-stack-client-swift) before a full build starts.
Important
During your first build, a dialog box asking you to enable and trust the OpenAPIGenerator extension will pop up. Select the option to Trust & Enable when prompted. If you don't do this, code for the SDK can't be generated, and the code won't work.
Provided the build completes without error you can now run the sample chatbot. We'll walk through the code shortly, but if you want to see a quick tour of the application, watch the interactive demo, and then run your own local copy.
Source code basics
The core sample source code was created using Xcode 16.3 using Swift 5 for the implementation language, along with these Apple App Frameworks packages:
- SwiftUI is used for all of the user interface elements along with controlling navigation within the application.
- Swift Data is used to persist application data.
- TipKit is used to help the user start using the application by pointing out usage tips
The application code is contained within the vLLMSwiftApp folder of the project, with the vLLMSwiftAppApp.swift file containing the application startup code. All views used in the application are in the Views folder, and the MainAppView.swift file is the main view that all other views are subviews of.
Within the MainAppView.swift file, all the code and data needed to dynamically build the main menu within the NavigationSplitView is provided. Basic context checking is performed to dynamically enable and disable menu options, and usage guidance is provided using tips via TipKit.
Understanding the Llama Stack API
The primary functionality of the chatbot is to interact with an LLM of your choice served by vLLM, and this article focuses on using the Llama Stack API for that interaction. The Llama Stack API can be reviewed in the API Reference section of the Llama Stack project documentation. The source YAML in OpenAPI 3.1.0 format is also available. The API consists of two main components:
- Endpoints: REST endpoints that clients call and servers implement.
- Schemas: Data structures used when interacting with these endpoints.
The Llama Stack project employs a contract-first development approach. This means that the API specification must be defined and agreed upon before any code development starts. This has implications for Swift developers using the llama-stack-client-swift SDK, which is designed to be compatible with a particular version of the API specification.
One such implication is that a significant portion of the llama-stack-client-swift SDK code is automatically generated using the open source Swift OpenAPI Generator project from the Llama Stack API specification. Local code generation occurs as part of the initial build of a project that includes the LlamaStackClient Swift package as a dependency. Your first build of the chatbot sample code did this, and you probably never noticed.
In the Xcode code navigator, review the LlamaStackClient 0.2.2 package Sources/LlamaStackClient directory. There you will find that two key files drive the OpenAPI code generation process:
openapi.yamldefines the API (compliant with OpenAPI 3.1.0) the SDK is based on and specifies the types and client code to be generated.openapi-generator-config.yamlconfigures how the Swift OpenAPI Generator operates.
The automatically generated SDK code includes the necessary data types and client-side code for making API calls. It is stored in a subdirectory within your build folder during the build process. Although the generated code does not show up in the Xcode project navigator, you can view it when you jump to definitions for data types and client code, as well as through Xcode generated documentation.
Where exactly is the OpenAPI generated code?
If you really want to find the OpenAPI generated code, select the Product → Show Build Folder in Finder menu option in Xcode. From the folder opened up using the menu option, open the following path of folders:Intermediates.noindex/BuildToolPluginIntermediates/llama-stack-client-swift.output/LlamaStackClient/OpenAPIGenerator. Within the final folder you will find the Swift code created by the OpenAPI Generator during the Xcode build.
As a result of the generated code being hidden from view in the SDK project navigator, the actual code in the Sources/LlamaStackClient directory of the llama-stack-client-swift SDK project is minimal. It consists of code that follows a facade design pattern which simplifies use of the generated OpenAPI code. The simplified code is what you interact with when interacting with Llama Stack API features—like remote inference—in a chatbot.
Version note
The llama-stack-client-swift SDK version used for this article is 0.2.2, which implements a subset of the Agents and Inference endpoints in the overall Llama Stack API. As the SDK evolves and matures, you should fully expect the SDK to implement more and more of the Llama Stack API specification.
Let's dive into more chatbot sample code. First, using the project navigator, open the LlamaStackChatViewModel.swift file in the vLLMSwiftApp project that contains code used to remotely connect to a Llama Stack server. The code in that file is specifically implemented to work with the SwiftUI code in the LlamaStackChatView.swift file, to form a Model-View-ViewModel (MVVM) pattern, which is commonly used in SwiftUI development.
The code in LlamaStackChatViewModel.swift will need to perform a series of steps to issue an inference request to the LlamaStack server.
- A connection will be made using a user provider server URL, name of the model to interact with, and optionally, an API key to use for security. The
RemoteInferenceclass in the SDK is used for this. - Issue a SDK
ChatCompletionRequestfunction call with one “user” message (prompt) that is input by the user in the application. - Once the inference request is made to the server via
ChatCompletionRequest, the chatbot code needs to deal with an asynchronous stream response that uses an Apple AsyncStream structure.
The actual code used in the chatbot to make the inference call looks like the following:
chatCompletion(
    request:
      Components.Schemas.ChatCompletionRequest(
        model_id: modelName,
        messages: [
          .user(
            Components.Schemas.UserMessage(
              role: .user,
              content:
                .InterleavedContentItem(
                  .text(
                    Components.Schemas.TextContentItem(
                      _type: .text,
                      text: prompt
                    )
                  )
                )
            )
          )
        ],
        stream: true)
  )
It isn't particularly complex code, but there are several values to set in nested data structures when making the call. In order to explain the inference call in detail, I'm going to take you on a journey through the SDK source code with the help of Xcode. We'll examine the details of the RemoteInference class and the chatCompletion function. The content that follows gets deep in the weeds, but I promise that it is worth following along.
The first step in our journey is to ask Xcode to help us by building documentation for the chatbot project, as well as the LlamaStackCient SDK that is a dependency. Doing this will make it much easier to review the details of Classes, Structures, Enumerations, and more.
To generate the documentation we will use, select the Product → Build Documentation menu item in Xcode. This will kick off a build process specifically for the documentation that takes a minute or two to complete. Once done, Xcode will provide you with a notification that the build completed. We'll use the generated documentation to help simplify the code review process.
LlamaStackClient SDK code walkthrough
To remotely connect to a Llama Stack server, the chatbot code uses the chatCompletion function in the RemoteInterface class found in the Sources → LlamaStackClient → Inference → RemoteInference.swift file in the SDK code base.
Open up the RemoteInference.swift file in Xcode and take a look at the code. Wow! The code is pretty short, and instantiation of the RemoteInterface class simply requires a URL, and optionally an API key.
Next, notice that the RemoteInterface class implements the Inference protocol (defined in Inference.swift), which requires only a single function (chatCompletion) be defined in the class for making a request from the remote server.
public class RemoteInference: Inference {
  private let url: URL
  private let client: Client
  private let encoder = JSONEncoder()

  public init (url: URL, apiKey: String? = nil) {
    self.url = url
    self.client = Client(
      serverURL: url,
      transport: URLSessionTransport(),
      middlewares: apiKey.map { [ProviderMiddleware(token: $0)] } ?? []
    )
  }

  public func chatCompletion(request: Components.Schemas.ChatCompletionRequest) async throws → AsyncStream<Components.Schemas.ChatCompletionResponseStreamChunk>
}
Important
The code exploration that follows is reviewing the code automatically generated to be compliant with the Llama Stack project API specification discussed earlier. The structure of the code and naming conventions used reflects how the Swift OpenAPI Generator operates.
Great! We only need to know one class and one function to remotely interact with the Llama Stack server.
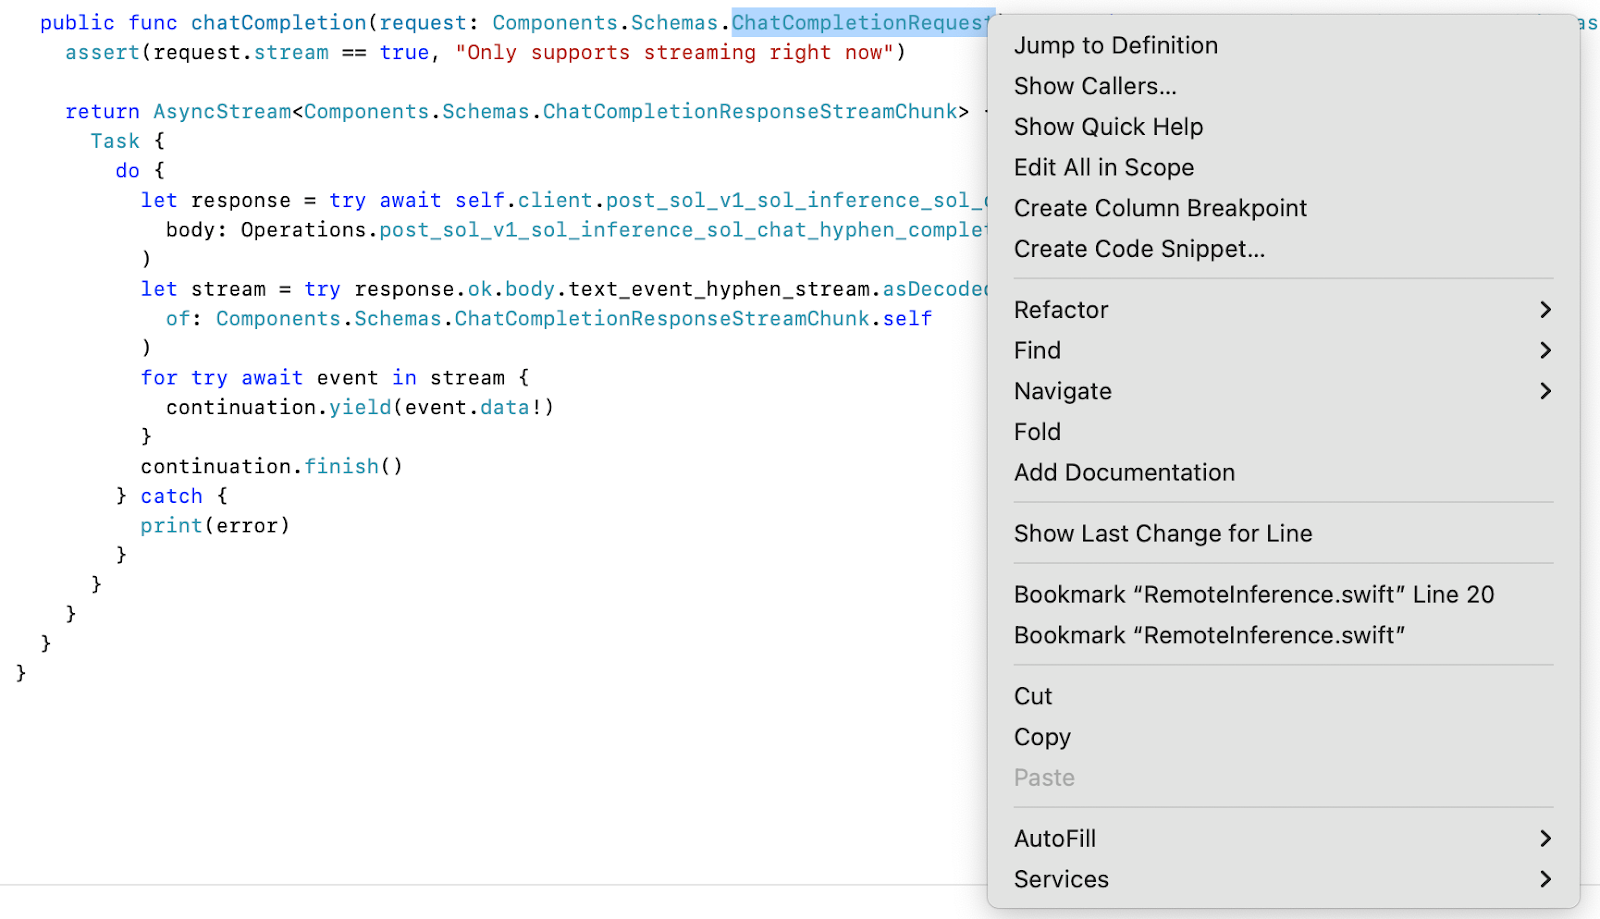
Now let's take a closer look at the details of the calling parameters. For the chatCompletion function, we provide a Components.Schemas.ChatCompletionRequest as the structure for values passed to the chatCompletion function. Using Xcode, right-click on ChatCompletionRequest to bring up a menu that allows you to see the definition of that parameter using the Jump to Definition pop-up menu item (Figure 2).
Whoa! The ChatCompletionRequest appears complex. How should you dig into the details? While you could examine the source code directly, the documentation you generated earlier offers a simpler way to understand the ChatCompletionRequest details.
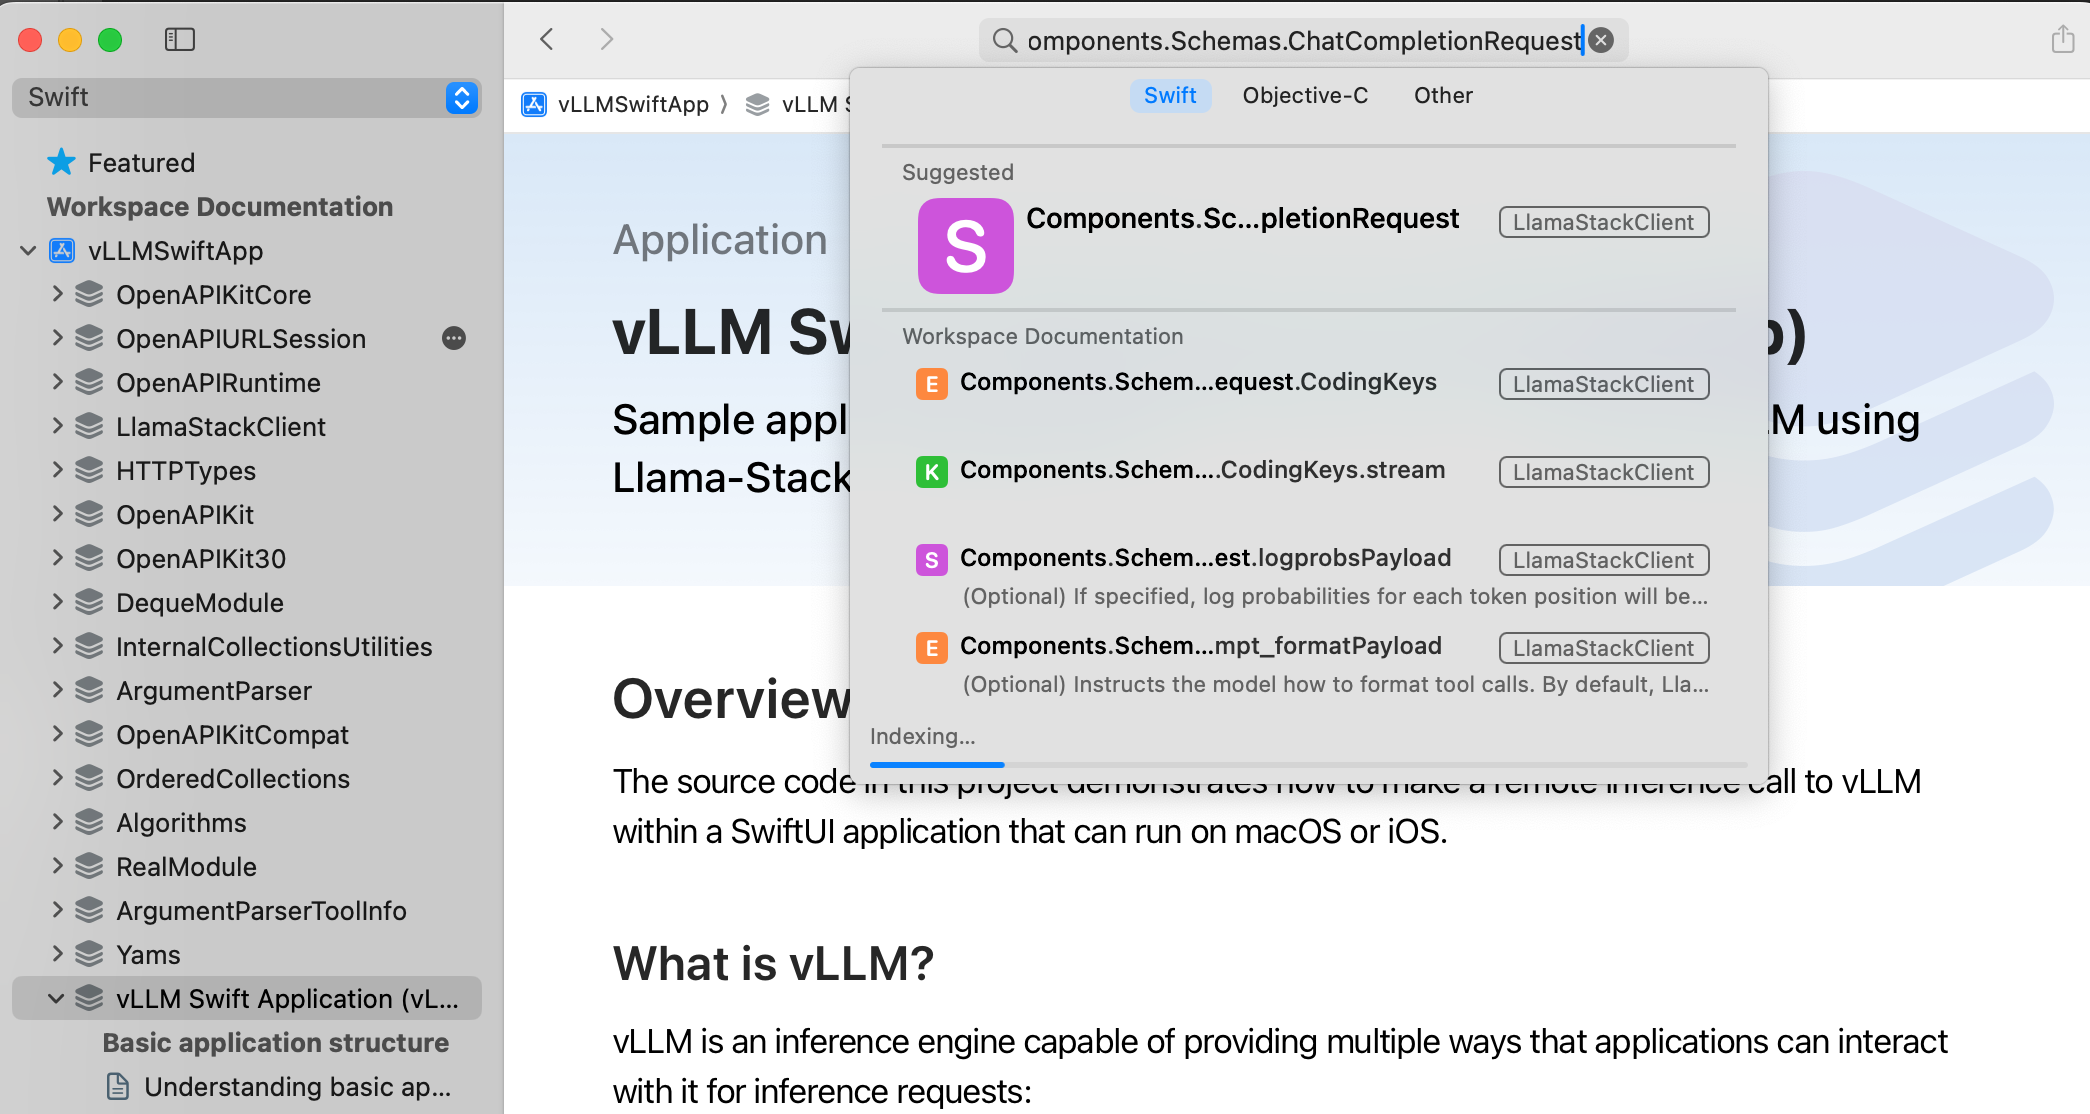
From the Xcode, select the Help → Developer Documentation menu item. A new window will open up with a lot of documentation available for you to use. What we're interested in is the documentation contained under the Featured → Workspace Documentation section at the top left of the documentation window.
Rather than navigate the documentation using the hierarchical list on the left side of the Developer Documentation window, we'll use the search feature. Type Components.Schemas.ChatCompletionRequest into the search field at the top of the documentation window, and select the first item that appears in the search results list (Figure 3).
Once you do that, a nicely formatted documentation page specific to Components.Schemas.ChatCompletionRequest appears; it is a lot easier to read than the source code. Scroll down to the instance properties section of the documentation. There you can see that only the messages and model_id instance properties are required. All other properties can contain nil values. However, because the SDK currently only supports streaming responses at the moment, setting the stream parameter to true is a additional runtime requirement even though the code doesn't strictly require it. So, until the SDK implemenation changes in a future version, treat the stream parameter as required.
Looking closer at the required parameters, model_id is a string value that determines what model you want to interact with. A Llama Sack server can be connected to multiple models, so you need to be specific about which one you will interact with.
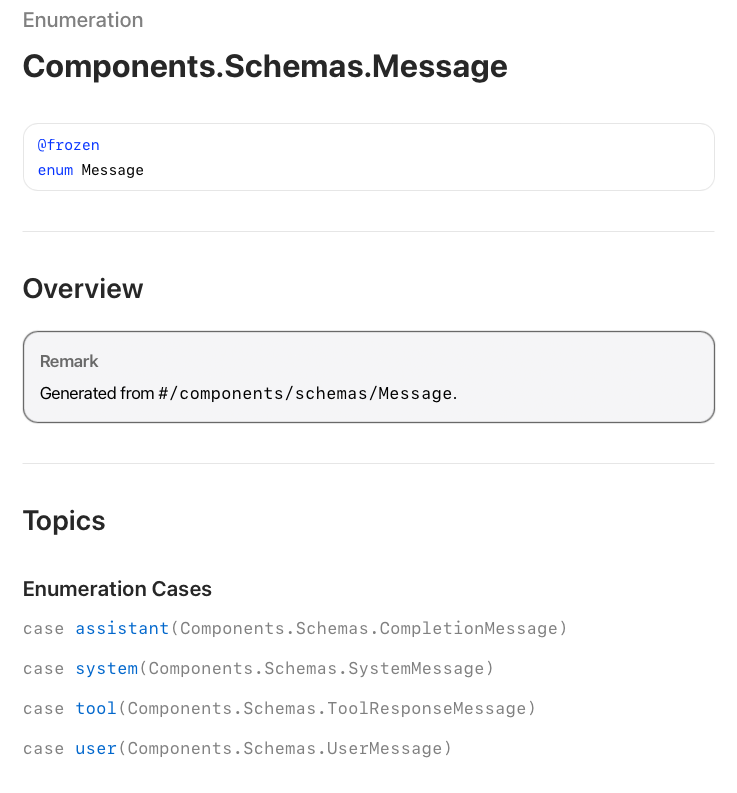
The next required parameter is a messages array of Components.Schemas.Message. Go ahead and search the documentation, and be sure to use the full Components.Schemas.Message name in the search field to find the specific Message definition we're searching for.
If you're not familiar with Swift, then Components.Schemas.Message being an enumeration might be confusing. However, all the enumeration does is specify that a message might be one of different defined types. This is commonly called a polymorphic message type, and in this case a message can be one of four types, as shown in Figure 4:
- assistant: A message containing the model's response to a chat completion request.
- system: A system message providing instructions or context to the model.
- tool: A message representing the result of a tool invocation in a chat completion request.
- user: A message from the user in an OpenAI-compatible chat completion request.
When the chatbot sends a message to the model, we want it to send a user message of type Components.Schemas.UserMessage. Look that up in the documentation and you will see that it is a struct with two required instance properties. Setting the role property to .user is the only value option for that variable, but there are several options for content which is of type Components.Schemas.InterleavedContent (Figure 5). Go ahead and look that up in the documentation.
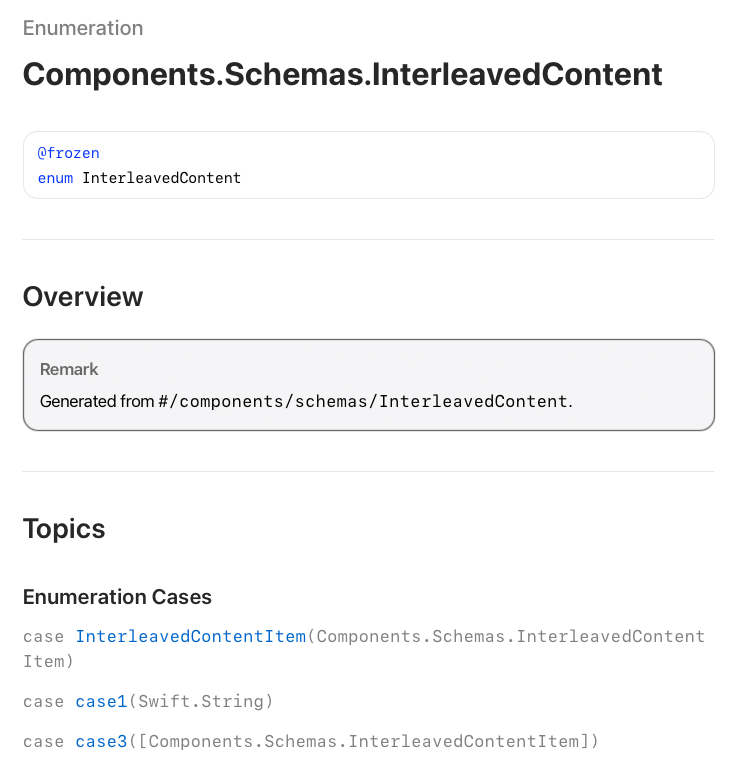
Like we've seen in previous struct definitions, the definition of Components.Schemas.InterleavedContent includes multiple enum options to allow different types of content:
InterleavedContentItem: Allows for a singleComponents.Schemas.InterleavedContentItemto be passed for an inference requestcase1: Allows for a singleStringvalue to be passedcase3: Allows for an array ofComponents.Schemas.InterleavedContentItementries to be passed.
Of the three enum options, the chatbot code uses the InterleavedContentItem enumeration. Enum option case1 could have also been used to send a single text request, and case3 could have been used for single text request by only including one Components.Schemas.InterleavedContentItem instance in the array.
Because you might want to enhance the chatbot code to send text or image, or both in the future, the sample code uses a single Components.Schemas.InterleavedContentItem in the call to the model using the InterleavedContentItem enum to demonstrate usage of this structure. In addition, using that enum is consistent with the sample code in the Llama-Stack Swift Client SDK.
Go ahead and look up the definition of Components.Schemas.InterleavedContentItem in the documentation. Holy catfish! Another enum! In this case, you can choose from one enum for image (Components.Schemas.ImageContentItem) and one for text (Components.Schemas.TextContentItem). We're just processing text requests in the chatbot, so go ahead and look up Components.Schemas.TextContentItem in the documentation.
Within the structure of Components.Schemas.TextContentItem, we need to set one instance property called text and one enumeration value. However, there are no other structs or enums to explore after this. We've reached the end of the parameter definitions to explore.
  chatCompletion(
    request:
      Components.Schemas.ChatCompletionRequest(
        model_id: modelName,
        messages: [
          .user(
            Components.Schemas.UserMessage(
              role: .user,
              content:
                .InterleavedContentItem(
                  .text(
                    Components.Schemas.TextContentItem(
                      _type: .text,
                      text: prompt
                    )
                  )
                )
            )
          )
        ],
        stream: true)
  )
That was a lot of code to walk through to understand the details of the simple function call shown above that makes up a chatComplete function call within the RemoteInference class of the SDK.
However, given that the Llama Stack API specification is comprehensive, and fully annotated, it is completely reasonable to expect the OpenAPI code generator would create robust code. None of this is particularly hard to understand, it's just robust to examine at the code level. That is why the DocC documentation generator embedded in Xcode is so useful, and I took advantage of it in this article. It offers an easier way for users to examine the code without having to look through it line by line.
Chatbot code walkthrough
Now that we've looked at the SDK code details, let's look at the rest of the code in the chatbot, using the documentation that accompanies it. Yes, I used the documentation generation capabilities embedded within Xcode to create durable documentation associated with the sample code!
Go ahead and open the Developer Documentation in Xcode using the Help → Developer Documentation menu item. Once open, select the vLLMSwiftApp item and then the vLLM Swift Application (vLLMSwiftApp) item.
Once you've clicked on the correct item, you'll see a documentation window similar to Figure 6; this is the main landing page for the generated application documentation.

You can drill into more specific detail about the application through the various major topic categories that have introductory articles associated with them:
- Basic application structure
- Common code components
- Llama Stack chat
I recommend that you start reading the documentation beginning with the Understanding basic application structure article. That article will introduce you to the fundamentals of how the application is structured, what actions are performed at startup, and how application data is persisted.
Next, I recommend reading the Understanding common code components article about the common core components that are used by all of the application chat implementations. It's important to see where code can be easily re-used in a chatbot application.
Finally, take a look at the Llama Stack chat article for a walkthrough of how that chat client functionality was implemented. Pay particular attention as to how the asynchronous processing of the streaming inference response from the server is handled.
In addition to those articles, the documentation also includes content on all the classes, structures, and enumerations associated with the sample code. Plus, you'll also be able to use the available documentation for the project dependencies. There is a huge amount of information contained in the application documentation available, and using it will help accelerate your learning of the code base.
Conclusion
In this installment of our series looking at how to integrate vLLM inference into your macOS and iOS apps, we've explored a practical implementation of a simple chatbot leveraging the Llama Stack Swift SDK to send inference requests to a Llama Stack server, that then connects to vLLM's to provide inference, and then process the results. By focusing on simplified, yet functional sample code, you've seen how to enable server selection, and make simple text inference requests within a SwiftUI-based macOS and iOS application. In addition, our exploration of the Llama Stack API and its SDK revealed a robust, contract-first approach to building AI-driven applications.
Finally, you also have the link to the GitHub repository with the sample code and detailed code documentation that allows you to quickly dive into the code.
Next, I'll dive deeper into direct vLLM integration using OpenAI-compatible APIs that will further expand the chatbot's capabilities. Read part 3: Integrate vLLM inference on macOS/iOS using OpenAI APIs
Last updated: July 1, 2025