In my previous article, we explored how easy is to deploy KServe on Red Hat OpenShift using Open Data Hub. Now that we have KServe installed, it's time to deploy a model. In this post, we will register the popular SKlearn runtime as a custom ServingRuntime and deploy the iris model.
While KServe makes it very easy to deploy models, it doesn't mean that everyone should have access to these models. Restricting access to certain individuals helps conserve resources. In this example, the runtime is CPU-based, but if you're using a GPU-based runtime, this resource issue becomes even more significant. Open Data Hub (ODH) and Red Hat OpenShift AI have made it simpler than ever with the integration of Authorino into the model serving components from ODH 2.10 and OpenShift AI 2.9.
Authorino is a powerful tool designed to support authentication for single models deployed using KServe. With just a few steps, you can easily add authentication to your inference service endpoints, ensuring that your models are protected from unauthorized access.
In this blog post, we'll walk you through the process of setting up Authorino within your ODH environment, deploying a sample model, and applying authentication to it—all using the convenient dashboard interface.
Let’s take a look at your Open Data Hub first
In the previous article, we didn’t install Authorino operator. (If you try to install fresh ODH KServe, I recommend installing Authorino operator at the beginning as a required operator). This can be found through the DataScienceCluster initialization:
oc get dsci -o yaml
…
    - lastHeartbeatTime: "2024-06-04T11:17:23Z"
      lastTransitionTime: "2024-05-30T18:16:27Z"
      message: Authorino operator is not installed on the cluster, skipping authorization
        capability
      reason: MissingOperator
      status: "False"
      type: CapabilityServiceMeshAuthorization
    phase: Ready
…
This message means that since the Authorino operator was not installed, the automatic installation related to Authorino was omitted. Additionally, if Authorino-related objects are not created, even the ODH model controller operator will not load the Authorino API.
Installing the Authorino Operator
The first step is to install the Authorino Operator within your ODH environment. You can do this directly from the OperatorHub in OpenShift. Once installed, you'll have access to all the necessary tools to configure authentication for your models. See Figure 1.

Restart OpenDataHub Operator
You can configure Authorino manually but I recommend that you leave it to Open Data Hub Operator. By default, the operator does nothing because DSCI content is not changed, so please restart the operator pod manually using the following command:
oc delete po -l name=opendatahub-operator -n openshift-operatorsAfter the opendatahub-operator pod is running, it will create Authorino configuration and you can see one of them with the following command:
oc get authorizationpolicies.security.istio.io -A -w
NAMESPACE      NAME                   AGE
istio-system         kserve-predictor   0s
In ODH KServe, authorization is configured using a global Istio AuthorizationPolicy targeting the predictor pods of InferenceServices. The Istio AuthorizationPolicy is crucial for defining and enforcing access control policies for the services. It specifies who is allowed to access your services and under what conditions.
An AuthorizationPolicy typically includes the following information:
Targets: Specifies the workloads or pods the policy applies to. In this case, it targets the predictor pods of
InferenceServices.Rules: Defines the conditions under which access is granted or denied. These rules can be based on various attributes such as source IPs, request headers, methods, paths, and more.
Actions: Defines the action to be taken, such as
ALLOWorDENY, based on the specified conditions. For ODH, we are usingCUSTOM.
This is the ISTIO AuthorizationPolicy for ODH KServe:
apiVersion: security.istio.io/v1beta1
kind: AuthorizationPolicy
metadata:
   name: kserve-predictor
   namespace: istio-system
spec:
   action: CUSTOM
   provider:
      name: opendatahub-auth-provider
   rules:
      - to:
           - operation:
                notPaths:
                   - /healthz
                   - /debug/pprof/
                   - /metrics
                   - /wait-for-drain
   selector:
      matchLabels:
         component: predictor
Note
If you are using ROSA cluster, please execute this command before you move on next.
There is a ticket to automate this process but it is under review:
export sa_issuer="$(oc get authentication cluster -o jsonpath --template='{ .spec.serviceAccountIssuer }' -n openshift-authentication)"
export dsci_audience="$(oc get DSCInitialization default-dsci -o jsonpath='{.spec.serviceMesh.auth.audiences[0]}')"
if [[ "z$sa_issuer" != "z" ]] && [[ "$sa_issuer" != "$dsci_audience" ]]
then
  echo “DSCI is updated”
  oc patch DSCInitialization default-dsci --type='json' -p="[{'op': 'replace', 'path': '/spec/serviceMesh/auth/audiences/0', 'value': '$sa_issuer'}]"
fi
Restart odh-model-controller Operator
After the Open Data Hub Controller creates the Authorino-related resources, we need to restart the odh-model-controller pod to enable the Authorino-related API and watch functionalities. The process is similar to the opendatahub-operator pod and can be done using the following command:
oc scale deploy/odh-model-controller -n opendatahub --replicas=0
oc wait pod --for=condition=delete --timeout=60s -l app=odh-model-controller -n opendatahub
oc get pod -l app=odh-model-controller -n opendatahub
# If there is no pod running, please execute the following command
oc scale deploy/odh-model-controller -n opendatahub --replicas=3
You can verify if the odh-model-operator enables Authorino or not from the log:
oc logs deploy/odh-model-controller -n opendatahub | less
2024-06-04T14:36:29Z    INFO    controller-runtime.metrics      Metrics server is starting to listen    {"addr": ":8080"}
2024-06-04T14:36:29Z    INFO    controllers.InferenceService    KServe with Service Mesh is enabled and Authorino is registered, enabling Authorization
Ok. We are ready to use Authorino now and let’s deploy IRIS model.
Deploying a sample model via ODH Dashboard
Next, let's deploy the Iris sample model to demonstrate how easy it is to protect your models with Authorino. Using the Open Data Hub Dashboard, you can create a new custom ServingRuntime (Sklearn) and configure the deployment settings with just a few clicks.
Deploy MinIO
Before we deploy the sample model, please deploy the MinIO in the cluster
oc create -f https://red.ht/45avARI Create a custom ServingRuntime (SKLearn)
Open Data Hub provides an easy way to register your custom ServingRuntime through ODH dashboard.
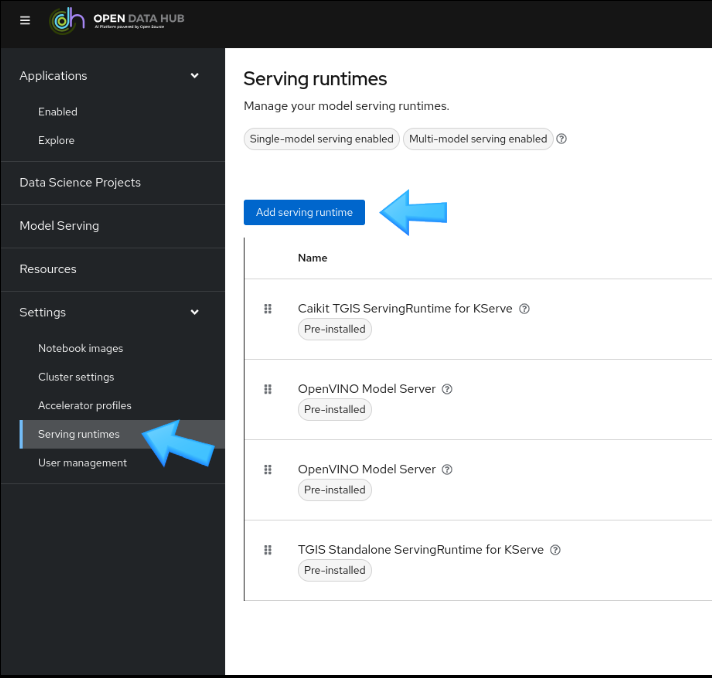
- Click Serving runtimes in the menu under Settings (Figure 2).
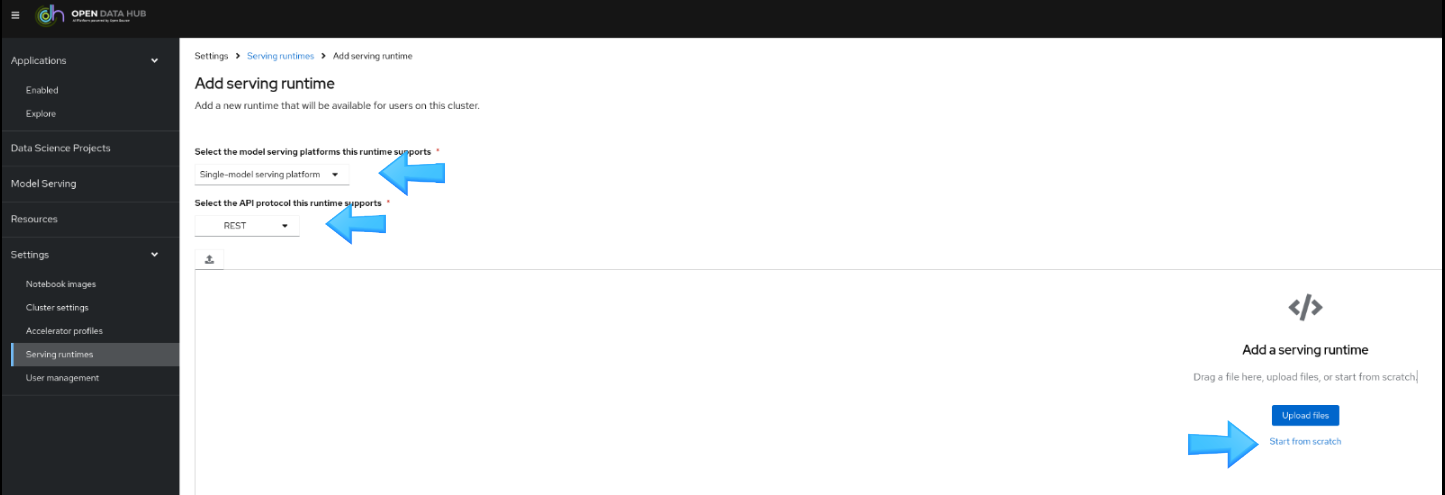
- Click Start from scratch (Figure 3).
- Paste this manifest to the page then click Create (Figure 4).
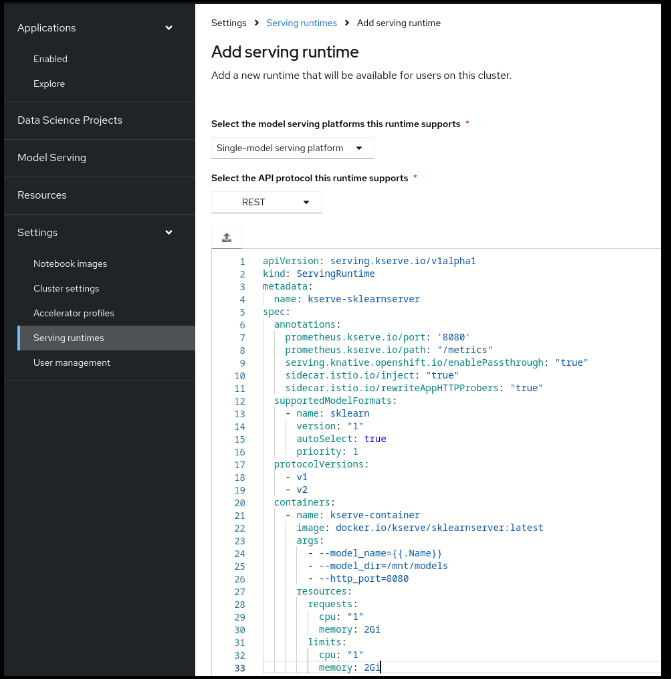
Then click “Create”.
Deploy the Iris model
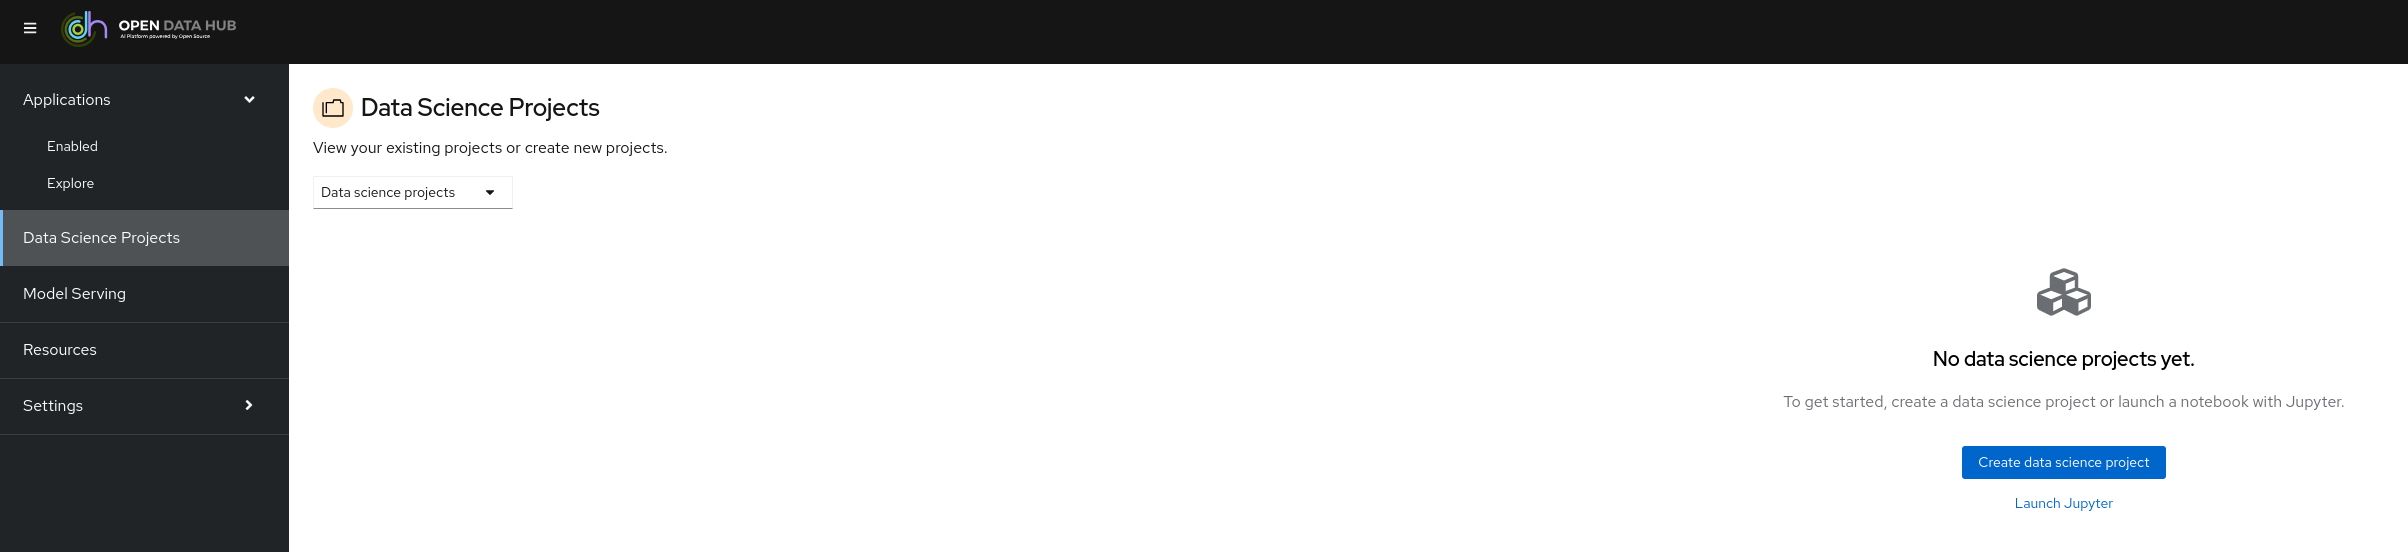
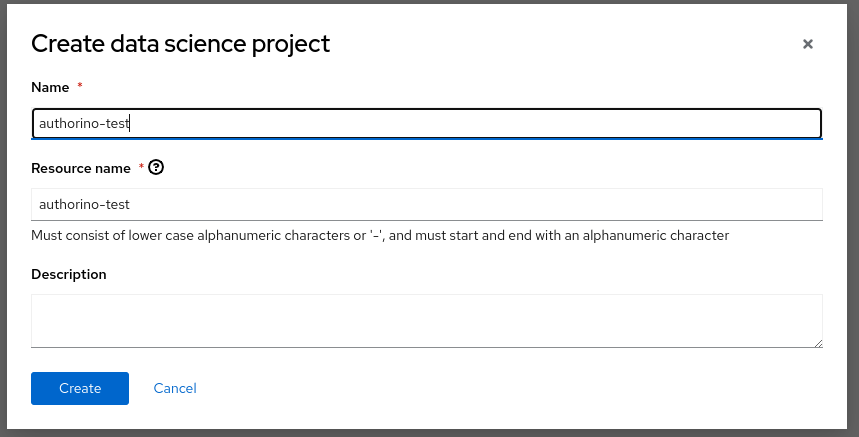
- Click Data Science Projects then Create data science project (Figure 5).
- Type “authorino-test” and click Create (Figure 6).
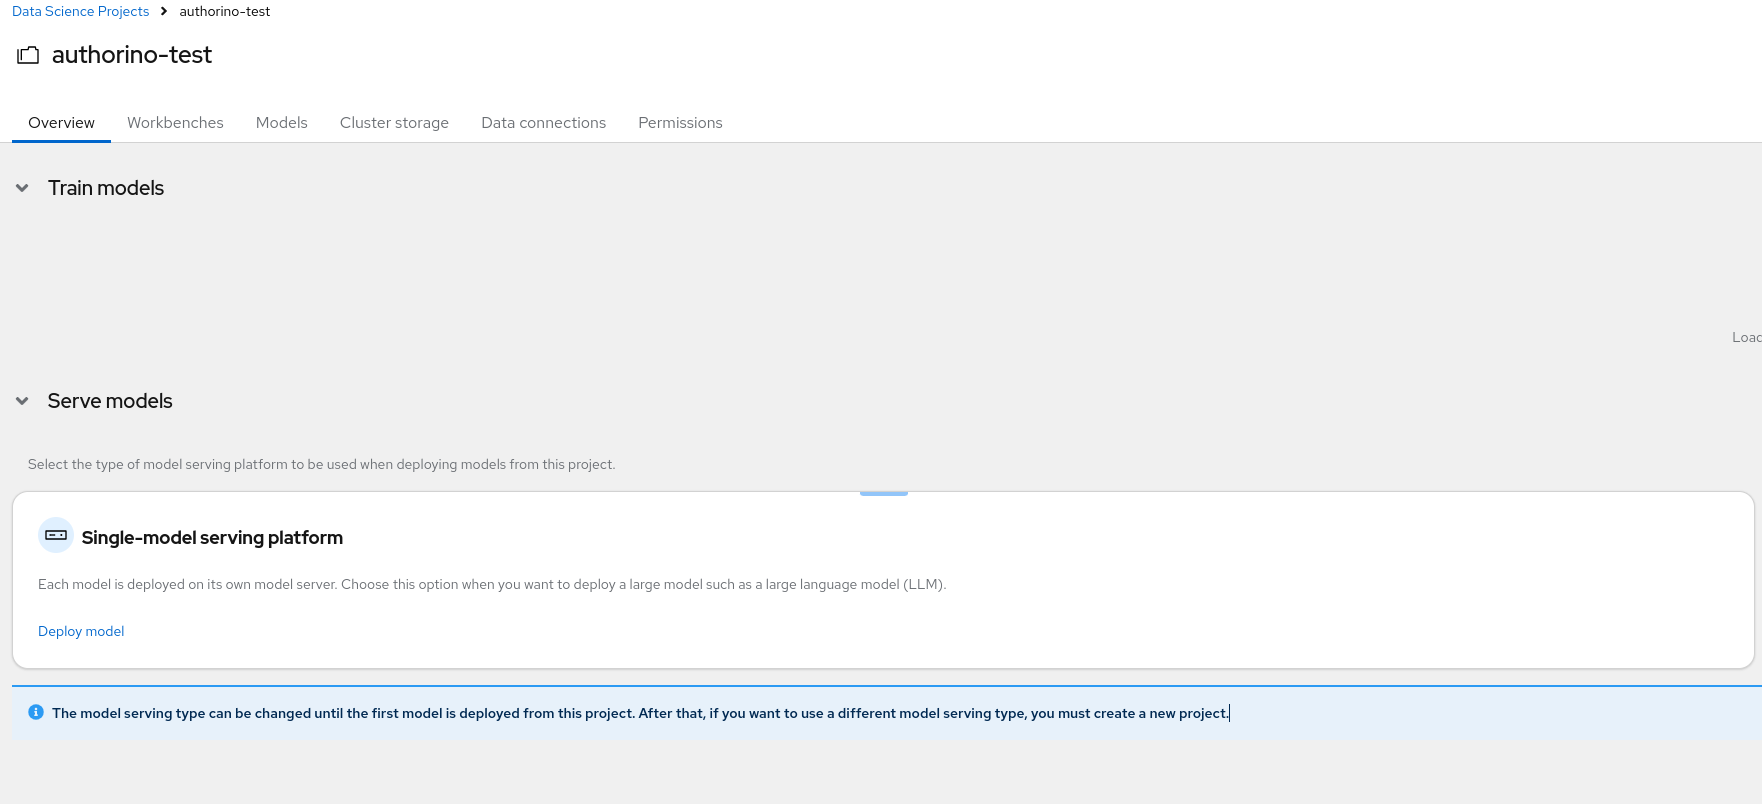
- Click Deploy model under Single-model serving platform (Figure 7).
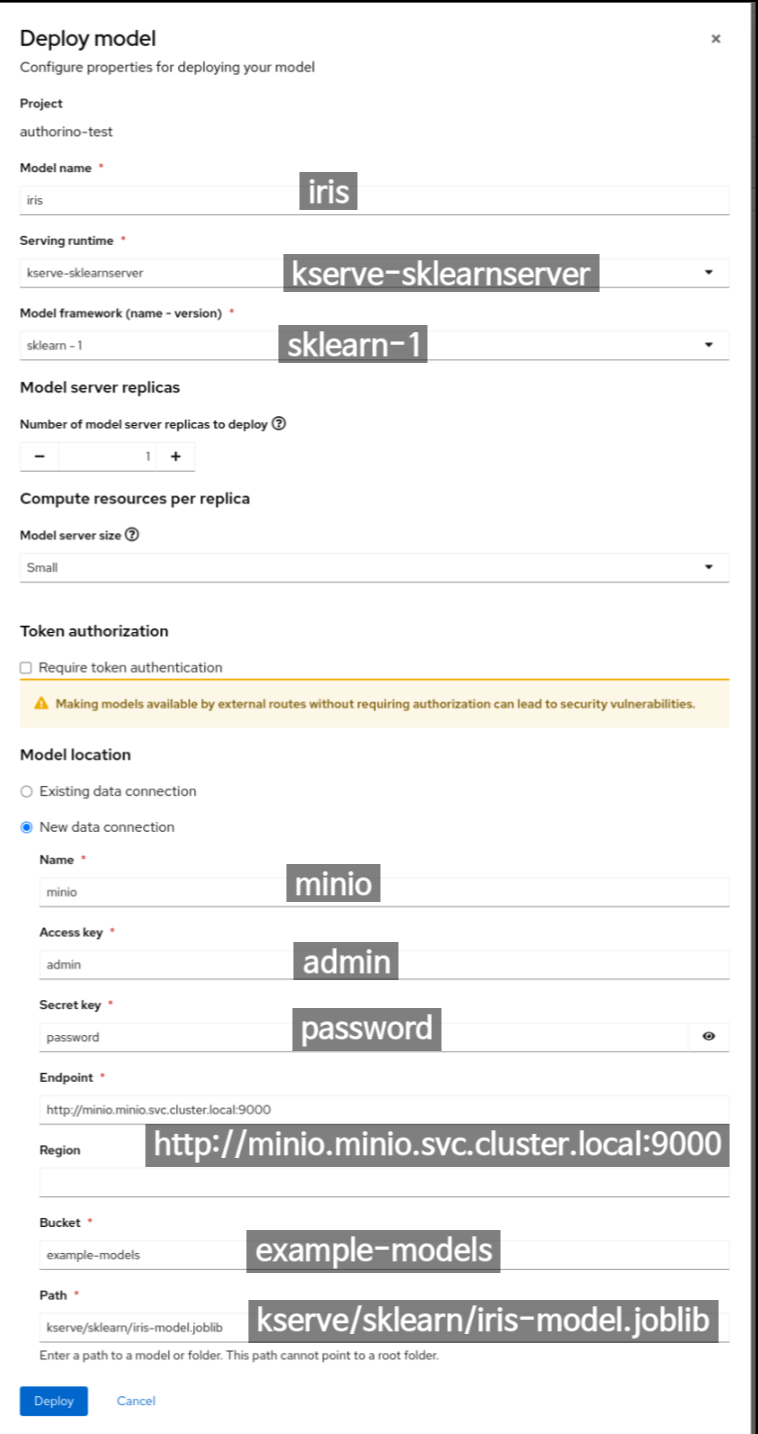
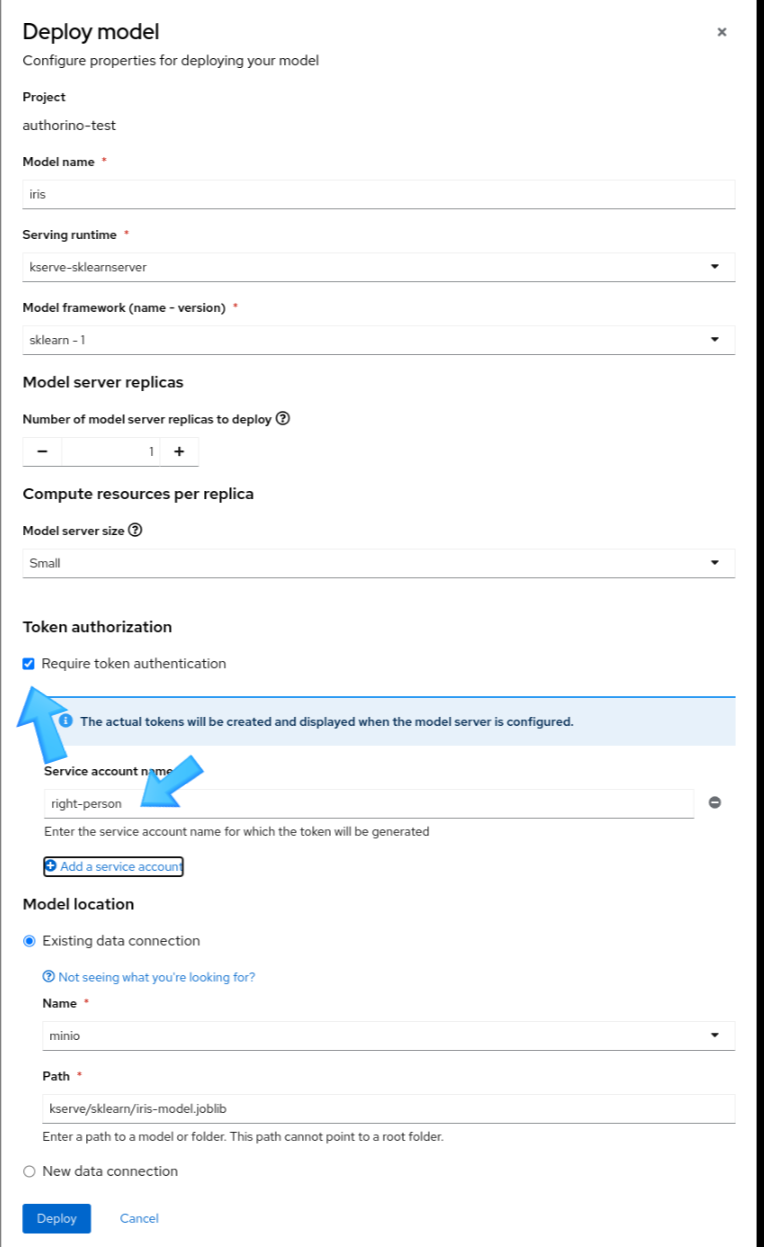
- Type all model information as shown in Figure 8 and click Deploy.
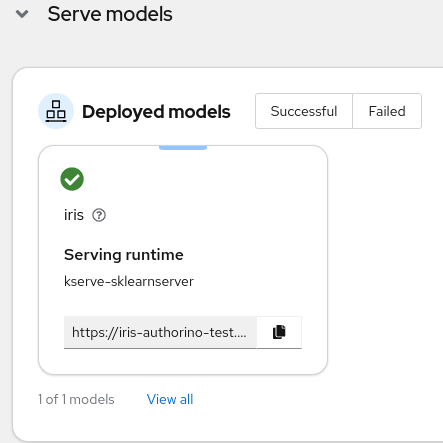
Please wait until the runtime is READY to accept requests.
Let’s send a request to verify if the model responds well:
curl -L https://red.ht/3x17lZP -o ./iris-input-v2.json
MODEL_ENDPOINT=$(oc get inferenceservice iris -o jsonpath='{.status.url}' -n authorino-test)
curl -k \
  -H "Content-Type: application/json" \
  -d @./iris-input-v2.json \
  ${MODEL_ENDPOINT}/v2/models/iris/infer
{"model_name":"iris","model_version":null,"id":"ae29ad02-7a3a-4878-aeb5-cd5bed0708a8","parameters":null,"outputs":[{"name":"output-0","shape":[2],"datatype":"INT32","parameters":null,"data":[1,1]}]}
Expected output:
{"model_name":"iris","model_version":null,"id":"ae29ad02-7a3a-4878-aeb5-cd5bed0708a8","parameters":null,"outputs":[{"name":"output-0","shape":[2],"datatype":"INT32","parameters":null,"data":[1,1]}]}Applying authentication
Now comes the exciting part: applying authentication to your deployed model. With Authorino, this process is incredibly straightforward. Simply add the security.opendatahub.io/enable-auth: "true" annotation to your inference service object, and Authorino will handle the rest, ensuring that only authorized users can access your model endpoints. However, using the ODH dashboard simplifies the process significantly.
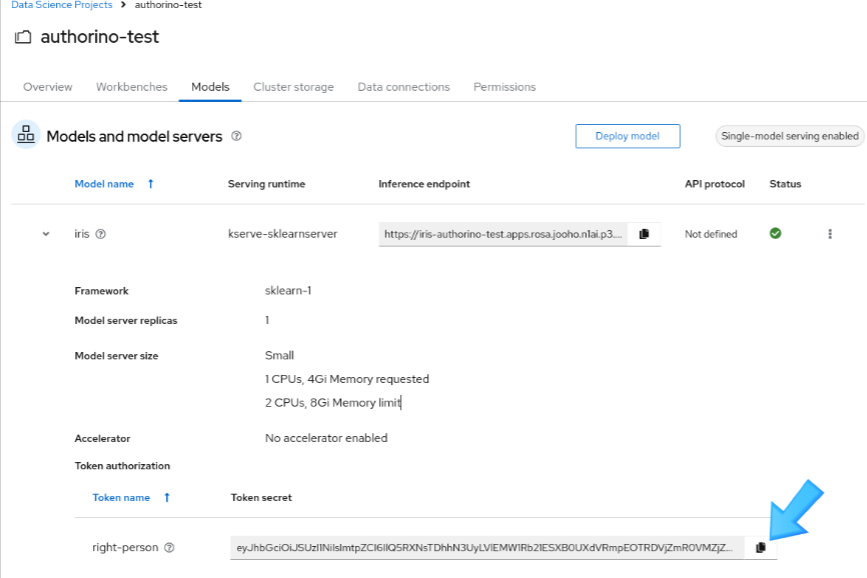
You can edit the model from this page by clicking the three vertical dots button (Figure 9).

Select Require token authentication and the Service account name with the right-person content (Figure 10).
Click the Deploy button, then it will restart the runtime pod.
To test this, copy the token from UI (Figure 11).
Ok, now we can finally test authentication.
Without token:
MODEL_ENDPOINT=$(oc get inferenceservice iris -o jsonpath='{.status.url}' -n authorino-test)
curl -k \
  -o /dev/null -s -w "%{http_code}\n"  \
  -H "Content-Type: application/json" \
  -d @./iris-input-v2.json \
  ${MODEL_ENDPOINT}/v2/models/iris/infer
Expected output:
401HTTP 401 Unauthorized response status code indicates that the client request has not been completed because it lacks valid authentication credentials for the requested resource.
With token:
TOKEN=$TOKEN  # paste your token here.
MODEL_ENDPOINT=$(oc get inferenceservice iris -o jsonpath='{.status.url}' -n authorino-test)
curl -k  \
 -H "Authorization: Bearer $TOKEN" \
 -H "Content-Type: application/json" \
 -d @./iris-input-v2.json \
  "${MODEL_ENDPOINT}/v2/models/iris/infer"
Expected output:
{"model_name":"iris","model_version":null,"id":"aa3c1590-a06c-4e3f-960c-9c05ce634c90","parameters":null,"outputs":[{"name":"output-0","shape":[2],"datatype":"INT32","parameters":null,"data":[1,1]}]}As expected, when a request is sent with the provided token, the response is identical to the result when authentication is disabled. This confirms that Authorino is correctly validating the authentication. Now, your model is protected from unauthorized access.
Conclusion
With Authorino integrated into ODH and OpenShift AI, protecting your models has never been easier. Now you can rest assured knowing that your models are secure from unauthorized access, right out of the box. When you're deploying a single model with KServe Serverless mode, Authorino provides the authentication support you need, with minimal configuration required. (Note that ODH KServe is not supporting RawDeployment yet).
So, what are you waiting for? Start leveraging the power of Authorino today and take your model deployments to new heights of security and reliability. Your models—and your users—will thank you for it.