As a software developer, it's often necessary to access a relational database—or any type of database, for that matter. If you've been held back by that situation where you need to have someone in operations provision a database for you, then this article will set you free. I'll show you how to spin up (and wipe out) a MySQL database in seconds using Red Hat OpenShift.
Truth be told, there are several databases that can be hosted in OpenShift, including Microsoft SQL Server, Couchbase, MongoDB, and more. For this article, we'll use MySQL. The concepts, however, will be the same for other databases. So, let's get some knowledge and leverage it.
MySQL, where are you?
Because MySQL is open source and immensely popular, we can easily find it on the internet, download it, and install it. You can find the Community Edition on the download web page.
Wait: This is OpenShift. There must be an easier way. No surprise, there is. (Face it; if there weren't an easier way, would I have even written this article? I'm all about things being easy.)
To the command line
Assuming you have OpenShift 4.x up and running and have logged in, your first (of only two) step is to visit the command line to get a list of Templates that are included with OpenShift. A Template is, basically, the steps needed to install an application—all in one nifty YAML file. Use this command to see the list:
oc get templates --namespace openshift
Once the somewhat lengthy list is returned (with 91 items last I counted), you'll see two entries for MySQL: mysql-ephemeral and mysql-persistent. We'll use the mysql-ephemeral template here. The whole idea is this: you'll enter a few keystrokes, wait a few seconds, and BOOM!, you have your MySQL database up and running for your development efforts. While you're in your development cycle, you can delete and start over multiple times, each time with a fresh database that you can mess up, I mean, work with.
When you're all finished, you can tear things down in an instant. But you'll be left with some useful artifacts, such as, some scripts that you, the Developer, created—scripts that can be handed off to the Operations folks. Hmm... Developer? Operations? Sounds like DevOps to me. Jus' sayin'.
Where was I?
Oh, yeah. We want to create an instance of MySQL running in OpenShift. We're going to use the ephemeral template, which—in the list we got above— is called mysql-ephemeral. We need to assign a name to it to make life easier as well. Use the following command. (Note that even though this example is using PowerShell, the command is the same in any terminal.)
oc new-app mysql-ephemeral --name mysql
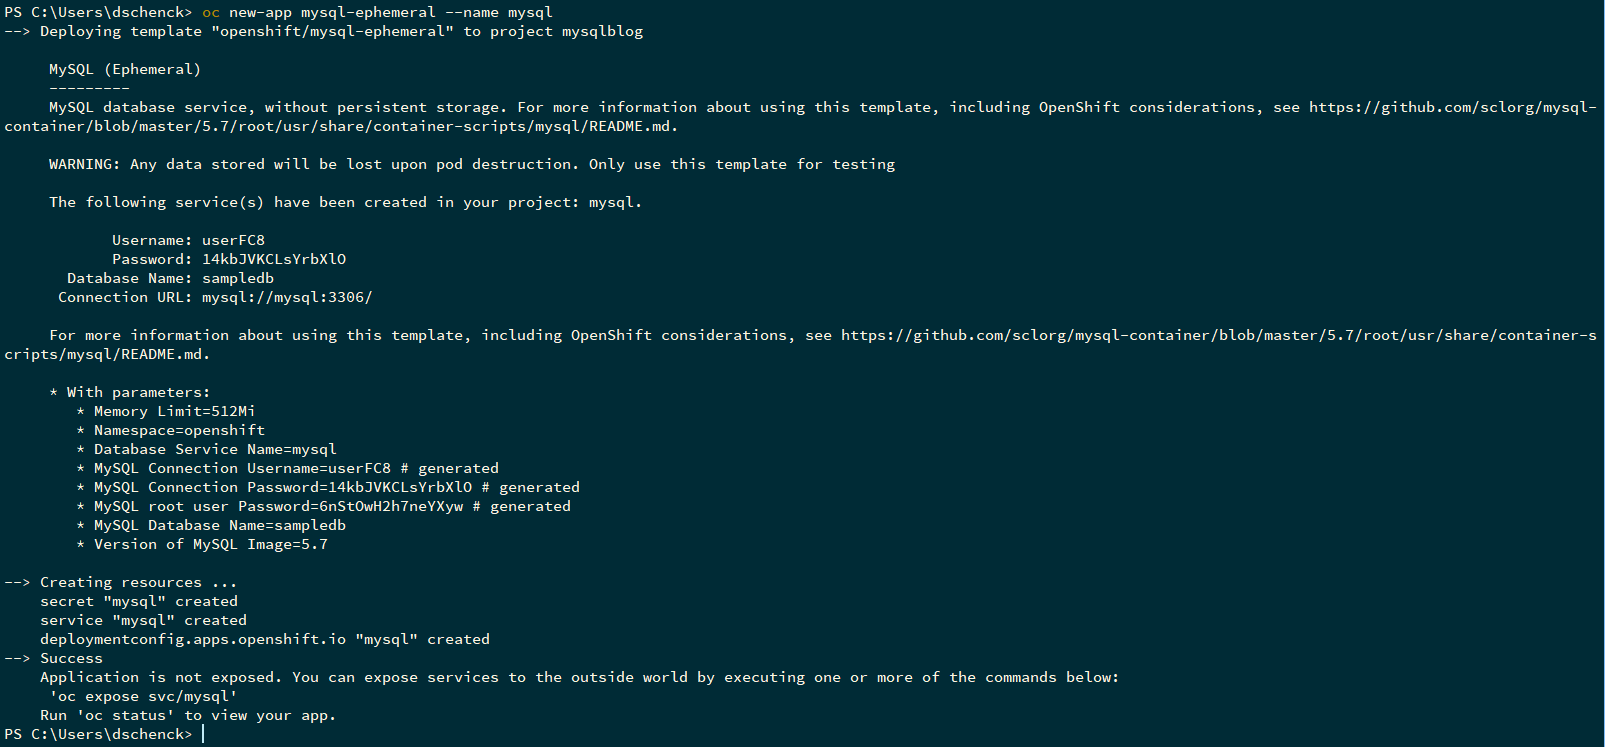
The --name flag, mysql, is there to make life easier in our scripts. You can use whatever name you wish, but you'll have to make sure the scripts match. This is a good opportunity to use some weirdness to add some fun to a dull day. But I digress...
Notice that OpenShift—thanks to the mysql-ephemeral template—created a user and password. This might be useful.
Next step
Nothing. That's it. We have MySQL up and running, with literally one command. And, here is where the fun starts. We want to get some tables built and put some data into those tables. First, let's get some information together.
Why two pods?
You can see a list of your MySQL pods by running the following command:
oc get pods --selector app=mysql
You should see something like the following:

Note the name of the pod and copy it to your computer clipboard if you wish. You'll be deleting it soon. I'll refer to it as {pod-name} later.
However, just for fun, let's see all of our pods by using the following command:
oc get pods

You will notice two MySQL pods. Why is that? It's because the one pod is dedicated to building the pod that is actually running MySQL. Want to see something cool? Let's delete the MySQL pod by running the following commands:
oc delete pod {pod-name}oc get pods
Notice that a new MySQL pod is now running. This is a demonstration of Kubernetes' self-healing ability, in that it makes sure you have pods up and running. As a developer using a database in a pod, we can use this to our advantage. When we want to start with a clean slate, we can simply delete the pod running MySQL and a new one will appear. Note, however, that this will be a new MySQL pod. All of the previous databases, tables, data—everything that was stored in the pod—will be gone. This is the "ephemeral" in mysql-ephemeral. The upside is that you know you have zero vestigial artifacts from any previous efforts; You are starting from nothing. As a developer, I love this.
Note: You can run MySQL in OpenShift and have it not be ephemeral; that's what the mysql-persistent template is all about. That's also a different article.
Running on empty
Using the oc rsh command, we can get inside the pod running MySQL and use the command-line utility to look around. All we need to do is get the pod name and then run oc rsh {pod_name}. Once inside, we can see that our database, sampledb, is empty.
Bash:
![]()
PowerShell:
![]()
An empty database. What is it good for? Absolutely nothing. So, let's build a table and populate it. We have some options:
- Use a desktop- or browser-based tool to log in and type commands.
- Connect to the database from our command line and type commands.
- Log into the pod and run the commands in the mysql utility.
Nope. Not interested. We're developers, not mouse-clickers. We want something automated. Something scripted. Something we can develop and use over and over. How about this idea: Create files and scripts to do all the work. That sounds a lot better. Always script as much as you can.
Some help from Red Hat OpenShift
Fortunately, the OpenShift command-line tool, oc, helps us out. I can use oc exec to run commands inside a pod. This is enough knowledge for any intrepid developer to start digging and searching and coding and failing and coding again and again until it works. I mean, I got it working first try. Yeah.
Evolution
My first attempt was to build one script that did everything; it created the table and populated it with data. This was sufficient for... okay, no, it was not sufficient. It was a good proof of concept (PoC), but it was obviously not the solution. I wanted a script that used files as input to create the table and populate it.
Script all the things
The first step was the easiest: I create a file of comma-separated values (i.e., a CSV) to be used to populate a small table called "customer." Next, I created a file that contained the SQL commands to create the table "customer."
Now comes the fun part of figuring out how to pipe those files into some command, somewhere on some machine, to build my table and populate it. It seemed to me that running the mysql command on the same machine as the MyQL instance seemed like the most logical thing to do. But I was not about to ask myself to log into the pod to run a command. What is this, 2015?
Another OpenShift command to the rescue: oc cp allows you to copy a file from the local machine into a pod running in OpenShift. If I could copy the files over to the pod, I could then remotely launch the commands needed, using the oc exec command that I mentioned earlier. The wheels in my developer mind started turning. Or else the coffee finally kicked in. Either way, I was on the right track.
Finally, to pull it all together, I wanted a no-hassle way to get the name of the pod where mysql was running. I definitely did not want to look it up, copy it to my clipboard, and paste it into a command or file. No, I wanted to develop something that worked automatically. I am a developer.
For Bash, the magic is in this command:
mpod=$(oc get pods --selector app=mysql --output name | awk -F/ '{print $NF}')Note: You need to have awk installed on your machine. If you don't—and I'm not joking—you can decide to either install awk or install PowerShell. Yes, PowerShell runs everywhere now.
For PowerShell, I used the following command:
$mpod = (oc get pods --selector app=mysql --output name | Select-Object).Split("/")[1]This means, even if the pod name changes—such as when I delete the pod and a new one replaces it automatically thanks to Kubernetes—the command will work against the new pod.
Time to build
With all this information in hand, I was able to build two scripts—one for PowerShell, one for Bash—that could be used to create and populate my table. The PowerShell script is this:
# Get name of pod running MySQL
$mpod=oc get pods --selector app=mysql --output name
$mpod=$mpod.Split("/")[1]

# Copy setup files to pod
Write-Output 'Copying setup files into pod...'
oc cp .\customer-table-create.sql ${mpod}:/tmp/customer-table-create.sql
oc cp .\customer-data.txt ${mpod}:/tmp/customer-data.txt

# Build table
Write-Output 'Creating table(s)...'
oc exec $mpod -- bash -c "mysql --user=root < /tmp/customer-table-create.sql"

# Populate table
Write-Output 'Importing data...'
oc exec $mpod -- bash -c "mysql --user=root -e 'use sampledb; LOAD DATA LOCAL INFILE \""/tmp/customer-data.txt\"" INTO TABLE customer FIELDS TERMINATED BY \"",\"" ENCLOSED BY \""\"" LINES TERMINATED BY \""\n\"" IGNORE 1 ROWS (customerName,effectiveDate,description,status);'"

# Prove it all worked
Write-Output 'Here is your table:'
oc exec $mpod -- bash -c "mysql --user=root -e 'use sampledb; SELECT * FROM customer;'"
You want me to type all that?
The Bash script is similar. Not to worry, you don't need to type all that. You can get the scripts and the associated files at the GitHub repository for this article.
Now I can recreate my data by running one command:
./create_customer.sh
in Bash, or:
./create_customer.ps1
in PowerShell.
Bonus
You're left with some scripts and two files: One file containing test data and the other that builds the table. Put all that code under version control (e.g., Git) and you have artifacts that you can hand over to Operations. Under source control. For repeatable action. We are getting closer to being a unicorn every day, and this is an important step.
If I could...
I'd make this into code that accepts parameters. I'd build a utility that accepts parameters and actually builds all my scripts. Run with these ideas and be a command-line hero where you work.
Next? Two things...
After the scripts are handed off to Operations, how do they run MySQL in a persistent setting? That article is coming soon. Watch this space.
In the meantime, my next article here will demonstrate how to actually use the MySQL database in your applications running in Red Hat OpenShift.
Last updated: September 3, 2019