Managing heterogeneous environments can be challenging and enterprises are always implementing more elaborated workflows to support standardization across multiple infrastructures and platforms.
With Red Hat Enterprise Linux and Red Hat Lightspeed (formerly Red Hat Insights), a feature that can support this process comes out of the box: image builder. In this article, we will go through the core capabilities and demonstrate how easy it is to start building the first image from scratch.
Getting started with RHEL image builder
Image builder is an available tool for Red Hat Enterprise Linux (RHEL) that allows users to customize and build their own image that can be used on either hypervisors or cloud providers, or built as an ISO installer to provision systems at scale using Anaconda and Kickstart for unattended installations.
The image builder is based on the osbuild-composer upstream project and is available in RHEL as an installable package. It also offers integration with the RHEL web console, which simplifies and enables a visual way of composing and creating images.
On a fresh system, both the web console and the image builder plug-ins can be easily installed:
sudo dnf install -y osbuild-composer composer-cli cockpit cockpit-composerAnd enabling the respective services:
sudo systemctl enable –now cockpit cockpit.socket osbuild-composer.socketAfter enabling the socket, it is possible to restart the osbuild-composer service:
sudo systemctl restart osbuild-composerAfter these steps, the web console will be enabled on port 9090 of your server and you can access it with your browser, as shown in Figure 1.

As an alternative, the image builder is also available on Red Hat Hybrid Cloud Console as a service, but in this article we will focus on the bundled version available on RHEL. See Figure 2.

What does an image look like?
When creating an image, many aspects should be considered, such as:
- The purpose of the image
- Where it will be deployed
- The packages that we want to ship with it
- The services that will be available and running in the end system
- Users authentication
All these aspects can be customized in a centralized way using the image builder blueprints. Figure 3 depicts this feature.
Blueprints are used as a skeleton for images we will build and come with a great set of customizable options that we can use to craft the resulting image, such as:
- Kernel versions and options
- Storage configuration and partitioning
- Packages and services, including custom repositories
- User management (users, group, SSH configuration)

Customizing the blueprint
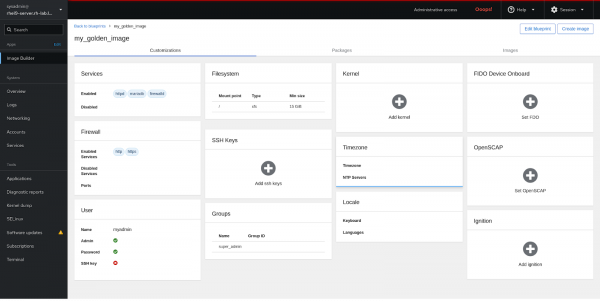
Once the blueprint is in place, the image builder plug-in for the RHEL web console provides a comprehensive section where we can further customize the blueprint and it will track all the customizations.
In this specific case we are creating the golden image for a service hosting a simple LAMP application, configuring the required packages, services, and firewall rules to start using the stack right from the first boot without further intervention, as shown in Figure 4.

The resulting blueprint is also available using the command-line interface composer-cli that is available as part of the packages we install.
On the system, running the following command will allow us to review the TOML version of the blueprint, which contains all the customization we added up to now:
sudo composer-cli blueprints show my_golden_imageThe output will produce the content of the blueprint and its customizations:
name = "my_golden_image"
description = ""
version = "0.0.0"
modules = []
groups = []
distro = ""
[[packages]]
name = "firewalld"
[[packages]]
name = "httpd"
[[packages]]
name = "php"
[customizations]
[[customizations.user]]
name = "myadmin"
password = "SHA256-password"
groups = ["wheel"]
[[customizations.group]]
name = "super_admin"
[customizations.timezone]
[customizations.locale]
[customizations.firewall]
[customizations.firewall.services]
enabled = ["http", "https"]
[customizations.services]
enabled = ["httpd", "mariadb", "firewalld"]
[[customizations.filesystem]
mountpoint = "/"
size = 10106127360
Building the golden image
Once we define and customize the blueprint for our image, we are then ready to choose the format for our image (hypervisor, ISO, cloud image) and start building it.
Image builder offers many output formats for images, including the following, among others:
- Cloud providers (AWS, Azure, Google Cloud, and Oracle Cloud)
- Hypervisors (OpenStack KVM, QEMU, VSphere)
- RHEL for edge installer, container, and
ostreecommits
From the blueprint configuration page we can click Create Image and select the desired format for our golden image we will use for our servers and create it, as shown in Figure 6.

The interface will provide us with the building status and once the image is ready it will be possible to download and start using it. See Figure 7.

Integrations
All the commands we issued using the web console can be replicated using the composer-cli utility or integrating external tools with the osbuild-composer APIs making it extremely easy and versatile to bring image building, definition and QA using automation on third-party utilities.
When it comes to Red Hat Ansible Automation Platform integrations, dedicated validated content for osbuild is available and supported to start automating image customization and building directly into existing workflows or by creating dedicated automation for them.
When it comes to the image builder service available on the Red Hat Hybrid Cloud Console, APIs are available as well and ready to be integrated.
Conclusion
Red Hat image builder is a great tool to start standardizing and providing consistent content across heterogeneous environments.
You can create and build images as well as introduce the building process as part of a workflow when releasing new versions of your custom images for your workloads or your servers and devices.
If you are interested in learning more, don’t hesitate to contact us!
