Welcome to the second installment of this series where we delve into the world of computer vision at the edge. Throughout this and the following episodes, we will explore the process of setting up all the infrastructure to develop and train AI/ML models and deploy them at the edge to perform real-time inference. This series will cover the following topics:
- How to install single node OpenShift on AWS
- How to install single node OpenShift on bare metal
- Red Hat OpenShift AI installation and setup
- Model training in Red Hat OpenShift AI
- Prepare and label custom datasets with Label Studio
- Deploy computer vision applications at the edge with MicroShift
The goal of this series is to make use of the power and versatility of Red Hat OpenShift for the preparation and deployment of computer vision applications on the edge. In environments where resources are limited, single node OpenShift (SNO) can be used as a data center for model processing and training. It can run on both cloud and bare metal nodes. On such nodes we will deploy Red Hat OpenShift AI and the necessary components to enable GPU hardware and accelerate our model training. OpenShift AI gives us the possibility to use notebooks where we will import our YOLO algorithm and the necessary dataset for training. Finally, with OpenShift Virtualization, we will simulate a device on the edge. There, we are going to install MicroShift and deploy our Safari application on top of it. This app will be able to detect animals in real time and give us information about them.
A bit tricky to follow? Don't worry, we will see everything from scratch step by step. In the meantime, maybe the following diagram helps (Figure 1). Sometimes a picture is worth a thousand words.

Introduction
In this article, we are going to explain how to install single node OpenShift on a physical bare-metal host with a GPU. The purpose of our baremetal node will be to be used for preparing, training, and modeling the AI model that will later be used for detection. In this demo we will use the Red Hat OpenShift Assisted Installer provided with the Hybrid Cloud Console to deploy single node OpenShift in our node, equipped with a GPU, in this case, an NVIDIA Tesla M60 GPU Card.
Single node OpenShift is Red Hat’s solution for edge use cases: we need to run OpenShift workloads on constrained and remote locations where, typically, the physical space for systems is limited and our network may be restricted by no or intermittent connectivity. SNO is capable of offering control and worker node capabilities in a single server, reducing the footprint and providing users with a consistent experience across the sites where OpenShift is present. This solution can be deployed using standard installation methods on bare metal hosts and certified hypervisors. However, it's important to understand that when using single node OpenShift, the most significant trade-off is the absence of high availability.
Also, it is important to note that the minimum system requirements for SNO are 8 vCPU cores, 16GB of RAM, and 120GB of storage. Having said that, an added requirement for this use case will be to have an available empty disk in your physical infrastructure, as it will be needed to install the Logical Volume Manager Storage (LVMS) operator in upcoming chapters.
Info alert: Note
In case of installing on a public cloud, the steps vary from a bare metal installation. For this purpose, we have also created a separate blog that will guide you through the necessary steps to get SNO running on AWS: How to install single node OpenShift on AWS
OpenShift Assisted Installer
The Assisted Installer in OpenShift is a powerful tool designed to simplify and optimize the deployment process of OpenShift clusters. By providing an intuitive interface and automated workflows, it facilitates a smooth and guided setup process, mitigating the complexities often associated with infrastructure provisioning.
Now that we've gone over the basics of the elements that will be used during this installation, it's time to get down to work. We are going to start with the configuration of our SNO from the Assisted Installer:
- Navigate to the OpenShift Red Hat Hybrid Cloud Console and log in using your Red Hat account credentials.
- Once on the landing page, click Create Cluster to start using the assisted installation tool.
- In this case, we are going to use a physical bare metal host, so we will need to select the Datacenter tab.
- Once in the Assisted Installer section, click Create Cluster. This will guide us to the cluster configuration wizard page.
- As you can see, there are plenty of fields that we can configure in our cluster:
- Cluster name:
sno(insert any preferred name) - Base domain:
pemlab.rdu2.redhat.com(to match our environment domain) - OpenShift version:
OpenShift 4.15(latest version at the time of publication) - CPU architecture:
x86_64(our bare metal host uses Intel architecture) - Check the Install single node OpenShift (SNO) box.
- Cluster name:
Leave the rest of the parameters as default and click Next until you reach the Host Discovery section. Note that we're skipping the Operators section since the purpose of this demonstration is to illustrate the complete installation process for the different operators needed to build this demo. However, feel free to check the Logical Volume Manager Storage box or OpenShift Virtualization in case you want to speed up the process.
Once in the Host Discovery tab:
- The installer is waiting for a host, so firstly we need to import it by clicking Add host.
- In the new pop-up window we can generate the discovery ISO to be installed in our node so it gets detected. In our case we want to boot using virtual media, so we need to select Minimal image file (note that if we are going to use this option, our node will require internet access to provision the image).
We also need to provide our SSH public key so we can connect to the host machine. You can get it by running the following command in your Terminal. Then, copy and paste the result into the SSH Public key box:
cat ~/.ssh/id_rsa.pub- At this point, we are ready to press Generate Discovery ISO.
- Click Download Discovery ISO to store the file on your computer. This will start the download process.
Host configuration
Now, we will switch to our bare metal virtual console. There, we need to configure our node to boot using our discovery ISO. In my case, I’m using an iDRAC to manage my node, as shown in Figure 2.

If your node management differs from mine, adapt the following steps, based on your environment specifications. Depending on the host, this procedure could be slightly different, but the steps are pretty similar overall.
- Open your host console. Click Launch Virtual Console.
- Select Connect Virtual Media.
- There, we should be able to Choose the File and select the discovery ISO we just downloaded.
- Select Map the device (Figure 3).

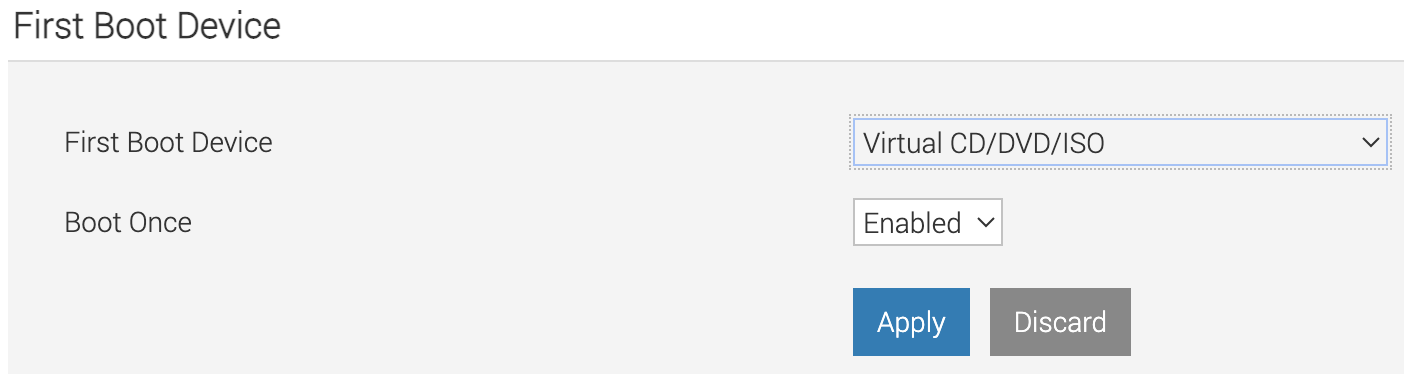
- Navigate to the Boot menu. We will need to configure our host to boot using the virtual media.
- Select Virtual CD/DVD/ISO from the list (Figure 4).
- Finally, all we need to do is reboot the system. Click Power Off System and then Power On the System again. With this, the Discovery installation will begin (Figure 5).

Once finished, go back to the OpenShift Red Hat Hybrid Cloud Console, where we will be able to see that our machine has been automatically recognized and listed in the Host Inventory section. Make sure to wait for the Status to change to Ready before proceeding to the next steps.

At this point we can directly jump to the end of the process.
- Click Next to navigate to the Storage section, where we can list all the disks present in our node.
- Click Next again, and that will guide you to the Networking section.
- Our node has already configured all the networking infrastructure, so all we have to do is select the Machine network IP range we want to use. To configure your environment network, refer to the OpenShift networking documentation. Figure 7 shows what my networking configuration looks like.

- In the Networking section of the wizard, confirm that Machine Network is correct and that the Host SSH Public Key box is checked.
After completing these configurations in our host, we will be ready to move onto the SNO installation process.
SNO installation
Now that our host is properly configured to allocate a single node OpenShift cluster, we are ready to proceed with the installation.
- Click Next to see a summary of your cluster details from the Review and create section.
- If everything is looking good, press Install cluster.
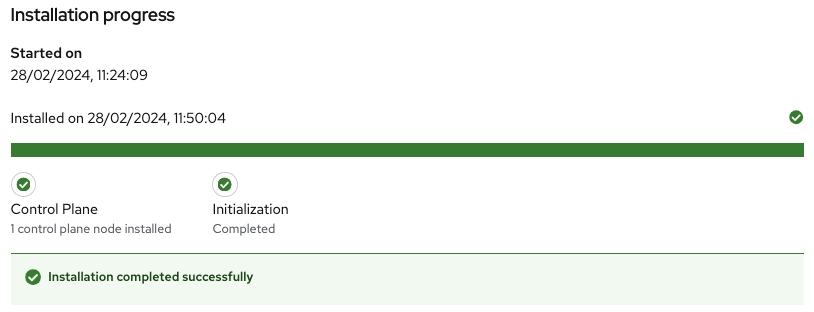
- The installer will automatically complete all the steps needed to have the node up and running. We can track this process through the progress bar. It should take around 30 minutes to finish the installation. However, this can vary depending on your host’s resources.
- Once it finishes you should see several checkmarks to show that your installation is complete (Figure 8).
Accessing our SNO
Once the installation has finished, we can access the OpenShift node using the credentials provided under the installation bar. You should be able to find the URL to the Web console, the kubeadmin user, and the password that we will use to authenticate.

To access the web console, click Launch OpenShift Console (Figure 10). A new pop-up window will appear. You will probably see a message warning you about the security of the page. This has to do with the fact that the certificates in OpenShift have been signed by ourselves and not any certified CA. We can safely ignore it.
Info alert: Note
You might need to configure your machine to resolve its hostname beforehand. We can do this by either adding the record to the DNS server or locally in the /etc/hosts configuration file. Copy and paste the entries there and again click Launch OpenShift Console.

Once on the login page, we will use the credentials provided after the SNO installation (kubeadmin user plus its password) to access our cluster. With this, we have successfully logged into the single node OpenShift web console.
However, some users may prefer to use the command line instead of the graphical interface, which we can do to run most of the commands. Follow the next steps to find the login command and begin using the command-line interface.
- Once on the Web Console, connect to the SNO by clicking on the current user kube:admin in the upper right corner. Select Copy login command (Figure 11).
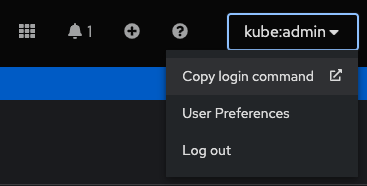
- This will open a new tab in our web browser. If we click Display token, we can copy the oc login command shown and paste it into our terminal. By doing this, we should be able to interact with our SNO using the command line interface.
Now run the following command to ensure everything is settled correctly:
oc get nodeThe output should look similar to this:
NAME                         STATUS  ROLES                          AGE     VERSION
        sno.pemlab.rdu2.redhat.com   Ready   control-plane,master,worker    5m      v1.28.6+6216ea1
There you have it: a fresh single node OpenShift with control and worker capabilities ready for you.
Video demo
The following video demo guides you through the process of the viewer will be guided through the process of installing Single Node OpenShift on a physical bare metal machine using the Assisted Installer as described in this article.
Next steps
In this article, we have covered the deployment of single node OpenShift on a physical bare metal node utilizing the OpenShift Assisted Installer, thus simplifying the setup process for OpenShift clusters.
In the next article in this series, we will focus on the infrastructure configuration needed to deploy Red Hat OpenShift AI before starting to work on the object-detection model: Red Hat OpenShift AI installation and setup
Last updated: August 28, 2025