One of the major challenges of managing a cluster and application resources with GitOps is validating that changes to the GitOps manifests are correct. When making changes to objects directly on the cluster, the user is immediately presented with feedback when issues exist. The user is able to troubleshoot and resolve those issues with the knowledge of the context of the changes they just made. When working with GitOps, that feedback cycle is often delayed and users don't receive feedback on changes until they are applied to the cluster, which could be hours or even weeks depending on the approval lifecycle of a change.
To reduce the number of errors in changes to a GitOps manifest and eliminate the dreaded Unknown state in an ArgoCD application, this article will discuss tools and best practices. We will discuss automating these validations with GitHub actions, but all of these validations can be configured with another CI tool of your choice.
Using YAML linters
YAML is the basis of nearly all GitOps repos. As you would expect, YAML has specific syntax standards for validity. Additionally, there are many recommended best practices that may not be required but can help improve the consistency and readability of the YAML.
YAML linters are a great tool to help validate requirements on a repo and enforce consistent style for some of the optional configurations. Many different YAML linter tools exists, but one that I recommend is yamllint. The yamllint is built with Python, making it easy to set up on most Linux and MacOS environments since Python is installed by default and easily installed on any Windows environment.
To install yamllint you can run the following command with pip, the Python package management tool:
pip install --user yamllint
Once installed, users can use the yamllint cli tool to manually validate individual files:
yamllint my-file.yaml
Or an entire directory structure:
yamllint .
The yamllint provides a default configuration that may provide warnings for some style standards that you many not wish to enforce. The default options can easily be configured by creating a file called .yamllint in the root of the project. The following is a common configuration used in many GitOps repos:
extends: default

rules:
  document-start: disable
  indentation:
    indent-sequences: whatever
  line-length: disable
  truthy:
    ignore: .github/workflows/
Automating with GitHub actions
Running yamllint locally is a great option for developers to get feedback while making changes to a repo, however running yamllint directly in a CI tool such as GitHub actions can help enforce standards and prevent improperly formatted YAML from ever making it into the main branch.
To add a yamllint GitHub action, we can utilize a pre-built GitHub action and create a file called .github/workflows/validate-manifests.yaml in your project containing the following:
name: Validate Manifests
on:
  push:
    branches:
      - "*"
  pull_request:
    branches:
      - "*"

jobs:
  lint-yaml:
    runs-on: ubuntu-latest
    steps:
      - name: Code Checkout
        uses: actions/checkout@v3
      - name: Validate YAML
        uses: ibiqlik/action-yamllint@v3
        with:
          format: github
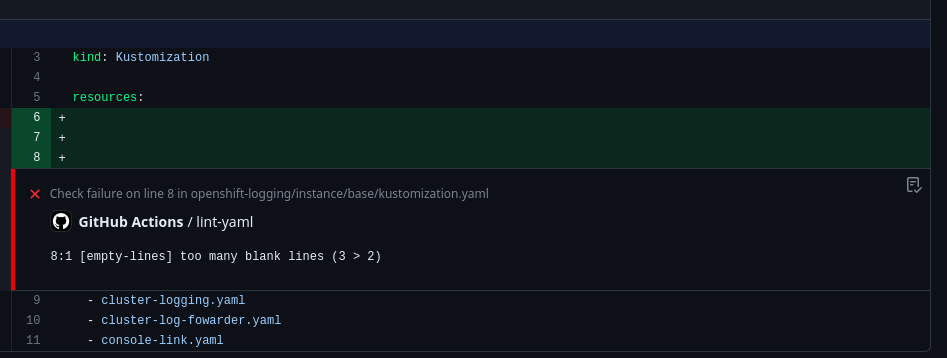
One great feature of yamllint is that it has native integration with GitHub and can do annotations directly on the lines of code with issues, making it easier for developers to identify problems and resolve them (Figure 1).
The benefits of YAML linters
YAML linters are designed to enforce generic YAML standards and make sure that objects are properly structured based on those generic standards. YAML linters are great for identifying issues with misconfigurations in YAML, such as extra lines in files or incorrect tabbing in objects. YAML linters can be great for catching problems such as objects incorrectly copied and pasted into a repo or a field accidentally duplicated in the same object.
YAML linters can also keep GitOps repos more consistent and enforce some chosen standards for all contributors to the repo, making the repo more readable and maintainable. However, YAML linters are generally not able to do any sort of deeper inspection of the objects, and they do not validate the object against the expected schema for that object type.
Kustomize validation
Kustomize is one of the most common tools found in a GitOps repo for helping to organize and deploy YAML objects. Repos can commonly contain dozen, if not hundreds of kustomization.yaml files that can be incorrectly configured and cause errors when you reach the deployment step if not validated beforehand.
A simple validation can be performed using the kustomize CLI tool:
kustomize build path/to/my/folder
This command will attempt to render the folder using kustomize and display the final YAML objects. If it successfully renders, the kustomization.yaml file is valid. If it does not, kustomize will display an error to troubleshoot the issue.
When making changes in kustomize, it can be easy to cause unforeseen problems. Therefore, it is always recommended to validate all kustomize resources in a repo, even those that you have not directly changed. A script that looks for all kustomization.yaml files in the repo, and attempts to run kustomize build for each folder can help to validate that no unintentional errors have been created. Fortunately, the Red Hat CoP has already created a script to do exactly that. Copy the validate_manifests.sh directly into a GitOps repo. Generally, I store it in a scripts folder, but you can run the script with the following:
./scripts/validate_manifests.sh
Automating with GitHub Actions
Just like the YAML lint, validating the kustomize in a CI tool is an important step to adding confidence to changes to a repo and ensuring that no errors are introduced into the main branch.
Conveniently, GitHub Actions already has the kustomize tool built in so we can create a simple action to run the previously mentioned script by adding a new job to the same validation action we created before:
jobs:
  lint-kustomize:
    runs-on: ubuntu-latest
    steps:
      - name: Code Checkout
        uses: actions/checkout@v3
      - name: Verify Kustomize CLI Installation
        run: |
          which kustomize
          kustomize version
      - name: Validate Manifests
        run: |
          ./scripts/validate_manifests.sh
The benefits of Kustomize validation
Kustomize is a powerful tool, but one that is easy for human error to cause problems. This simple practice of validating every kustomization.yaml file in a repo can reduce the number of errors created by accidentally misspelling a filename or forgetting to update a filename in the kustomization.yaml file after renaming it. This kustomize check can also identify problems where objects are updated and any patches that impact those objects are no longer valid.
Additional, this validation can help to ensure that you don't accidentally break dependencies where another kustomization.yaml file inherits from a folder you did change. You can quickly catch problems before changes are merged into the main branch, such as when an object is removed from a base folder and that same object is being referenced in the overlay.
Using the Helm tool
Helm is another popular tool that is utilized in GitOps repos for organizing complex applications. Helm is an extremely powerful tool but one that can be prone to errors due to its complex syntax and structure.
Fortunately, Helm provides a built in tool to help validate charts within the CLI:
helm lint path/to/my/chart
Helm's linting capabilities will help to validate the template code to ensure that it is valid, verify all of the necessary values are present, and emit warnings for other recommendations.
As with the kustomize script, we can automate validating all of the charts in the repo by searching for any Chart.yaml files. The following script can be created in a file called validate_charts.sh:
#!/bin/sh

for i in `find "${HELM_DIRS}" -name "Chart.yaml" -exec dirname {} \;`;
do

    echo
    echo "Validating $i"
    echo

    helm lint $i

    build_response=$?

    if [ $build_response -ne 0 ]; then
        echo "Error linting $i"
        exit 1
    fi

done

echo
echo "Charts successfully validated!"
You can easily validate all of the charts in a repository at once by running the following command:
./scripts/validate_charts.sh
This new script can be triggered from a GitHub Action just like the previous kustomize check. However in this case, helm is not built into the base action, so it must be installed as follows:
jobs:
  helm-lint:
    runs-on: ubuntu-latest
    env:
      HELM_VERSION: 3.12.3
      HELM_DIRS: .
    steps:
      - name: Install Helm
        run: |
          sudo curl -L -o /usr/bin/helm https://get.helm.sh/helm-v${HELM_VERSION}-linux-amd64.tar.gz
          sudo chmod +x /usr/bin/helm
      - name: Code Checkout
        uses: actions/checkout@v3
      - name: Validate Charts
        run: |
            ./scripts/validate_charts.sh
The benefits of Helm lint
Helm linting can help to catch many issues. Helm is notorious for its complexity and the challenges that the templating language can introduce. You can catch common issues, such as misspelling a value name or incorrectly scoping a variable, with the Helm linting tool. Additionally, a Helm lint can catch other configuration issues in a chart such as an invalid reference in the Chart.yaml file.
Helm linting does not do any validation on the YAML from the rendered charts. It only validates that the chart can be rendered. In some cases, it may be beneficial to apply additional validations on the rendered charts themselves.
Next steps and limitations
The validations discussed are a great first step for improving the confidence of changes in a GitOps repo before deployment. Running these validations can help you avoid common mistakes in GitOps and allow you to catch and resolve problems before they are ever attempted to be validated against the cluster.
One major limitation of these checks is the lack of validation of the objects being applied to a cluster. If a field only accepts a value of true or false the validations discussed today will not be able to identify an invalid configuration such as this.
More specialized tools such as kubeval and kubeconform can help to validate standard Kubernetes objects, but they lack support for Red Hat OpenShift specific objects or CustomResources from Operators out of the box. Extracting schemas for those objects is possible, which can help to extend validation of objects even beyond standard k8s objects.
Additionally, you can perform validations directly against a target cluster itself using the --dry-run=server flag with oc apply. Using the dry-run flag allows the objects to be validated against the cluster itself and provides an even greater degree of confidence that objects applied to the cluster will be successful.