In this article, we will demonstrate how to deploy Open Policy Agent in server mode into a Red Hat OpenShift cluster. We will then set up simple Rego policies to validate a JWT token and provide authorization to specific APIs.
About Open Policy Agent
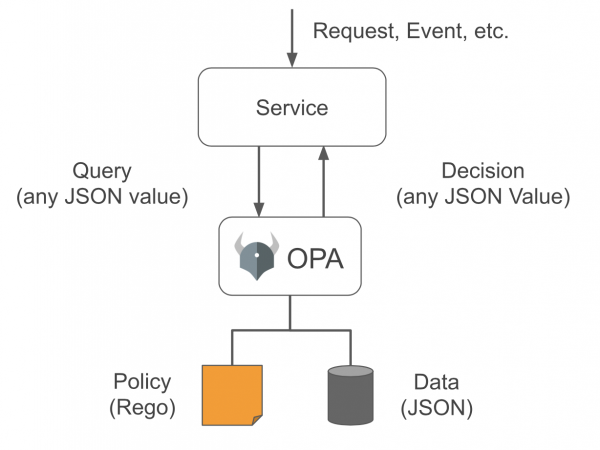
Open Policy Agent (OPA) is a Cloud Native Computing Foundation (CNCF) graduated project. OPA is an open source policy agent ideal for decoupling authorization from cloud-native applications, APIs, Kubernetes resources, and CI/CD pipelines, along with other artifacts. OPA uses Rego, a declarative language, to define policies as code. Applications and services can use OPA to query, provide an input evaluated against predefined policies, and provide a policy decision, as shown in the Figure 1 diagram.

How to deploy OPA using REST API
OPA provides 3 primary options of deploying OPA to evaluate policies:
- REST API: Deployed separate from your application or service.
- Go library: Requires Go to deploy as a side car alongside your application.
- WebAssembly (WASM): Deployed alongside your application regardless of the language.
In this article, we will demonstrate the REST API option and focus on the use cases for leveraging OPA for API authorization. We will describe each step for deploying OPA, creating simple policies, and then evaluating the using the OPA REST API.
Prerequisites
To complete this demo you will need the following prerequisites:
- Red Hat OpenShift cluster: For this demo, we use OCP 4.12. However, any 4.x version should work. Alternatively, you can use any Kubernetes cluster. The instructions in this demo are specific to OpenShift.
- OpenShift CLI: You can download the OpenShift CLI (
oc) from your cluster as specified in the OpenShift documentation. - Git bash or shell/bash terminal: Although not required, the commands presented in this article assume a Linux shell syntax.
Deploying OPA in 2 steps
To deploy OPA as a REST API, first create three Kubernetes resources.
Step 1: Create Kubernetes definition files
Create a file named deployment.yaml with the following content:
apiVersion: apps/v1
kind: Deployment
metadata:
  name: opa
spec:
  replicas: 1
  selector:
    matchLabels:
      app: opa
  template:
    metadata:
      labels:
        app: opa
    spec:
      containers:
        - name: opa
          securityContext:
            capabilities:
              drop: ["ALL"]
            runAsNonRoot: true
            allowPrivilegeEscalation: false
            seccompProfile:
              type: "RuntimeDefault"
          image: openpolicyagent/opa:0.50.1-debug
          args:
            - "run"
            - "--watch"
            - "--ignore=.*"
            - "--server"
            - "--skip-version-check"
            - "--log-level"
            - "debug"
            - "--set=status.console=true"
            - "--set=decision_logs.console=true"
Most of these parameters are optional, but we included them for higher verbosity level which is helpful for troubleshooting. You can view the purpose of these parameters in the documentation for the opa run command.
Important observations:
- We are using OPA version 0.50.1, the latest available at the time of writing. We are using the
-debugversion of the OPA image which includes a CLI that can be useful for inspecting the deployed files. However for a production release it is recommended that you use the-rootlessversion of this image. - The
--serverparameter is what tells OPA to run in server mode so that it can listen for REST API requests.
Next, create a file named service.yaml which will expose OPA as a service within the cluster as follows:
kind: Service
apiVersion: v1
metadata:
  labels:
    app: opa
  name: opa
spec:
  selector:
    app: opa
  ports:
  - name: http
    protocol: TCP
    port: 80
    targetPort: 8181
Finally, create a file named route.yaml which will expose OPA service as follows:
kind: Route
apiVersion: route.openshift.io/v1
metadata:
  labels:
    app: opa
  name: opa
spec:
  selector:
    matchLabels:
      app: opa
  to:
    kind: Service
    name: opa
  port:
    targetPort: http
Note: We are using http for demo purposes. In a production environment, ensure that you are using https.
Step 2: Deploy Kubernetes resources to OpenShift cluster
First, log in to your OpenShift cluster by obtaining a token from your cluster using the OC CLI as follows:
oc login --token=<sha256~token> --server=<your-openshift-cluster-api-url>
Next, create a new project for this cluster. We export the NAMESPACE name as a variable so that it can be used in subsequent steps.
NAMESPACE=opa
oc new-project $NAMESPACE
Then, create the resources using the files created previously as follows:
oc apply -f deployment.yaml -n $NAMESPACE
oc apply -f service.yaml -n $NAMESPACE
oc apply -f route.yaml -n $NAMESPACE
To get the route that was created, issue the following command:
echo http://$(oc get route $NAMESPACE -o jsonpath='{.spec.host}')
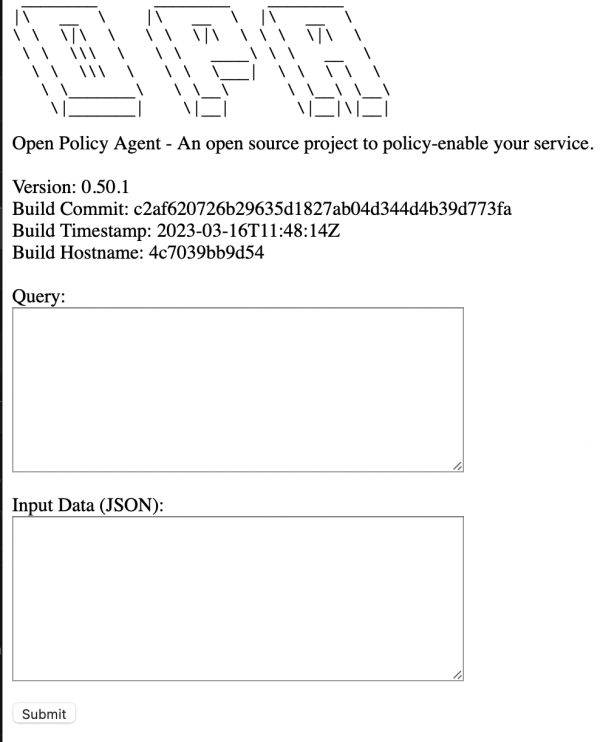
Navigate to the route in your browser to view the OPA home screen (Figure 2), which allows you to evaluate a policy.

Policy evaluation 3-step demo
Now, we need to define and load policies for demo purposes.
Step 1: Create common JWT policy
One of the nice features about Rego is that it provides several built-in functions. One set of functions that is particularly helpful is the one for JWT (JSON Web Token) token validation. The policy will decode a JWT token, and then validate it against the secret used to sign the token.
We will use a shared secret for demo purposes. However, the JWT function can verify the token using JWKS (JSON Web Key Sets). Anybody familiar with the JWKS verification flow knows that it is not a trivial implementation. The built-in verify token functions will take care of retrieving KIDs (key ids) from the corresponding well known URL, and it even provides caching capabilities to speed up that process.
First, create a file named jwt.regoas follows:
package com.redhat.common.jwt

import input
import future.keywords.in

valid_token(jwt) = token {
    [header, payload, sig]:= io.jwt.decode(jwt)

    valid := io.jwt.verify_hs256(jwt, 'secret')
    token := {"valid": valid,
                "name": payload.name}
}
As you can see from this Rego file, it is primarily JSON, except for the import/package headers. Again, we are using a shared secret, which is done only for demo purposes.
Next, load this policy using the create policy REST API from the OPA as follows:
OPA_URL=http://$(oc get route $NAMESPACE -o jsonpath='{.spec.host}')
cat jwt.rego | curl --location --request PUT "${OPA_URL}/v1/policies/com/redhat/common/jwt" --header 'Content-Type: text/plain' --data-binary '@-'
Deconstructing this URL:
${OPA_URL}: The base OPA URL.v1/policies: The default location for policies.com/redhat/common/jwt: This is how policies are retrieved. Notice that it matches the package name (i.e.,com.redhat.common.jwt), but using a different character separator. There is no hard rule that these should match, but I have found it a good practice to follow to make it easier to organize policies.
Step 2: Create API authorization policy
In this step, we will create a policy that uses the common JWT policy loaded in step 1. Create a file named api.rego with the following content:
package com.redhat.myapi

import data.com.redhat.common.jwt.valid_token

default allow := { #disallow requests by default
    "allowed": false,
    "reason": "unauthorized resource access"
}

allow := { "allowed": true } { #allow GET requests to viewer user
    input.method == "GET"
    input.path[1] == "policy"
    token := valid_token(input.identity)
    token.name == "viewer"
    token.valid
}

allow := { "allowed": true } { #allow POST requests to admin user
    input.method == "POST"
    input.path[1] == "policy"
    token := valid_token(input.identity)
    token.name == "admin"
    token.valid
}
Notice the import to the valid_token function. It matches the package used previously, but it is prepended with data.
Next, load this policy with a similar curl command as follows:
cat api.rego | curl --location --request PUT "${OPA_URL}/v1/policies/com/redhat/myapi" --header 'Content-Type: text/plain' --data-binary '@-'
Step 3: Evaluate the policy
To evaluate the policy, we will need to get a valid JWT token. You can get one from jwt.io, the only requirement is that you enter the same secret from the jwt policy into the <your-256-bit-secret> in the Verify Signature section.
Additionally, change the name in the Payload section to viewer and copy the generated token.
Repeat these steps and enter admin as the name, and then save both tokens in a file from where you can copy values.
Next, create a request to test a successful viewer request named viewer-allowed.json:
{
    "input": {
        "identity": "<viewer token>",
        "path": "policy",
        "method": "GET"
    }
}
Execute the curl command (notice the url changes from policy to data):
cat viewer-not-allowed.json | curl --location --request POST "${OPA_URL}/v1/data/com/redhat/myapi" --header 'Content-Type: application/json' --data-binary '@-'
Expect an allowed true output similar to the following:
{
    "result": {
        "allow": {
            "allowed": true
        }
    }
}
Next, create a request to test a not allowed viewer request named viewer-not-allowed.json by changing the method to POST.
{
    "input": {
        "identity": "<viewer token>",
        "path": "policy",
        "method": "POST"
    }
}
Execute the following curl command and expect the output to include allowed false.
cat viewer-not-allowed.json | curl --location --request POST "${OPA_URL}/v1/data/com/redhat/myapi" --header 'Content-Type: application/json' --data-binary '@-'

{"result":{"allow":{"allowed":false,"reason":"unauthorized resource access"}}
Next, create an admin-allowed.json file with the following request:
{
    "input": {
        "identity": "<admin jwt token>",
        "path": "policy",
        "method": "POST"
    }
}
Execute the curl command and expect the output to include allowed true as follows:
cat admin-allowed.json | curl --location --request POST "${OPA_URL}/v1/data/com/redhat/myapi" --header 'Content-Type: application/json' --data-binary '@-'
Open Policy Agent easily deployed
This article demonstrated how to easily deploy the Open Policy Agent into an OpenShift cluster and load a common JWT policy with an API policy. We also described how policy evaluation works within OPA. This demo showcased a small set of the capabilities and potential that OPA offers, providing an introduction to OPA and Rego policies.
Last updated: September 19, 2023