The previous article in this series, How does RPM package discovery work?, described how the RPM package management technology discovers and installs an .rpm package on a local computer running the Red Hat Enterprise Linux, Fedora, or CentOS Stream operating system. In that article, you learned that the .repo files stored in the /etc/yum.repos.d directory of the local machine play a critical role in discovering, installing, and managing RPM packages.
This article goes to the next level of detail to describe the format specified for a .repo file.
This article describes not only the format specification for a .repo file but also describes the logic that's applied to a .repo file when managing RPM packages on a given machine. But, before delving in, let's review how RPM discovers a package on the internet and then installs it.
Understanding RPM package discovery and installation
dnf (or yum) finds a package to install by doing a lookup on what is called a repository manifest file. This file might exist locally in the dnf (or yum) cache of the local machine, which is where dnf will look first to find a reference to the package location. If the package reference can't be found in the local cache, dnf install looks in the .repo files in the directory /etc/yum.repos.d to get the URL of the repository associated with the .repo file under examination.
dnf install has the intelligence to parse and analyze the information in the .repo file to locate the actual manifest file that describes the .rpm packages stored in the given remote repository.
If there is no reference to the .rpm file for the package of interest, dnf install moves on to the next .repo file in the /etc/yum.repos.d directory. Once the .rpm file is located, dnf install does the work of installing the package on the local machine. This is all illustrated in Figure 1.
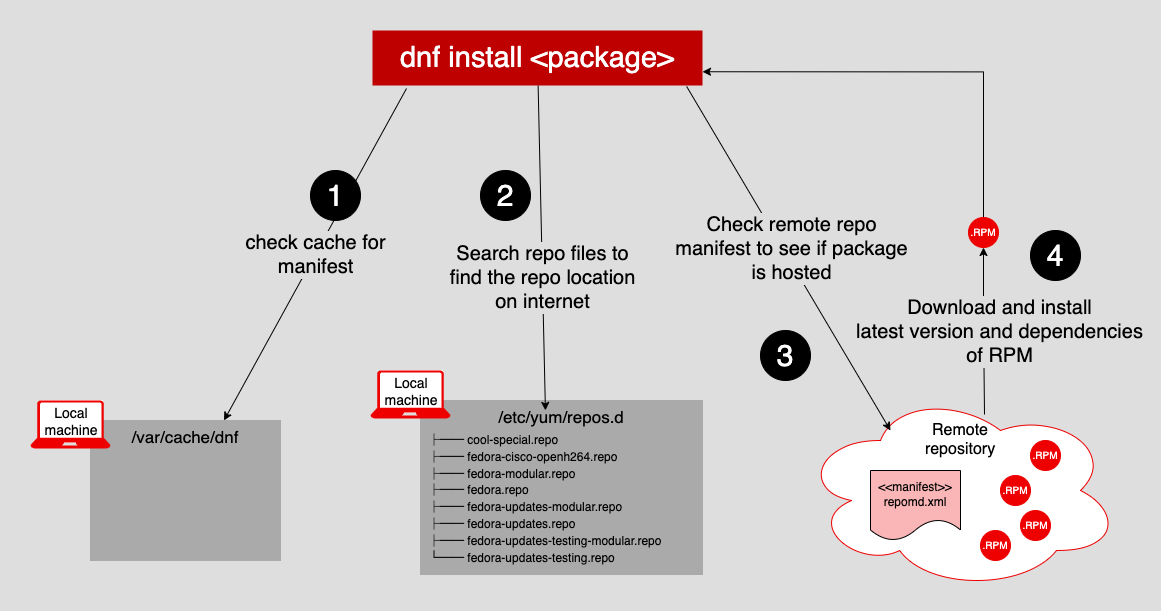
If dnf install can't locate the package reference using the .repo files in /etc/yum.repos.d, it will respond with an error.
As you can see, .repo files play a pivotal role in the RPM ecosystem. Understanding them is essential to those interested in how RPM works under the covers. So, let's take a look at the structure of a .repo file.
Anatomy of a .repo file
The listing below shows an excerpt of the contents of the file /etc/yum.repos.d/fedora.repo. The file fedora.repo is usually present on a computer running Fedora Server or Desktop. The file is a good candidate for analysis:
[fedora]
name=Fedora $releasever - $basearch
#baseurl=http://download.example/pub/fedora/linux/releases/$releasever/Everything/$basearch/os/
metalink=https://mirrors.fedoraproject.org/metalink?repo=fedora-$releasever&arch=$basearch
enabled=1
countme=1
metadata_expire=7d
repo_gpgcheck=0
type=rpm
gpgcheck=1
gpgkey=file:///etc/pki/rpm-gpg/RPM-GPG-KEY-fedora-$releasever-$basearch
skip_if_unavailable=False

[fedora-debuginfo]
name=Fedora $releasever - $basearch - Debug
#baseurl=http://download.example/pub/fedora/linux/releases/$releasever/Everything/$basearch/debug/tree/
metalink=https://mirrors.fedoraproject.org/metalink?repo=fedora-debug-$releasever&arch=$basearch
enabled=0
metadata_expire=7d
repo_gpgcheck=0
type=rpm
gpgcheck=1
gpgkey=file:///etc/pki/rpm-gpg/RPM-GPG-KEY-fedora-$releasever-$basearch
skip_if_unavailable=False
.
.
.
The structure of a .repo file is predefined according to specification. Table 1 is a list of the more common fields defined in the specification.
|
Key |
Description |
Example |
|---|---|---|
|
|
A string that represents the unique identifier of the given repository. |
|
|
|
A friendly, descriptive name of the repository. |
|
|
|
A URL that presents access to a given repository. |
|
|
|
A URL that returns an XML document that includes checksums and lists of mirrors that have repodata. |
|
|
|
Indicates that the given |
|
|
|
Indicates that a special flag should be added to a single, randomly chosen metalink/mirrorlist query each week. This flag allows the owner of the repository owner to determine the number of systems consuming the given repository. |
|
|
|
The period of time after which the given repository is checked for metadata update. The default is 48 hours. |
|
|
|
Indicates that a check on the GPG signature on this repository's metadata needs to be conducted. The default is |
|
|
|
Indicates the type described by the repository metadata. Supported values are |
|
|
|
Indicates that GPG signature check should be performed on packages in the given repository. The default is |
|
|
|
A list of URLs for GPG key fields that can be used to sign metadata and packages of the given repository. The default is an empty string (no keys). |
|
|
|
When set to |
|
As noted, when you run dnf install, the command will inspect the .repo files in the /etc/yum.repos.d directory to locate an appropriate repository. Once the repository is located, dnf install will execute according to the parameters defined as fields in the given .repo file.
You can learn about all the specified fields for a .repo file by reading the dnf documentation.
Viewing a list of repositories
The information in a .repo file is used not only to populate available packages using dnf install but also as the source of data for the dnf repolist command, which informs the system which repositories are enabled.
The listing below shows a list of repositories returned when executing the command dnf repolist. The listing has two column headings, repo id and repo name. These two columns are displayed by default.
repo id                                                   repo name
fedora                                                    Fedora 35 - x86_64
fedora-cisco-openh264                                     Fedora 35 openh264 (From Cisco) - x86_64
fedora-modular                                            Fedora Modular 35 - x86_64
updates                                                   Fedora 35 - x86_64 - Updates
updates-modular                                           Fedora Modular 35 - x86_64 - Updates
An interesting point to note is that values for the repo IDs and names are extracted directly from the .repo file for the corresponding repository—fedora.repo, in this case. For example, when you look back to the first listing above, you'll see that the .repo file has the following in the first two lines of content:
[fedora]

name=Fedora $releasever - $basearch
The dnf repolist command extracts the value fedora from the [fedora] entry in the file fedora.repo. The value for the repo name, Fedora 35 - x86_64 is extracted from the name field of the .repo file, which is declared as Fedora $releasever - $basearch.
At this point, you may be wondering: how does the string Fedora $releasever - $basearch transform into Fedora 35 - x86_64? As it happens, $releasever and $basearch are variables that get resolved at runtime.
And how are their values determined? Well, to determine the value of $releasever variable, check the /etc/fedora-release file. It should contain a line like this:
Fedora release 35
To determine the value of the $basearch variable, type the following at the command line:
$ uname -i
The command should return a response similar to the following:
X86_64
Working with the cache
As you read earlier, the dnf install command checks the local computer's cache for repository information before taking the time to go to the internet to locate and install RPM packages.
Typically, the dnf cache on a local machine running RHEL, Fedora, or CentOS Stream is in the directory /var/cache/dnf/.
You can list the contents of the dnf cache by executing this command:
ls /var/cache/dnf/
The following listing shows some sample contents of the /var/cache/dnf/ directory.
$ ls -lh /var/cache/dnf/


total 9.5M

drwxr-xr-x. 4 root root   38 Jul 14 10:39 copr:copr.fedorainfracloud.org:group_redhat-et:microshift-4288080f6baba874

-rw-r--r--. 1 root root    2 Jul 14 15:57 expired_repos.json

drwxr-xr-x. 4 root root   38 Jul 14 15:56 fedora-37d3cae0527b6391

drwxr-xr-x. 3 root root   22 Jul 14 15:56 fedora-cisco-openh264-1ed815b676713aa8

drwxr-xr-x. 3 root root   22 Jul 14 15:56 fedora-modular-cd949c6b43ea9b3d

-rw-r--r--. 1 root root    0 Jul 14 14:06 last_makecache

-rw-r--r--. 1 root root 9.5M Jul 14 13:30 packages.db

drwxr-xr-x. 2 root root    6 Jul 14 14:06 rpms.famillecollet.com_enterprise_remi-release-7.rpm-31d898f8b7b0a3bc

-rw-r--r--. 1 root root    2 Jul 14 13:30 tempfiles.json

drwxr-xr-x. 4 root root   38 Jul 14 15:56 updates-7eea87b22825bc0d

drwxr-xr-x. 4 root root   38 Jul 14 15:56 updates-modular-67de45f4f37a0461
Not only are there files that are dedicated to a particular repo, such as the fedora-37d3cae0527b639, which maps to the fedora repository; there are also files that are particular to managing the cache, such as packages.db.
The command to clean out the cache and start afresh is sudo dnf clean all.
Getting repository information from the local SQLite database
RPM does more than store repository information in the cache or .repo files. When a package is installed, RPM makes entries into a SQLite database hosted on the local computer. This database is dedicated to RPM activity and is located in the host computer's /var/lib/rpm directory.
The SQLite entries describe metadata about the package that's been installed. You use rpm -qi to get information from the SQLite database about a particular package. This listing shows an example of executing the rpm -q -i jq command to get information about the jq utility, which is used to parse and filter JSON files.
$ rpm -q -i jq


Name        : jq

Version     : 1.6

Release     : 9.el9

Architecture: x86_64

Install Date: Mon 30 May 2022 02:07:40 PM PDT

Group       : Unspecified

Size        : 400049

License     : MIT and ASL 2.0 and CC-BY and GPLv3

Signature   : RSA/SHA256, Wed 11 Aug 2021 05:50:53 PM PDT, Key ID 05b555b38483c65d

Source RPM  : jq-1.6-9.el9.src.rpm

Build Date  : Mon 09 Aug 2021 03:22:17 PM PDT

Build Host  : x86-02.stream.rdu2.redhat.com

Packager    : builder@centos.org

Vendor      : CentOS

URL         : http://stedolan.github.io/jq/

Summary     : Command-line JSON processor

Description :

lightweight and flexible command-line JSON processor


 jq is like sed for JSON data – you can use it to slice

 and filter and map and transform structured data with

 the same ease that sed, awk, grep and friends let you

 play with text.


 It is written in portable C, and it has zero runtime

 dependencies.


 jq can mangle the data format that you have into the

 one that you want with very little effort, and the

 program to do so is often shorter and simpler than

 you'd expect.
You can also view information from the SQLite database that has RPM repository data directly by using a SQLite client. You install SQLite and the client using this command:
sudo dnf install sqlite
After it's been installed, you gain access to the RPM using the SQLite client by executing the following command:
$ sqlite3 /var/lib/rpm/rpmdb.sqlite
Once the client is invoked, you can use SQLite commands and queries at the prompt of the SQLite client to set and get information in the SQLite RPM/dnf database. This listing shows the command that produces a list of tables in the SQLite database.
sqlite> .tables


Basenames             Name                  Sigmd5

Conflictname          Obsoletename          Suggestname

Dirnames              Packages              Supplementname

Enhancename           Providename           Transfiletriggername

Filetriggername       Recommendname         Triggername

Group                 Requirename

Installtid            Sha1header
Putting it all together
The RPM installation process is pretty ingenious. It's no small feat to set things up so that a single command executed in a terminal window does the enormous amount of work required to find and install the multitude of components required to run a particular application on a RHEL, Fedora, or CentOS Stream computer. There's a good argument to be made that the RPM package manager helped bring Linux into the mainstream for business and home users.
At the center of it all is the .repo file. The standardization inherent in a .repo file provides the predictability that is essential to making RPM work. The RPM discovery and installation process based on a standard .repo file specification makes it so all RPM packages are installed in the same manner on any computer running RHEL, Fedora, or CentOS Stream. It's an amazing feat.
Understanding the details of a .repo file as described in this article is an important next step for working with RPM beyond general usage, particularly when you start developing your own RPM packages. Hopefully, the information provided in the article will help make it easier for you to move forward working with RPM.