Redhat Developers  Logo
  • AI

    Get started with AI

    • Red Hat AI
      Accelerate the development and deployment of enterprise AI solutions.
    • AI learning hub
      Explore learning materials and tools, organized by task.
    • AI interactive demos
      Click through scenarios with Red Hat AI, including training LLMs and more.
    • AI/ML learning paths
      Expand your OpenShift AI knowledge using these learning resources.
    • AI quickstarts
      Focused AI use cases designed for fast deployment on Red Hat AI platforms.
    • No-cost AI training
      Foundational Red Hat AI training.

    Featured resources

    • OpenShift AI learning
    • Open source AI for developers
    • AI product application development
    • Open source-powered AI/ML for hybrid cloud
    • AI and Node.js cheat sheet

    Red Hat AI Factory with NVIDIA

    • Red Hat AI Factory with NVIDIA is a co-engineered, enterprise-grade AI solution for building, deploying, and managing AI at scale across hybrid cloud environments.
    • Explore the solution
  • Learn

    Self-guided

    • Documentation
      Find answers, get step-by-step guidance, and learn how to use Red Hat products.
    • Learning paths
      Explore curated walkthroughs for common development tasks.
    • Guided learning
      Receive custom learning paths powered by our AI assistant.
    • See all learning

    Hands-on

    • Developer Sandbox
      Spin up Red Hat's products and technologies without setup or configuration.
    • Interactive labs
      Learn by doing in these hands-on, browser-based experiences.
    • Interactive demos
      Click through product features in these guided tours.

    Browse by topic

    • AI/ML
    • Automation
    • Java
    • Kubernetes
    • Linux
    • See all topics

    Training & certifications

    • Courses and exams
    • Certifications
    • Skills assessments
    • Red Hat Academy
    • Learning subscription
    • Explore training
  • Build

    Get started

    • Red Hat build of Podman Desktop
      A downloadable, local development hub to experiment with our products and builds.
    • Developer Sandbox
      Spin up Red Hat's products and technologies without setup or configuration.

    Download products

    • Access product downloads to start building and testing right away.
    • Red Hat Enterprise Linux
    • Red Hat AI
    • Red Hat OpenShift
    • Red Hat Ansible Automation Platform
    • See all products

    Featured

    • Red Hat build of OpenJDK
    • Red Hat JBoss Enterprise Application Platform
    • Red Hat OpenShift Dev Spaces
    • Red Hat Developer Toolset

    References

    • E-books
    • Documentation
    • Cheat sheets
    • Architecture center
  • Community

    Get involved

    • Events
    • Live AI events
    • Red Hat Summit
    • Red Hat Accelerators
    • Community discussions

    Follow along

    • Articles & blogs
    • Developer newsletter
    • Videos
    • Github

    Get help

    • Customer service
    • Customer support
    • Regional contacts
    • Find a partner

    Join the Red Hat Developer program

    • Download Red Hat products and project builds, access support documentation, learning content, and more.
    • Explore the benefits

Open source edge detection with OpenCV and Pachyderm

June 1, 2022
JooHo Lee
Related topics:
Artificial intelligenceCI/CDKubernetes
Related products:
Red Hat OpenShift

    Edge detection is central to image recognition, which is one of the most common applications of machine learning. This article introduces a Jupyter notebook for creating a Pachyderm pipeline that performs edge detection. For convenience, the article uses a Red Hat OpenShift cluster configuration described in an earlier Red Hat Developer article, How to install an open source tool for creating machine learning pipelines, but you can use the notebook on any Kubernetes cluster.


    Edge detection with OpenCV

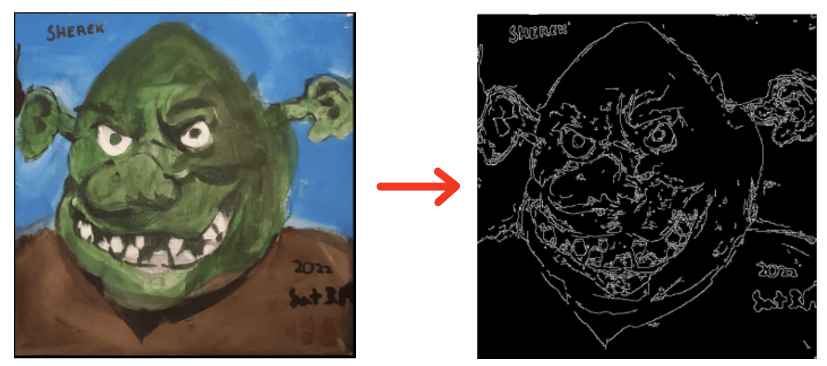
    A good way to understand edge detection is to look at Figure 1. Compare the picture my son drew of the cartoon character Shrek, on the left, with the image produced by an edge detection algorithm on the right. Edge detection is one of the first steps in many machine learning processes that alter images or identify their content.

    Edge detection, performed here on a child's picture, is the first step in identifying the elements an image.
    Figure 1: Edge detection, performed here on a child's picture, is the first step in identifying the elements an image.

    The most popular open source tool for image and video manipulation is OpenCV. I use its edge detection library along with Pachyderm to create the machine learning pipeline in the Jupyter notebook.

    There are several advantages to using Pachyderm for this task. Like Git, Pachyderm's data versioning allows you to manage your data and iterate over it using repositories and commits. Pachyderm is not limited to text files and structured data, but can version any data (image, audio, video, text). Pachyderm's version control system is optimized to scale to large datasets of all types, providing consistent reproducibility.

    Pachyderm's pipelines allow you to connect your code to data repositories. It can be used to automate many components of the machine learning lifecycle, such as data preparation, testing, model training, and more, by rerunning the pipeline when new data is committed. Pachyderm's pipelines and version control capabilities work together to visualize the end-to-end flow of your machine learning workflow.

    The notebook in this article creates two repositories. The first, named images, receives the input images. The second, named edges, stores the results of the Pachyderm pipeline (Figure 2). Once the flow is configured, execution of the pipeline is triggered by committing an image to the images source repository. The Python source code I use for edge detection is in a GitHub repository.

    Images in an input Pachyderm repository pass through the edges.py pipeline to generate edges in an output Pachyderm repository.
    Figure 2: Images in an input Pachyderm repository pass through the edges.py pipeline to generate edges in an output Pachyderm repository.

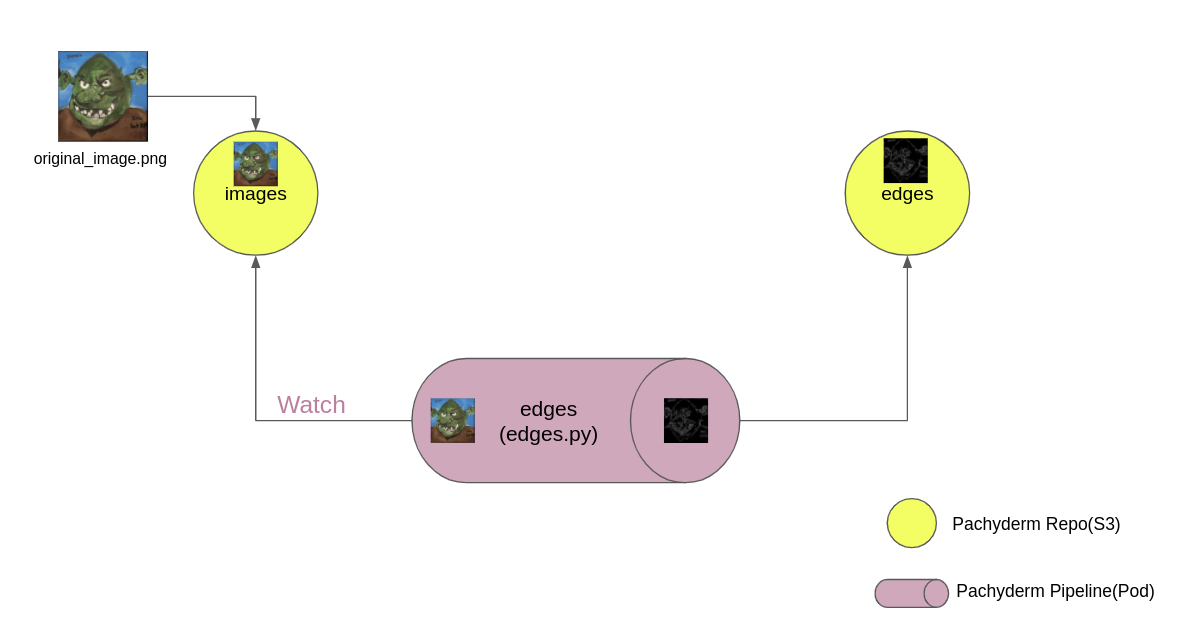
    Pachyderm's pipeline monitors the images source repository and detects when a new image is pushed to it. Once the pipeline pod is running, you can reuse it by pushing other images to the source repository. The notebook includes detailed explanations for each of its cells.

    Obtaining and running the Jupyter notebook

    The environment in my previous article went to Open Data Hub to download Pachyderm and JupyterHub on an OpenShift instance. The steps in this article start with that environment. Using Open Data Hub, you can also deploy Pachyderm and JupyterHub on any Kubernetes cluster you have.

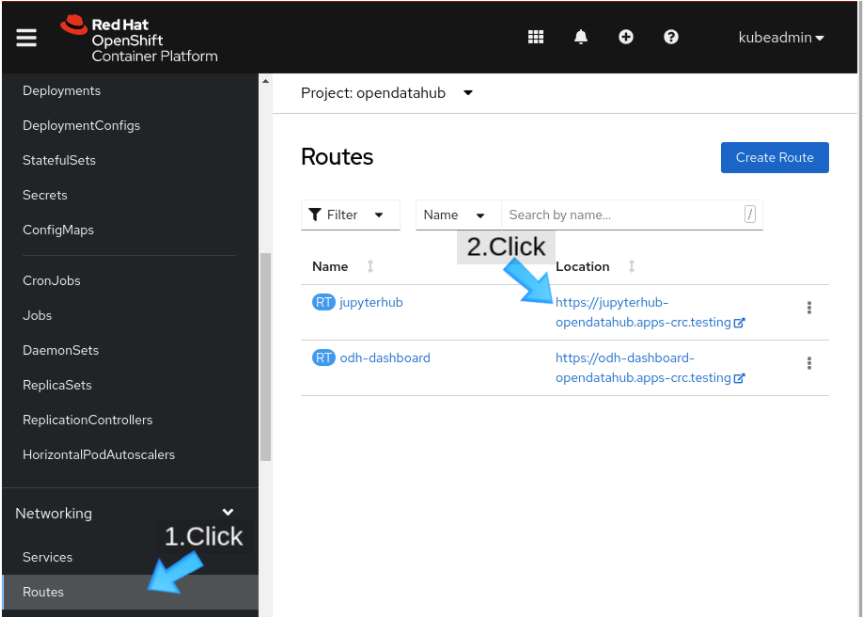
    First, visit your installed instance of JupyterHub. If you installed JupyterHub through Open Data Hub, you can find a jupyterhub route in the Open Data Hub project (Figure 3).

    Choose Routes in the left-hand menu and then click the jupyterhub route.
    Figure 3: Choose Routes in the left-hand menu and then click the jupyterhub route.

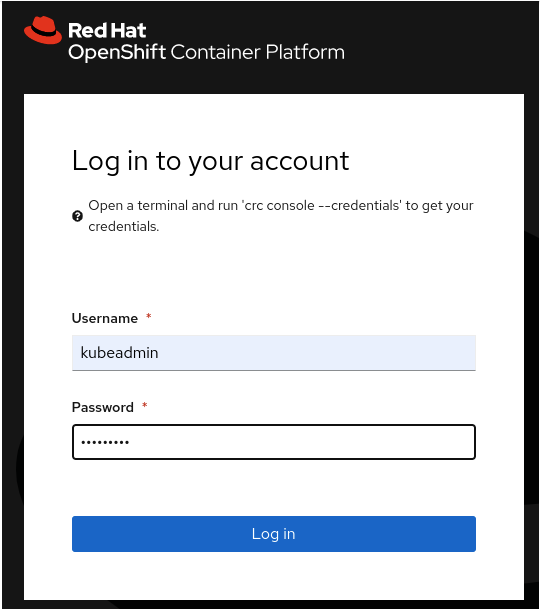
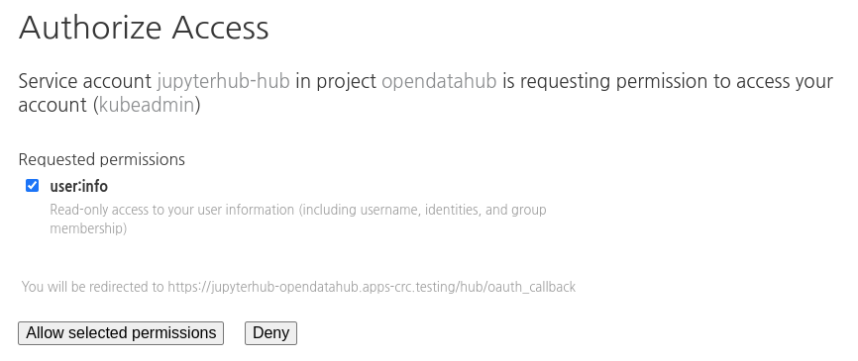
    OpenShift's OAuth proxy is integrated with JupyterHub, so you can get into JupyterHub after you enter your username and password in OpenShift (Figure 4). The web page prompts you to give JupyterHub access to your account (Figure 5).

    Log in to OpenShift Container Platform to get access to JupyterHub.
    Figure 4: Log in to OpenShift Container Platform to get access to JupyterHub.
    Press "Allow selected permissions" to giv e JupyterHub access to your information.
    Figure 5: Press "Allow selected permissions" to giv e JupyterHub access to your information.
    Figure 5: Click "Allow selected permissions" to give JupyterHub access to your information.

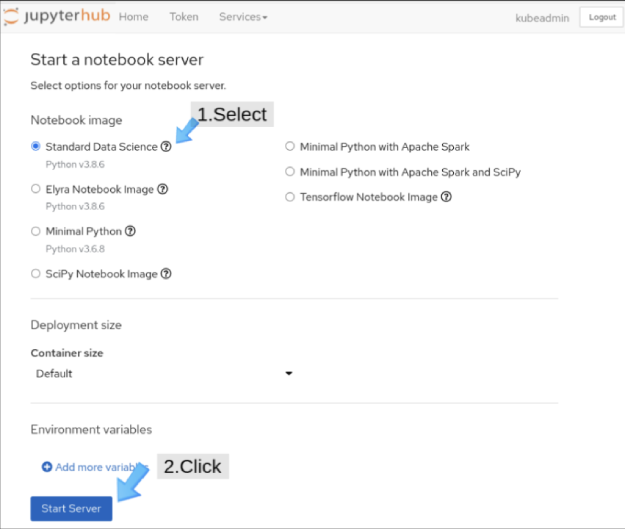
    We turn now to the JupyterHub web interface, Swan. On the Start a notebook server page, choose the Standard Data Science notebook (Figure 6).

    Start the server for the Standard Data Science notebook.
    Figure 6: Start the server for the Standard Data Science notebook.

    The image takes a few minutes to load (Figure 7).

    A pop-up shows the progress while the image is being loaded.
    Figure 7: A pop-up shows the progress while the image is being loaded.

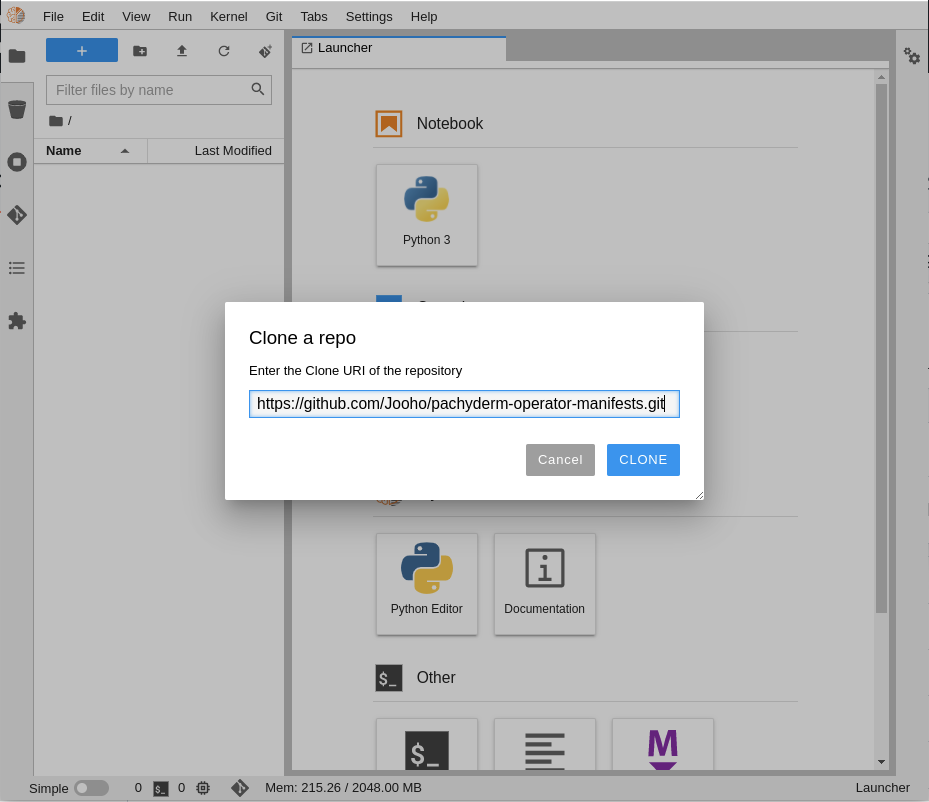
    Using the menu at the top of the interface (Figure 8), clone the GitHub repository, which is named https://github.com/Jooho/pachyderm-operator-manifests.git (Figure 9).

    The icon to clone the GitHub repository is the rightmost icon on the top menu on the left of the screen.
    Figure 8: The icon to clone the GitHub repository is the rightmost icon on the top menu on the left of the screen.
    A dialog allows you to paste in the URL of the Git repository.
    Figure 9: A dialog allows you to paste in the URL of the Git repository.

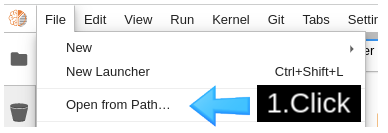
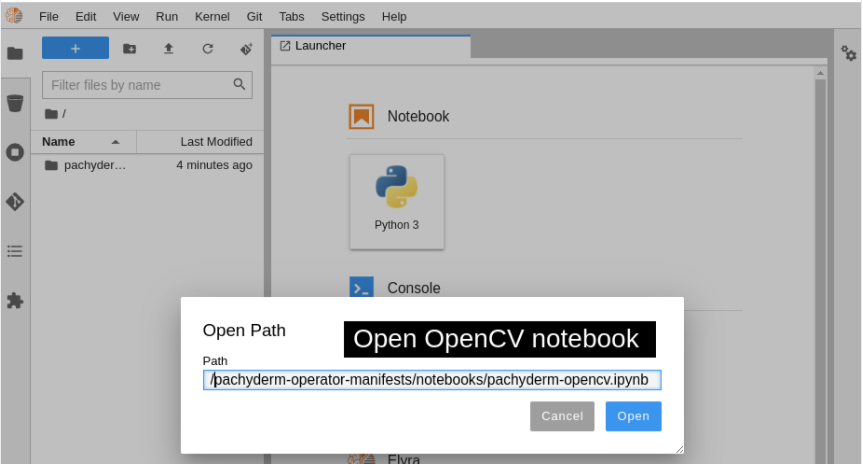
    Run the notebook by opening the file on your system (Figure 10). The notebook is at /pachyderm-operator-manifests/notebooks/pachyderm-opencv.ipynb in the repository you downloaded from GitHub (Figure 11). You can now interact with the cells in the OpenCV Edge Detection Jupyter notebook.

    From the File menu, choose "Open from Path."
    Figure 10: From the File menu, choose "Open from Path."
    In the dialog box, paste in the path to the local notebook.
    Figure 11: In the dialog box, paste in the path to the local notebook.

    Congratulations: You're now ready to start experimenting with image recognition, which has a number of use cases in machine learning. The following two-minute video outlines the steps in this article so you can see how it works in action!

    Last updated: November 6, 2023

    Related Posts

    • How to install an open source tool for creating machine learning pipelines

    • Configure CodeReady Containers for AI/ML development

    Recent Posts

    • Every layer counts: Defense in depth for AI agents with Red Hat AI

    • Fun in the RUN instruction: Why container builds with distroless images can surprise you

    • Trusted software factory: Building trust in the agentic AI era

    • Build a zero trust AI pipeline with OpenShift and RHEL CVMs

    • Red Hat Hardened Images: Top 5 benefits for software developers

    What’s up next?

    book cover

    Open Source Data Pipelines for Intelligent Applications provides data engineers and scientists insight into how Kubernetes provides a platform for building data platforms that increase an organization’s data agility. 

    Download the free e-book
    Red Hat Developers logo LinkedIn YouTube Twitter Facebook

    Platforms

    • Red Hat AI
    • Red Hat Enterprise Linux
    • Red Hat OpenShift
    • Red Hat Ansible Automation Platform
    • See all products

    Build

    • Developer Sandbox
    • Developer tools
    • Interactive tutorials
    • API catalog

    Quicklinks

    • Learning resources
    • E-books
    • Cheat sheets
    • Blog
    • Events
    • Newsletter

    Communicate

    • About us
    • Contact sales
    • Find a partner
    • Report a website issue
    • Site status dashboard
    • Report a security problem

    RED HAT DEVELOPER

    Build here. Go anywhere.

    We serve the builders. The problem solvers who create careers with code.

    Join us if you’re a developer, software engineer, web designer, front-end designer, UX designer, computer scientist, architect, tester, product manager, project manager or team lead.

    Sign me up

    Red Hat legal and privacy links

    • About Red Hat
    • Jobs
    • Events
    • Locations
    • Contact Red Hat
    • Red Hat Blog
    • Inclusion at Red Hat
    • Cool Stuff Store
    • Red Hat Summit
    © 2026 Red Hat

    Red Hat legal and privacy links

    • Privacy statement
    • Terms of use
    • All policies and guidelines
    • Digital accessibility

    Chat Support

    Please log in with your Red Hat account to access chat support.