What is path MTU discovery?
A maximum transmission unit (MTU) is the largest packet that can be transmitted as a single entity over a network connection. Each network node defines the MTU for packets it's transmitting through a standard called path MTU discovery (PMTUD). The goal of PMTUD is to choose the most efficient packet size that will succeed in reaching the recipient. In this article, you'll learn how this process works in the Linux kernel's implementation of the Stream Control Transmission Protocol (SCTP).
Linux SCTP uses an algorithm called Datagram Packetization Layer Path MTU Discovery (DPLPMTUD, or just PLPMTUD), which is described in RFC 8899. Unlike earlier forms of PMTUD, this method does not rely on reception and validation of Packet Too Big (PTB) ICMP messages. The new implementation is therefore more robust than the classical PMTUD.
PLPMTUD for SCTP was implemented in the Linux kernel some months ago and will be supported on versions 8.6 and 9.0 of Red Hat Enterprise Linux.
The general strategy behind PLPMTUD runs in the kernel's packetization layer (PL). It sends probe packets using various packet sizes to determine the largest size of unfragmented datagram that can be sent over a network path. If a probe packet is successfully delivered (as determined by the PL), the PLPMTU is raised to the size of the successful probe. If a black hole is detected (that is, if packets of size PLPMTU are consistently not received), the method reduces the PLPMTU.
Probes and acknowledgements
RFC 8899 defines the contents of a probe packet and the acknowledgement (ACK) returned by the recipient.
Each probe packet consists of an SCTP common header followed by a HEARTBEAT chunk and a PAD chunk. The HEARTBEAT chunk causes the recipient to send back a HEARTBEAT ACK packet to confirm that the probe was successful. The PAD chunk specifies the length of the probe packet.
The HEARTBEAT chunk also carries a Heartbeat Information parameter that includes the size of the probe packet in a PROBED_SIZE field. Because the recipient returns this value in its HEARTBEAT ACK packet, the sender can be certain as to what the size of the original probe is, and therefore what is safe to assign as a packet size for further traffic. If the PROBED_SIZE field in a successful exchange is bigger than the PLPMTU, the sender can start using the larger size.
The implementation on Linux uses the timers and variables described in the following subsections.
Timers
There is one timer per transport. The timer is used as the PMTU_RAISE_TIMER defined in the RFC when path MTU discovery is in the Search Complete state, and as the PROBE_TIMER in other states. (You'll get an outline of these various states later in this article.)
The timer is started once PLPMTUD is enabled and path MTU discovery enters the Base state. The timer times out after every PROBE_INTERVAL, causing the node to resend any lost probe packets.
When in the Search Complete state, the timer times out every 30 PROBE_INTERVAL periods. The node then goes back to the Search state, using the timer to trigger resends when necessary.
Variables
The following variables track values and state in Linux path MTU discovery:
PLPMTU: Keeps the most recently confirmedPROBED_SIZE. The value equalspath MTU - sizeof(IP/IPv6 header). When path MTU discovery enters the Search Complete state, the path MTU used for transmission is updated to the valuePLPMTU + sizeof(IP/IPv6 header).PROBE_COUNT: A count for the number of successive unsuccessful probe packets that have been sent. When a probe packet is acknowledged, the value is set to zero.PROBE_INTERVAL: The time interval (in milliseconds) used to schedule the PLPMTUD probe timer. The timer expires if the node fails to receive an acknowledgement to a probe packet after this period. This variable is also the time interval between probes for the current path MTU when probe searching is done.PROBED_SIZE: The size of the current probe packet as determined at the PL. This value is a tentative value for thePLPMTU, awaiting confirmation by an acknowledgement.PTB/PTB_SIZE: As noted above,PTBstands for Packet Too Big; this is sometimes also called Fragmentation Needed.PTB_SIZEis related to the path MTU, but with the IP header length subtracted from the value.
Constants
The following constants are used in making path MTU discovery decisions:
BASE_PLPMTU: A configured size that is expected to work for most paths, set to 1200. PLPMTUD starts its probe with this value asPROBED_SIZE. If the realPLPMTUturns out to be smaller, the kernel enters the Error state and allows IP fragmentation.MAX_PROBES: The maximum value of thePROBE_COUNTcounter. If consecutive probe attempts of any size exceed this value, the state can change and start to probe in a different rhythm. This constant is set to 3.BIG_STEP,MIN_STEP: The increments added toPROBED_SIZEwhen a probe succeeds.BIG_STEPis used when the Search state starts. If a probe fails,MIN_STEPis used instead.BIG_STEPis set to 32 andMIN_STEPto 4.
Commands to set options for path MTU discovery
System administrators or developers can change runtime parameters through the mechanisms in this section.
sysctl
The sysctl command provides a default value for new sockets' PROBE_INTERVAL value:
sysctl -w net.sctp.plpmtud_probe_interval=5000
The parameter is set for the network namespace (netns). A new association takes the value from its socket, and a new transport takes the value from its association. Changes to this parameter affect only sockets that are created subsequently.
setsocketopt
To configure the PROBE_INTERVAL on a fine-grained basis, this system call can change the value for a socket, an association, or even a transport:
setsocketopt(SCTP_PLPMTUD_PROBE_INTERVAL, interval)
State machine and steps in path MTU discovery
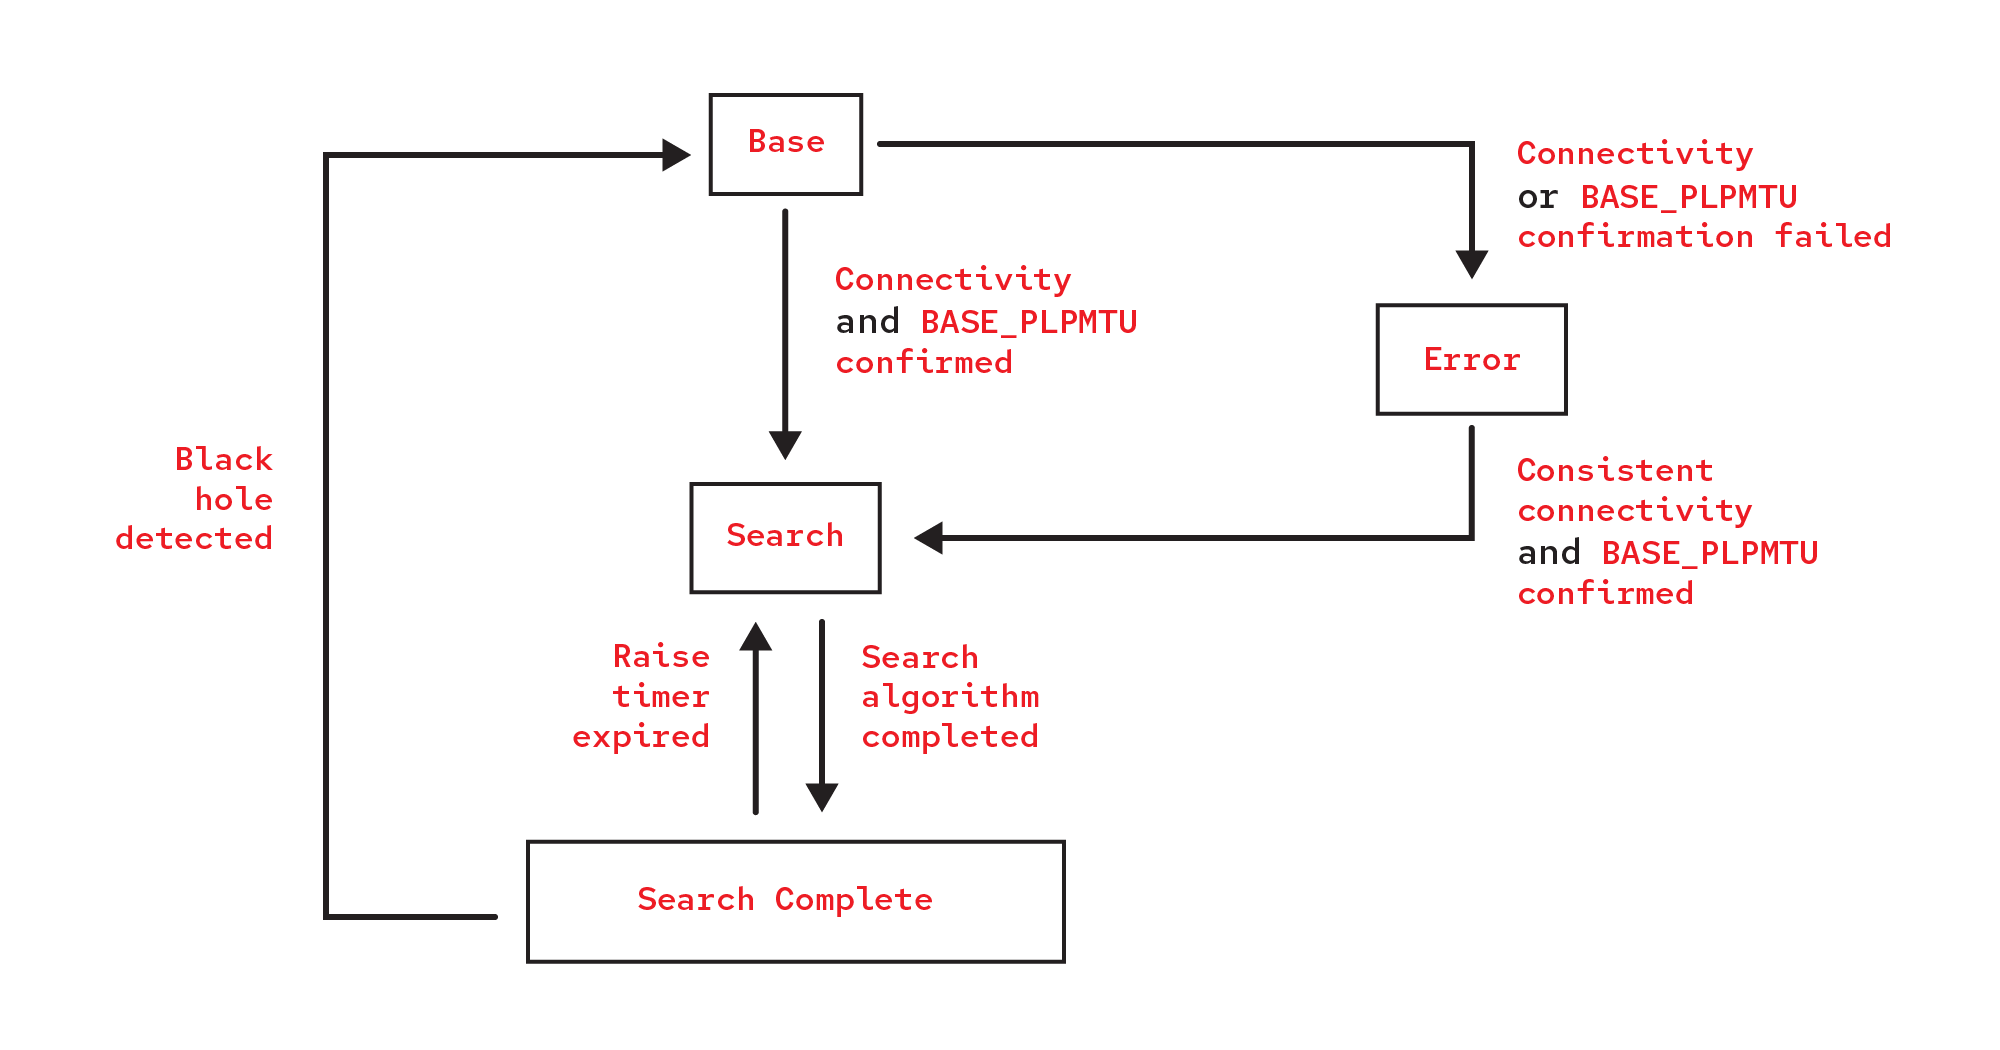
Figure 1 shows the stages in path MTU discovery and how the node moves between them.
In the following subsections, we'll examine the most common state transitions.
Base → Search → Search Complete
A normal probe starts from the Base state and probes with a path MTU of BASE_PLPMTU (1200). Once a packet is acknowledged, path MTU discovery enters the Search state. The next probe starts by incrementing the PROBED_SIZE by BIG_STEP (32).
This probe-ack-increment-probe sequence advances until a probe packet fails to be acknowledged. When that happens, the node resends the probe MAX_PROBES-1 more times (2 times, by default) with the same PROBED_SIZE following a wait of PROBE_INTERVAL milliseconds.
If these probes do not succeed, the node starts to probe with the PLPMTU and increments it by MIN_STEP (4) each time. It continues until one probe fails in the same way as before. The node then assumes that the proper PLPMTU is found. The node updates the path MTU on transport and enters the Search Complete state.
Search Complete → Search → Search Complete
In the Search Complete state, the node waits for 30 intervals of PROBE_INTERVAL milliseconds unless it notices a data retransmission.
When there is a data retransmission or the 30 PROBE_INTERVAL periods expire, the node enters the Search state. It starts probing with a probe of PROBED_SIZE+MIN_STEP. If this probe gets acknowledged, the next probe increments the size by BIG_STEP. When a new proper PLPMTU is found, the node updates the transport path MTU with that value and re-enters the Search Complete state.
Search/Search Complete → Base
During a search, any probe that fails with the PROBED_SIZE set to the PLPMTU causes a "Black Hole detected" error, sending the node back to the Base state.
If a probe fails even with the BASE_PLPMTU, the node enters the Error state, where IP fragmentation is allowed.
Packet Too Big or Fragmentation Needed
During PTB packet processing, if the PTB_SIZE is between the PLPMTU and PROBED_SIZE, the next probe starts with the PROBED_SIZE set to PTB_SIZE. This could save some rounds of probing when finding the proper PLPMTU.
Path MTU discovery example scenarios
This section contains examples showing how PROBED_SIZE changes during PLPMTUD probing in different scenarios in Linux SCTP. The examples are based on the topology in Figure 2. The topology has two clients and a router with two interfaces:
- A host (client) at
link1_1exchanges packets with the router at itslink1_2interface. - A host (server) at
link2_2exchanges packets with the router at itslink2_1interface.

We begin by starting an SCTP connection from client to server:
  sctp_darn -H 192.168.2.1 -P 8888 -l  # on Server
  sctp_darn -H 192.168.1.1 -P 8888 -h 192.168.2.1 -p 8888 -s  # on Client
Each of the scenarios that follow shows system administration commands that trigger a path MTU discovery sequence change, and the steps followed by the kernel to set the path MTU.
Basic sequence
Many sequences in path MTU discovery return to the one in this section. The sequence can be triggered through the following commands:
  iptables -A INPUT -p icmp -j DROP  # on Client, disable the classical PMTUD
  ip link set link2_1 mtu 1400  # on Router
Steps in path MTU discovery (Base → Search → Complete):
- Probed size: 1200 (Starts at
BASE_PLPMTU(1200), tries to confirm) - Probed size: 1200 (Confirmed and enters Search, increments by
BIG_STEP) - Probed size: 1232 → 1264 → ... → 1356
- Probed size: 1388 (3-time-rtx failed, goes back to 1356)
- Probed size: 1356 (increments by
MIN_STEP) → 1360 → 1364 → ... → 1380 - Probed size: 1384 (3-time-rtx failed, tries to confirm 1380)
- Probed size: 1380 (confirmed, enters Complete and sets path MTU)
- Probed size: 1380 (raise-timer up, enters Search, increments by
MIN_STEP) - Probed size: 1384 (3-time-rtx failed, tries to confirm 1380)
- Probed size: 1380 (confirmed, enters Complete and sets path MTU)
Other sample sequences
In this section, you'll see the sequences that can be triggered by a number of specific commands.
If this command is entered:
ip link set link2_1 mtu 1500 # on Router
Then these are the steps in path MTU discovery (Complete → Search → Complete):
- Probed size: 1380 (raise-timer up, tries to confirm 1380)
- Probed size: 1380 (confirmed, enters Search, increments by
MIN_STEP) - Probed size: 1384 (confirmed, increments by
BIG_STEP) → 1416 → 1448 → ... → 1480 - Probed size: 1512 (3-time-rtx failed, goes back to 1480)
- Probed size: 1480 (increments by
MIN_STEP) - Probed size: 1484 (3-time-rtx failed, tries to confirm 1480)
- Probed size: 1480 (confirmed, enters Complete and sets path MTU)
If this command is entered:
ip link set link2_1 mtu 1400 # on Router
Then these are the steps in path MTU discovery (Complete → Base → Search):
- Probed size: 1480 (raise-timer up, tries to confirm 1480)
- Probed size: 1480 (3-time-rtx failed, enters Base, goes back to 1200, sets path MTU)
- Probed size: 1200 (confirmed, enters Search, increments by
BIG_STEP) - Probed size: 1232
- Starts basic sequence
If this command is entered:
ip link set link2_1 mtu 1000 # on Router
Then these are the steps in path MTU discovery (Complete → Search → Base → Error):
- Probed size: 1380 (raise-timer up, tries to confirm 1380)
- Probed size: 1380 (3-time-rtx failed, enters Base, goes back to 1200 and sets path MTU)
- Probed size: 1200 (3-time-rtx failed, enters Error, allows IP fragmentation)
- Probed size: 1200 (3-time-rtx failed, enters Error, allows IP fragmentation)
- Probed size: 1200 (...)
If this command is entered:
ip link set link2_1 mtu 1400 # on Router
Then these are the steps in path MTU discovery (Error → Base → Search → Complete):
- Probed size: 1200 (confirmed, enters Base, tries to confirm 1200 again)
- Probed size: 1200 (confirmed, enters Search, increments by
BIG_STEP) - Probed size: 1232
- Starts basic sequence
If this command is entered:
ip link set link1_1 mtu 1500 # on Client
Then these are the steps in path MTU discovery (Complete → Base):
- Probed size: 1380 (rtx-timer reset, enters Base, goes back to 1200)
- Probed size: 1200 (confirmed, enters Search, increments by
BIG_STEP) - Probed size: 1232
- Starts basic sequence
If this command is entered:
  iptables -D INPUT -p icmp -j DROP  # on Client, enable the classical PMTUD
  ip link set link1_1 mtu 1430  # on Client
Then these are the steps in path MTU discovery (Complete → Search → Complete):
- 1. Probed size: 1380 (raise-timer up, tries to confirm 1380)
- Probed size: 1380 (confirmed, enters Search, increments by
MIN_STEP) - Probed size: 1384 (confirmed, increments by
BIG_STEP) - Probed size: 1416 (
PTBreceived (path MTU == 1430), tries to confirm the path MTU from it) - Probed size: 1408 (confirmed, increments by
BIG_STEP) - Probed size: 1440 (3-time-rtx failed, goes back to 1408)
- Probed size: 1408 (increments by
MIN_STEP) - Probed size: 1412 (3-time-rtx failed, tries to confirm 1408)
- Probed size: 1408 (enters Complete and sets path MTU)
If this command is entered:
ip link set link2_1 mtu 1400 # on Router
Then these are the steps in path MTU discovery (Complete → Base):
- Probed size: 1408 (raise-timer up, tries to confirm 1408)
- Probed size: 1408 (PTB received (path MTU < 1408), enters Base, goes back to 1200 and sets path MTU)
- Probed size: 1200 (confirmed, enters Search, increments by
BIG_STEP) - Probed size: 1232
- Starts basic sequence
If these commands are entered:
  iptables -A INPUT -p icmp -j DROP  # on Client, disable the classical PMTUD
  ip link set link2_1 mtu 1300  # on Router
  # on Client, input 1350 bytes data in sctp_darn
Then these are the steps in path MTU discovery (Complete → Base):
- Probed size: 1380 (Data RTX happens, tries to confirm 1380)
- Probed size: 1380 (3-time-rtx failed, enters Base, goes back to 1200 and sets path MTU)
- Probed size: 1200 (confirmed, enters Search, increments by
BIG_STEP) - Probed size: 1232
- Starts basic sequence
Conclusion
Packets that cause ICMP PTB or Fragmentation Needed errors are often dropped or disabled in networking routers or servers. Classical PMTUD is not able to get the proper path MTU, which causes inefficient data transmission and even packet loss. PLPMTUD provides us with an effective way to overcome this. If you are an SCTP user, this article has shown you the details of how PLPMTUD works in SCTP, and how it can be used in your SCTP programs.
Last updated: October 8, 2024