Red Hat OpenShift Service on AWS is a version of the Red Hat OpenShift hosting service managed by Amazon Web Services (AWS). Although your cluster's own integrity is secure in that environment, communicating safely outside the cluster requires considerable setup. In this article, you'll learn how to connect securely through a firewall to the internet while keeping your cluster in a private workspace. We use Amazon's Virtual Private Cloud (VPC), Security Token Service (STS), and AWS Transit Gateway to effect secure connections.
Note: To follow along with this article, you should be familiar with the AWS command-line interface (CLI), and have a basic understanding of AWS networking, routing, AWS permissions, transit gateways, and OpenShift, as well as Linux shell commands.
Secure connections to managed cloud services
There has been a recent industry-wide shift to managed services, and Red Hat has begun to see users migrate from the self-managed OpenShift Container Platform to the OpenShift Service on AWS. Such a move allows you to take advantage of a managed OpenShift cluster while focusing business resources where they are most needed.
During these migrations, there is often discussion among application platform, infrastructure, cloud, networking, and security teams around the specific resources created during provisioning and these would fit into any existing architectures users may have. The solution outlined in this article will help you understand how STS can help to enhance your security, and how you can manage all your outbound internet communication securely from one place without compromising VPC isolation. By consolidating your outbound traffic, you can manage outbound communications security, scaling, and configuration in one place.
OpenShift Service on AWS private clusters with AWS PrivateLink are completely private. Red Hat site reliability engineering teams will make use of PrivateLink endpoints to access the cluster for management. You don't need public subnets, route tables, or an internet gateway. Typically, OpenShift Service on AWS private clusters with PrivateLink uses a transit gateway where the VPC for OpenShift Service on AWS will not have internet access. Traffic will flow from the OpenShift Service on AWS VPC to either an on-premise system or to another VPC or AWS account that provides a single controlled point of egress.
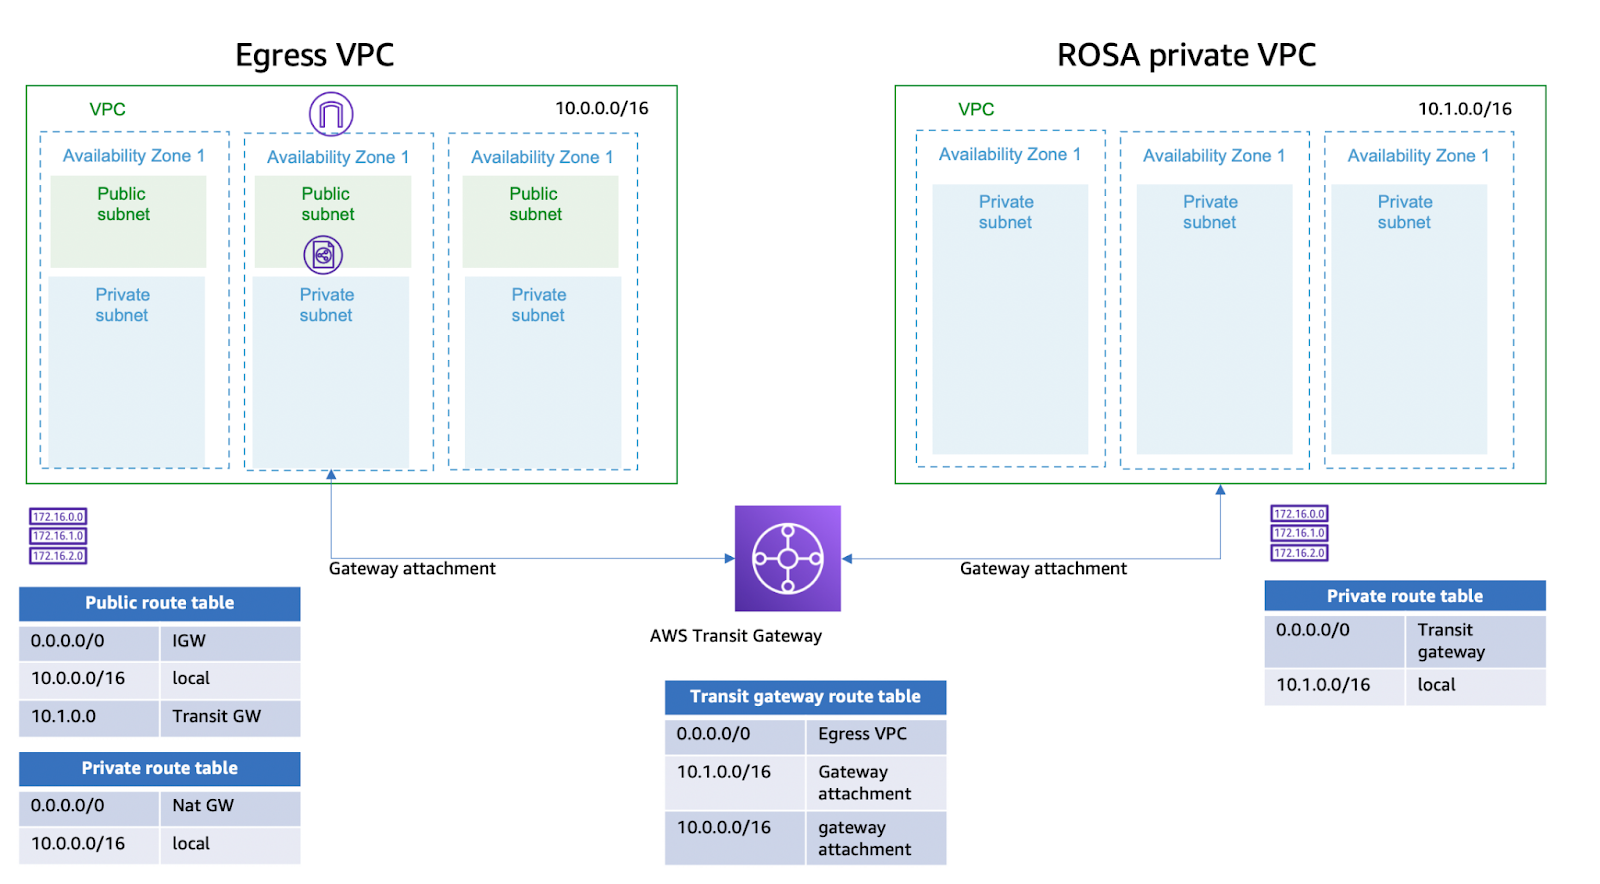
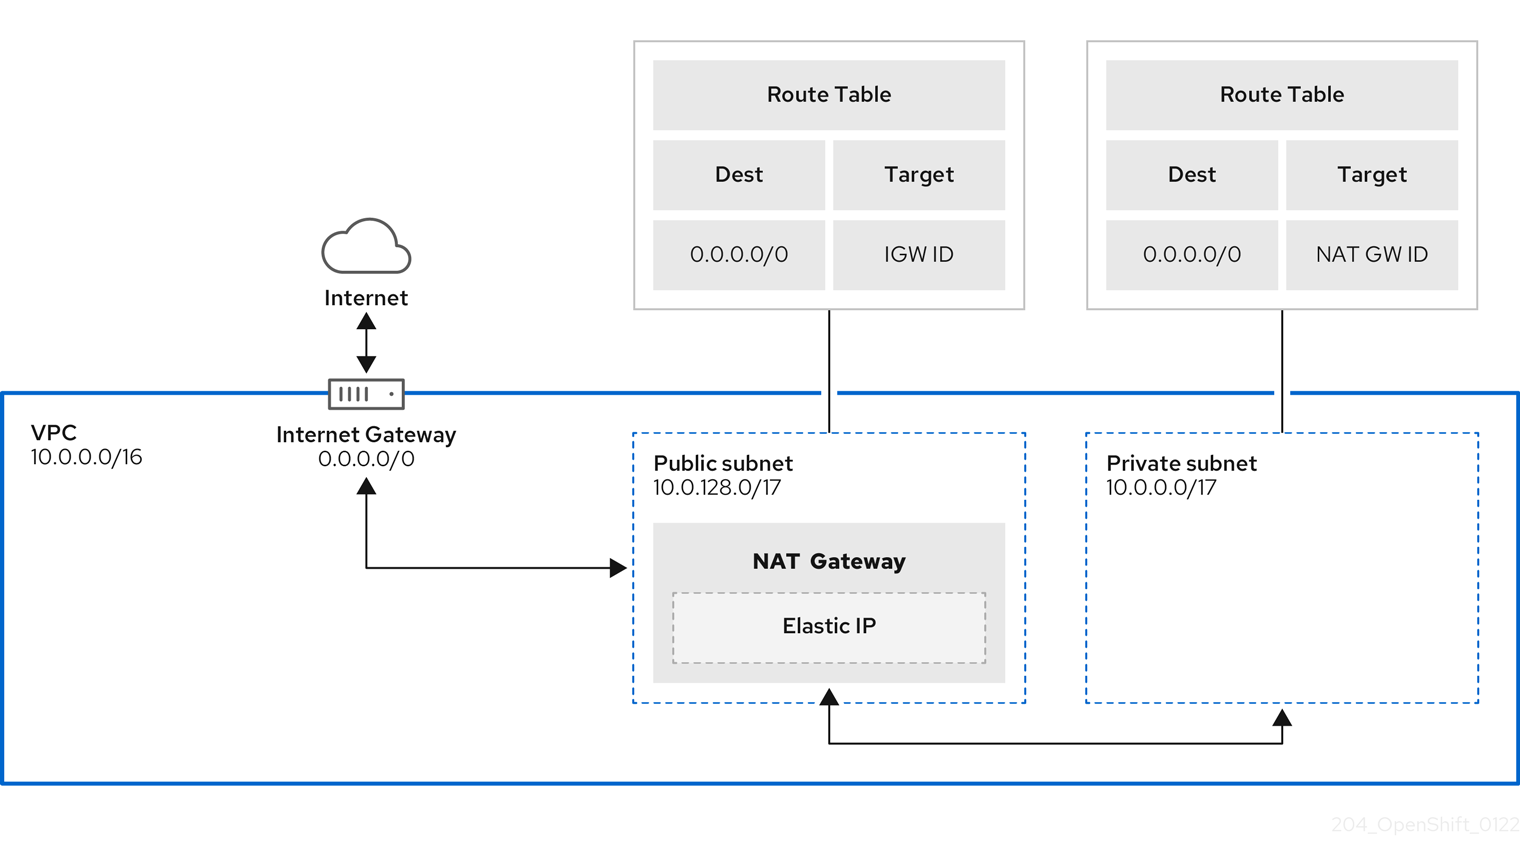
The scenario we'll describe in this article uses two VPCs: A private VPC in OpenShift Service on AWS and a public-facing VPC called the egress VPC. The private VPC contains only a single, private subnet, where all of the cluster resources reside. The egress VPC has a private subnet that communicates with the private VPC through the AWS Transit Gateway, and a public subnet that filters internet traffic through a standard firewall using network address translation (NAT).
Note: Although the example uses a single subnet in OpenShift Service on AWS for simplicity, we strongly recommend that a production cluster use multiple availability zones to minimize the potential for outages.
Figure 1 shows the overall architecture. Figure 2 shows how the egress VPC handles traffic to and from the internet. Over the course of this article, you'll see the commands that set up all these resources.
Prerequisites
The procedure in this article requires:
- The AWS CLI
- The OpenShift Service on AWS CLI (
rosa), version 1.1.7 - The jq command-line JSON processor
Before you create an OpenShift Service on AWS cluster that uses STS, you must complete the AWS prerequisites, verify that the required AWS service quotas are available, and set up your environment.
Please follow the OpenShift Service on AWS documentation to set up the account prerequisites. Review the identity and access management (IAM) policies, STS version, and firewall and security group prerequisites. Then configure your AWS account and enable OpenShift Service on AWS.
Create your private VPC
If this is a brand new AWS account that has never had an AWS Load Balancer installed, run the following command:
$ aws iam create-service-linked-role --aws-service-name "elasticloadbalancing.amazonaws.com"
Configure the following environment variables, submitting your own values for the ROSA_CLUSTER_NAME, VERSION, and REGION environment variables.
$ export VERSION=4.9.21 ROSA_CLUSTER_NAME=suresh-rosa AWS_DEFAULT_REGION=ap-southeast-1
Create the private VPC where the OpenShift Service on AWS cluster will be installed:
$ VPC_ID_1=`aws ec2 create-vpc --cidr-block 10.1.0.0/16 | jq -r .Vpc.VpcId`
Add a tag for the OpenShift Service on AWS private VPC:
$ aws ec2 create-tags --resources $VPC_ID_1 --tags Key=Name,Value=rosa_intranet_vpc
Create your egress VPC
Create the egress VPC with the following command:
$ VPC_ID_2=`aws ec2 create-vpc --cidr-block 10.0.0.0/16 | jq -r .Vpc.VpcId`
Tag the egress VPC:
$ aws ec2 create-tags --resources $VPC_ID_2 --tags Key=Name,Value=egress_vpc
Set up DNS
Configure the VPCs to allow DNS hostnames for their public IP addresses:
$ aws ec2 modify-vpc-attribute --vpc-id $VPC_ID_1 --enable-dns-hostnames
$ aws ec2 modify-vpc-attribute --vpc-id $VPC_ID_2 --enable-dns-hostnames
Create the subnets
Create a private subnet in the OpenShift Service on AWS private VPC where cluster instances will be running:
$ ROSA_PRIVATE_SUBNET=`aws ec2 create-subnet --vpc-id $VPC_ID_1 --cidr-block 10.1.0.0/17 | jq -r .Subnet.SubnetId`
Tag the private subnet in the OpenShift Service on AWS private VPC:
$ aws ec2 create-tags --resources $ROSA_PRIVATE_SUBNET --tags Key=Name,Value=intranet-pvt
Create a private subnet in the egress VPC:
$ EGRESS_PRIVATE_SUBNET=`aws ec2 create-subnet --vpc-id $VPC_ID_2 --cidr-block 10.0.0.0/17 | jq -r .Subnet.SubnetId`
Tag the private subnet in the egress VPC:
$ aws ec2 create-tags --resources $EGRESS_PRIVATE_SUBNET --tags Key=Name,Value=egress-pvt
Create a public subnet in the egress VPC to egress the traffic to the internet:
$ EGRESS_PUBLIC_SUBNET=`aws ec2 create-subnet --vpc-id $VPC_ID_2 --cidr-block 10.0.128.0/17 | jq -r .Subnet.SubnetId`
Tag the public subnet in the egress VPC:
$ aws ec2 create-tags --resources $EGRESS_PUBLIC_SUBNET --tags Key=Name,Value=egress-public
Create the internet gateway in the egress VPC
Create the internet gateway with the following command:
$ I_GW=`aws ec2 create-internet-gateway | jq -r .internetGateway.internetGatewayId`
Tag the internet gateway:
$ aws ec2 create-tags --resources $I_GW --tags Key=Name,Value=suresh_rosa_cluster
Attach the internet gateway to the egress VPC:
$ aws ec2 attach-internet-gateway --vpc-id $VPC_ID_2 --internet-gateway-id $I_GW
Create the NAT gateway in the egress VPC
Allocate an Elastic IP address:
$ EIP=`aws ec2 allocate-address --domain vpc | jq -r .AllocationId`
Create the NAT gateway with the following command and allocate the new Elastic IP address:
$ NAT_GATEWAY=`aws ec2 create-nat-gateway --subnet-id $EGRESS_PUBLIC_SUBNET --allocation-id $EIP | jq -r .NatGateway.NatGatewayId`
Tag the Elastic IP address:
$ aws ec2 create-tags --resources $EIP --resources $NAT_GATEWAY --tags Key=Name,Value=egress_nat_public
The new NAT gateway should now be created and associated with your VPC.
Create the AWS transit gateway
Create a transit gateway to attach the two VPCs as follows:
$ T_GW=`aws ec2 create-transit-gateway | jq -r .TransitGateway.TransitGatewayId`
Tag the transit gateway:
$ aws ec2 create-tags --resources $T_GW --tags Key=Name,Value=suresh-transit-gateway
The transit gateway starts in the pending state and will move to an available state in a few minutes. Once the transit gateway is in the available state, create a transit gateway VPC attachment for the OpenShift Service on AWS private VPC with a private subnet:
$ T_GW_A_RPV=`aws ec2 create-transit-gateway-vpc-attachment --transit-gateway-id $T_GW --vpc-id $VPC_ID_1 --subnet-ids $ROSA_PRIVATE_SUBNET | jq -r .TransitGatewayVpcAttachment.TransitGatewayAttachmentId`
Add a tag for the transit gateway attachment for the OpenShift Service on AWS private VPC:
$ aws ec2 create-tags --resources $T_GW_A_RPV --tags Key=Name,Value=transit-gw-intranet-attachment
Create the transit gateway VPC attachment for the egress VPC with a private subnet:
$ T_GW_A_EPV=`aws ec2 create-transit-gateway-vpc-attachment --transit-gateway-id $T_GW --vpc-id $VPC_ID_2 --subnet-ids $EGRESS_PRIVATE_SUBNET | jq -r .TransitGatewayVpcAttachment.TransitGatewayAttachmentId`
Add a tag for the transit gateway attachment for the egress VPC:
$ aws ec2 create-tags --resources $T_GW_A_EPV --tags Key=Name,Value=transit-gw-egress-attachment
Egress gateway route
Grab the default transit gateway's route table ID:
$ T_GW_D_RT=`aws ec2 describe-transit-gateways --transit-gateway-id $T_GW | jq -r '.TransitGateways | .[] | .Options.AssociationDefaultRouteTableId'`
Add a tag for the transit gateway's route table:
$ aws ec2 create-tags --resources $T_GW_D_RT --tags Key=Name,Value=transit-gw-rt
Add a static route for internet traffic to go to the egress VPC:
$ aws ec2 create-transit-gateway-route --destination-cidr-block 0.0.0.0/0 --transit-gateway-route-table-id $T_GW_D_RT --transit-gateway-attachment-id $T_GW_A_EPV
Grab the main route table associated with the OpenShift Service on AWS private VPC:
$ ROSA_VPC_MAIN_RT=`aws ec2 describe-route-tables --filters 'Name=vpc-id,Values='$VPC_ID_1'' --query 'RouteTables[].Associations[].RouteTableId' | jq .[] | tr -d '"'`
Add a tag for the OpenShift Service on AWS VPC's main route table:
$ aws ec2 create-tags --resources $ROSA_VPC_MAIN_RT --tags Key=Name,Value=rosa_main_rt
Grab the main route table associated with the egress VPC:
$ EGRESS_VPC_MAIN_RT=`aws ec2 describe-route-tables --filters 'Name=vpc-id,Values='$VPC_ID_2'' --query 'RouteTables[].Associations[].RouteTableId' | jq .[] | tr -d '"'`
Create a private route table in the egress VPC:
$ EGRESS_PRI_RT=`aws ec2 create-route-table --vpc-id $VPC_ID_2 | jq -r .RouteTable.RouteTableId`
Associate the private subnet from the egress VPC:
$ aws ec2 associate-route-table --route-table-id $EGRESS_PRI_RT --subnet-id $EGRESS_PRIVATE_SUBNET
NAT gateway route
Create a route in the egress private route table for all addresses to the NAT gateway:
$ aws ec2 create-route --route-table-id $EGRESS_PRI_RT --destination-cidr-block 0.0.0.0/0 --gateway-id $NAT_GATEWAY
Create a route in the egress VPC's main route table for all addresses going to the internet gateway:
$ aws ec2 create-route --route-table-id $EGRESS_VPC_MAIN_RT --destination-cidr-block 0.0.0.0/0 --gateway-id $I_GW
Create a route in the egress VPC's main route table to direct addresses in the OpenShift Service on AWS private VPC to the transit gateway:
$ aws ec2 create-route --route-table-id $EGRESS_VPC_MAIN_RT --destination-cidr-block 10.1.0.0/16 --gateway-id $T_GW
Create a route in the OpenShift Service on AWS private route table to direct all of its addresses to the transit gateway:
$ aws ec2 create-route --route-table-id $ROSA_VPC_MAIN_RT --destination-cidr-block 0.0.0.0/0 --gateway-id $T_GW
Create a cluster using Red Hat OpenShift Service on AWS
Make sure that the rosa binary is downloaded and available in the current working directory with executable permissions set. Then enter:
$ ./rosa create account-roles --mode auto --yes
Create your cluster:
$ ./rosa create cluster -y --cluster-name $ROSA_CLUSTER_NAME --region $AWS_DEFAULT_REGION --version $VERSION --private-link --machine-cidr=10.1.0.0/16 --sts --subnet-ids=$ROSA_PRIVATE_SUBNET
The output of this command should look like this:
I: Using arn:aws:iam::XXXXX:role/ManagedOpenShift-Installer-Role for the Installer role

I: Using arn:aws:iam::XXXXX:role/ManagedOpenShift-ControlPlane-Role for the ControlPlane role

I: Using arn:aws:iam::XXXXX:role/ManagedOpenShift-Worker-Role for the Worker role

I: Using arn:aws:iam::XXXXX:role/ManagedOpenShift-Support-Role for the Support role

W: You are choosing to use AWS PrivateLink for your cluster. STS clusters can only be private if AWS PrivateLink is used. Once the cluster is created, this option cannot be changed.

I: Creating cluster 'suresh-rosa'

I: To view a list of clusters and their status, run 'rosa list clusters'

I: Cluster 'suresh-rosa' has been created.

I: Once the cluster is installed you will need to add an Identity Provider before you can login into the cluster. See 'rosa create idp --help' for more information.

I: To determine when your cluster is Ready, run 'rosa describe cluster -c suresh-rosa'.

I: To watch your cluster installation logs, run 'rosa logs install -c suresh-rosa --watch'.

Name:                       suresh-rosa

ID:                         1qi0bhb8o7fighppuft1n6cm5e8k2p36

External ID:

OpenShift Version:

Channel Group:              stable

DNS:                        suresh-rosa.sv9i.p1.openshiftapps.com

AWS Account:                XXXXX

API URL:

Console URL:

Region:                     ap-southeast-1

Multi-AZ:                   false

Nodes:

 - Control plane:           3

 - Infra:                   2

 - Compute:                 2

Network:

 - Service CIDR:            172.30.0.0/16

 - Machine CIDR:            10.0.0.0/16

 - Pod CIDR:                10.128.0.0/14

 - Host Prefix:             /23

STS Role ARN:               arn:aws:iam::XXXXX:role/ManagedOpenShift-Installer-Role

Support Role ARN:           arn:aws:iam::XXXXX:role/ManagedOpenShift-Support-Role

Instance IAM Roles:

 - Control plane:           arn:aws:iam::XXXXX:role/ManagedOpenShift-ControlPlane-Role

 - Worker:                  arn:aws:iam::XXXXX:role/ManagedOpenShift-Worker-Role

Operator IAM Roles:

 - arn:aws:iam::XXXXX:role/suresh-rosa-f0l3-openshift-machine-api-aws-cloud-credentials

 - arn:aws:iam::XXXXX:role/suresh-rosa-f0l3-openshift-cloud-credential-operator-cloud-crede

 - arn:aws:iam::XXXXX:role/suresh-rosa-f0l3-openshift-image-registry-installer-cloud-creden

 - arn:aws:iam::XXXXX:role/suresh-rosa-f0l3-openshift-ingress-operator-cloud-credentials

 - arn:aws:iam::XXXXX:role/suresh-rosa-f0l3-openshift-cluster-csi-drivers-ebs-cloud-credent

State:                      waiting (Waiting for OIDC configuration)

Private:                    Yes

Created:                    Mar 01 2022 15:33:27 UTC

Details Page:               https://console.redhat.com/openshift/details/s/25W6HXZWTTdk35T4ERcFTRZHHIb

OIDC Endpoint URL:          https://XX-oidc.s3.us-east-1.amazonaws.com/1qi0bhb8o7fighppuft1n6cm5e8k2p3

I: Run the following commands to continue the cluster creation:

    rosa create operator-roles --cluster suresh-rosa

    rosa create oidc-provider --cluster suresh-rosa
Create the Operator provider:
$ ./rosa create operator-roles --cluster $ROSA_CLUSTER_NAME --mode auto -y
The output of this command should look like this:
? Permissions boundary ARN (optional):

? Role creation mode: auto

I: Creating roles using 'arn:aws:iam::XXXXX:user/user'

I: Created role 'suresh-rosa-f0l3-openshift-cluster-csi-drivers-ebs-cloud-credent' with ARN 'arn:aws:iam::XXXXX:role/suresh-rosa-f0l3-openshift-cluster-csi-drivers-ebs-cloud-credent'

I: Created role 'suresh-rosa-f0l3-openshift-machine-api-aws-cloud-credentials' with ARN 'arn:aws:iam::XXXXX:role/suresh-rosa-f0l3-openshift-machine-api-aws-cloud-credentials'

I: Created role 'suresh-rosa-f0l3-openshift-cloud-credential-operator-cloud-crede' with ARN 'arn:aws:iam::XXXXX:role/suresh-rosa-f0l3-openshift-cloud-credential-operator-cloud-crede'

I: Created role 'suresh-rosa-f0l3-openshift-image-registry-installer-cloud-creden' with ARN 'arn:aws:iam::XXXXX:role/suresh-rosa-f0l3-openshift-image-registry-installer-cloud-creden'

I: Created role 'suresh-rosa-f0l3-openshift-ingress-operator-cloud-credentials' with ARN 'arn:aws:iam::XXXXX:role/suresh-rosa-f0l3-openshift-ingress-operator-cloud-credentials'
Create the OpenID Connect (OIDC) provider:
$ ./rosa create oidc-provider --cluster $ROSA_CLUSTER_NAME --mode auto -y
The output of this command should look like this:
? OIDC provider creation mode: auto

I: Creating OIDC provider using 'arn:aws:iam::XXXXX:user/user'

I: Created OIDC provider with ARN 'arn:aws:iam::XXXXX:oidc-provider/XX-oidc.s3.us-east-1.amazonaws.com/1qhvtf5n3n4pvnjmeqe37dj6fnsq0htm'
Other administrative tasks
Watch the installation logs:
$ ./rosa logs install -c $ROSA_CLUSTER_NAME --watch
Create an OpenShift Service on AWS administrative user and save the login command for later use:
$ ./rosa create admin -c $ROSA_CLUSTER_NAME
The output of this command should look like the following. Copy and save the oc login command, which can be used to log in to the cluster from the CLI:
W: It is recommended to add an identity provider to login to this cluster. See 'rosa create idp --help' for more information.

I: Admin account has been added to cluster 'suresh-rosa'.

I: Please securely store this generated password. If you lose this password you can delete and recreate the cluster admin user.

I: To login, run the following command:

   oc login https://api.suresh-rosa.sv9i.p1.openshiftapps.com:6443 --username cluster-admin --password KfVVi-GgtcP-uSgYc-2c9u3


I: It may take up to a minute for the account to become active.
List the cluster:
$ ./rosa list cluster
Once the cluster has finished installing, it's time to validate it. Validation when using a private link requires the use of a jump host. Create a jump host in the public subnet with the following command, replacing <ami-id> with the exact ami-id from your environment and rosakeypair with the SSH key pair details:
$ aws ec2 run-instances --image-id <ami-id> --count 1 --instance-type t2.micro --key-name rosakeypair --subnet-id $EGRESS_PUBLIC_SUBNET --associate-public-ip-address
Refer to AWS documentation for more options you can use to create the instances.
Conclusion
This article was inspired by real-world customer experience. If you want to traverse the traffic from multiple VPCs before network packets goe outside your infrastructure from OpenShift on AWS cluster, or when network packets enter your infrastructure to communicate with OpenShift on AWS cluster, the approach taken in this article will help you to achieve your requirements. You can use the same approach to connect more than two VPCs to forward the traffic from the internal VPC to the internet. In this way, after completing the steps outlined here, your private resources can communicate with internet.
Last updated: September 20, 2023