If you're writing an application for Kubernetes and want to expose secrets for connecting, or binding, to external services such as REST APIs, databases, or event buses, you have traditionally needed to manually and custom-write the code for these tasks. This process can be error-prone and can slow down developers, and the community lacked a consistent and automated way to connect applications and services.
The Service Binding Operator (SBO) provides such a solution. In this article, you'll learn article how to use the Service Binding Operator to easily bind a Node.js application to Red Hat OpenShift Streams for Apache Kafka.
Apache Kafka is an open source, distributed publish/subscribe messaging system for creating fault-tolerant, real-time data feeds. OpenShift Streams for Apache Kafka is a cloud service running on Red Hat OpenShift that simplifies the process of running Apache Kafka.
How does the Service Binding Operator bind applications and services?
When you request a binding, the Service Binding Operator looks at the data stored within the custom resource (CR) and its corresponding custom resource definition (CRD) inside the application. This data contains parameters required to bind the application with the service. The Service Binding Operator then projects this binding data into the application's workload resources as environment variables or files.
To learn more about other features of the Service Binding Operator and its integration with other products, refer to the project documentation.
In the absence of the Service Binding Operator, the following parameters must be manually configured to connect a Node.js application to Apache Kafka:
bootstrapServers: Details about the Kafka cluster serverpassword: Password to connect to Kafkaprovider: Provider of the Kafka instancesaslMechanism: Mechanism through which the application will transfer datasecurityProtocol: Security protocol required for data transfer between the application and Kafkatype: Service typeUser: Username
Doing all that configuration manually can lead to errors. The Service Binding Operator can detect these parameters through annotations, provisioned services, or the Operator Lifecycle Manager (OLM). In this article's example application, OpenShift Streams for Apache Kafka projects this information as annotations, so SBO can automatically detect the parameters and inject them as files in the /bindings folder. Each filename is treated as a key, and its content is treated as the corresponding values. The SBO automates the configuration process and makes it less error-prone.
The SBO can also be installed in a local Kubernetes cluster to bind applications to services. If you have a local Apache Kafka and Node.js application setup, installing SBO in your local cluster makes things easier for developers. Consult the quick start tutorial for more details. General documentation for SBO can be found at the Red Hat Developers site on GitHub.
What is a Node.js application?
Node.js allows you to run JavaScript outside of a browser. The Node.js framework is a crucial component of modern web stacks that run back-end services, and is a key component of development tooling. The framework's small size, its fast startup, and the developer productivity it unlocks have led to its use in a broad range of niches, including microservices, single-page applications, scripting and automation, agents and data collectors, desktop applications, and embedded software.
This article uses two Node.js applications: a producer and a consumer. (For more on how producers and consumers work in Kafka, read A developer's guide to using Kafka with Java.) The producing application generates a country name, and the consuming application displays it. A Kafka instance in OpenShift Streams for Apache Kafka is used to forward the update as an event to the consuming application.
Resources: Developer Sandbox and OpenShift Application Services Operator
The Developer Sandbox for Red Hat OpenShift provides a private OpenShift environment in a shared, multitenant OpenShift cluster that is preconfigured with a set of developer tools. You can easily create containers from your source code or Dockerfile, build new applications using the samples and stacks provided, add services such as databases from Red Hat's template catalog, and deploy Helm charts. Refer to the guide to get access and use the Sandbox.
Two namespaces are available when your account is created. In this example, my namespaces are fmehta-dev and fmehta-stage.
The Red Hat OpenShift Application Services Operator is a Kubernetes Operator used to interact with Red Hat cloud services. This Operator can be installed on any Kubernetes cluster using the OLM catalog source. The Operator watches its custom resources and updates its Status subresource. The Status subresource is consumed by the Service Binding Operator, which makes the custom resources available to your applications.
This article uses the Developer Sandbox to access an OpenShift environment, OpenShift Streams for Apache Kafka, and the OpenShift Application Services Operator, connecting to and using OpenShift Streams, the Service Binding Operator, and the two Node.js applications.
Ensure the Operators are installed and available
Note: To run the examples in this article, you need a Developer Sandbox account. For more information on how to set that up, refer to the getting started guide.
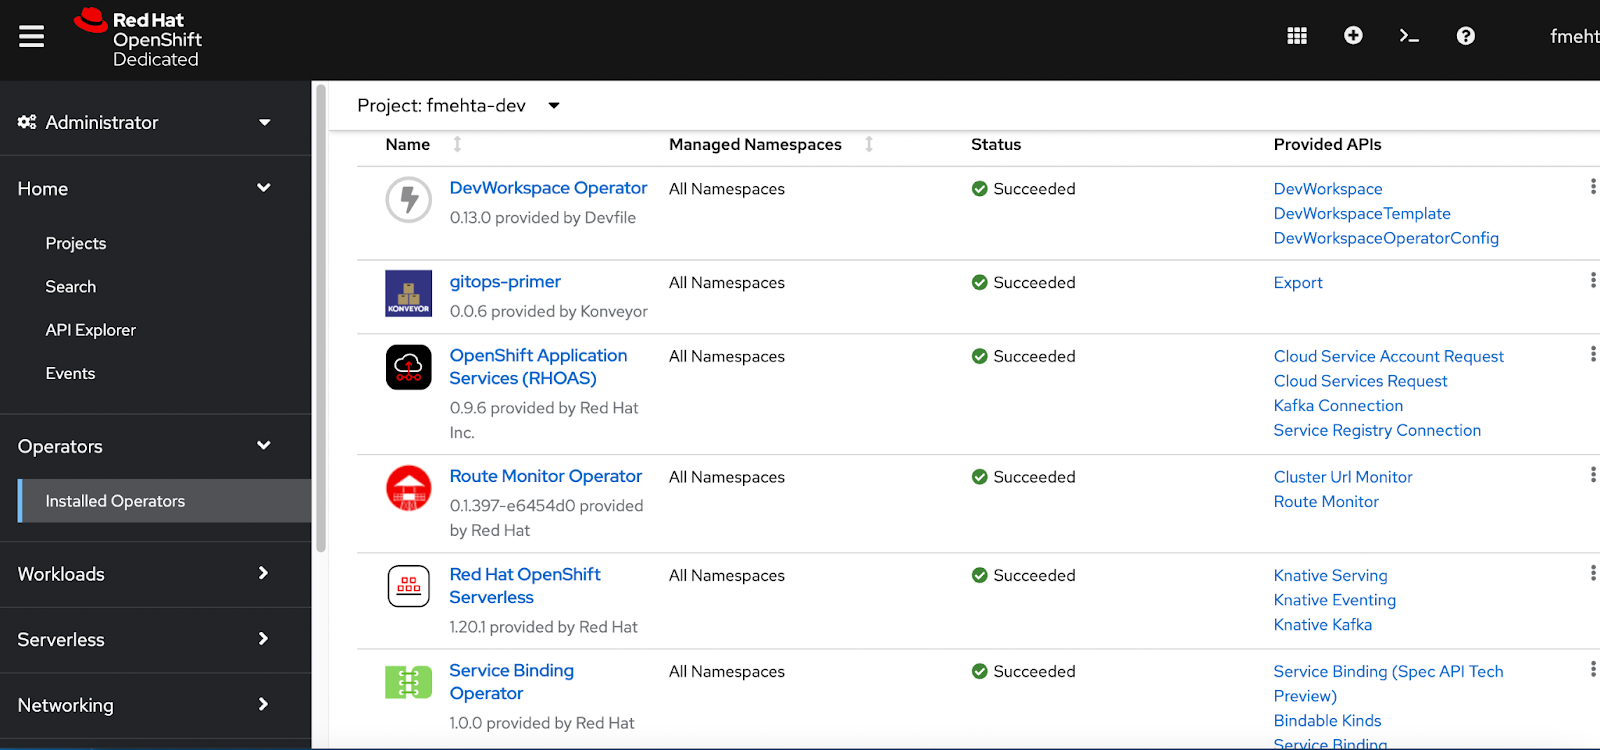
To verify that the OpenShift Application Services and Service Binding Operators are already installed in your sandbox, perform the steps in this section.
You can see a list of installed Operators ready to use as follows:
- Log in to your Developer Sandbox account.
- Switch to the Administrator perspective, located at the top left corner of the console under RedHat OpenShift Dedicated > Developer Sandbox.
- Navigate to Operators > Installed Operators.
- Search for "RHOAS Operator" and "Service Binding Operator." The screen should display them (Figure 1).
Configure OpenShift Streams for Apache Kafka
You can configure OpenShift Streams for Apache Kafka by performing the following steps.
Log in to the OpenShift CLI
You need the OpenShift command-line interface (CLI), operated through the oc command. For more information, see Installing the OpenShift CLI in the OpenShift documentation.
On your computer, open a command-line window. The next few steps will allow you to log in to the OpenShift CLI using a token.
- Log in to the OpenShift web console in your web browser.
- Next to your user name in the console's upper-right corner, click the drop-down menu and select Copy login command.
- A new page opens. Click the Display Token link.
- In the section titled Log in with this token, copy the full
oclogin command shown. - On the command line, paste the login command you copied by right-clicking the command line and selecting Paste. You should see output confirming that you are logged in to your OpenShift cluster and showing you the current project that you are using.
Log in to the OpenShift Application Services CLI
You need the latest version of rhoas, the OpenShift Application Services CLI. For more information, see Installing and configuring the rhoas CLI in the Red Hat OpenShift Application Services documentation.
On your command line window, log in to the OpenShift Application Services CLI:
$ rhoas loginThe
logincommand opens a sign-in process in your web browser.Use the OpenShift Application Services CLI to connect to your OpenShift cluster and retrieve the cluster status on the command line:
$ rhoas cluster statusThe output should look something like this:
Namespace: fmehta-dev
RHOAS Operator: Installed
Create a topic in a Kafka instance
You need a Kafka instance in the Ready state in OpenShift Streams for Apache Kafka. To learn how to create a Kafka instance, see Red Hat OpenShift Streams for Apache Kafka's getting started guide.
- On the Kafka Instances page of the OpenShift Streams for Apache Kafka web console, click the name of the Kafka instance where you want to add a topic.
Select the Topics tab, click Create topic, and follow the indicated steps to define the details of the
countriestopic (Figure 2). Click Next to complete each step and click Finish to complete the setup. As you click Next to create the topic, enter the following values:- Topic name: countries
- Partitions: 1
- Retention: 1 week
Replicas: 3
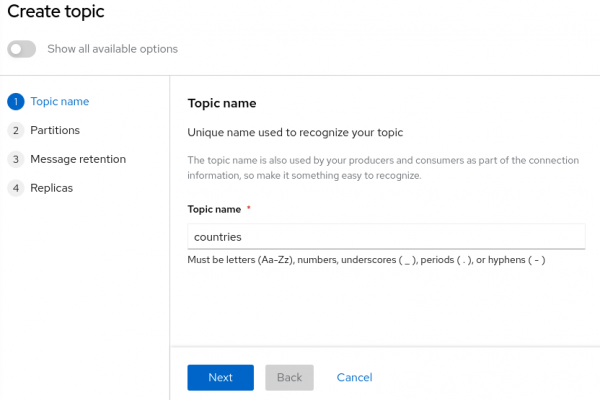
Figure 2. Add countries as a topic name. Figure 2: Add countries as a topic name.
After you complete the topic setup, the new Kafka topic will be listed in the topics table.

Connect the Kafka instance to your OpenShift cluster
You can connect a Kafka instance in OpenShift Streams for Apache Kafka to the current project in the cluster. You must establish this connection before you can bind applications running in the project to the Kafka instance.
Use the OpenShift CLI to specify the current OpenShift project. In the following command, replace my project name with the name of the project that you created when verifying the connection to your OpenShift cluster:
$ oc project fmehta-devUse the OpenShift Application Services CLI to connect a Kafka instance in OpenShift Streams for Apache Kafka to the current project in your OpenShift cluster. Use the service account name you selected while creating the Kafka instance:
$rhoas cluster connect --service-type kafka --service-name kafka-sbo-demoYour output should look something like this:
Connection Details: Service Type: kafka Service Name: kafka-sbo-demo Kubernetes Namespace: fmehta-dev Service Account Secret: rh-cloud-services-service-account- Confirm the connection details shown by the OpenShift Application Services CLI output in the previous step. Then:
- Type
yand press Enter. You will be prompted to provide an access token. The OpenShift Application Services Operator requires this token to connect to your Kafka instance. - In your web browser, open the OpenShift Cluster Manager API Token page and click Load token.
- After the page refreshes, copy the API token shown.
- Type
On the command line, right-click and select Paste, then press Enter. The OpenShift Application Services Operator automatically uses the API token to create a
KafkaConnectionresource in your OpenShift cluster.The output should look something like this:
Service Account Secret "rh-cloud-services-service-account" created successfully
Client ID: srvc-acct-8c95ca5e1225-94a-41f1-ab97-aacf3df1
…
KafkaConnection resource "kafka-sbo-demo" has been created
Waiting for status from KafkaConnection resource.
Created KafkaConnection can be injected into your application.
…
KafkaConnection successfully installed on your cluster.
Use the OpenShift CLI to verify that the OpenShift Application Services Operator successfully created the connection:
$ oc get KafkaConnectionHere's what your output should look like:
NAME AGE
kafka-sbo-demo 2m35s
Deploy an example Node.js application on OpenShift
To install a Node.js application and publish and install packages to and from a public or private Node Package Manager registry, you must install Node.js and the npm command-line interface using either a Node version manager or a Node installer.
To download the latest version of npm, run the following command in the shell:
$ npm install -g npmTo deploy the example application, use the sample code from the Nodeshift Application Starters reactive example repository in GitHub. This example is a straightforward streaming application readily available for our use and is open source. You can install the following components of the Node.js application:
- A producer backend component that generates random country names and sends those names to a topic in your Kafka instance.
- A consumer backend component that consumes the country names from the Kafka topic.
Once all that's been installed, you're ready to deploy the example application on OpenShift.
On the command line, clone the Nodeshift Application Starters reactive example repository from GitHub:
$ git clone https://github.com/nodeshift-starters/reactive-example.gitNavigate to the
reactive-exampledirectory of the repository that you cloned:$ cd reactive-exampleNavigate to the directory for the consumer component. Use
npmto install the component's dependencies:$ cd consumer-backend $ npm installBuild the consumer component and deploy it to the
my-projectproject. This step deploys the Node.js application to your OpenShift cluster, because you have already logged in to that cluster:$ npm run openshift- Log in to the OpenShift web console.
- Click the perspective switcher in the upper-left corner and switch to the Developer perspective. The Topology page opens.
Ensure that the current OpenShift project is the one you previously connected your Kafka instance:
- At the top of the Topology page, click the Project drop-down menu.
- Select my-project from the drop-down menu.
On the Topology page, you should see an icon for the consumer component that you deployed. The component is a
DeploymentConfigobject and is labeledDC. After some time, OpenShift should complete the deployment.- Click the icon for the consumer component created in the previous step. A sidebar will open with the Resources tab displayed. Under Pods, you should see a single pod.
Next to the name of the pod, click View logs.
In the pod logs for the consumer component (Figure 3), you should see errors indicating that the component cannot connect to Kafka. You will establish this connection later using the binding procedure with the help of the Service Binding Operator.
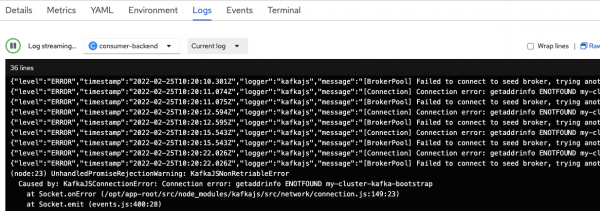
Figure 3. The application tries and fails to connect to Kafka. Figure 3: The application tries and fails to connect to Kafka. On the command line, navigate to the producer component's directory in the repository you cloned. Use
npmto install the dependencies for this component:$ cd .. $ cd producer-backend $ npm installBuild the producer component and deploy it to your OpenShift project:
$ npm run openshiftOn the Topology page of the OpenShift web console, you should see an icon for the producer component you deployed. The producer component is also a
DeploymentConfigobject and is labeledDC. After some time, OpenShift completes the deployment.Open the pod logs for the producer component in the same way you did for the consumer component. In the logs, you should see the same errors as shown in Figure 3, indicating that the producer component cannot connect to Kafka. You'll also establish this connection later in this tutorial using the binding procedure, again with the help of the Service Binding Operator.
Bind a Node.js application to OpenShift Streams for Apache Kafka
You'll use the OpenShift web console for this task.
- Log in to the OpenShift console as the same user who deployed the Node.js application earlier in this article—in other words, as the same user you used to log in to OpenShift Dedicated. A different user cannot bind the application because the Service Binding Operator watches the resources in the same namespace. Different users may be using different namespaces.
- Click the perspective switcher in the upper-left corner and switch to the Developer perspective. The Topology page opens.
- Ensure that the current OpenShift project is where you previously connected your Kafka instance.
- At the top of the Topology page, click the Project drop-down menu.
Select the my-project project where you previously connected your Kafka instance.
On the Topology page for your project, you should see an icon for the
KafkaConnectionobject created when you connected a Kafka instance to the project. The object's name should match the name of the Kafka instance that you connected to the project. The icon for theKafkaConnectionobject is labeled AKC.You should also see icons for the producer and consumer components of the Node.js application that you deployed. Each component is a
DeploymentConfigobject and is labeledDC.
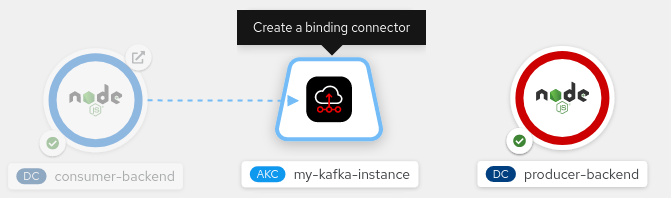
To start creating a service binding connection, hover the mouse pointer over the icon for the consumer component. An arrow with a dotted line appears from the icon. Left-click and drag the head of the arrow until it is directly over the icon for the
KafkaConnectionobject. As shown in Figure 4, a tooltip appears over the icon for theKafkaConnectionobject, indicating that you are about to create a service binding connection.
Figure 4. Create a connection by dragging an arrow from the backend application to the Kafka instance. Figure 4: Create a connection by dragging an arrow from the backend application to the Kafka instance. To create the service binding connection, release the left mouse button. You should now see a solid arrow, as shown in Figure 5. This indicates that you have established a service binding connection between the Node.js consumer component and the
KafkaConnectionobject.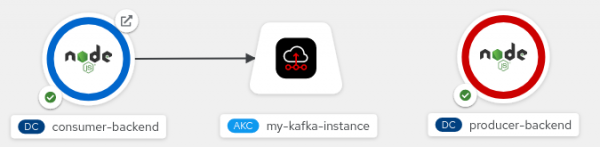
Figure 5. A solid arrow indicates a connection between the backend application and the Kafka instance. Figure 5: A solid arrow indicates a connection between the backend application and the Kafka instance. When creating the binding connection, the Service Binding Operator injects connection parameters as files into the pod for the consumer component.
- To bind the producer component to the
KafkaConnectionobject, drag a connection to theKafkaConnectionobject just as you did for the consumer component. After connecting to the
KafkaConnectionobject, click the icon for the consumer component. A sidebar opens, displaying the Resources tab. Under Pods, a single pod appears, corresponding to the component (Figure 6). Next to the name of the pod, click View logs.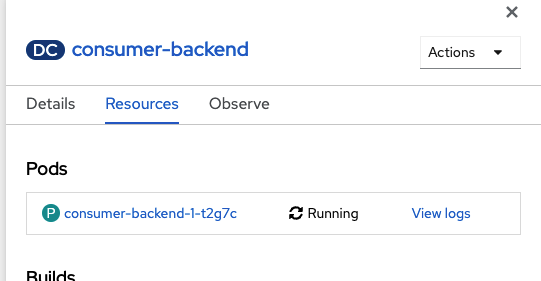
Figure 6. The web page for an application contains a "View logs" link. Figure 6: The web page for an application contains a View logs link. Similarly, click View logs for the Producer component next to the pod's name. You should now see that the producer has connected to the Kafka instance. The producer generates random country names and sends these as messages to the
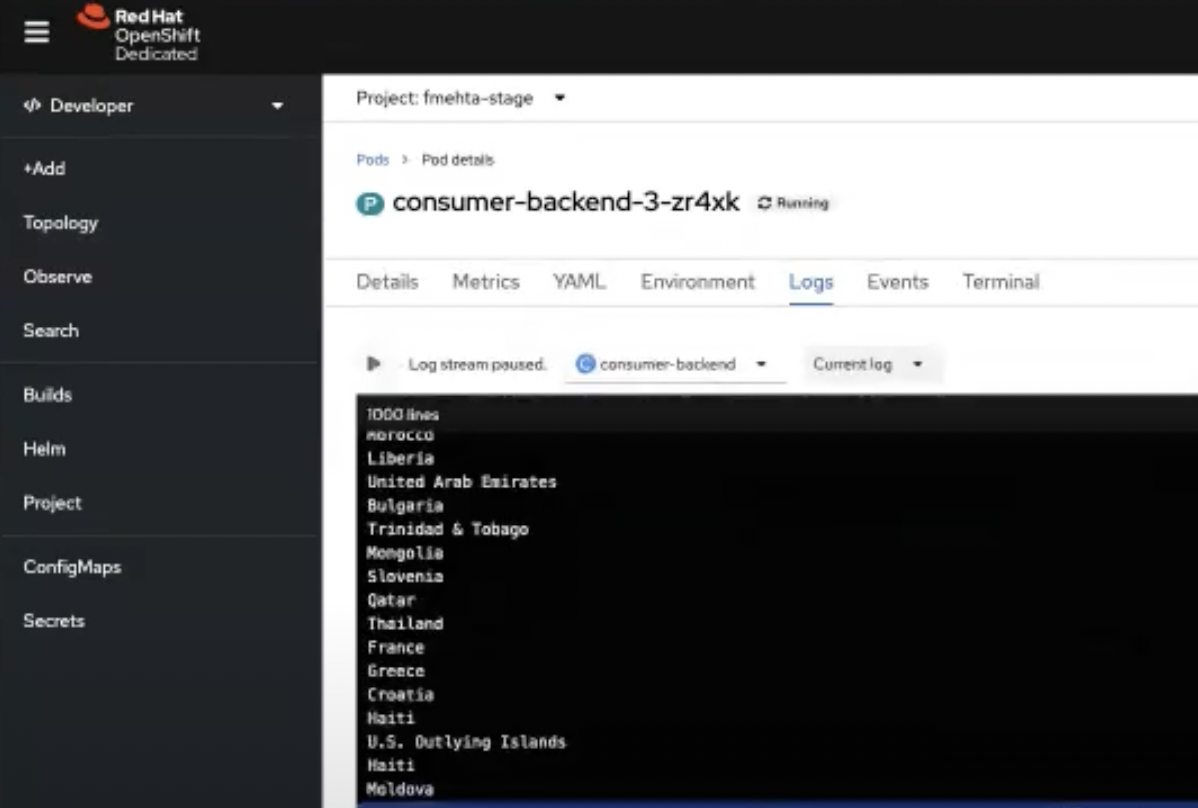
countriesKafka topic that you created (Figure 7).Figure 7: The producer sends a stream of country names to the Kafka instance. Open the consumer component pod logs as you did for the producer component. You should now see that the consumer has connected to the Kafka instance. The consumer displays the same country names that the producer sends to the
countriesKafka topic, in the same order.
Figure 8. The consumer receives and displays the country names sent by the producer. Figure 8: The consumer receives and displays the country names sent by the producer. The logs show that the Node.js applications are successfully bound to Kafka with the help of the Service Binding Operator.


Conclusion
To dispense with the manual, error-prone traditional method of exposing secrets for connecting applications to external services, we need a consistent and automated way to connect applications and services. The Service Binding Operator provides such a solution. The OpenShift Application Services Operator further simplifies setup by creating resources consumed by the Service Binding Operator.
For more information, read Connect Node.js applications to Red Hat OpenShift Streams for Apache Kafka with Service Binding, or check out the accompanying video.
Last updated: August 27, 2025