Apache Kafka is a vital piece of infrastructure for teams adopting an event-driven architecture. By connecting applications with minimal coupling, event-driven architecture lets teams create distributed, fault-tolerant applications using the runtimes most appropriate for the specific task and team. However, managing infrastructure and Kafka clusters is a complex and time-consuming task. A managed Kafka service such as Red Hat OpenShift Streams for Apache Kafka allows teams to focus on delivering applications, while Red Hat takes care of the Kafka infrastructure.
Once your Kafka infrastructure is in place, you'll want to start developing applications using your preferred runtimes. This article focuses on Node.js, which has become one of the most popular runtimes for cloud-native application development. Integrating Node.js applications with their organization's broader event-driven architecture based on Kafka is critical for developers.
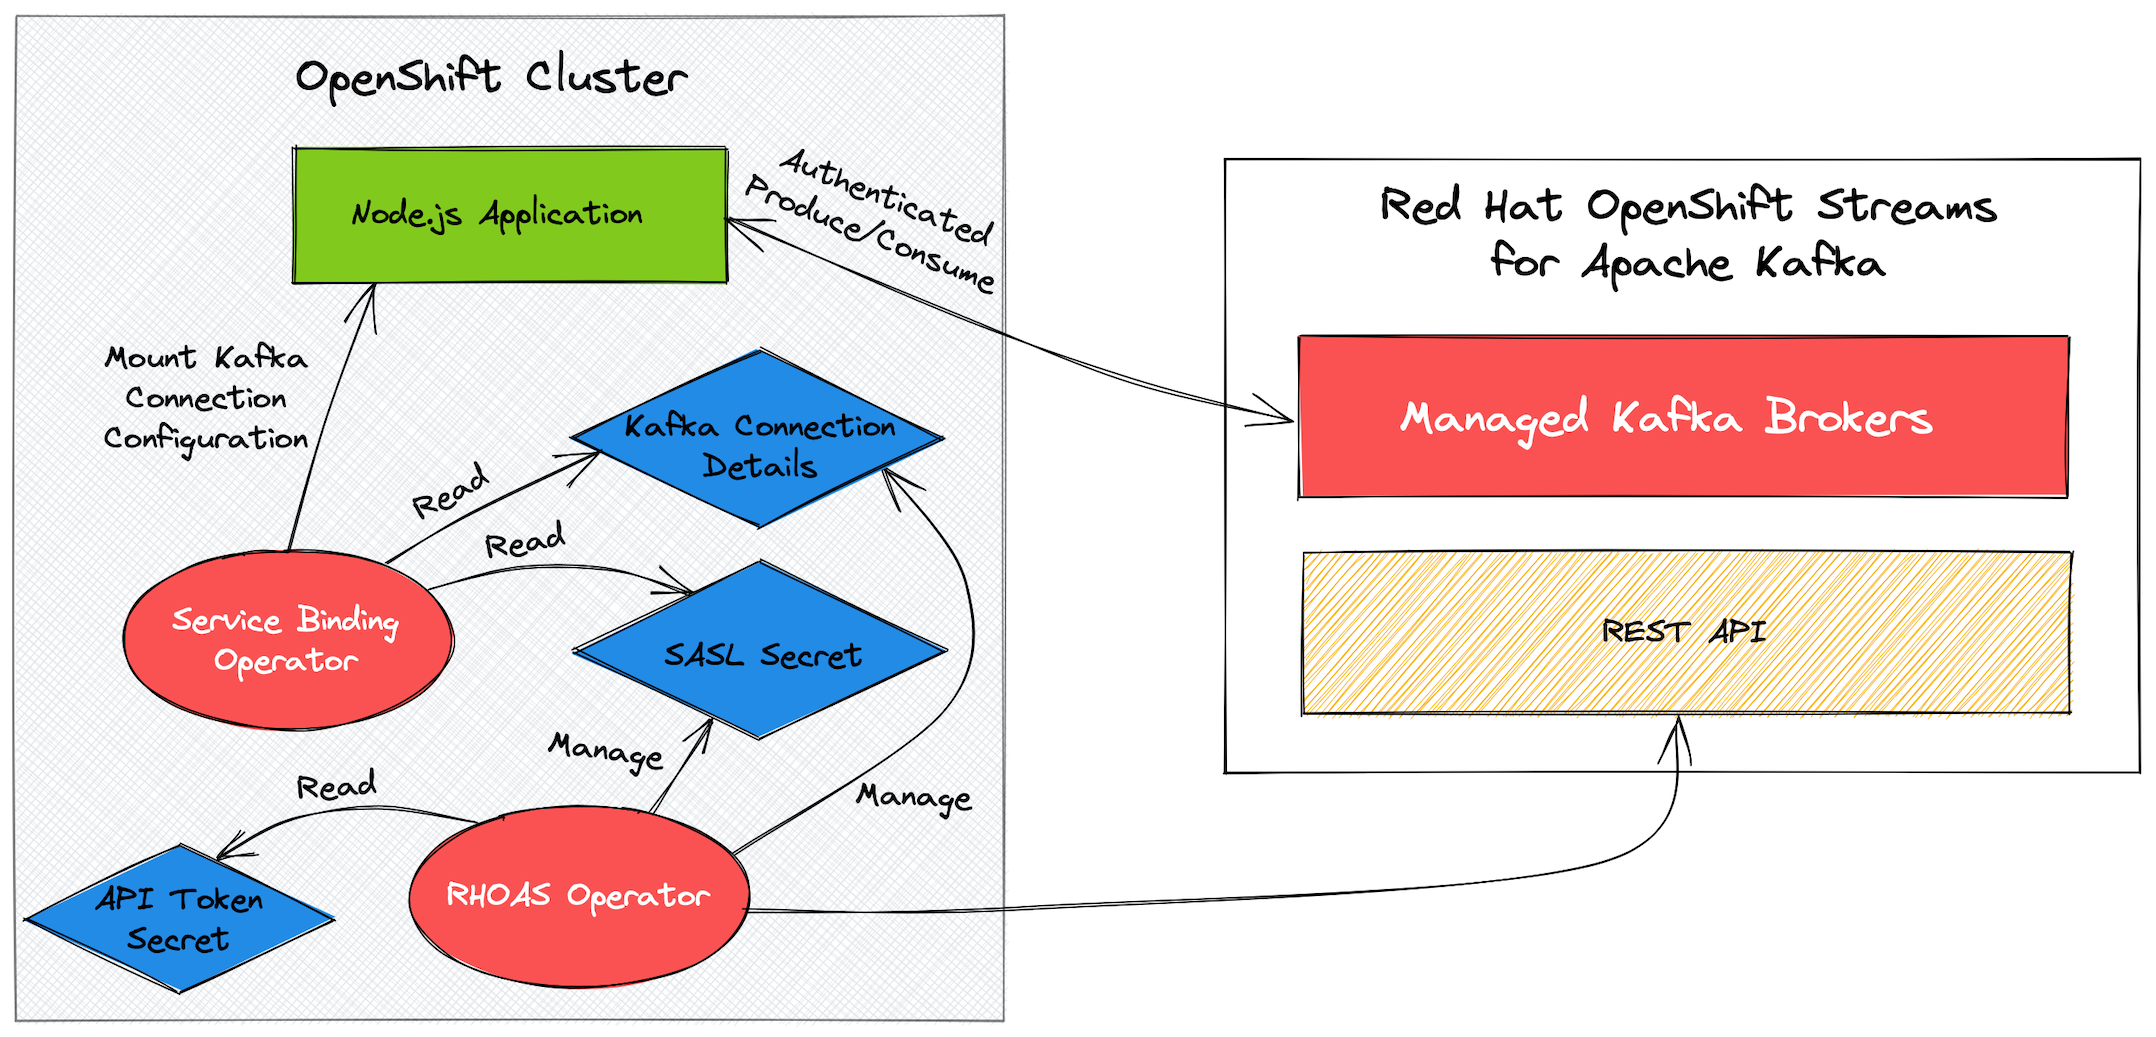
This article demonstrates how to connect and authenticate your Node.js applications to OpenShift Streams for Apache Kafka using the Service Binding Specification for Kubernetes. The Service Binding spec says that it "aims to create a Kubernetes-wide specification for communicating service secrets to applications in an automated way." Figure 1 shows a high-level overview of the interactions between the components in this specification. Don’t worry if you’re not yet familiar with these components or concepts; this article walks you through each step.
Note: A video demonstration of the process described in this article is available on the Red Hat Developer YouTube channel.
Prerequisites
You should be set up on the following services to carry out the techniques in this article:
- Red Hat OpenShift Streams for Apache Kafka. Click the Create a Kafka instance button to get started. There is no charge for this OpenShift Streams for Apache Kafka instance.
- Developer Sandbox for Red Hat OpenShift. Use the Get started in the Sandbox button to get access. This service is also free.
Note: You can follow the instructions in this article using your own OpenShift cluster instead of Developer Sandbox. If you choose to use your own cluster, you must install two additional tools: the Service Binding Operator, which can be found on GitHub, and the Red Hat OpenShift Application Services Operator. These operators are pre-installed in the sandbox.
You will also need to download the following tools:
- The Red Hat OpenShift Application Services command-line interface (CLI). Installation instructions are available on GitHub.
- The OpenShift CLI, available at an OpenShift repository.
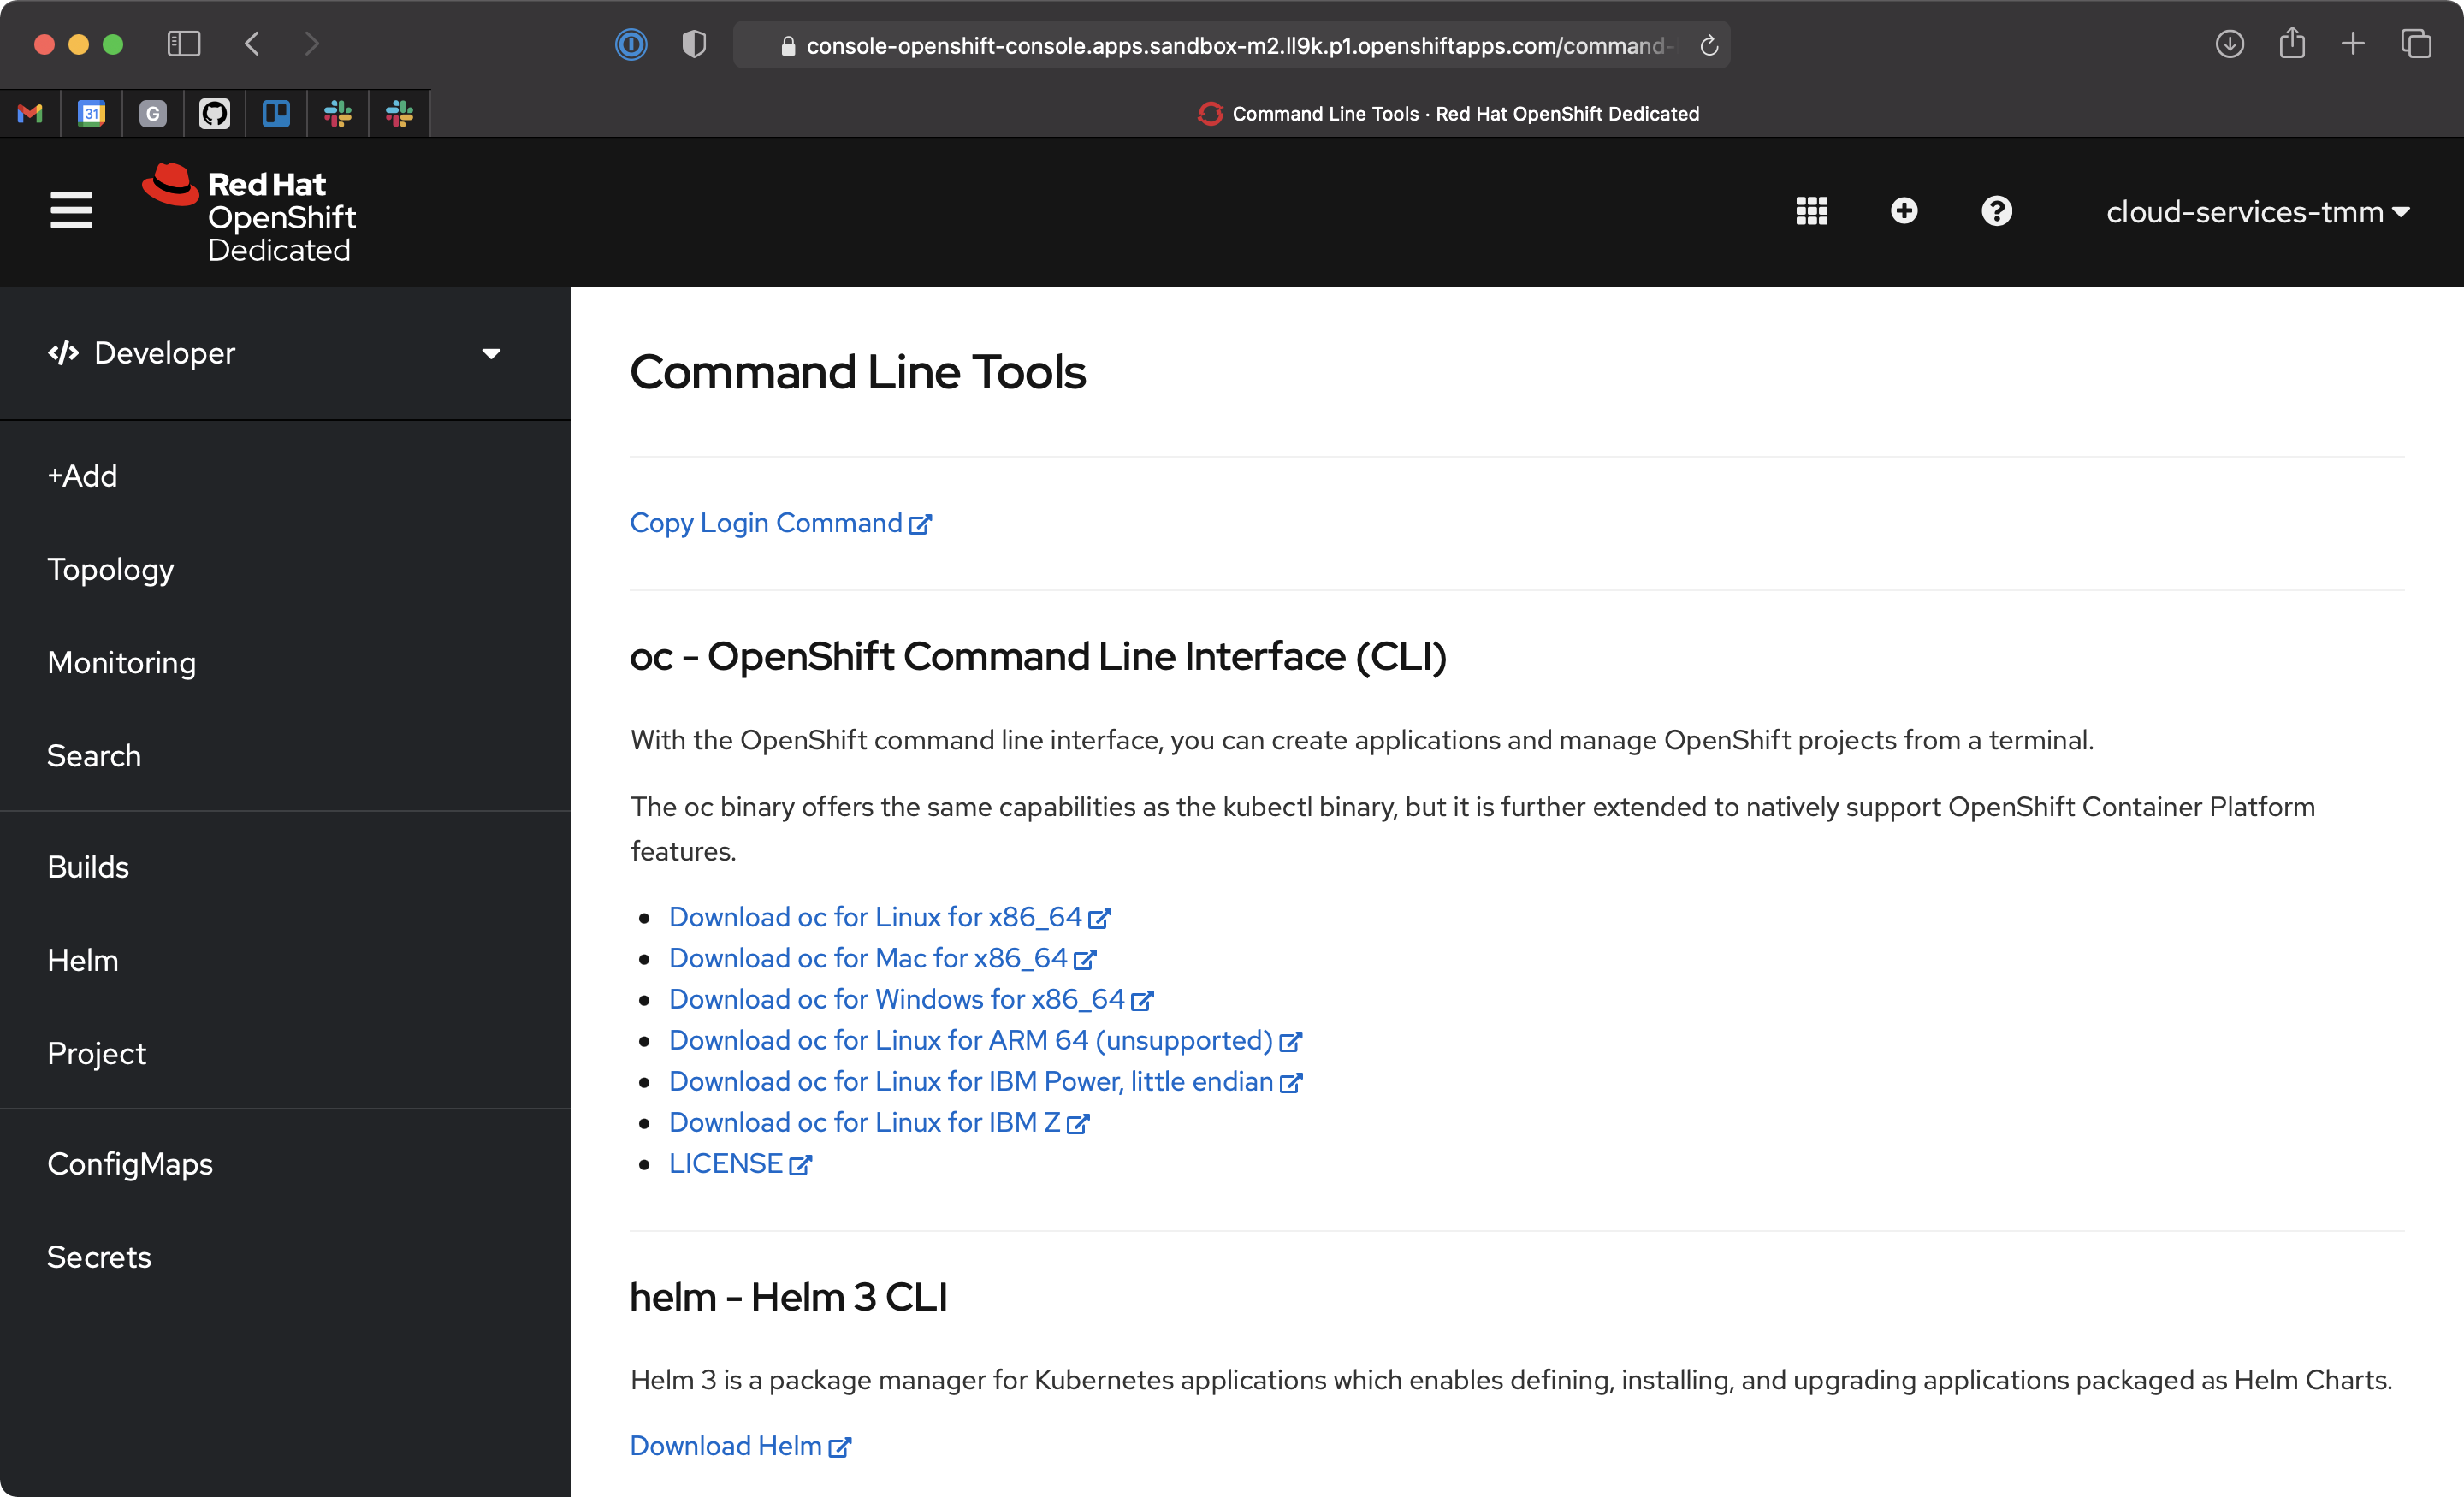
Instructions to install the OpenShift CLI and use it to log into your cluster are available via the Command line tools section of the OpenShift help menu. This screen is shown in Figure 2. Use the Copy Login Command link to obtain a login command once you have the CLI installed.
Provisioning a managed Kafka Instance on OpenShift Streams for Apache Kafka
This section will be brief because we’ve already written an article and published a video covering the steps. You can create a managed Kafka instance using the OpenShift Streams for Apache Kafka UI or the following Red Hat OpenShift Application Services CLI commands:
- Log in using a browser-based flow:
$ rhoas login - Create a managed Kafka instance named
nodejs-binding:$ rhoas kafka create --name nodejs-binding
The Kafka cluster should finish provisioning after about three minutes. You can verify it’s ready using the status field from the output of the rhoas kafka list command or from the status column in the user interface (UI).
Once the Kafka cluster is provisioned, you can create the topic that will be used in this article as follows:
- Enter the following command and follow the interactive prompts to choose a Kafka instance or context:
$ rhoas kafka use - Create an orders topic:
$ rhoas kafka topic create --name orders --partitions 3 - Apply a broad access control rule for this topic:
$ rhoas kafka acl grant-access --producer --consumer --all-accounts --topic orders --group "*"
Now you should have a Kafka instance with an orders topic running in the cloud. You’re ready to deploy a Node.js application and connect it to your Kafka instance.
Deploying a Node.js Kafka producer on OpenShift
The source code for the application used in this article is available in the OpenShift Streams Node.js Service Binding Example repository on GitHub. The code is a typical Node.js application that uses the Express web framework and a KafkaJS client to interact with a Kafka cluster. Users submit a web form exposed by this application, and the form's inputs generate a record in the orders Kafka topic.
What’s interesting about this application is that it uses the kube-service-bindings module to retrieve a Kafka configuration that’s managed by the Red Hat OpenShift Application Services Operator and Service Binding Operator. The kube-service-bindings module reads configuration data that has been mounted into the application container. The configuration is compatible with the Service Binding specification.
Create a Kafka producer
Reading the mounted configuration and creating a Kafka producer requires just a few lines of Node.js code that run when the application starts:
const { Kafka } = require('kafkajs')

const { getBinding } = require('kube-service-bindings')


module.exports = async getKafkaProducer () => {

  // Obtain the a kafkajs format configuration to connect to a

  // Red Hat OpenShift Streams for Apache Kafka cluster

  const cfg = getBinding('KAFKA', 'kafkajs')


  // Create the Kafka instance and a producer

  const kafka = new Kafka(cfg)

  const producer = kafka.producer()


  // Return a connected producer object

  await producer.connect()

  return producer

}
Deploy the Node.js application
Use the OpenShift CLI to deploy the application. Run the following commands to deploy the Node.js application and expose an HTTP endpoint to access it:
- Define a variable to hold the name of the OpenShift project where the Node.js application will be deployed:
$ export PROJECT=<your-project-name>Note: You can list available projects using the
oc projectscommand. - Select the project. It will be used as a context for subsequent commands:
$ oc project $PROJECT - Define a variable to hold the URL of the image on quay.io that you will deploy:
$ export IMAGE=quay.io/evanshortiss/rhosak-nodejs-sbo-example - Deploy the image as a container and expose an endpoint:
$ oc new-app $IMAGE -l app.openshift.io/runtime=nodejs

$ oc expose svc rhosak-nodejs-sbo-example
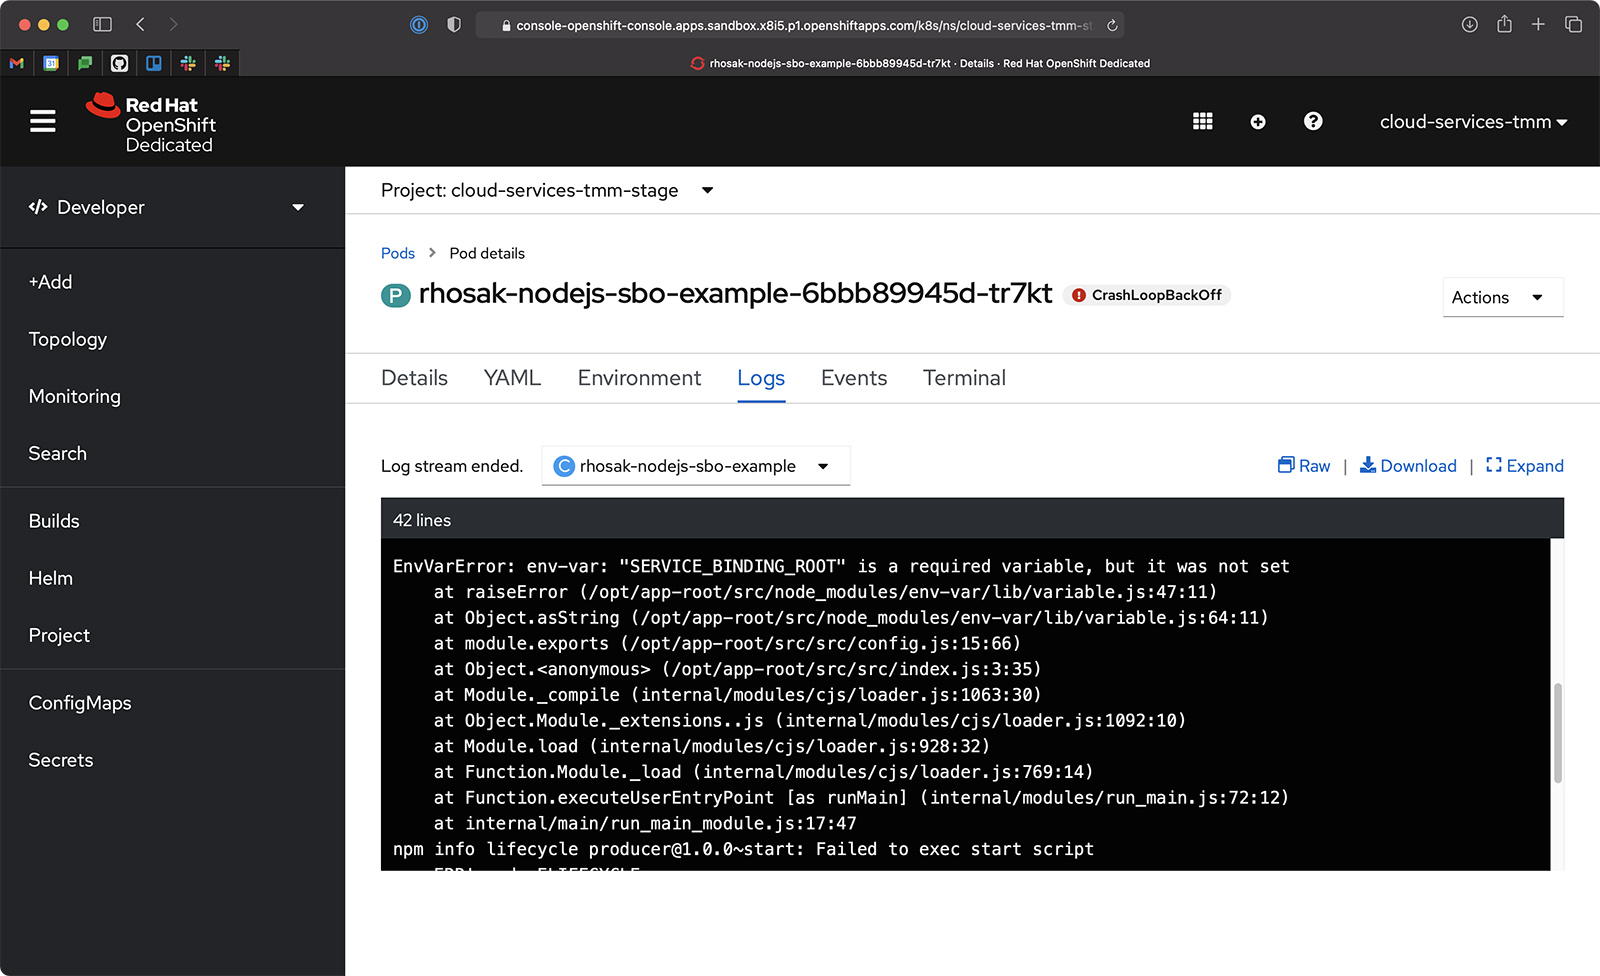
The application will attempt to start, but it’s coded to verify that the SERVICE_BINDING_ROOT environment variable is set. Because we haven't set this variable yet, the application knows that it cannot retrieve a Kafka connection configuration and fails to start. Figure 3 shows this behavior and the Node.js pod log output. We'll fix the problem in the next section.
Creating a KafkaConnection and Service Binding
Addressing the Node.js application’s missing configuration is straightforward, thanks to the Red Hat OpenShift Application Services CLI.
Create a KafkaConnection custom resource
Enter the following command and follow the prompts to create a KafkaConnection custom resource. The name you use for $PROJECT must be the same project into which you deployed the Node.js application:
$ rhoas cluster connect --namespace $PROJECT
Note: If you receive an error about exceeding the maximum number of service accounts, use the rhoas serviceaccount delete command to remove an inactive service account.
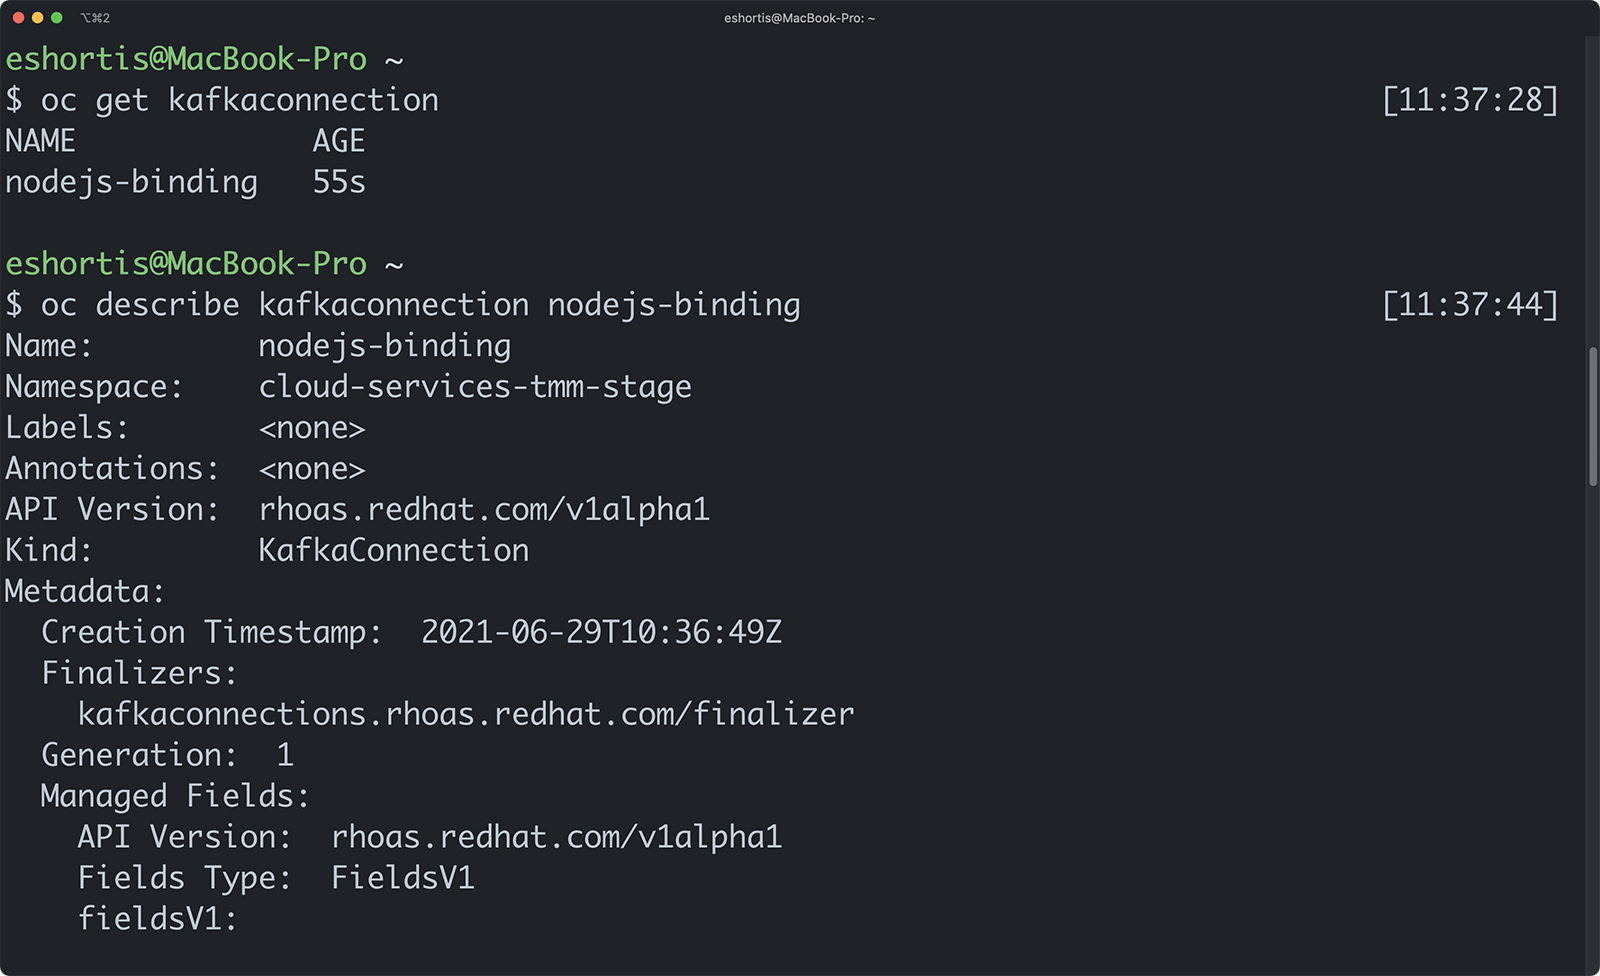
Once the rhoas cluster connect command has run, a KafkaConnection custom resource is created in your OpenShift project, along with two secrets. The first secret is named rh-cloud-services-accesstoken-cli and is used by the Red Hat OpenShift Application Services Operator to communicate with cloud.redhat.com APIs. The other secret is named rh-cloud-services-service-account. It contains the Simple Authentication and Security Layer (SASL) username and password your application requires to authenticate with your managed Kafka instance. Use the OpenShift CLI to describe the KafkaConnection resource, as shown in Figure 4. Note that it refers to these secrets.
Create the Service Binding
The last step is to bind this information to your Node.js application. Enter the following command and follow the prompts to create a Service Binding:
$ rhoas cluster bind --namespace $PROJECT
The command creates a ServiceBinding customer resource. The Service Binding Operator uses this resource to update the Node.js application Deployment with the SERVICE_BINDING_ROOT environment variable and mount a volume containing the Kafka connection configuration. You can run the oc describe deployment/rhosak-nodejs-sbo-example command to confirm that the deployment has been updated with this configuration.
Verifying the Node.js producer and Kafka connectivity
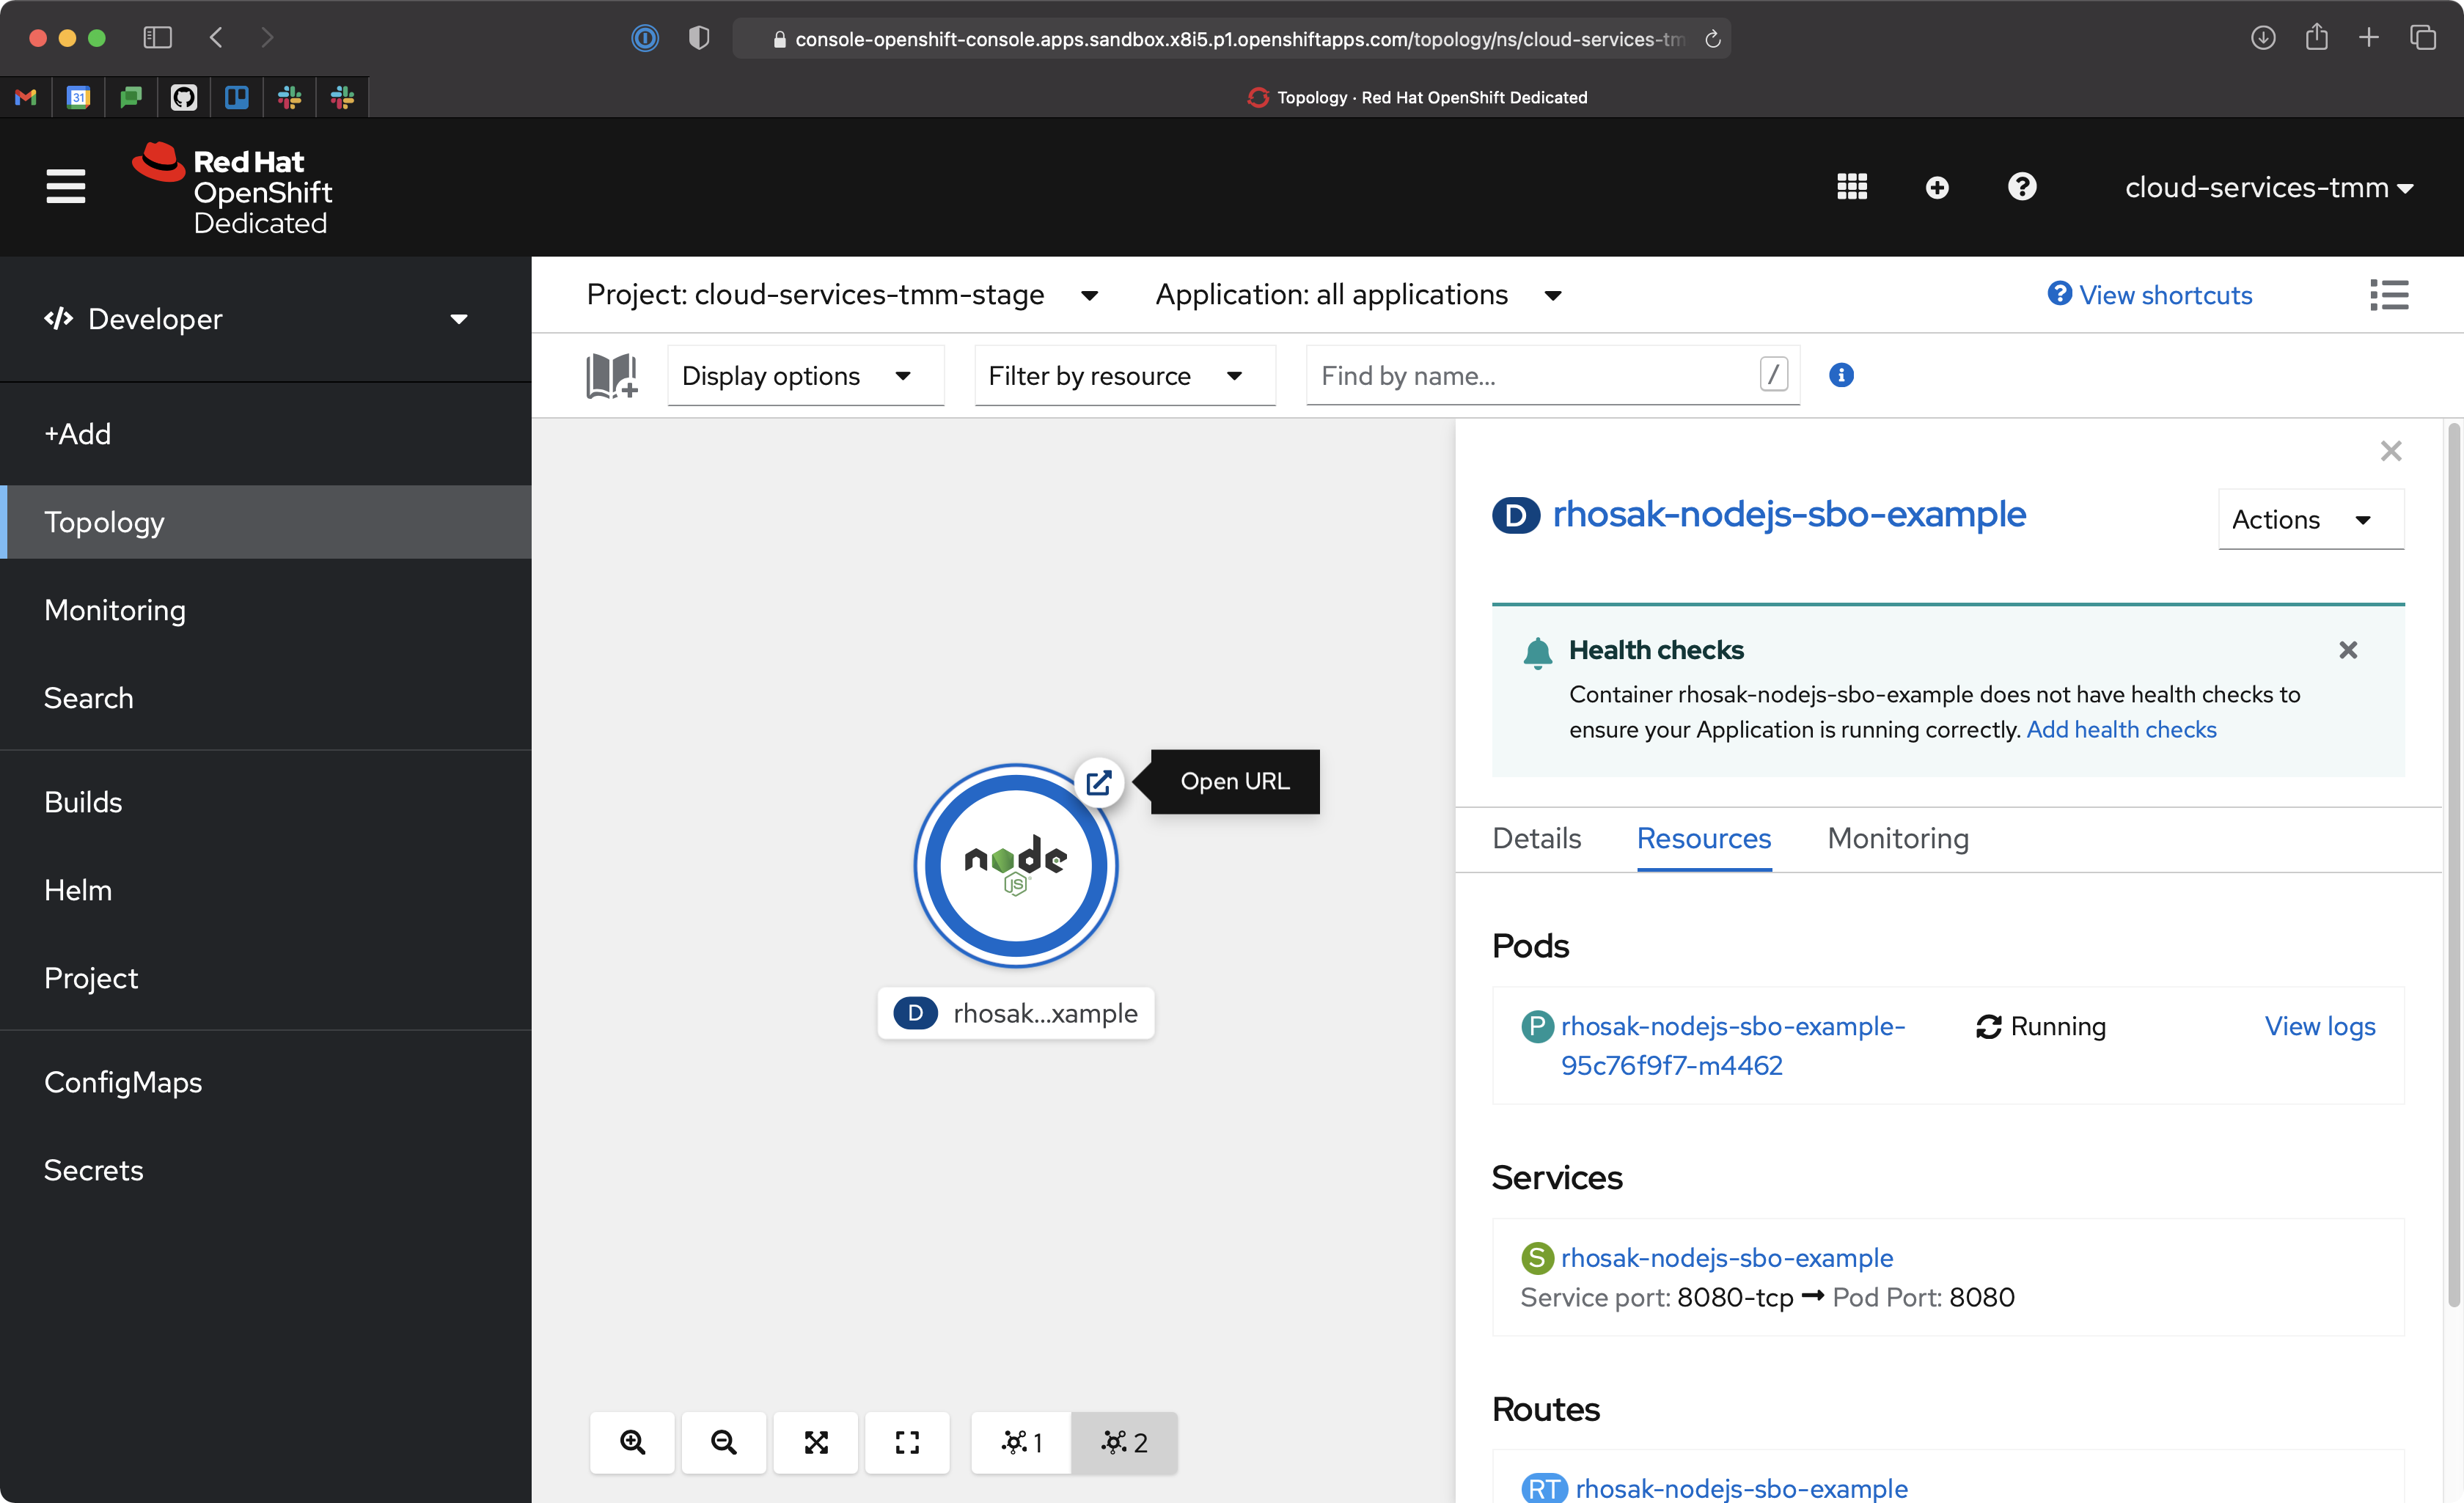
At this point, the Node.js application is running. Use the Open URL button from the OpenShift UI's Topology view, as shown in Figure 5, to load the application homepage in your browser.
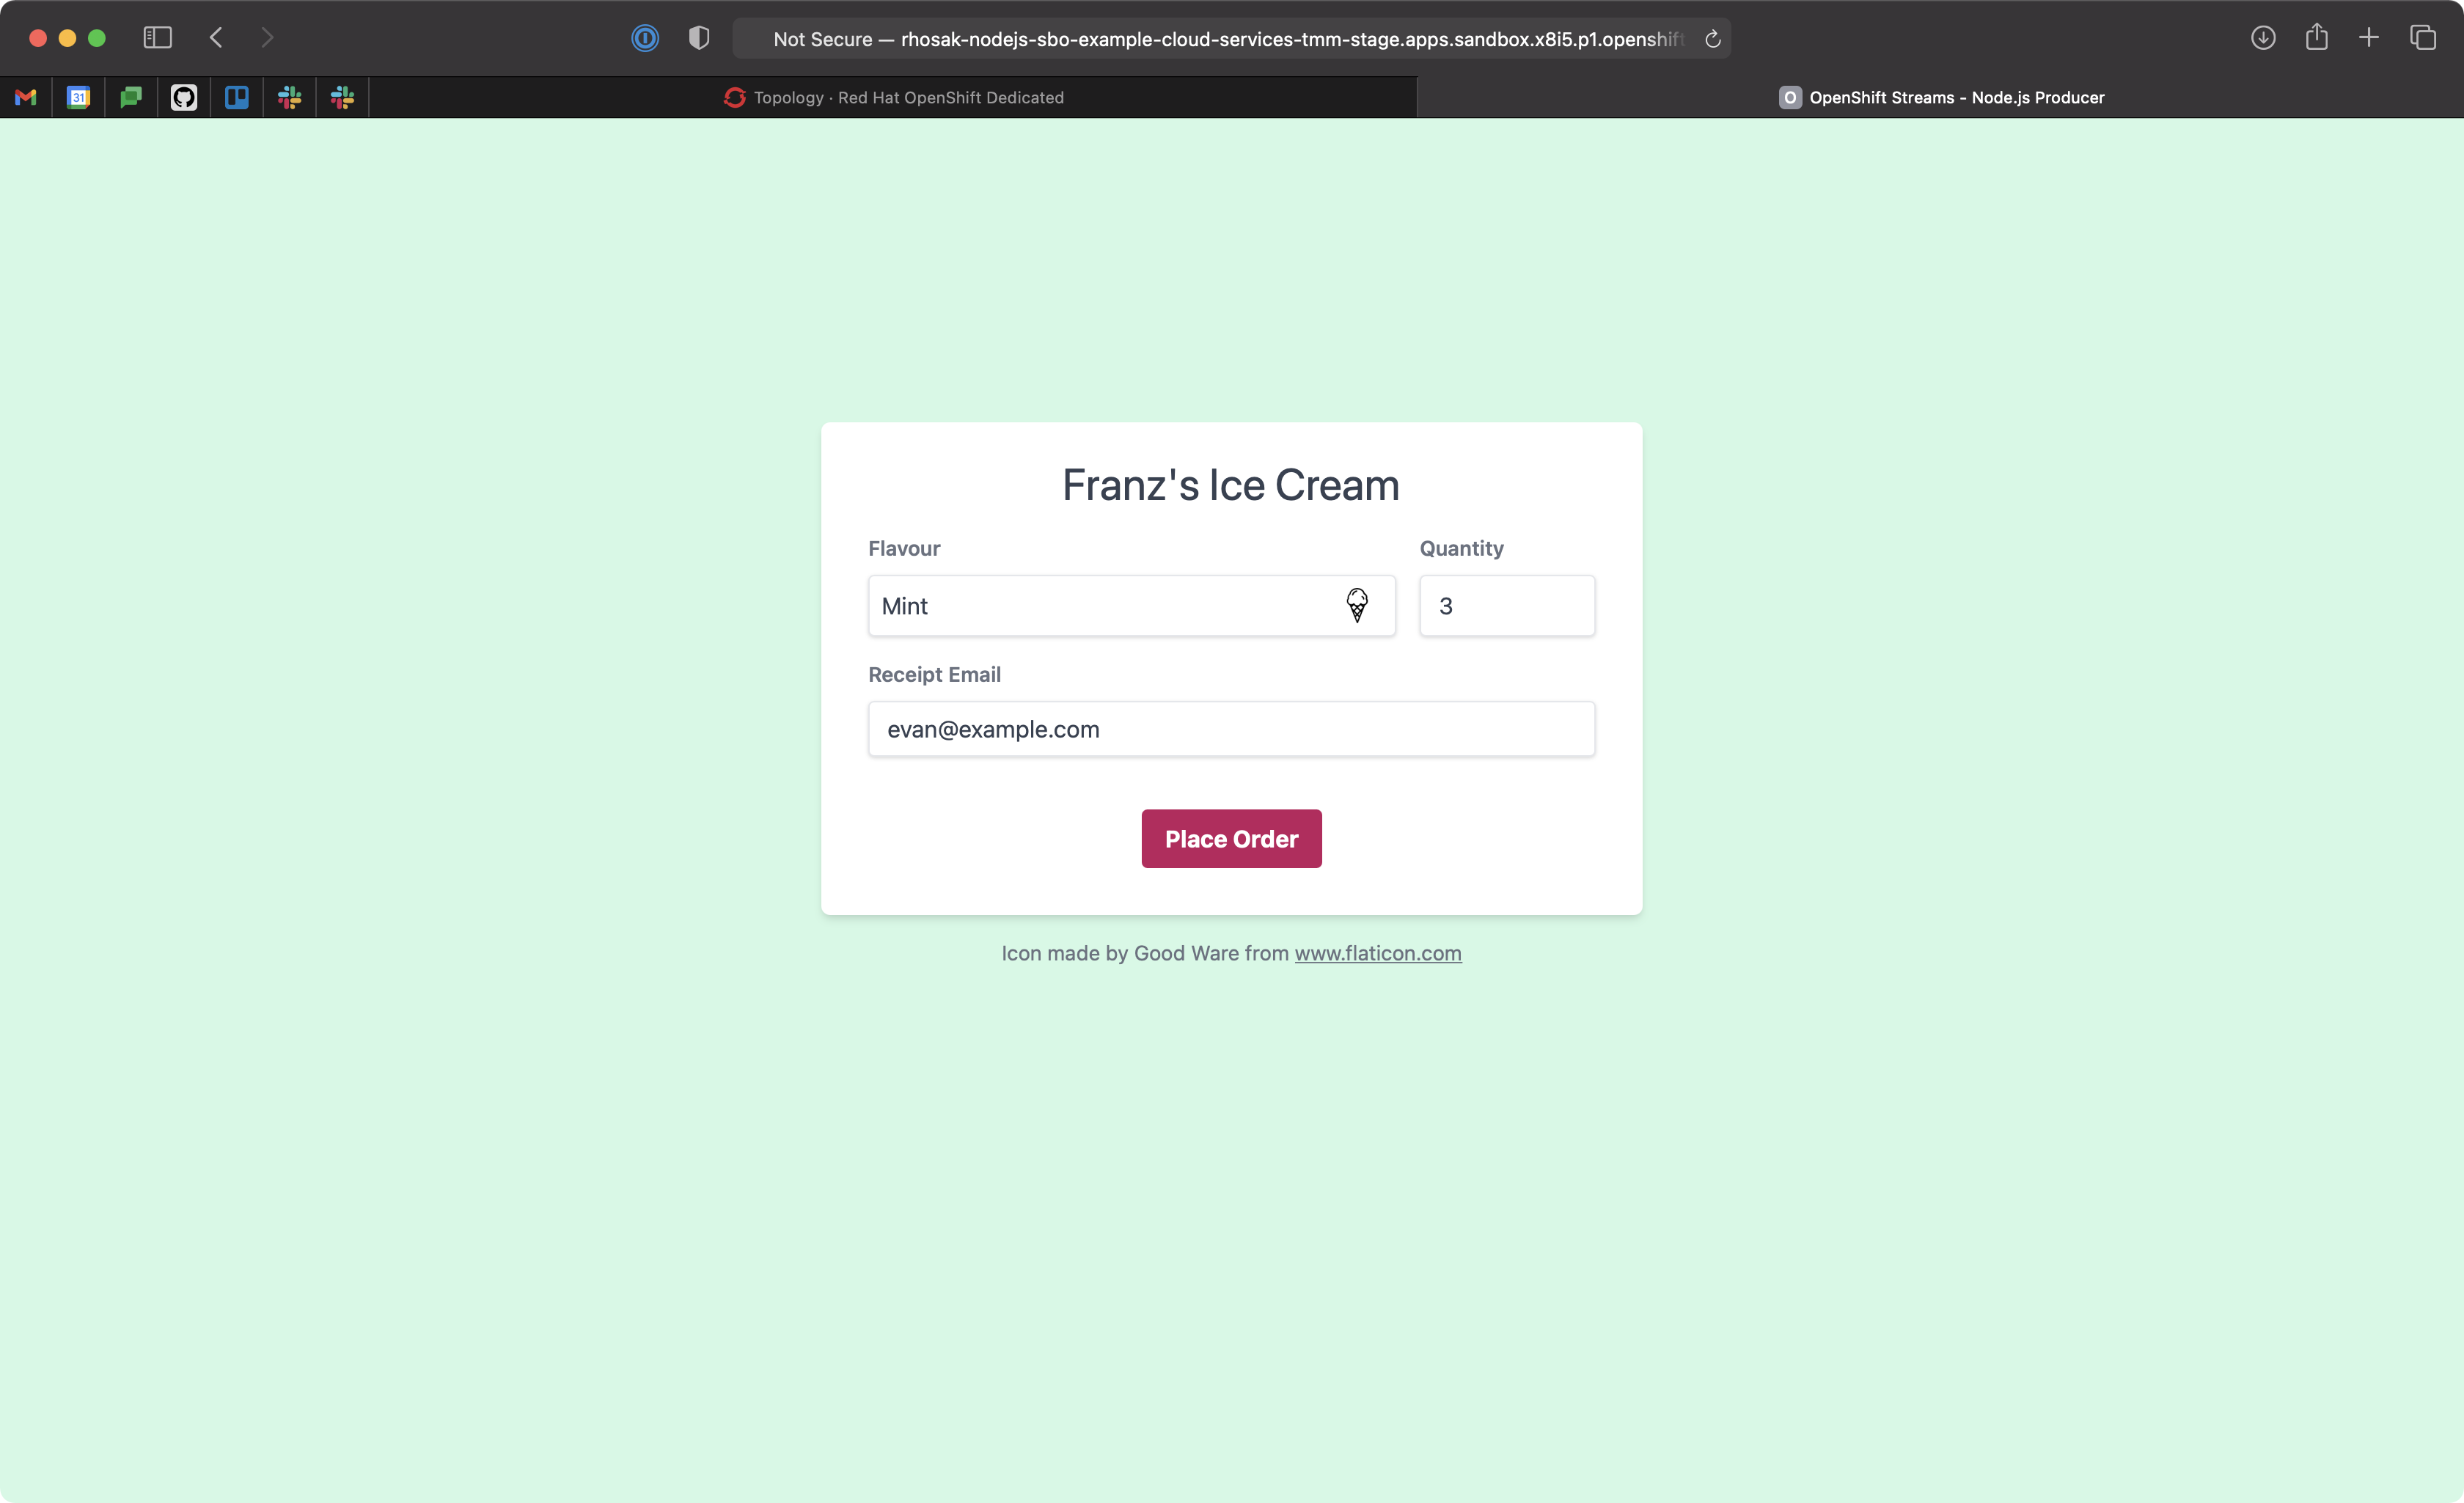
Place a few orders for ice cream using the application UI. Each order you submit is produced to the orders topic of the managed Kafka cluster running on Red Hat OpenShift Streams for Apache Kafka. The Receipt Email field shown in Figure 6 is used as a key when producing the record.
You can verify the orders are written to Kafka using a tool such as Kafkacat. The Kafkacat command to consume the orders in your terminal is:
# These variables can be obtained from the OpenShift Streams UI or using the

# rhoas kafka describe and rhoas serviceaccount CLI commands


$ export KAFKA_BOOTSTRAP_SERVERS=<replace-me>

% export KAFKA_CLIENT_ID=<replace-me>

$ export KAFKA_CLIENT_SECRET=<replace-me>


$ kafkacat -t orders -b $KAFKA_BOOTSTRAP_SERVERS \

-X sasl.mechanisms=PLAIN \

-X security.protocol=SASL_SSL \

-X sasl.username=$KAFKA_CLIENT_ID \

-X sasl.password=$KAFKA_CLIENT_SECRET -K " / " -C
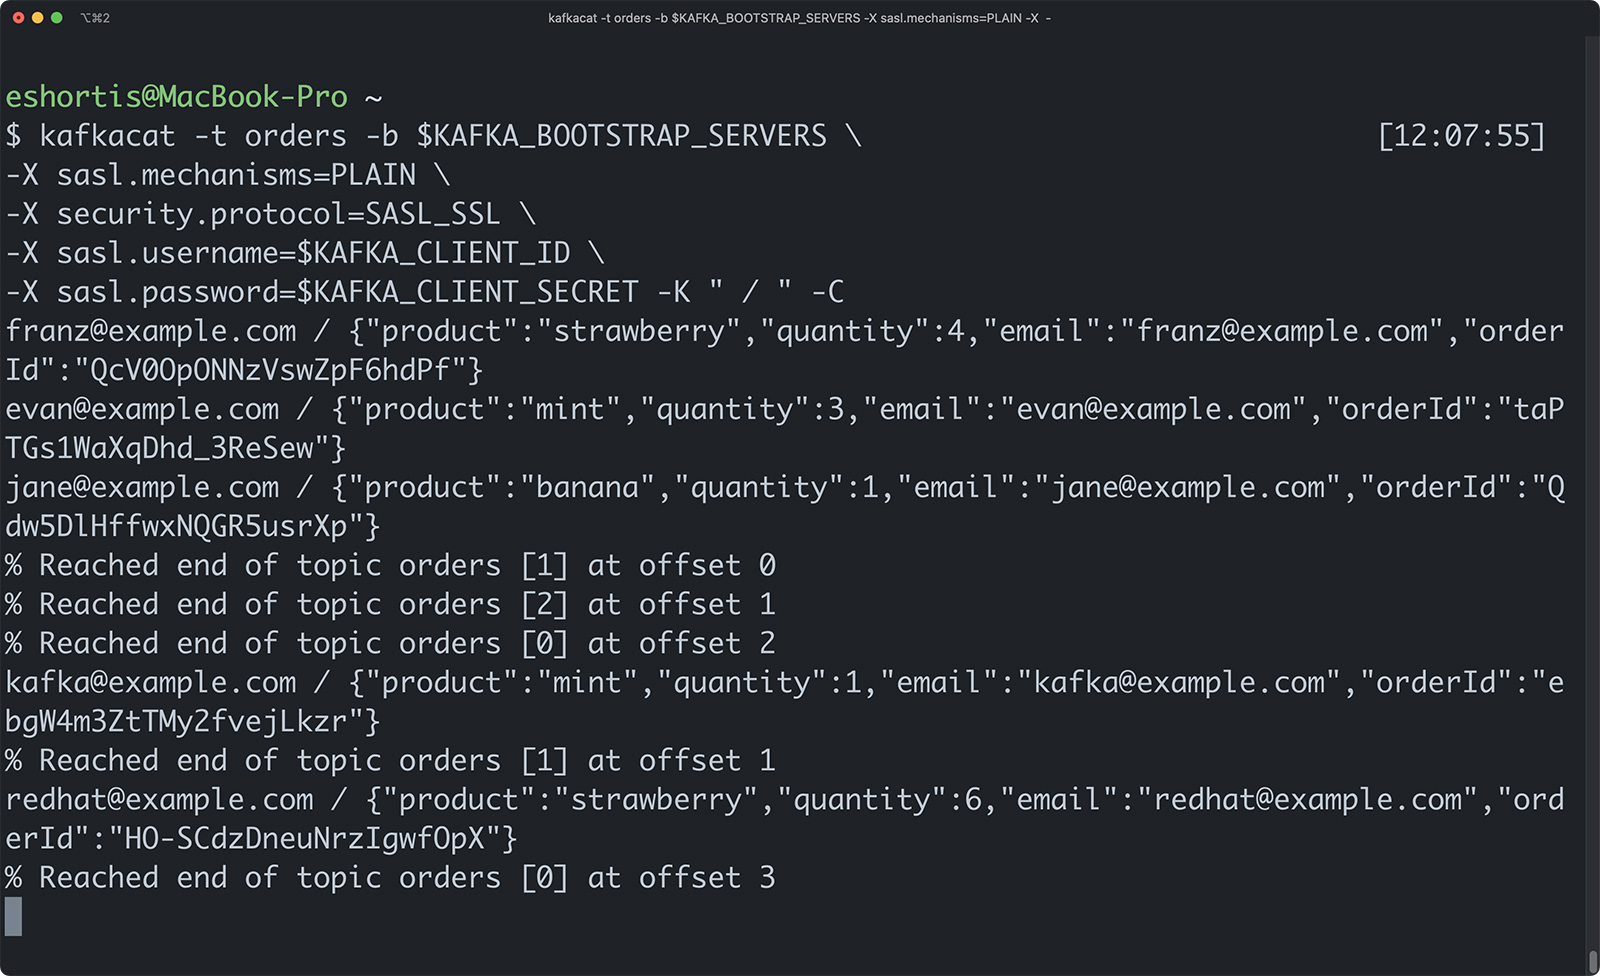
Figure 7 shows the Kafkacat output. The email address is the key, and the JSON is the message value. Orders from the same email address will be processed in a series because they are routed to the same partition.
Summary
In this article, you’ve learned how to connect your Node.js applications to Red Hat OpenShift Streams for Apache Kafka using Service Binding. If you’re wondering how this supports local development environments against a managed Kafka instance, take a look at the local development section of the sample application repository—it’s refreshingly straightforward.
Using managed services such as OpenShift Dedicated (which underlies the Developer Sandbox) and OpenShift Streams for Apache Kafka allows you to focus on building applications instead of infrastructure.
Interested in learning more? Why not try creating a consumer application that processes the entries from the orders topic that were produced using this article. You can use this Quarkus Kafka application as a template.