This article covers the new features available in the Red Hat Integration Service Registry 2.0, which became generally available in June 2020. To illustrate one of the most valuable new features, I'll show you how to secure your service registry using Red Hat's single sign-on (SSO) technology. The security feature uses a newly available integration powered by the Quarkus OpenID Connect security extension.
About Red Hat Integration Service Registry
Red Hat Integration Service Registry is a datastore for standard event schemas and API designs. Developers can use it to decouple the data structure from their applications and share and manage the data structure using a REST interface. The Red Hat Service Registry builds on the Apicurio Registry open source community project.
In the past, I've written about new features and storage options in the Service Registry, and offered a first look at its new UI and operator. One of the most requested features from customers was controlling access to the web console using users and role-based access control (RBAC). The new Service Registry release addresses this request and other improvements, resulting in an improved registry for your Apache Kafka schemas and API designs.
What’s new in Service Registry 2.0
As developers have increased their use of the Service Registry and expanded it into larger projects, they've discovered the need to manage stored artifacts in a more structured and organized way. One of the most requested features was the ability to group and categorize schemas, specifications, and other documents. In response, the new release includes an improved REST API that lets you group your artifacts by teams or projects.
Next, the serialization and deserialization libraries were improved significantly. The service registry offers Java libraries as Maven artifacts to simplify their use within your applications. These libraries are now independent for each data format: Apache Avro, JSON Schema, and Google Protocol Buffers. The SerDes Java JARs offer a new, simplified configuration that improves the developer experience while providing powerful and flexible options.
Additionally, the Service Registry 2.0 release supports integrations through webhooks and Apache Kafka to allow custom or third-party connections. Every time you create a new artifact or change an existing one in the registry, the connected integrations receive a notification event. In this way, you can automatically notify other developers through an organizational channel such as Slack or Telegram, and announce that a new version of the artifact is available.
The new version also implements a preview of the Schema Registry API released by the Cloud Native Computing Foundation (CNCF) as part of the efforts of the CloudEvents Working Group for standardization and interoperability. The Red Hat Service Registry is the first registry to support this specification and will certainly help to encourage its adoption.
Last but not least, the new release supports authentication to secure the registry's REST API and web console. The Service Registry uses the OpenID Connect (OIDC) protocol, a simple identity layer on top of OAuth 2.0. The Service Registry uses the Quarkus extensions for OpenID Connect to connect conveniently to an identity provider such as Red Hat's single sign-on (SSO) technology.
You can use Red Hat's single sign-on technology to create users that map to the teams accessing the registry. Then, you can add specific roles to those users to control their access to artifacts. If required, you can enable owner-only access control, which limits the management access to the user that created the resource. Let's take a closer look at this security feature.
Secure your registry with SSO
The Red Hat Service Registry uses Quarkus extensions for user authentication and authorization. These extensions require an identity provider that implements the OpenID Connect protocol to verify the identity of the user and the roles assigned to the user. Red Hat's single sign-on technology is based on the Keycloak project and lets you secure web applications with single sign-on capabilities. It's part of the Red Hat Integration subscription, so we will use it to secure the registry.
Note: Follow the documentation to install and start a single sign-on server using the Red Hat OpenShift templates.
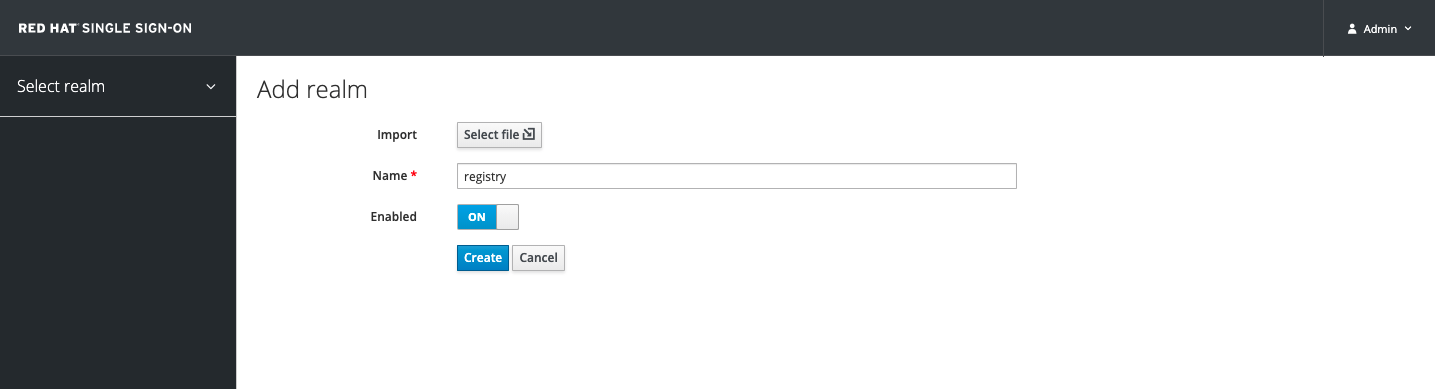
Step 1: Create a registry realm
You need to create a realm in the SSO admin console (shown in Figure 1) in order to use a configuration independent from other applications that use the same single sign-on instance. By default, the Service Registry expects a realm name of registry. For more details about creating single sign-on realms, see Getting Started with Red Hat Single Sign-On.
Step 2: Create an SSO client for the Service Registry API
Now, create a single sign-on client for the Service Registry API, as shown in Figure 2.
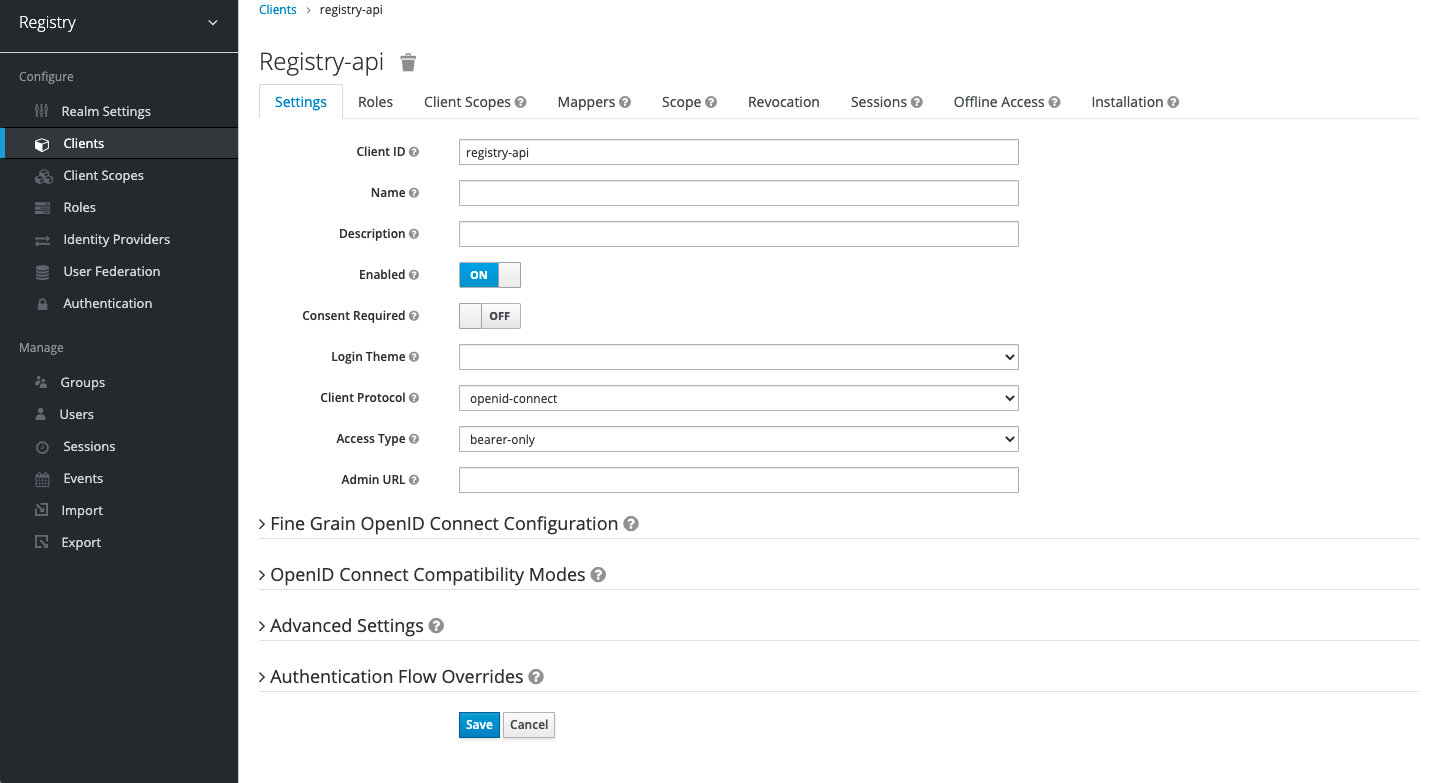
By default, Service Registry expects the following settings:
Client ID: registry-api
Client Protocol: openid-connect
Access Type: bearer-only
Step 3: Create an SSO client for the Service Registry console
Next, create a single sign-on client for the Service Registry web console, shown in Figure 3.

By default, Service Registry expects the following settings:
Client ID: apicurio-registry
Client Protocol: openid-connect
Access Type: public
Valid Redirect URLs: http://<YOUR_REGISTRY_URL>/*
Web Origins: +
You can use the defaults for the other client settings.
Step 4: Configure the authentication using SSO
In your Service Registry deployment on OpenShift, set the following Service Registry environment variables to configure authentication using SSO:
AUTH_ENABLED=true
KEYCLOAK_REALM=registry
KEYCLOAK_URL=https://<YOUR_SSO_URL>/auth
You will need to assign one of the following roles to each user:
sr-admin: Full access to all create, read, update, and delete operations.sr-developer: Access to create, read, edit, and delete operations, except for configuring global rules. This role can configure artifact rules.sr-readonly: Access to read and search operations only. This role cannot configure any rules.
If you want to enable owner-only authorization for updates to schemas and API artifacts, set the following environment variable:
REGISTRY_AUTH_OWNER_ONLY_AUTHORIZATION=true
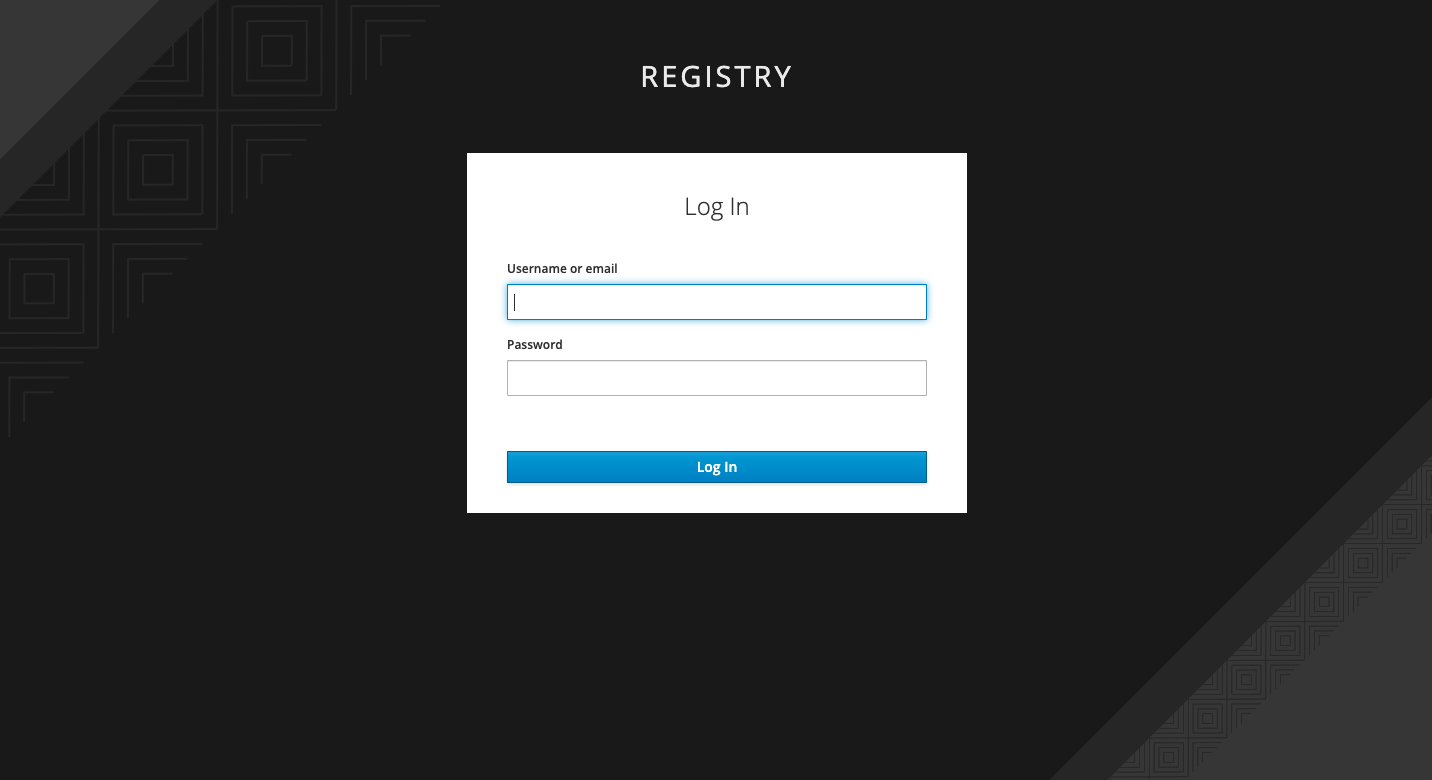
Step 5: Restart your pod
Restart your pod with the new variables. When you visit the main registry URL, you should see the single sign-on login page shown in Figure 4.
Congratulations! You have successfully secured your service registry.
Summary
In this article, we quickly reviewed the new features of Red Hat Integration Service Registry 2.0, including new SerDes libraries, an improved REST API implementation of the CNCF schema registry API, and an essential element: Authentication with OpenID Connect. The authentication allows secure access to the registry using Red Hat's single sign-on technology to manage users and assign them roles.
I then showed you how to configure SSO to create a realm, the required clients with their configuration, and the setup for the registry to enable role-based access control. By following the instructions in this article, you can quickly get started with a secure registry on top of OpenShift for APIs and Apache Kafka schemas.
Up next: Learn more about getting started with the service registry and how to replace the Confluent schema registry with the Red Hat Service Registry.
Last updated: September 19, 2023