API Management
Create web application programming interfaces and manage how they're accessed and used with API Management
Create web application programming interfaces and manage how they're accessed and used with API Management

Application programming interfaces (APIs) deliver fundamental business value in a digital world—from supporting internal innovation and enabling cross-enterprise agility, to creating new products and revenue streams.
An API is a set of tools, definitions, and protocols for building application software. It lets your product or service communicate with other products and services without having to know how they’re implemented. APIs can simplify app development which saves developers time and companies money. When you’re designing new tools and products—or managing existing ones—APIs give you flexibility, they simplify API design, administration, and use, and they provide opportunities for innovation.
APIs let you open up access to your resources while maintaining security and control. How you open access and to who is up to you. Connecting to APIs, and creating applications that consume the data or functionality exposed by APIs, can be done with a distributed integration platform that connects everything—including legacy systems and the Internet of Things (IoT).
Red Hat 3scale API Management makes it easy to manage your APIs for internal or external users. Share, secure, distribute, control, and monetize your APIs on an infrastructure platform built with performance, customer control, and future growth in mind. 3scale components can be deployed on-premise, in the cloud, as a managed service, or on any required combination.
APIs are at the center of a quality integration strategy. Enterprise APIs can be implemented in combination with enterprise integration patterns (EIPs) through one or a combination of the following ways:
API Management provides the same set of APIs for different audiences through packaging and unique consumption plans. API owners can decide the consumer profile for APIs.

The API is only for internal use. This gives companies the most control over their API.

The API is shared with specific business partners. This provides additional revenue streams without compromising quality.

The API is available to everyone. This allows third parties to develop apps that interact with your API and serve as a source for innovation.

The evolution of microservices and containers in recent years has significantly changed the way we design, develop, and run software. Today’s applications are optimized for scalability, elasticity, failure, and speed of change. Driven by new principles, modern architectures require a different set of patterns and practices.
With this book, you'll learn to:

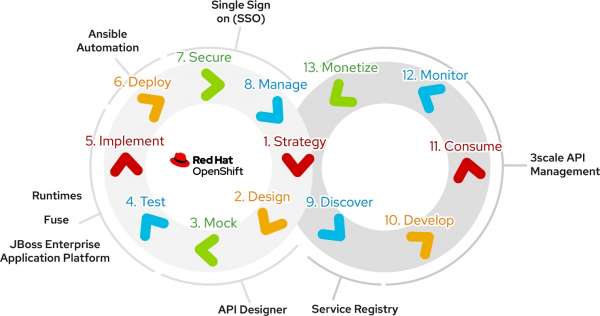
Red Hat provides a rich stack of products and community tools to assist with the API life cycle for each stage. Here are several products and tools to help with your implementation of an API life cycle:
With APIs becoming so central, it's essential to deal with full API life cycle management.
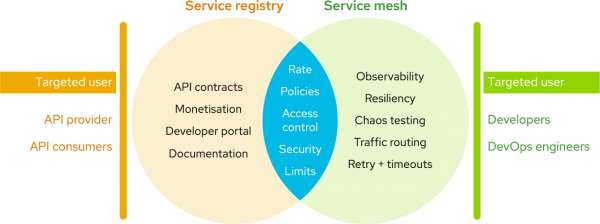
With the rise in popularity of micro services architecture (MSA), there is an increasing overlap between API Management and service mesh use cases.

In most solutions, it is not a choice of either/or, but using both API Management and service mesh together to provide the right functionality for the architecture.

Designing APIs as a Product means changing the way you craft APIs and...

In this article, Nicolas Massé shows how to use the 3scale toolbox to deploy...

This article covers the installation and use of 3scale toolbox, as a powerful...
