Applying fine-grained access control to APIs is a common enterprise requirement that can be challenging to implement. Encapsulating authorization decisions into the API gateway can quickly become difficult to manage in complex APIs with many resources and access control rules. However, you can externalize API authorization decisions from the API gateway and from your microservices by leveraging Keycloak Authorization Services as a centralized authorization component. Keycloak Authorization Services acts as a policy decision point integrated with 3scale API gateway, which is the central enforcement place to access your APIs.
Integrating Keycloak Authorization Services into your API architecture has many benefits:
- Centralized control with simplified administration: Organizations have a single point of control for managing access policies with simplified operations, where the administrator can efficiently manage authorization decisions and permissions from a central Keycloak web console gives them the power to define exactly the policies they need without the need for changes in the API gateway.
- Separation of concerns: Externalizing authorization decisions to a specialized authorization service allows API gateways and API services to remain lightweight and focused on their primary responsibilities.
- Fine-grained access control: Keycloak Authorization Services supports policy-based access control , allowing for very granular and fine-grained access control policies. This enables precise control over who /when can access what within your APIs.
- Fast security review: It becomes easier to perform security checks for permissions without knowledge in the API gateway.
This article introduces the Keycloak authorizer custom policy and details how to integrate Red Hat 3scale API Management with Red Hat build of Keycloak Authorization Services to decouple your API authorization policies.
3scale API Management provides a feature that allows users to define custom policies. These policies enable you to enhance the default behavior of the APIcast/gateway.
Keycloak Authorization Services
Red Hat build of Keycloak is based on the Keycloak open source identity and access management solution, which provides features like single sign-on (SSO), user management, OAuth 2.0/OpenID Connect support, and authorization services.
Keycloak Authorization Services provide fine-grained authorization policies that give businesses the ability to control authorizations for all of their services from the Administration Console, enabling them to set the policies they need accurately with the ability to combine different access control patterns such as:
- Attribute-based access control (ABAC)
- Role-based access control (RBAC)
- User-based access control (UBAC)
- Context-based access control (CBAC)
- Rule-based access control
- Time-based access control

By leveraging Keycloak Authorization Services, organizations can ensure that they have a consistent, powerful, and flexible solution to manage access to their APIs and resources, thereby increasing security while also providing a better experience for developers and end users.
Furthermore developers and administrators can implement complex access control scenarios, from basic role-based access control to detailed, attribute-based access control, and even context-aware policy enforcement. This empowers organizations to enhance their security posture and ensure that users only access the resources they are authorized to use.
Scenario
Imagine we have a course management microservice that exposes REST APIs through 3scale for viewing and deleting course resources that can serve users with two types of roles:
- Instructor
- Student
Only instructors are allowed to delete a course; both student and instructor are allowed to view the course resource. In this demo, we are going to implement a basic RBAC access control pattern.
Architecture
The flow is shown in Figure 2 and described below.

- API consumer application hits request to 3scale API product secured by OpenID Connect authentication method with Keycloak.
- The gateway redirects the user to the Keycloak authentication page to authenticate and issue a token using OAuth 2.0 authorization code flow.
- Keycloak Authorizer Policy extracts resource name and scope from policy configuration based on matching mapping rule of the incoming HTTP request in order to send an authorization request to Keycloak Authorization Services for decision making.
- Keycloak Authorization Services replies with an authorization decision.
- The gateway will allow or deny the request based on the authorization decision; if the decision is allowed, then the request will be proxied to the upstream service.
In this architecture, the gateway acts as a policy enforcement point (PEP), while Keycloak acts as a policy decision point (PDP) and OpenID Connect identity provider.
Prerequisites
The following resources are necessary to run this demonstration:
- Red Hat 3scale API Management 2.13 on-premises deployment.
- Red Hat Build of Keycloak 22.0.
Step 1: Configure Keycloak
-
In the Red Hat build of Keycloak console, create a realm named
3scale-course-mgmtfor a 3scale client, as shown in Figure 3.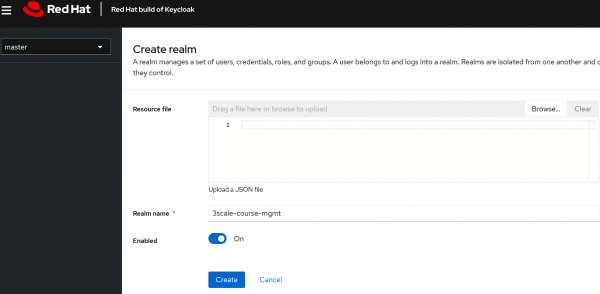
Figure 3 : Create a realm named 3scale-course-mgmt Figure 3 : Create a realm named 3scale-course-mgmt. -
Create a client in the realm 3scale-course-mgmt with the configurations of the integration as an identity provider for 3scale.
-
Next, we'll set up a client within the 3scale-course-mgmt realm, configured to serve as the identity provider for 3scale (see Figure 4).
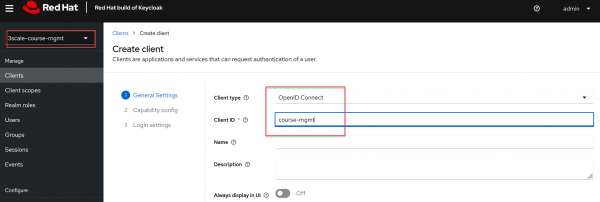
Figure 4: Create a client named course-mgmt Figure 4: Create a client named course-mgmt. In the Capability config section, make the following adjustments (Figure 5):
- Turn ON the client authentication.
- Turn ON Authorization to enable Authorization Services.
- Disable the Standard Flow and Direct access grands by unchecking it.
- After making these changes, click Next and Save.
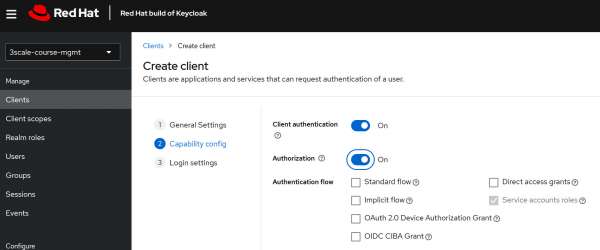
Figure 5: configure the client for OIDC identity provider with 3scale Figure 5: Configure the client for OIDC identity provider with 3scale. -
Next, assign roles to the service account for the client using these steps, illustrated in Figure 6:
- Head to the Service Account Roles section for the client.
- Click the Assign role button.
- Choose Filter by client and search by manage-clients.
- Within the search result section, choose manage-clients and then click on Assign to allocate the role.
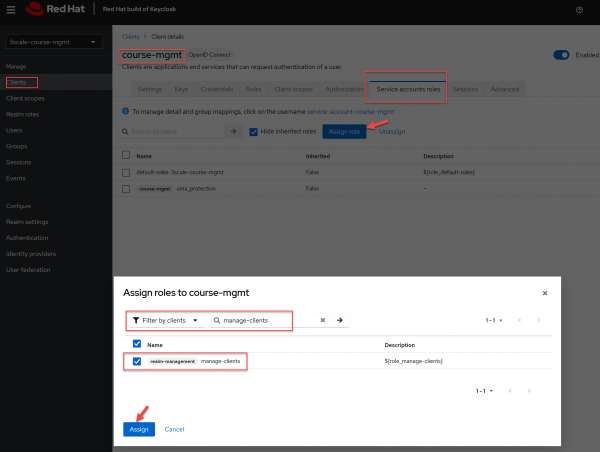
Figure 6: configure Service Account roles for 3scale integration Figure 6: Configure Service Account roles for 3scale integration. Note the client credentials shown in Figure 7:
- Make a note of the client ID (
<client_id>). - Navigate to the Credentials tab of the client and make a note of the Secret field (
<client_secret>).
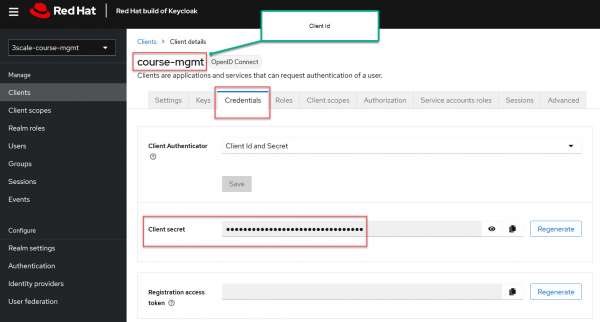
Figure 7: shows the Client ID and Client secret. Figure 7: The Client ID and Client secret. -
Now move to the Roles section. Create realm roles for students and instructors, as shown in Figure 8.
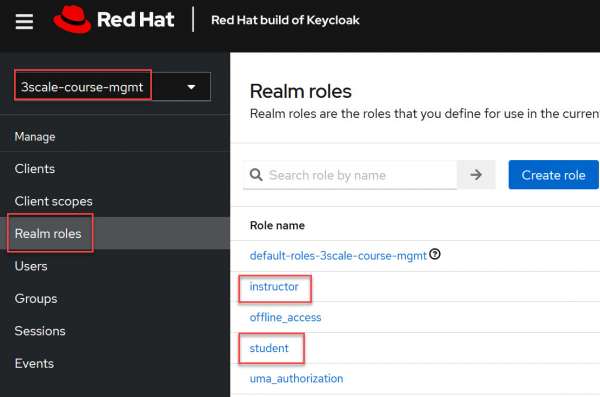
Figure 8: Create realm roles for student and instructor Figure 8: Create realm roles for student and instructor.
Configure Keycloak Authorization Services
- Create scopes: In Keycloak's Authorization Services, a scope represents a specific action, access level, or privilege that can be applied to a resource. Essentially, scopes help define in more granular detail what a user can do with a given resource. In our example, we have view and delete scopes that belong to Course Resource (Figure 9).

Figure 9: Create authorization scopes for delete and view scopes. - Create the Course resource: In the context of Keycloak's Authorization Services, a resource represents any asset or entity that you want to protect and control access to. Essentially, it's something for which you wish to enforce certain access constraints based on user roles, attributes, or other criteria. In our example, the target REST resource is the course resource (Figure 10).
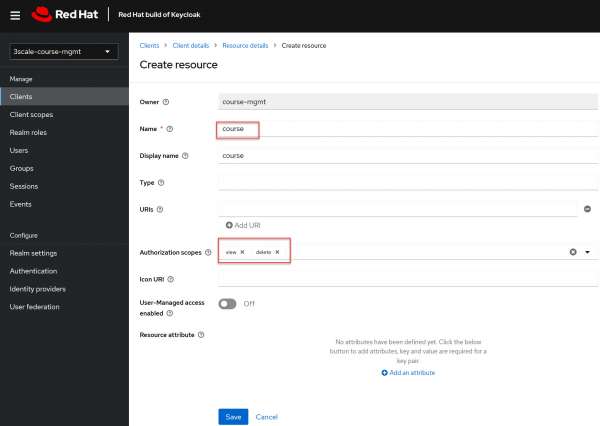
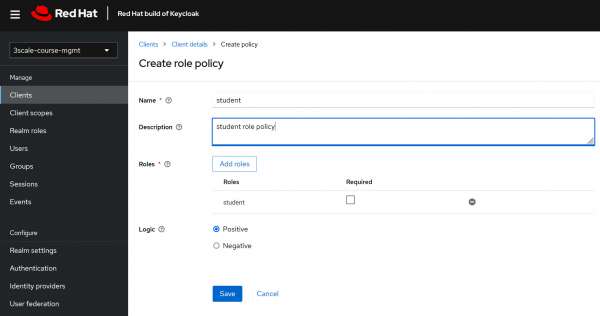
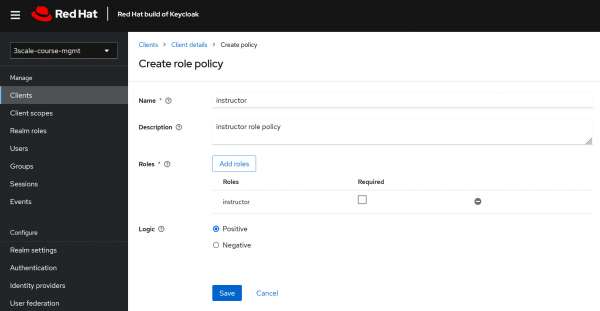
Figure 10: create Course resource attaching view and delete scopes. Figure 10: Create a course resource attaching view and delete scopes. - Create a role policy: A role policy is a type of policy that grants access based on the roles assigned to a user. It allows you to specify that users with a particular role (or set of roles) will either be granted or denied access to a resource or a specific scope within that resource. In our example, we will create two role policies:
- Create scope-based permissions: In Keycloak's Authorization Services, a permission represents the association between resources and policies, and it defines who can access what and under which conditions. In our example, we need to create two scope permissions:
- Course view permission that associates course resource, view scope, student role policy, and instructor role policy (Figure 13).
- Course delete permission that associates course resource,delete scope and instructor role policy (Figure 14).
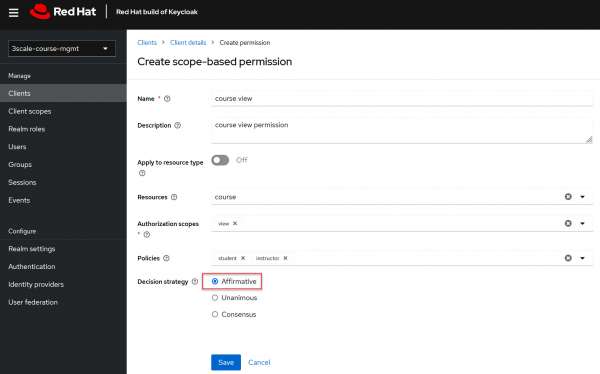
Figure 13: Create scope based permission for viewing the course Figure 13: Create scope based permission for viewing the course. 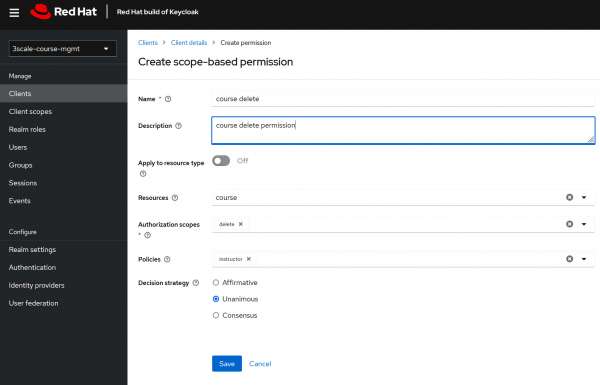
Figure 14: Create scope based permission for deleting the course Figure 14: Create scope-based permission for deleting the course.
Step 2: Add keycloak-authorizer-policy to 3scale API Management
Next, you need to deploy keycloak-Authorization-policy to APIcast 3scale managed in OpenShift.
- Start by cloning the custom policy from the GitHub repository:
$ git clone https://github.com/3scale-demos/keycloak-Authorization-policy $ cd keycloak-Authorization-policy/policies/keycloak_Authorize -
Create an OpenShift secret with the custom policy content in 3scale API manager namespace:
oc create secret generic keycloak-authorizer-policy --from-file=keycloak_Authorizer.lua --from-file=init.lua --from-file=apicast-policy.json --from-file=http_headers.lua --from-file=http_connect.lua -n <<3scale-api-manager>> -
Configure and deploy APIManager CR with the custom policy.
-
Next, you need to add custom policy definition to your APIManager custom resource in the section of 3scale managed apiCast staging and production definition as shown below:
apiVersion: apps.3scale.net/v1alpha1 kind: APIManager metadata: name: example-3scale spec: apicast: stagingSpec: customPolicies: - name: keycloak_authorizer secretRef: name: keycloak-authorizer-policy version: 1.0.0 productionSpec: customPolicies: - name: keycloak_authorizer secretRef: name: keycloak-authorizer-policy version: 1.0.0 -
Next, you need to create 3scale CustomPolicyDefinition Custom Resource in order to view the policy configuration in the API Manager policy editor UI, the custom policy should be registered using customPolicyDefinition custom resource as shown below.
apiVersion: capabilities.3scale.net/v1beta1
kind: CustomPolicyDefinition
metadata:
 name: custompolicydefinition-kca
spec:
 name: "keycloak_authorizer"
 version: "1.0.0"
 schema:
    $schema: 'http://json-schema.org/draft-07/schema#'
    configuration:
      properties:
        error_message:
          description: Error message to show to user when traffic is blocked
          title: Error message
          type: string
        rules:
          description: 'List of rules '
          items:
            properties:
              Keycloak_resource_name:
                description: Keycloak resource name
                type: string
              Keycloak_scope:
                description: Keycloak scope name
                type: string
              methods:
                default:
                  - ANY
                description: Allowed methods
                items:
                  enum:
                    - ANY
                    - GET
                    - HEAD
                    - POST
                    - PUT
                    - DELETE
                    - PATCH
                    - OPTIONS
                    - TRACE
                    - CONNECT
                  type: string
                type: array
              resource:
                description: >-
                  Resource controlled by the rule. This is the same format as
                  Mapping Rules. This matches from the beginning of the string
                  and to make an exact match you need to use '$' at the end.
                type: string
              resource_type:
                description: How to evaluate 'resource' field
                oneOf:
                  - enum:
                      - plain
                    title: Evaluate as plain text.
                  - enum:
                      - liquid
                    title: Evaluate as liquid.
                type: string
            required:
              - Keycloak_resource_name
              - resource
              - Keycloak_scope
            type: object
          type: array
      type: object
    name: keycloak_authorizer
    summary: 'The policy integrates APICast with Keycloak Authorization services '
    version: 1.0.0
Step 3: Configure 3scale API management
-
Now you need to create an API backend in 3scale, which is the actual API endpoint or service that 3scale manages. In this demo we are going to create the
course-mgmtbackend using 3scale's Echo API.The API backend can be created in 3scale using the admin portal or using 3scale operator application capabilities; the following YAML file uses the operator capabilities:
apiVersion: capabilities.3scale.net/v1beta1 kind: Backend metadata: name: course-mgmt spec: name: "Course-Mgmt" systemName: "course-mgmt" privateBaseURL: "https://echo-api.3scale.net" -
Next you need to create an API product CR in 3scale using operator with the following configurations:
- Attach
course-mgmtbackend in the product. - Secure the API product by OpenID Connect authentication method and Keycloak. You will need to replace the
CLIENT_SECRETthat we created in step 1 and other variables, like the Keycloak host and port in the YAML CR below. - Create an application plan.
- Create mapping rules for the view/delete course REST endpoints.
- Add
keycloak_authorizerpolicy to the product after APIcast policy with the configurations shown in Table 1 for mapping REST endpoint to the Keycloak resource and scope name.
Table 1: Configuration of keycloak_authorizer policy.
Resource mapping rule HTTP method Keycloak resource name Keycloak scope name /course$GETcourseview/course$DELETEcoursedeleteapiVersion: capabilities.3scale.net/v1beta1 kind: Product metadata: name: course-mgmt spec: name: "Course-Mgmt" backendUsages: course-mgmt: path: "/" deployment: apicastHosted: stagingPublicBaseURL: "<<stagingPublicBaseURL>>" productionPublicBaseURL: "<<productionPublicBaseURL>>" authentication: oidc: issuerType: "keycloak" issuerEndpoint: "https://course-mgmt:<CLIENT_SECRET>@<RHSSO-HOST>:<PORT>/realms/3scale-course-mgmt" authenticationFlow: standardFlowEnabled: true implicitFlowEnabled: false serviceAccountsEnabled: false directAccessGrantsEnabled: false jwtClaimWithClientID: "azp" jwtClaimWithClientIDType: "plain" metrics: hits: description: Number of API hits friendlyName: Hits unit: "hit" methods: view-course: friendlyName: view course delete-course: friendlyName: delete course mappingRules: - httpMethod: GET pattern: "/course" increment: 1 metricMethodRef: view-course - httpMethod: DELETE pattern: "/course" increment: 1 metricMethodRef: delete-course applicationPlans: basic: name: "basic" published: true appsRequireApproval: false policies: - name: apicast version: builtin enabled: true configuration: {} - name: keycloak_authorizer version: 1.0.0 enabled: true configuration: error_message: blocked because of keycloak Authorizer policy rules: - methods: - GET resource_type: plain Keycloak_resource_name: course resource: "/course$" Keycloak_scope: view - methods: - DELETE resource_type: plain Keycloak_scope: delete resource: "/course$" Keycloak_resource_name: course - Attach
Conclusion
This article showed how to integrate Keycloak authorization service with 3scale API Management to externalize your API protection for authentication and authorization.
Today's modern API architecture requires a centralized authentication and authorization component integrated with the API gateway. Red Hat build of Keycloak provides powerful fine-grained authorization services that can be integrated with 3scale API gateway using a custom policy to externalize authorization decisions for the incoming API requests.
