I was interested in doing some load testing against Red Hat 3scale API Management. After a bit of digging around, I discovered perftest-toolkit, an open source load testing toolkit.
Figure 1 depicts an infrastructure diagram from the perftest-toolkit repository.

At first look I was unsure what this gave me or what it required. But after playing around with it for a while, I eventually figured it out along with a few pain points.
What do we need?
Prerequisites:
- A Red Hat OpenShift Kubernetes cluster.
- An instance of 3scale API Management on this cluster.
- An Amazon Elastic Compute Cloud (EC2) instance that can connect a route on your cluster, and also connect to your local PC via SSH. As you are load testing this, the EC2 instance needs to be resourced to handle the load (e.g., c5.xlarge).
- Ansible 2.9.14 (this is used by the repo to deploy resources).
- An endpoint like the
echo-apiendpoint; use the following commands to deploysecho-apiin anecho-apinamespace:
oc new-project echo-api
cat << EOF | oc create -f -
apiVersion: apps/v1
kind: Deployment
metadata:
  name: echo-api
spec:
  replicas: 1
  selector:
    matchLabels:
      app: echo-api
  strategy:
    type: RollingUpdate
    rollingUpdate:
      maxSurge: 25%
      maxUnavailable: 25%
  template:
    metadata:
      labels:
        app: echo-api
    spec:
      containers:
        - name: echo-api
          image: quay.io/3scale/echoapi:stable
          livenessProbe:
            tcpSocket:
              port: 9292
            initialDelaySeconds: 10
            timeoutSeconds: 1
          readinessProbe:
            httpGet:
              path: /test/200
              port: 9292
            initialDelaySeconds: 15
            timeoutSeconds: 1
          ports:
            - containerPort: 9292
              protocol: TCP
---
apiVersion: v1
kind: Service
metadata:
  name: echo-api
spec:
  ports:
  - name: echo-api-port
    port: 9292
    protocol: TCP
    targetPort: 9292
  selector:
    app: echo-api
  type: ClusterIP
---
kind: Route
apiVersion: route.openshift.io/v1
metadata:
  name: echo-api
  namespace: echo-api
spec:
  to:
    kind: Service
    name: echo-api
  port:
    targetPort: echo-api-port
  tls:
    termination: edge
    insecureEdgeTerminationPolicy: Allow
  wildcardPolicy: None
---
EOF
What does perftest-toolkit do?
The perftest-toolkit creates 3scale API Management resources like backends and products, as show in Figure 2.

It installs Hyperfoil, an open source CLI load testing tool sponsored by Red Hat, locally and on the remote EC2 instance. This can be accessed via the browser, as shown in Figure 3, with the EC2 instance public address via port 8090 or directly on the EC2 instances.

It uploads a 3scale-benchmark.yaml file like the following:
    name: 3scale-benchmark
    agents:
      ec2-agent:
        host: ec2-54-93-91-242.eu-central-1.compute.amazonaws.com
        port: 22
    http:
    - host: https://perf-test-dwxpoent-3scale-apicast-production.apps.aucunnin-ccs.lpi0.s1.devshift.org:443
      sharedConnections: 50
    usersPerSec: 228
    duration: 3600s
    maxDuration: 3600s
    scenario:
    - testSequence:
      - randomCsvRow:
         file: /tmp/3scale.csv
         skipComments: 'True'
         removeQuotes: 'True'
         columns:
           0: target-host
           1: uri
      - template:
          pattern: ${target-host}:443
          toVar: target-authority
      - httpRequest:
          authority:
            fromVar: target-authority
          GET:
            fromVar: uri
          headers:
            HOST:
              fromVar: target-host
    threads: 4
It also uploads a CSV with endpoint data to the /tmp directory on the EC2 instance which is consumed by the benchmark above.
# cat 3scale.csv
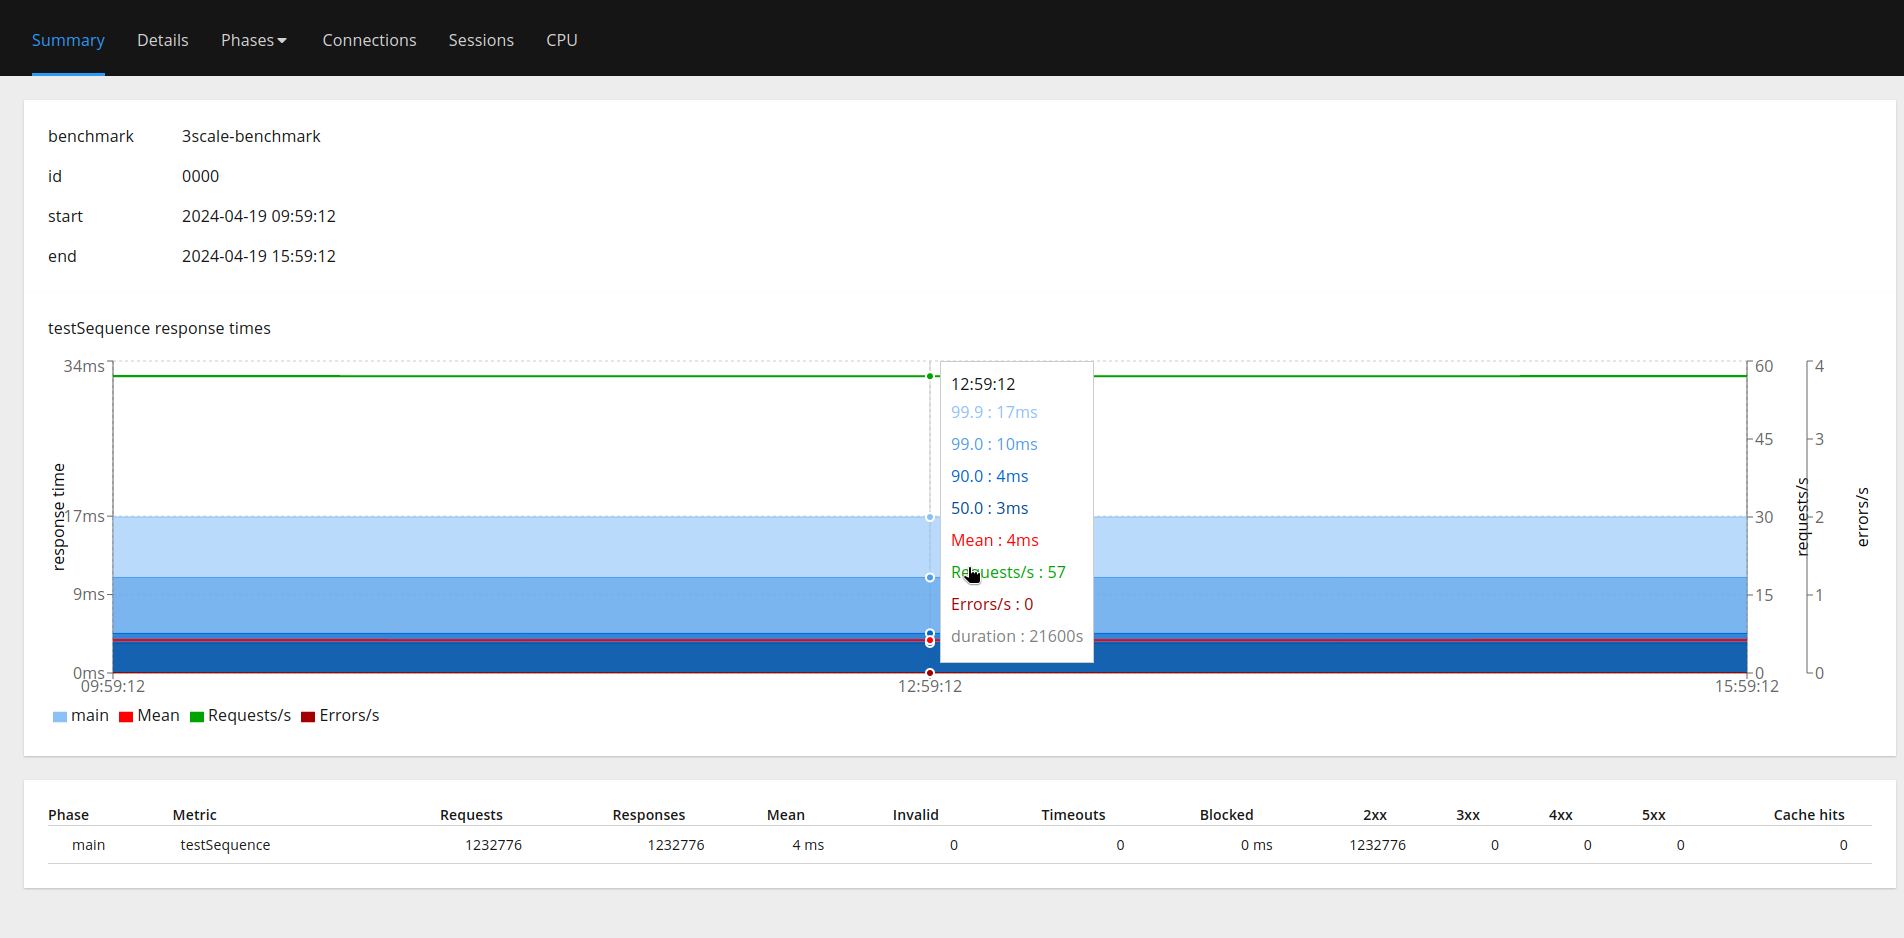
"perf-test-dwxpoent-3scale-apicast-production.apps.aucunnin-ccs.lpi0.s1.devshift.org","/pets?user_key=<some_user_key_from_3scale>"It will run the test automatically and return an HTML report when done (e.g., 0001.html in Figure 4).
Pain points
Firstly, a couple of pain points. I needed to install Docker on the EC2 instance as it was a Red Hat Enterprise Linux 8 AIM. I used the following commands on the EC2 instance:
    sudo yum-config-manager --add-repo https://download.docker.com/linux/rhel/docker-ce.repo &&
    sudo yum install -y docker-ce docker-ce-cli containerd.io docker-buildx-plugin docker-compose-plugin &&
    sudo systemctl start docker &&
    sudo usermod -aG docker $USER &&
    newgrp docker
The version of Hyperfoil I was using requires id_rsa key pair on the EC2 instance, so I generated them and added the public key to the authorized_keys:
    cd ~/.ssh/
    ssh-keygen -t rsa
    cat id_rsa.pub >> authorized_keys
There are few Ansible playbooks to run as part of the perftest-toolkit but I hit a few blocks when trying to run them. In the end I ended up using ansible-galaxy to install the missing collections:
    # You may not have to do this "ansible-galaxy collection list" will show you if the are installed or not
    ansible-galaxy collection install ansible.posix
    ansible-galaxy collection install community.docker
    ansible-galaxy collection install community.general
In deployment/ansible.cfg I needed to point the SSH key to allow Ansible to access the EC2 instance via SSH, so I added the [ssh_connection] section. Updating this was in the readme but was missing the key.
    # project specific configuration for Ansible
    [defaults]
    inventory_plugins=inventory
    command_warnings=False
    [inventory]
    enable_plugins=3scale_inventory_plugin,ini
    [ssh_connection]
    ssh_args = -o ServerAliveInterval=30 -i "~/.ssh/pem_key_name.pem"
    pipelining = True
One final pain point I found is that running Hyperfoil for longer runs (4 to 6 hours) resulted in hitting up against some garbage collection issues:
Error [
        "ec2-agent: Jitter watchdog was not invoked for 109 ms; check GC settings.",
        "ec2-agent: Agent unexpectedly left the cluster."
        ]
I got around this by increasing the Java memory settings with extras: -XX:+UseShenandoahGC -Xms1G -Xmx4G in the Hyperfoil benchmark to the max my EC2 instance could handle, in this case 4GB. I updated the agents section in deployment/benchmark/3scale-benchmark.yaml.j2 as follows:
      name: 3scale-benchmark
      agents:
      {% for agent in groups[hyperfoil_agent_group] %}
        {{ agent }}:
          host: {{ hostvars[agent]['ansible_host'] }}
          port: {{ hyperfoil_agent_port }}
          extras: -XX:+UseShenandoahGC -Xms1G -Xmx20G
      {% endfor %}
Getting started
Run the requirements playbook to install Hyperfoil locally:
    git clone https://github.com/3scale-labs/perftest-toolkit
    cd deployment
    ansible-galaxy install -r requirements.yaml
Next, we edit a couple of files. First, in deployment/hosts, we add in the EC2 instances public address:
    upstream ansible_host=ec2-54-93-91-242.eu-central-1.compute.amazonaws.com ansible_user=ec2-user
    [hyperfoil_controller]
    ec2 ansible_host=ec2-54-93-91-242.eu-central-1.compute.amazonaws.com ansible_user=ec2-user
    [hyperfoil_agent]
    ec2-agent ansible_host=ec2-54-93-91-242.eu-central-1.compute.amazonaws.com ansible_user=ec2-user
In the deployment/run.yml we set:
shared_connections: Hyperfoil setting number of concurrent connections to your load testing endpoint. A pain point is that, if set to low, Hyperfoil will fail the load test, and if set to high, can overload the test; you have to play around with it. I found that for a 5 million requests per dayshared_connectionof 30 worked, where as with 100 we see an increase in the 4xx error rate.users_per_sec: Rate per second e.g., 5 million request per day (5,000,000÷60÷60÷24 = 57.87, so round to 58 request per second).duration_sec: Length of load test run in seconds.
    ---
    - hosts: hyperfoil_controller
      roles:
        - hyperfoil.hyperfoil_test
      vars:
        test_name: 3scale-benchmark
        test_files:
          - "{{ csv_dest_file_path }}"
        shared_connections: 30
        users_per_sec: 58
        duration_sec: 3600
    - hosts: hyperfoil_controller
      become: yes
      roles:
        - hyperfoil_generate_report
    - hosts: hyperfoil_controller
      tasks:
        - name: Retrieve the report
          fetch:
            src: "{{ reports_path }}/{{ test_runid }}.html"
            dest: "{{ playbook_dir }}/{{ toolkit_csv_file_path }}/"
            flat: yes
Next we need to populate the main.yml found in deployments/roles/profiled-traffic-generator/defaults/main.yml.
You need to get the 3scale-admin route, 3scale-admin access token, and the echo-api route. The commands below will give you these:
    # oc get routes -n <3scale-namespace-here> | grep 3scale-admin | awk '{print $2}'
    3scale-admin.apps.aucunnin-ccs.lpi0.s1.devshift.org
    # oc get secret system-seed -n <3scale-namespace-here> -o jsonpath="{.data.ADMIN_ACCESS_TOKEN}"| base64 --decode
    <Some_token>
    # oc get routes -n echo-api | awk '{print $2}'
    echo-api-echo-api.apps.aucunnin-ccs.lpi0.s1.devshift.org
Then add them to main.yml as follows:
    ---
    # defaults file for profiled-traffic-generator
    # URI that includes your password and portal endpoint in the following format: <schema>://<password>@<admin-portal-domain>.
    # The <password> can be either the provider key or an access token for the 3scale Account Management API.
    # <admin-portal-domain> is the URL used to log into the admin portal.
    # Example: https://access-token@account-admin.3scale.net
    threescale_portal_endpoint: https://<Some-token>@3scale-admin.apps.aucunnin-ccs.lpi0.s1.devshift.org/
    # Used traffic for performance testing is not real traffic.
    # It is synthetically generated traffic based on traffic models.
    # Information about available traffic profiles (or test plans) can be found here:
    # https://github.com/3scale/perftest-toolkit/blob/master/buddhi/README.md#profiles
    # Currently available profiles: [ simple ]
    traffic_profile: simple
    # Private Base URL
    # Make sure your private application behaves like an echo api service
    # example: https://echo-api.3scale.net:443
    private_base_url: https://echo-api-echo-api.apps.aucunnin-ccs.lpi0.s1.devshift.org
    # Public Base URL
    # Public address of your API gateway in the production environment.
    # Optional. When it is left empty, public base url will be the hosted gateway url
    # example: https://gw.example.com:443
    public_base_url:
Info alert: Note
We have selected the simple profile here as it’s quickest to set up and is a single product and back end. Other profiles are backend, medium, and standard, with standard producing the most endpoints and being a slower setup.
So once we have the hosts, run, and main set we can run the following playbook, which is basically setup and deployment jobs:
ansible-playbook -i hosts profiled-injector.ymlOnce completed, you can run your test with this playbook:
ansible-playbook -i hosts -i benchmarks/3scale.csv run.ymlSo how do you know it’s working?
You will see a polling in the Ansible output, don't worry about the "FAILED" in the polling message.
    TASK [hyperfoil.hyperfoil_test : Start benchmark] ******************************************************************************************************************
    ok: [ec2] => {"changed": false, "connection": "close", "content_length": "303", "cookies": {}, "cookies_string": "", "elapsed": 0, "location": "http://ip-10-0-180-45:8090/run/0001", "msg": "OK (303 bytes)", "redirected": false, "status": 202, "url": "http://ip-10-0-180-45:8090/benchmark/3scale-benchmark/start"}
    TASK [hyperfoil.hyperfoil_test : Set run ID] ***********************************************************************************************************************
    ok: [ec2] => {"ansible_facts": {"test_runid": "0001"}, "changed": false}
    TASK [hyperfoil.hyperfoil_test : Log run ID] ***********************************************************************************************************************
    ok: [ec2] => {
    "msg": "Benchmark URI: http://ip-10-0-180-45:8090/run/0001 -> 0001"
    }
    TASK [hyperfoil.hyperfoil_test : Poll benchmark completion] ********************************************************************************************************
    FAILED - RETRYING: [ec2]: Poll benchmark completion (100000 retries left).
    FAILED - RETRYING: [ec2]: Poll benchmark completion (99999 retries left).
    FAILED - RETRYING: [ec2]: Poll benchmark completion (99998 retries left).
    FAILED - RETRYING: [ec2]: Poll benchmark completion (99997 retries left).
    FAILED - RETRYING: [ec2]: Poll benchmark completion (99996 retries left).
    FAILED - RETRYING: [ec2]: Poll benchmark completion (99995 retries left).
    FAILED - RETRYING: [ec2]: Poll benchmark completion (99994 retries left).
    FAILED - RETRYING: [ec2]: Poll benchmark completion (99993 retries left).
    FAILED - RETRYING: [ec2]: Poll benchmark completion (99992 retries left).
    FAILED - RETRYING: [ec2]: Poll benchmark completion (99991 retries left).
The Ansible output above shows that this is run/0001; we can hit that endpoint using the EC2 public address and port 8090 and check the status. Figure 5 depicts an example of a complete status.

There are multiple endpoints we can hit to gather different information. A couple of ones I found useful were /run/0001/stats/all and /run/0001/stats/total. See the documentation for more information on the Hyperfoil API.
You can SSH to the EC2 instance and access via the Hyperfoil CLI in /tmp/hyperfoil/hyperfoil-0.15/bin and run the CLI with ./cli.sh.
    [ec2-user@ip-10-0-133-148 ~]$ cd /tmp/hyperfoil/hyperfoil-0.15/bin
    [ec2-user@ip-10-0-133-148 bin]$ ./cli.sh
    [hyperfoil]$ connect 0.0.0.0 -p 8090
    Connected to 0.0.0.0:8090
    [hyperfoil]$ stats 0001
    Total stats from run 0001
    PHASE  METRIC        THROUGHPUT   REQUESTS  MEAN     p50      p90      p99       p99.9     p99.99     TIMEOUTS  ERRORS  BLOCKED   2xx     3xx  4xx  5xx  CACHE
    main   testSequence  56.88 req/s    102390  3.63 ms  3.21 ms  4.46 ms  10.94 ms  20.05 ms  210.76 ms         0       0  10.01 s   102390    0    0    0      0
    [hyperfoil]$ exit
As stated above, you should get a run HTML file each time you run the load test in the deployment/benchmarks directory which can be opened in the browser. Figure 7 shows the directory.

We can then gather details from the report like percentile response times, number of successful/failed requests, etc., as shown in Figure 8.
Conclusion
The perftest-toolkit is highly effective for setting up performance testing tools and the necessary 3scale API Management components. If you are testing on your existing 3scale instance, I recommend using the Simple traffic profile. This profile only installs a single product and backend, making cleanup straightforward. For testing with the Standard traffic profile, it's best to use a disposable 3scale instance. This profile installs thousands of backends, products, and mapping rules, which can be challenging to remove afterward.
