Page
Prerequisites and step-by-step guide

Prerequisites
Our solution leverages a powerful combination of technologies:
- Red Hat OpenShift cluster
- Jenkins: Our CI/CD pipeline orchestrator
- RHSSO (Red Hat Single Sign-On): For identity and access management
- Quay.io: Our container registry
- A running instance of Red Hat Trusted Artifact Signer (RHTAS) on OpenShift
- A running instance of Red Hat Trusted Profile Analyzer (RHTPA) on OpenShift
Step-by-step guide
Infrastructure Setup:
Before we can go ahead and implement our secure pipeline, we need to set up a few necessary infrastructure components. This process involves several steps:
1. Deploy RHSSO (Red Hat Single Sign-On)
In this exercise we will be using RHSSO, based on the Keycloak project, as our Identity provider. If you want to check out other options, look here.
You can install RHSSO by following the official guide here. Once you have RHSSO installed, please proceed with the following steps.
1.1 Create a new Keycloak resource named "keycloak" in the keycloak namespace. Use the default configurations.


YAML File:
kind: Keycloak
apiVersion: keycloak.org/v1alpha1
metadata:
  name: keycloak
  labels:
    app: sso
  namespace: keycloak
spec:
  instances: 1
  externalAccess:
    enabled: true
Username: admin
Password: Located in a secret within the namespace called "credential-admin"
Wait for the Keycloak Resource to deploy before continuing to the next step.
1.2 Go to Networking -> Routes to find the url to access Keycloak.

Go to the Keycloak console with the credentials (available in Workloads -> Secrets) stored in "credential-admin".
We will now create a "trusted-artifact-signer" realm in RHSSO to provide a dedicated and isolated authentication and authorization domain specifically for the artifact signing process, enhancing security by separating these critical operations from other authentication contexts (we will create more later for the purposes of RHTPA).
1.3 Create a new realm


Name: trusted-artifact-signer
Click on "Create" Button and proceed.
1.4 Create Users: Click on 'Add user' option to create a new user.

Username: jdoe
First Name: Jane
Last Name: Doe
Email: jdoe@redhat.com
Email Verified: Checked
Click Save.

1.5 Click the Credentials tab and set the following values as per Figure 6.
Password: secure
Uncheck Temporary to make sure it is set as 'OFF' and then click Save.

1.6 Now let us create a new client for RHTAS. Navigate to the "Clients" Sub group on left hand menu and click on the 'Create' button and use the values provided below.

Id: trusted-artifact-signer
Redirect URI: * Note: * is good for demos
Enable OAuth 2.0 Device Authorization Grant


The ci-builder client allows our CI/CD pipeline (Jenkins) to authenticate with RHSSO, ensuring that only authorized processes can interact with our secure pipeline.
1.7 Now let us create a new Client for the CI Builder. Use sample values provided below.

Id: ci-builder
Access type: Confidential
Service Accounts Enabled: Checked Redirect URI: *
Enable OAuth 2.0 Device Authorization Grant
Now click "Save" button at the bottom of the screen which will enable the Service Accounts tab, which we will configure in next step.

1.8 Configure Service Account
Click on the Service Account Roles tab and then select "service-account-ci-builder" user name. Use the following values as per figure 12.
Email: ci-builder@redhat.com
First Name: CI
Last Name: Builder
Email Verified: Checked
Click Save.


1.9 Configure audience protocol mapper
Goto the ci-builder client.

Then click on the mappers tab.

Click on Create and use following values as per figure 16.
Name: audience
Mapper Type: Hardcoded Claim Token Claim
Name: aud
Claim value: trusted-artifact-signer
Click Save to continue.

2. Deploy RHTAS (Red Hat Trusted Artifact Signer)
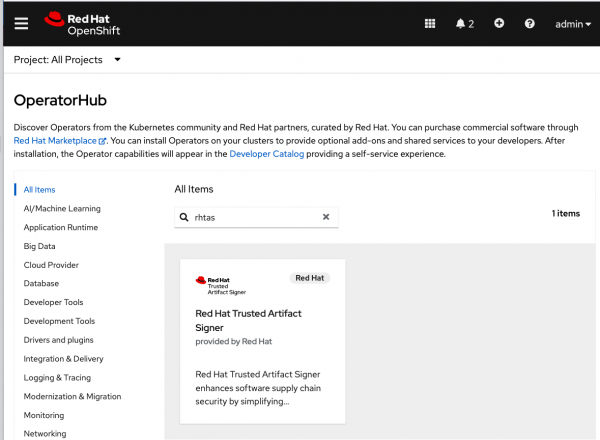
2.1 In Red Hat OpenShift OperatorHub, install the RHTAS Operator in the trusted-artifact-signer namespace.
Create a new SecureSign resource in the trusted-artifact-signer namespace, select YAML view and add following parameters in OIDC Issuer Section.
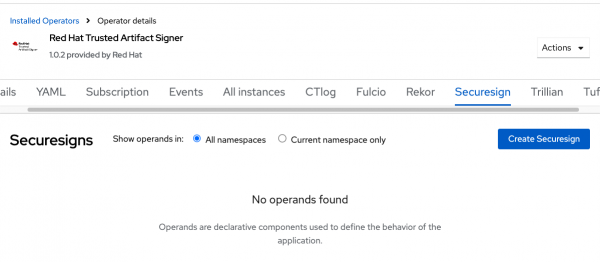
Figure 18: Create Securesign. Set OIDCIssuers appropriately for Fulcio (replace ${OCP_BASE_DOMAIN} with your OpenShift base domain):
OIDCIssuers:
 - ClientID: trusted-artifact-signer
     Issuer: 'https://keycloak-keycloak.apps.${OCP_BASE_DOMAIN}/auth/realms/trusted-artifact-signer'
     IssuerURL: https://keycloak-keycloak.apps.${OCP_BASE_DOMAIN}/auth/realms/trusted-artifact-signer
     Type: email
Final YAML file should look like figure 19.
By setting the OIDC issuers to match Keycloak, we're telling RHTAS to trust and accept tokens issued by our Keycloak instance which we have created in the above section.

Name: securesign
SecureSign is the productized version of Cosign (part of Sigstore), It lets you sign digital artifacts like container images.
Click Save
In this exercise, we will be using RHSSO/Keycloak as our IDP, so please set the values accordingly. Remember to replace the ${OCP_BASE_DOMAIN} with your actual cluster domain name.
3. Deploy OIDC Token Refresher
To provide an identity for the Jenkins builder, we will create a new deployment that will retrieve a new ID token routinely. Create a Jenkins Project in OpenShift and create the following pods in the jenkins namespace.
3.1 ServiceAccount purpose: This provides an identity for the token refresher process within the Kubernetes cluster, allowing it to interact with the Kubernetes API securely.
apiVersion: v1
kind: ServiceAccount
metadata:
  name: oidc-token-refresher
  namespace: jenkins
3.2 Role purpose: This allows the token refresher to create, update, and manage the secrets where the refreshed tokens will be stored.
apiVersion: rbac.authorization.k8s.io/v1
kind: Role
metadata:
  name: oidc-token-refresher
  namespace: jenkins
rules:
- apiGroups:
  - ""
  resources:
  - secrets
  verbs:
  - get
  - create
  - patch
  - update
  - list
3.3 RoleBinding purpose: This grants the necessary permissions defined in the Role to the ServiceAccount, allowing the token refresher to perform its operations.
apiVersion: rbac.authorization.k8s.io/v1
kind: RoleBinding
metadata:
  name: oidc-token-refresher
  namespace: jenkins
roleRef:
  apiGroup: rbac.authorization.k8s.io
  kind: Role
  name: oidc-token-refresher
subjects:
- kind: ServiceAccount
  name: oidc-token-refresher
  namespace: jenkins
3.4 Secret purpose: This provides a place to store the secret details.
apiVersion: v1
stringData:
  OIDC_CLIENT_ID: ci-builder
  OIDC_CLIENT_SECRET: ${CI_BUILDER_CLIENT_SECRET}
  OIDC_TOKEN_ENDPOINT: https://keycloak-keycloak.apps.${OCP_BASE_DOMAIN}/auth/realms/trusted-artifact-signer/protocol/openid-connect/token
kind: Secret
metadata:
  name: oidc-info
  namespace: jenkins
type: Opaque
Replace ${OCP_BASE_DOMAIN} with the OpenShift base domain and replace ${CI_BUILDER_CLIENT_SECRET} with the client secret for the ci-builder Keycloak client.
- Go to the keycloak instance we configured before
- Click on ci-builder client
- Click on the Credentials tab
- Copy the value in the Secret textbox

3.5 Deployment purpose: This runs the script that periodically requests new OIDC tokens and stores them in a Kubernetes secret. It ensures that fresh, valid tokens are always available for the CI/CD pipeline to use when interacting with other services.
apiVersion: apps/v1
kind: Deployment
metadata:
  name: oidc-token-refresher
  namespace: jenkins
spec:
  progressDeadlineSeconds: 600
  replicas: 1
  revisionHistoryLimit: 10
  selector:
    matchLabels:
      app: oidc-token-refresher
  strategy:
    rollingUpdate:
      maxSurge: 25%
      maxUnavailable: 25%
    type: RollingUpdate
  template:
    metadata:
      creationTimestamp: null
      labels:
        app: oidc-token-refresher
        deployment: oidc-token-refresher
    spec:
      containers:
      - command:
        - sh
        - -c
        - |
          #!/bin/bash
          while true; do
            JWT_TOKEN=$(curl -sL --location "${OIDC_TOKEN_ENDPOINT}" \
            --header "Content-Type: application/x-www-form-urlencoded" \
            --data-urlencode "grant_type=client_credentials" \
            --data-urlencode "client_id=${OIDC_CLIENT_ID}" \
            --data-urlencode "client_secret=${OIDC_CLIENT_SECRET}" \
            --data-urlencode "scope=openid" | jq -r '.id_token')
            kubectl create secret generic oidc-token --from-literal=id-token=${JWT_TOKEN} --dry-run=client -o yaml | kubectl apply -f-
            sleep 120
          done
        envFrom:
        - secretRef:
            name: oidc-info
        image: quay.io/openshiftdemos/rollouts-terminal-tooling:latest
        imagePullPolicy: Always
        name: oidc-token-refresher
        terminationMessagePath: /dev/termination-log
        terminationMessagePolicy: File
      dnsPolicy: ClusterFirst
      restartPolicy: Always
      schedulerName: default-scheduler
      serviceAccount: oidc-token-refresher
      serviceAccountName: oidc-token-refresher
      terminationGracePeriodSeconds: 30
Once running, a new Token will be requested every 2 minutes. Once a new token has been requested, a new secret called oidc-token will be created. Confirm the id-token property has been populated as this will be used by Jenkins.
4. Deploy RHTPA (Red Hat Trusted Profile Analyzer)
Deploy RHTPA According to the documentation.
5. Setup bombastic token refresher
The bombastic token refresher serves a similar purpose to the OIDC token refresher we created above, but it's specifically for interacting with Red Hat Trusted Profile Analyzer (RHTPA). It ensures that there's always a valid token available for communicating with RHTPA, preventing authentication failures due to expired tokens. By enabling this refresher, you have continuous and uninterrupted access to TPA services, which is crucial for ongoing SBOM upload in the CI/CD pipeline.
Navigate to the RHTPA Keycloak console from Network -> Routes in the namespace where you deployed RHTPA in Section 4.

In the chicken realm in Keycloak, create a new Client. Name the client ci-builder (same as was created in RHTAS).
- Flip on Authentication (Access type = Confidential)
- Check Service accounts roles
- Set redirect url to *
- Allow Oauth 2.0 Device Authorization Grant
- Click on the Service Account Roles tab.
Select chicken-manager and click on "Add Selected". This will put the chicken-manager in the "Assigned Roles" bucket.
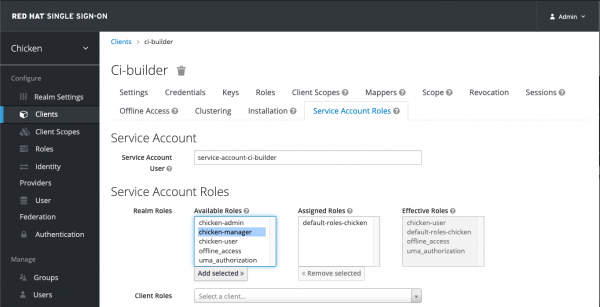
Figure 23: CI-builder UI. 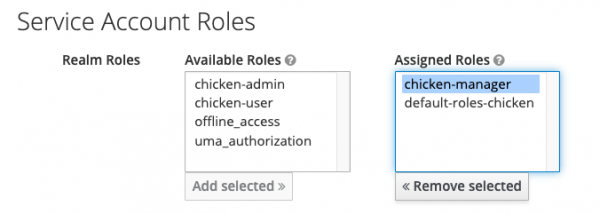
Figure 24: Service account roles. - Click the username service-account-ci-builder
- Enter an email address, check Email Verified and provide a first and last name
Click Save
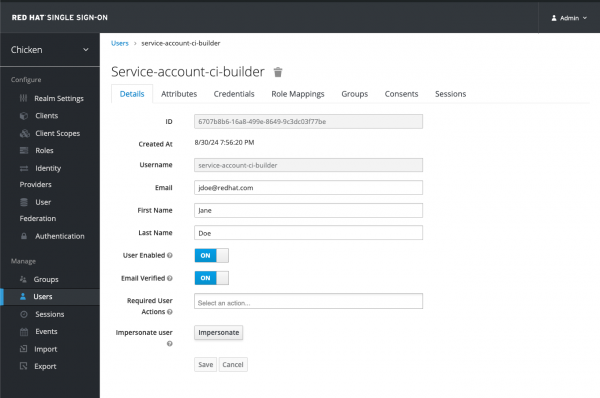
Figure 25: Service account ci-builder. Click on Client Scopes tab
Select create:document and read:document and click on Add Selected ->, this should put both the client scopes in "Assigned Default Client Scopes" on the bucket on the right.
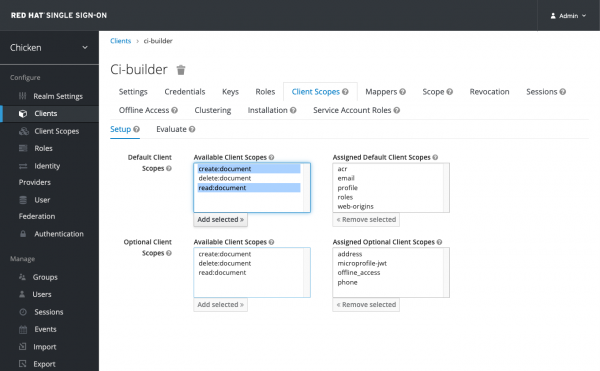
Figure 26: Client scopes. 
Figure 27: Assigned default client scopes. Now go to OpenShift Console, locate the bombastic-api-auth ConfigMap in the namespace RHTPA is installed, and add the following in the list of clients in the auth.yaml property
- clientId: ci-builder
issuer Url: https://keycloak-trustification.apps.cluster-qlmsw.qlmsw.sandbox619.opentlc.com/auth/realms/chicken
scopeMappings: *keycloakScopeMappings
Make sure the issuerUrl should match the others in there

Finally, delete the bombastic-api-* pod (you can find it in the RHTPA installed namespace) so that it will be updated with the latest updated content. The pod will deploy again automatically.

Now. go back to the OpenShift console and create the following in the Jenkins namespace, the pods structure and purpose are similar to the OIDC token refresher, so the explanation is the same as before.
5.1 Service account:
apiVersion: v1
kind: ServiceAccount
metadata:
  name: bombastic-token-refresher
  namespace: jenkins
5.2 Role for managing secrets:
apiVersion: rbac.authorization.k8s.io/v1
kind: Role
metadata:
  name: bombastic-token-refresher
  namespace: jenkins
rules:
  - apiGroups: [""]
    resources: ["secrets"]
    verbs: ["get", "create", "patch", "update", "list"]
5.3 RoleBinding:
apiVersion: rbac.authorization.k8s.io/v1
kind: RoleBinding
metadata:
  name: bombastic-token-refresher
  namespace: jenkins
roleRef:
  apiGroup: rbac.authorization.k8s.io
  kind: Role
  name: bombastic-token-refresher
subjects:
  - kind: ServiceAccount
    name: bombastic-token-refresher
    namespace: jenkins
5.4 Secret for storing Keycloak client credentials:
apiVersion: v1
kind: Secret
metadata:
  name: bombastic-oidc-info
  namespace: jenkins
type: Opaque
stringData:
  OIDC_CLIENT_ID: ci-builder
  OIDC_CLIENT_SECRET: <your-client-secret>
OIDC_TOKEN_ENDPOINT: https://{IDP}-{RHTPA_INSTALLED_NAMESPACE}.apps.{OCP_BASE_DOMAIN}/auth/realms/chicken/protocol/openid-connect/token- Replace {your-client-secret} with the actual client secret for the 'ci-builder' client you created in Keycloak
- Replace {OCP_BASE_DOMAIN} with your openshift domain
- Replace {IDP} name of the identity provider
- Replace {RHTPA_INSTALLED_NAMESPACE} with the namespace where you have RHTPA installed
If you have been following this exercise and screenshots so far, the OIDC_TOKEN_ENDPOINT should look like this https://keycloak-trustification.apps.cluster-qlmsw.qlmsw.sandbox619.opentlc.com/auth/realms/chicken/protocol/openid-connect/token
5.5 Deploy bombastic token refresher:
apiVersion: apps/v1
kind: Deployment
metadata:
  name: bombastic-token-refresher
  namespace: jenkins
spec:
  replicas: 1
  selector:
    matchLabels:
      app: bombastic-token-refresher
  template:
    metadata:
      labels:
        app: bombastic-token-refresher
    spec:
      serviceAccountName: bombastic-token-refresher
      containers:
      - name: token-refresher
        image: quay.io/openshiftdemos/rollouts-terminal-tooling:latest
        command:
        - /bin/bash
        - -c
        - |
          while true; do
            BOMBASTIC_TOKEN=$(curl -s -X POST "${OIDC_TOKEN_ENDPOINT}" \
              -H "Content-Type: application/x-www-form-urlencoded" \
              -d "grant_type=client_credentials" \
              -d "client_id=${OIDC_CLIENT_ID}" \
              -d "client_secret=${OIDC_CLIENT_SECRET}" \
              -d "scope=openid" | jq -r '.access_token')

            kubectl create secret generic bombastic-token \
              --from-literal=token=${BOMBASTIC_TOKEN} \
              --dry-run=client -o yaml | kubectl apply -f -

            echo "Token refreshed at $(date)"
            sleep 300
          done
        envFrom:
        - secretRef:
            name: bombastic-oidc-info
Once running, a new token will be requested every 2 minutes. Once a new token has been requested, a new secret called bombastic-token will be created. We will later use this bombastic-token in our Jenkins pipeline to automate the process of uploading a SBOM to RHTPA.
6. Deploy Jenkins
In this section, we will deploy Jenkins in our OpenShift cluster, where we will bring together all the steps performed above to create a secure pipeline using RHTAS and RHTPA.
Navigate to the jenkins namespace in OpenShift.
6.1 Change to Developer perspective:

6.2 Under Developer Services, click All Services and search for Jenkins.
6.3 Select Jenkins (Be sure to select the Templates type and NOT Ephemeral)

- Click Instantiate Template
- Memory and Volume Capacity: 10Gi
- Accept the rest of the default configurations
- Click Create
6.4 Configure non root-builder Support: Running containers as non-root is a widely recognized security best practice in container environments and also adheres to the principle of least privilege, reducing the potential impact if the build process is compromised. In order to be able to build container images within our Jenkins Pipeline, a series of assets need to be configured within the jenkins namespace. Create the following pods within the jenkins namespace.
6.5 ServiceAccount Purpose: This allows the build processes to interact with the Kubernetes API and other resources securely, with a specific set of permissions.
apiVersion: v1
kind: ServiceAccount
metadata:
  name: nonroot-builder
  namespace: jenkins
6.6 SecurityContextConstraint purpose: This SCC is tailored to allow non-root builds, providing the necessary permissions while still maintaining security. It allows running with any non-root UID and in multiple namespaces, which is crucial for building images with Podman and Buildah.
allowHostPorts: false
allowPrivilegeEscalation: true
allowPrivilegedContainer: false
allowedCapabilities: null
apiVersion: security.openshift.io/v1
defaultAddCapabilities: null
fsGroup:
  type: RunAsAny
groups: []
kind: SecurityContextConstraints
metadata:
  annotations:
    kubernetes.io/description: nonroot-builder provides all features of the nonroot
      SCC but allows users to run with any non-root UID and multiple namespaces for
      nonroot building of images with podman and buildah
  name: nonroot-builder
priority: 5
readOnlyRootFilesystem: false
requiredDropCapabilities:
- KILL
- MKNOD
runAsUser:
  type: MustRunAs
  uid: 1001
seLinuxContext:
  type: MustRunAs
supplementalGroups:
  type: RunAsAny
users: []
volumes:
- configMap
- downwardAPI
- emptyDir
- persistentVolumeClaim
- projected
- secret
6.7 Role purpose: This role allows the use of the custom SCC we created, enabling non-root builds across the cluster.
apiVersion: rbac.authorization.k8s.io/v1
kind: ClusterRole
metadata:
  name: system:openshift:scc:nonroot-builder
rules:
- apiGroups:
  - security.openshift.io
  resourceNames:
  - nonroot-builder
  resources:
  - securitycontextconstraints
  verbs:
  - use
6.8 RoleBinding Purpose: This grants the permissions defined in the ClusterRole to the nonroot-builder ServiceAccount, allowing it to use the custom SCC.
apiVersion: rbac.authorization.k8s.io/v1
kind: ClusterRoleBinding
metadata:
  name: system:openshift:scc:nonroot-builder
roleRef:
  apiGroup: rbac.authorization.k8s.io
  kind: ClusterRole
  name: system:openshift:scc:nonroot-builder
subjects:
- kind: ServiceAccount
  name: nonroot-builder
  namespace: jenkins
7. Configure Jenkins
Now that we have deployed Jenkins in the above section, it's time to configure Jenkins settings a little bit to be able to build our pipeline
7.1 Login into the Jenkins instance by navigating to the Route and update the plugins in the Jenkins instance.
- Navigate to the Plugin Manager, select all available plugins and install all updates
- Click Manage Jenkins
- Plugin Manager Click the "Restart Jenkins when No Jobs are Running" checkbox so that Jenkins restarts once all updates have been installed.
7.2 Create credentials associated with the container registry where images will be pushed. Ideally, no changes would be needed in the Jenkinsfile, but would instead be dynamically managed as external configurations, such as these credentials. In this example we will be using Quay.io as the registry, but you are free to modify this part of JenkinsFile to be able to work with other registries.
- Click Manage Jenkins
- Under Security, click Credentials
- Click System
- Click Global credentials (unrestricted)
- Click Add Credentials
- Enter the username
- Enter the password
- Enter a unique ID for the credentials, such as registry-credentials Click Create.
7.3 Create a new Job
- From the Dashboard, click New Item
- Enter sigstore-rhtas-java as the name
- Click Pipeline as the type
Click OK
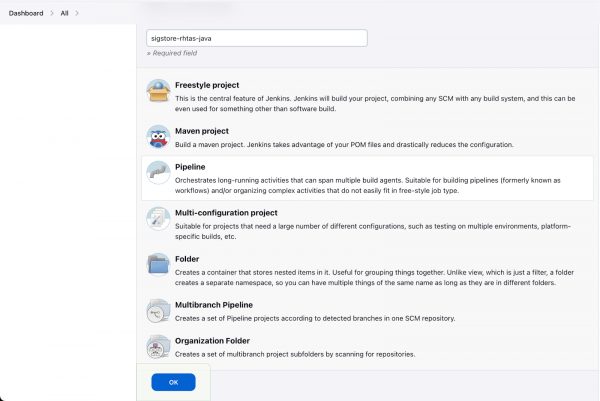
Figure 32: Create a new Jenkins job. Check this project is parameterized and following string parameters.
Agent Image
- Name: AGENT_IMAGE
- Default value: quay.io/ablock/nonroot-jenkins-agent-maven:latest
- Description: Agent Image
This is the dockerfile for the agent image: (This is just for viewing/informational purposes, you dont need to paste/modify this Dockerfile)
FROM registry.redhat.io/openshift4/ose-jenkins-agent-maven:latest
ENV _BUILDAH_STARTED_IN_USERNS="" \
    BUILDAH_ISOLATION=chroot \
    STORAGE_DRIVER=vfs
USER root
RUN adduser -g 0 -u 1001 jenkins && \
    yum -y update && \
    yum install -y --setopt=tsflags=nodocs podman skopeo buildah --exclude container-selinux && \
    yum clean all && \
    chown -R jenkins:0 /home/jenkins && \
    chmod -R 775 /home/jenkins && \
    chmod -R 775 /etc/alternatives && \
    chmod -R 775 /var/lib/alternatives && \
    chmod -R 775 /usr/lib/jvm && \
    chmod -R 775 /usr/bin && \
    chmod 775 /usr/share/man/man1 && \
    mkdir -p /var/lib/origin && \
    chmod 775 /var/lib/origin && \
    chmod u-s /usr/bin/new[gu]idmap && \
    setcap cap_setuid+eip /usr/bin/newuidmap && \
    setcap cap_setgid+eip /usr/bin/newgidmap && \
    rm -f /var/logs/*
USER 1001Purpose: The Jenkins Agent integrates provides an environment for executing Jenkins pipeline tasks and includes tooling for building Maven applications and container images on OpenShift without the use of root privileges.
Cluster Apps Domain
        Name: APPS_DOMAIN
        Description: Cluster Apps Domain
OIDC Issuer
        Name: OIDC_ISSUER
        Description: OIDC Issuer
Client ID
        Name: CLIENT_ID
        Default Value: trusted-artifact-signer
        Description: Client ID
Keycloak Realm
        Name: KEYCLOAK_REALM
        Default Value: trusted-artifact-signer
        Description: Keycloak Realm
Image Destination
        Name: IMAGE_DESTINATION
        Description: Image Destination
Registry Credentials
        Name: REGISTRY_CREDENTIALS
        Default Value: registry-credentials
        Description: Registry Credentials
TPA Instance
        Name: TPA_INSTANCE
        Description: TPA INSTANCE Domain

Under the Pipeline section, under the Definition dropdown, select Pipeline from SCM
        Under SCM, select Git
        Repository URL: https://github.com/Akshar-code/sigstore-rhtas-java
This is an example JenkinsFile whose detailed steps are outlined in a later section.
        Under Branch Specifier, enter */main
        Click Save
7.4 Perform a build
- Click Build with Parameters
Set the following Parameters
APPS_DOMAIN: apps.${OCP_BASE_DOMAIN}
OIDC_ISSUER: https://keycloak-keycloak.apps.${OCP_BASE_DOMAIN}/auth/realms/trusted-artifact-signer
IMAGE_DESTINATION: <Location_Image_Should_Be_Pushed>
TPA_INSTANCE: https://sbom-${tpa_installed namespace}.apps.${OCP_BASE_DOMAIN}
${tpa_installed namespace} = The namespace where TPA is installed
- Click Build
- Watch build logs perform a .jar build, image build and then sign the artifacts
Once the pipeline finishes, you should end up with something similar to the following.

You can view the SBOM of the generated Image in the TPA console.

One easy way to identify your SBOM is by sorting "created on" to ascending. The below is a sample dependency analytics report.

8. Deep Dive into the JenkinsFile
This example Jenkins pipeline implements a comprehensive workflow to ensure security at each step.
8.1 Setup Environment: Configure necessary environment variables and download required tools.
stage('Setup Environment') {
       script {
          env.COSIGN_FULCIO_URL="https://fulcio-server-trusted-artifact-signer.${params.APPS_DOMAIN}"
           env.COSIGN_REKOR_URL="https://rekor-server-trusted-artifact-signer.${params.APPS_DOMAIN}"
           env.COSIGN_MIRROR="https://tuf-trusted-artifact-signer.${params.APPS_DOMAIN}"
           env.COSIGN_ROOT="https://tuf-trusted-artifact-signer.${params.APPS_DOMAIN}/root.json"
           env.COSIGN_OIDC_ISSUER="${params.OIDC_ISSUER}"
           env.COSIGN_OIDC_CLIENT_ID="${params.CLIENT_ID}"
           env.COSIGN_CERTIFICATE_OIDC_ISSUER="${params.OIDC_ISSUER}"
           env.COSIGN_YES="true"
           env.SIGSTORE_FULCIO_URL="https://fulcio-server-trusted-artifact-signer.${params.APPS_DOMAIN}"
           env.SIGSTORE_OIDC_CLIENT_ID="${params.CLIENT_ID}"
           env.SIGSTORE_OIDC_ISSUER="${params.OIDC_ISSUER}"
           env.SIGSTORE_REKOR_URL="https://rekor-server-trusted-artifact-signer.${params.APPS_DOMAIN}"
           env.REKOR_REKOR_SERVER="https://rekor-server-trusted-artifact-signer.${params.APPS_DOMAIN}"
           env.COSIGN="bin/cosign"
           env.REGISTRY=sh(script: "echo ${params.IMAGE_DESTINATION} | cut -d '/' -f1", returnStdout: true).trim()
           if(params.APPS_DOMAIN == "") {
               currentBuild.result = 'FAILURE'
               error('Parameter APPS_DOMAIN is not provided')
           }
           dir("bin") {
               sh '''
                   #!/bin/bash
                   echo "Downloading cosign"
                   curl -Lks -o cosign.gz https://cli-server-trusted-artifact-signer.$APPS_DOMAIN/clients/linux/cosign-amd64.gz
                   gzip -f -d cosign.gz
                   rm -f cosign.gz
                   chmod +x cosign
               '''
           }
           dir("tuf") {
               deleteDir()
           }
           sh '''
             $COSIGN initialize
           '''

           stash name: 'binaries', includes: 'bin/*'
       }
   }
8.2 Checkout: Retrieve the source code from the repository.
 stage('Checkout') {
           checkout scm
       }
8.4 Build and Push Image: Create a container image and push it to Quay.
 stage('Build and Push Image') {
           withCredentials([[$class: 'UsernamePasswordMultiBinding', credentialsId: params.REGISTRY_CREDENTIALS, usernameVariable: 'REGISTRY_USERNAME', passwordVariable: 'REGISTRY_PASSWORD']]) {
               sh '''
                  podman login -u $REGISTRY_USERNAME -p $REGISTRY_PASSWORD $REGISTRY
                  podman build -t $IMAGE_DESTINATION -f ./src/main/docker/Dockerfile.jvm .
                  podman push --digestfile=target/digest $IMAGE_DESTINATION
               '''
           }
       }
8.5 Generate SBOM: Use Syft to create a Software Bill of Materials in CycloneDX JSON format.
Push SBOM to Quay.io Container Registry.
SBOM RHDA Analysis: RedHat Dependency Analytics is a suite of Plugins across different popular IDEs and CI/CD pipelines. You can checkout more here. Perform initial analysis of the SBOM. (Report can be seen via the Pipeline execution output).
Send SBOM to TPA: Transfer the SBOM to Trusted Profile Analyzer for deeper analysis.
stage('Generate and put SBOM in TPA') {
   withCredentials([[$class: 'UsernamePasswordMultiBinding', credentialsId: params.REGISTRY_CREDENTIALS, usernameVariable: 'REGISTRY_USERNAME', passwordVariable: 'REGISTRY_PASSWORD']]) {
       sh '''
           #!/bin/bash
           echo "Installing syft"

           # Create a directory for syft installation
           INSTALL_DIR="${WORKSPACE}/bin"
           mkdir -p ${INSTALL_DIR}

           # Install syft
           curl -sSfL https://raw.githubusercontent.com/anchore/syft/main/install.sh | sh -s -- -b ${INSTALL_DIR}

           # Add the bin directory to PATH
           export PATH=${INSTALL_DIR}:$PATH
           # Check installation
           echo "Checking syft installation"
           syft version

           echo "Generating SBOM"
           syft $IMAGE_DESTINATION -o cyclonedx-json@1.4 > sbom.cyclonedx.json
           echo "Printing SBOM For testing"
           cat sbom.cyclonedx.json
           echo "Pushing SBOM to Quay repository"
           SBOM_FILE="sbom.cyclonedx.json"
           REPOSITORY="quay.io/${REGISTRY_USERNAME}/test"
           UPLOAD_URL="${REPOSITORY}/manifests/latest"

           curl -u ${REGISTRY_USERNAME}:${REGISTRY_PASSWORD} -X PUT -H "Content-Type: application/vnd.quay.sbom.cyclonedx+json" --data-binary @${SBOM_FILE} ${UPLOAD_URL}

           echo "SBOM pushed successfully"
           echo "SBOM RHDA Analysis"
           curl -X POST https://rhda.rhcloud.com/api/v4/analysis \
           -H "Accept: application/json" \
           -H "Content-Type: application/vnd.cyclonedx+json" \
           -H "rhda-source: test" \
           --data @$SBOM_FILE
       '''
       script {
           def bombasticToken = sh(script: "kubectl get secret bombastic-token -o jsonpath='{.data.token}' | base64 --decode", returnStdout: true).trim()
           sh """
               curl -v -g -X 'PUT' \\
               '${params.TPA_INSTANCE}/api/v1/sbom?id=rhtas_testing' \\
               -H 'accept: */*' \\
               -H 'Authorization: Bearer ${bombasticToken}' \\
               -H 'Content-Type: application/json' \\
               -d @sbom.cyclonedx.json
           """
       }
   }
}
8.6 Sign Artifacts: Use RHTAS to cryptographically sign and attest both the JAR file and the container image.
 stage('Sign Artifacts') {
           unstash 'binaries'
           // Sign Jar
           sh '''
           $COSIGN sign-blob $(find target -maxdepth 1  -type f -name '*.jar') --identity-token=/var/run/sigstore/cosign/id-token
           '''
           // Sign Container Image and Attest SBOM
           withCredentials([[$class: 'UsernamePasswordMultiBinding', credentialsId: params.REGISTRY_CREDENTIALS, usernameVariable: 'REGISTRY_USERNAME', passwordVariable: 'REGISTRY_PASSWORD']]) {
               sh '''
                  set +x
                  DIGEST_DESTINATION="$(echo $IMAGE_DESTINATION | cut -d \":\" -f1)@$(cat target/digest)"
                  $COSIGN login -u $REGISTRY_USERNAME -p $REGISTRY_PASSWORD $REGISTRY
                  $COSIGN sign --identity-token=/var/run/sigstore/cosign/id-token $DIGEST_DESTINATION
                  $COSIGN attest --identity-token=/var/run/sigstore/cosign/id-token --predicate=./target/classes/META-INF/maven/com.redhat/sigstore-rhtas-java/license.spdx.json -y --type=spdxjson $DIGEST_DESTINATION
               '''
           }
       }
8.7 Verify Signature: Confirm the validity of the signatures.
stage('Verify Signature') {
           sh '''
           $COSIGN verify  --certificate-identity=ci-builder@redhat.com  $IMAGE_DESTINATION
           '''
       }