Page
Set up your activity environment
Your first step in learning Kubernetes with the Developer Sandbox is to set up your environment.
In order to get full benefit from taking this lesson, you need to:
- Access the Developer Sandbox
- Prepare a local configuration
- Clone repositories
In this lesson, you will:
- Set up your environment so you can complete the later steps in the learning path
Access the Developer Sandbox
If you’re unsure how to do this, you can find instructions here: Access your Developer Sandbox for Red Hat OpenShift from the command line.
Prepare a local Kubernetes configuration to allow access from the command line
You don't log into a Kubernetes cluster. You actually set your local environment to access the API server when issuing kubectl commands. This part is a bit cumbersome, but it's necessary. You can, of course, automate it. You can also use tools to help moving forward.
Cheat code: If you have the OpenShift command-line interface oc installed (not necessary for this tutorial), you can cheat and use the oc login command. If you can install the oc CLI, it makes life a lot easier.
There are three parts in play here:
- Your credentials
- A Kubernetes (or OpenShift) cluster
- A context, i.e., namespace, within the cluster
After establishing those three parts, you use the context you desire. The following commands will take care of this, but first, we need to extract some pieces of information from our sandbox. We'll need to get the following items:
- Username, which is represented by {
username} in the following commands - Authorization token {
token} - Name of the cluster {
cluster_name} - Context assigned to us {
context} - URL of the cluster API server {
api_server_url}
You'll need to be logged in to your Developer Sandbox dashboard to get this information.
Username
Our value for {username}. This is displayed in the upper right corner of the dashboard (Figure 1). For example:
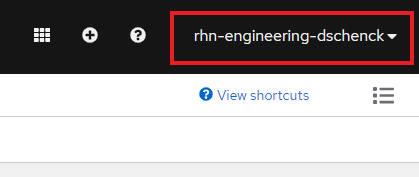
Given this example, the username would be rhn-engineering-dschenck.
Info alert: The namespace we'll be using is simply your username with -dev appended to it, e.g., rhn-engineering-dschenck-dev.
Authorization token
Our value for {token}. If you click on Username, select Copy login command, and log in as DevSandbox, you can see your token. If this is confusing, here is an article that will help.
URL of the cluster API server
Our value for {api_server-url}. Using the same instructions as the previous section (Authorization token), locate the URL of your API server (Figure 2).

Name of the cluster
Our value for {cluster_name}. The cluster name is a modification of the host URL with all periods converted to dashes. Also, the console-openshift-console-apps portion of the host URL is replaced with api. For example, if you navigate to the Topology page of your dashboard, your URL looks something like Figure 3:

Given this, the cluster name will be api-sandbox-x8i5-p1-openshiftapps-com:6443.
Context assigned to us
Our value for {context}. The context is constructed by combining your username with the name of the cluster in the following format: {username}-dev/{cluster_name}/{username}.
For example, using what we have up to this point, the value for {context} would be:
rhn-engineering-dschenck-dev/api-sandbox-x8i5-p1-openshiftapps-com:6443/rhn-engineering-dschenck
View and delete your local PC Kubernetes configuration
The command kubectl config view. will show your configuration. If you wish, you can remove all of your Kubernetes local configuration information by deleting the file ~/.kube/config", e.g., rm ~/.kube/config.
With the information you gathered, run the following four kubectl commands, substituting your own values where noted:
kubectl config set-credentials {username}/{cluster_name} --token={token}
kubectl config set-cluster {cluster_name} --server={api_server_url}
kubectl config set-context {context} --user={username}/{cluster_name} --namespace={username}-dev --cluster={cluster_name}
kubectl config use-context {context}
Clone source code repositories
Run the following three commands to clone the following three repositories (repos) from GitHub:
git clone https://github.com/redhat-developer-demos/quotesweb.git
git clone https://github.com/redhat-developer-demos/quotemysql.git
git clone https://github.com/redhat-developer-demos/qotd-python.git
Info alert: For the purposes of this tutorial, the three directories you created will be referenced by their repo name. Where you put them on your local machine is up to you.
Congratulations. You have set up your environment. You're ready to move forward and create a back-end RESTful service.
