Page
Simplify containerization with Quarkus and Tilt

Now that you've installed Tilt and accessed the Developer Sandbox, it's time to use Quarkus and execute a Tilt file.
In order to get the full benefit of this lesson, you will need:
- A local development environment
- A Developer Sandbox account
- A container image registry
In this lesson, you will:
- Create a Quarkus application
- Define and execute a Tilt file
Red Hat Quay
We also need a container image registry to store the generated images. If you are using the Developer Sandbox, you can use the same account to log in to quay.io and use it as a container registry.
Of course, Docker Hub is still a valid option. The only thing you will need to do is change the container image name to point it out to Docker Hub.
In the case of Quay, create a new repo by clicking Create a New Repository link, as shown in Figure 8:

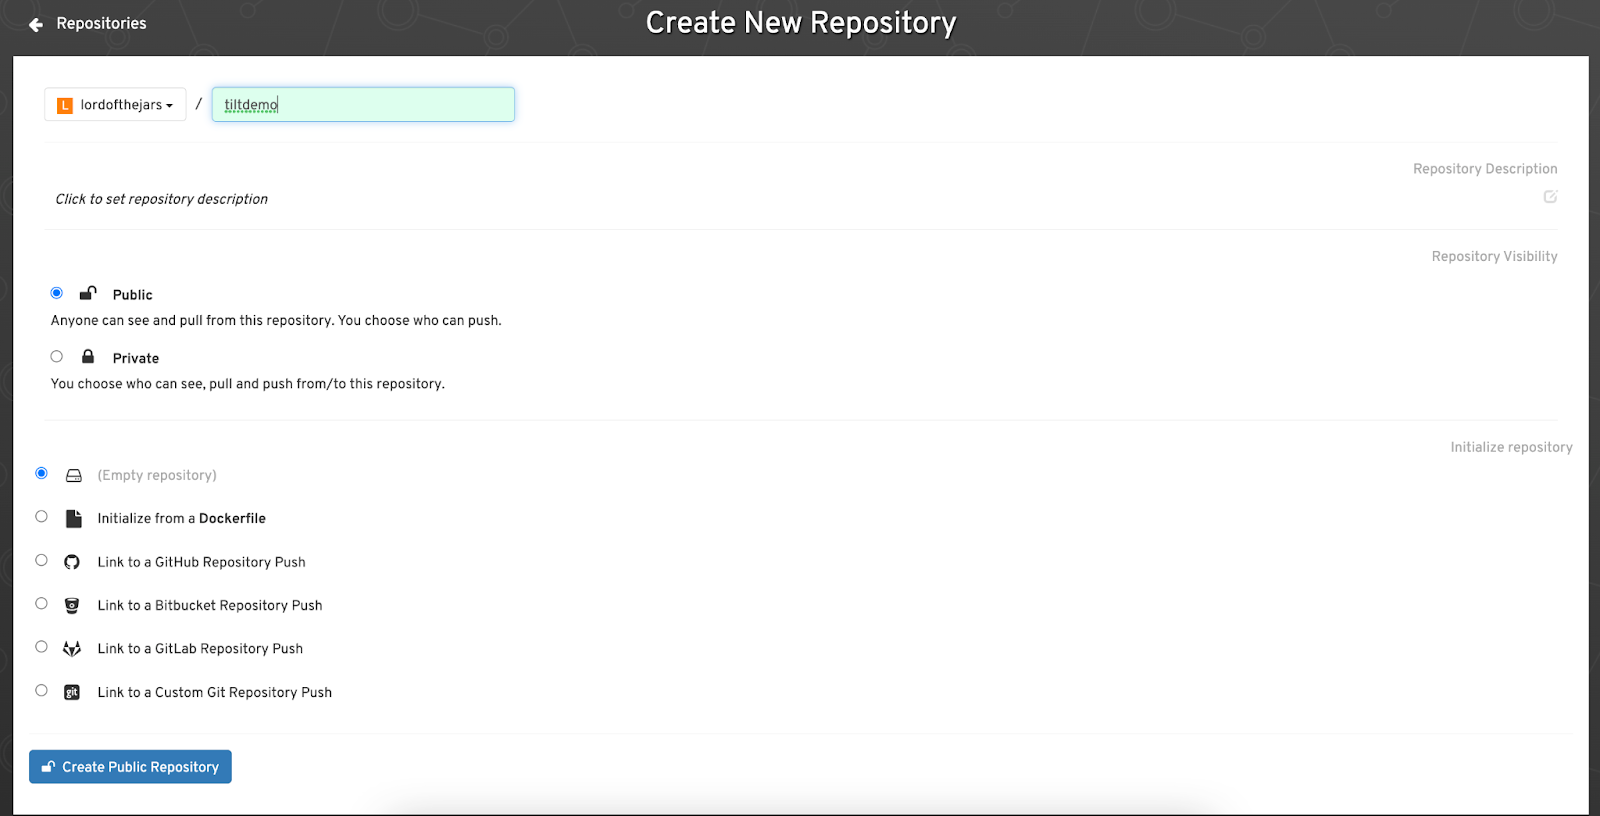
Then create a new public repository with the name tiltdemo (Figure 9).
With this in place, it’s time to develop a simple Quarkus application.
Quarkus simplifies containerization
It’s not necessary to use a Quarkus application because any other application is valid. But you’ll see that with Quarkus, it’s so smooth to containerize and Kubernetize an application. Let’s create a Quarkus application with two extensions:
- Jib extension: The creation of the container occurs in a dockerless way where no docker is required.
- Kubernetes extension: Quarkus automatically scaffolds a Kubernetes deployment file without developing YAML files.
mvn io.quarkus.platform:quarkus-maven-plugin:3.0.1.Final:create \
    -DprojectGroupId=org.acme \
    -DprojectArtifactId=tiltdemo \
    -Dextensions='resteasy-reactive,jib,kubernetes'
cd tiltdemo
Next, we need to configure the image name for this project. Open the src/main/resources/application.properties file, and add the following line:
quarkus.container-image.image=quay.io/lordofthejars/tiltdemo:latestSubstitute the image name part of the username (in this case, lordofthejars) for your username. If you are using Docker Hub, then it is not necessary to specify the host, as it will be the default value.
To validate that everything works as expected, run the following command:
./mvnw clean package -DskipTests -Dquarkus.container-image.push=trueInfo alert: IMPORTANT: Run docker login quay.io to set the Quay credentials to push the container image.
When the build is completed, Quarkus has scaffolded a Kubernetes YAML file to deploy the application. Moreover, Jib created a container image and pushed it to the Quay repository we configured in the previous step.
Create a Tilt file
Now that you have installed Tilt and created the Quarkus application, it’s time to make a TiltFile to configure Tilt for the Quarkus application. This file contains instructions for building, containerizing, and deploying the application into the Kubernetes cluster.
Create a file in the root directory of the project named Tiltfile with the following content:
default_registry('quay.io/lordofthejars')

k8s_yaml('target/kubernetes/kubernetes.yml')

allow_k8s_contexts('asotobue-dev/api-sandbox-m2-ll9k-p1-openshiftapps-com:6443/asotobue')

custom_build(
  'quay.io/lordofthejars/tiltdemo',
  deps=['src'],
  skips_local_docker = True,
  command='./mvnw package -DskipTests -Dquarkus.container-image.image=$EXPECTED_REF -Dquarkus.container-image.push=true',
)

k8s_resource('tiltdemo', port_forwards=[8080])
Defining the commands
Let’s explain each of the commands step by step.
The following command defines the registry location:
default_registry('quay.io/lordofthejars')(Of course, you should change
lordofthejarswith your username.)Quarkus automatically generates these deployment files in
target/kubernetesfolder. This defines where the Kubernetes deployment files are stored:k8s_yaml('target/kubernetes/kubernetes.yml')By default, Tilt only supports connecting to local Kubernetes clusters. You need to configure the context if you connect to an external one. If you don’t know the context, no problem, don’t set it, as the error message will tell you which context needs to be set.
allow_k8s_contexts('asotobue-dev/api-sandbox-m2-ll9k-p1-openshiftapps-com:6443/asotobue')The following command configures the container base name and the command to run to containerize the application. Tilt generates a random tag for each image; the final container image name with the random tag is stored in the
EXPECTED_REFvariable.custom_build( 'quay.io/lordofthejars/tiltdemo', deps=['src'], skips_local_docker = True, command='./mvnw package -Dquarkus.profile=tilt -DskipTests -Dquarkus.container-image.image=$EXPECTED_REF -Dquarkus.container-image.push=true',The last line defines the Deployment name to modify with the value of the
EXPECTED_REFvariable and the forward port value:k8s_resource('tiltdemo', port_forwards=[8080])
Tilt execution
Let’s see Tilt in action. First, run the tilt up command in the terminal and push the letter s to stream the output.
When Tilt notifies that the pod is ready, list the pods in another terminal as follows:
kubectl  get pods
NAME                        READY   STATUS    RESTARTS   AGE
tiltdemo-84678f679d-4whv4   1/1     Running   0          28s
Also, since Tilt executes a port forwarding operation, cURL the service using localhost:
curl localhost:8080/hello
Hello from RESTEasy Reactive
To see Tilt in action, open the src/main/java/org/acme/GreetingResource.java class file, change the returned String to Hello from Tilt, and save the file.
You’ll see that automatically, Tilt starts doing something. Rerun the following cURL command when Tilt finishes the redeployment to check if the message has changed.
curl localhost:8080/hello
Hello from Tilt
Conclusion
Thanks to Tilt, the developer experience is improved when developing applications for the Kubernetes cluster. Although this has been a brief introduction to Tilt, it offers much more, making it easy to use with projects shared among different developers. Tiltfile is a Python file, so you can always use Python statements for creating more complex logic.
Ready to try another Red Hat OpenShift-based learning path?
