Page
Update the original Python application and deploy it

Using Podman and Podman Desktop together brings an entire OCI container development environment to your local machine. Adding in the Developer Sandbox gives you the ability to develop and test an application locally before deploying it to your sandbox instance. By careful application of naming, you can send multiple versions of the same application to your sandbox instance and have them run side-by-side.
Prerequisites:
- Terminal session on your computer.
- Podman Desktop.
- Developer Sandbox account.
- Podman CLI installed on your computer (Podman).
In this lesson, you will:
- Update and application and deploy it to your sandbox instance.
Step 1: Update source code
Using the editor of your choice, change the file /templates/index.html in such a way that the change will be noticeable. For example, around line 16, you could change the text "Hello World! This website has been viewed" to something else (Figure 1).

Save the file, and we’ll proceed to rebuild the image in the next step.
Step 2: Rebuild image
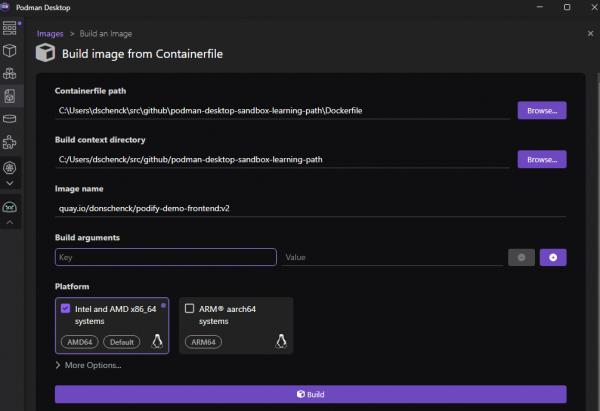
Previously, you used the command line to build the container image, but now, let’s use the Podman Desktop interactive graphical user interface (GUI). From the right-hand side of the Images section of Podman Desktop, select Build an Image. Here, you’ll find the Dockerfile that you’re using in our project and build the image using your own unique image name with one very important exception: this time, you will tag the image as v2. (Figure 2).

Step 3: Push the updated image to your image registry
With Podman authenticated to your registry of choice, you should already have credentials and be able to push this image. On the right side of your built image, select the kebab menu, and you’ll be able to select the image to push to the registry by clicking Push Image (Figure 3).

Step 4: Replace the existing python-frontend container on your local PC (inside Podman Desktop)
Delete all of the existing containers in Podman Desktop. This will also remove the existing local pod. In Podman Desktop, select all containers, then click the trash can icon (i.e., delete button) at the top of the panel (Figure 4).

With the newly-created v2 image, run the script on your local machine to create two containers and a network to link them.
Run the preload script:
- If using Bash:
./preload.sh {image-name-goes-here} - If using PowerShell:
./preload.ps1 {image-name-goes-here}
Here’s an example:
C:\ .\preload.ps1 quay.io/donschenck/podify-demo-frontend:v2
Starting image quay.io/donschenck/podify-demo-frontend:v2
5ebb6fcbca52bebe616c8bd5eeea5364dc7bc0fd4589785bbaa7537ef0a13759
8d6d3af8ff5f5aa230d579c5f19a4b81e36a3541c1cce9442a34d04774c90938
The result will be shown in the Containers section of Podman Desktop (Figure 5).

On the far right side of the row for the python-frontend container, click the kebab menu and select the Open Browser option to view the front-end website in your browser (Figure 6).

Step 5: Create a pod (in Podman Desktop) using running containers
At this point, there are two containers running. The next step is to put those two containers into a single pod that can later be deployed to OpenShift—in this case, your Developer Sandbox instance. This is the same technique as was used in Lesson 2, but this time it will be assigned a different name: my-pod-v2.
In Podman Desktop, as highlighted in Figure 7, begin by selecting both containers and clicking the Create Pod image near the top of Podman Desktop.

On the Copy containers to a pod panel, first un-select the Port 6379—there is no reason to expose the Redis port outside of the pod. Then click the Create Pod button (Figure 8).

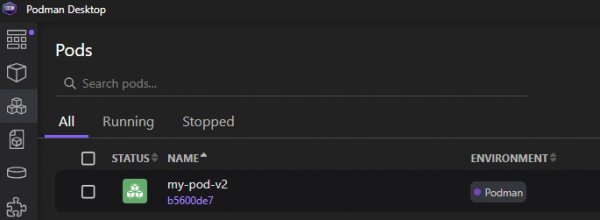
After a few moments, formerly running containers will be stopped and the newly created pod will be displayed in the Pods section, as well as combined logs and a summary of the containers if clicked on (Figure 9).

Step 6: Deploy the pod
In the Pods view of Podman Desktop, click the kebab menu for the pod you created in the previous lesson and choose the Deploy to Kubernetes option. When prompted, click the Deploy button (Figure 10).

As a result, you will now have two pods running two versions of your application (Figure 11).

Switch to your Developer Sandbox to Developer Topology view and you will see the new pod. By clicking the Open URL icon, you can view the website in your browser
What have you accomplished?
In this learning path, you’ve been introduced to key concepts such as containers, images, and pods, and learned to use tools like Podman Desktop for container management and Kubernetes for container orchestration. By following these instructions, you should now have two versions of the application running in your Developer Sandbox.
If you wish to go further and switch between versions one and two with one simple command, consider the learning path Perform in-place Kubernetes updates with a Blue/Green Deployment.
Summary
This learning path gives you the knowledge to use Podman, Podman Desktop, and the Developer Sandbox to create a complete container development environment.
Red Hat Developer provides a variety of resources to help streamline and enhance the efficiency of container development, including:
- OpenShift Toolkit for VSCode and IntelliJ helps develop, build, and test containerized applications on Kubernetes directly within the IDE.
- Working with Kubernetes in Podman Desktop explains how to transition from development to production and the capabilities offered in Podman Desktop
