Page
Open your application and retrieve a serverless URL

Now that you have created your application, it's time to get your serverless URL and test it..
In order to get full benefit from taking this lesson, you need:
- A Developer Sandbox account
- The oc command-line interface
- A web browser to access the Developer Sandbox
In this lesson, you will:
- Learn how to open your application
- Learn how to create a serverless URL and observe the results
Open the Photobooth application
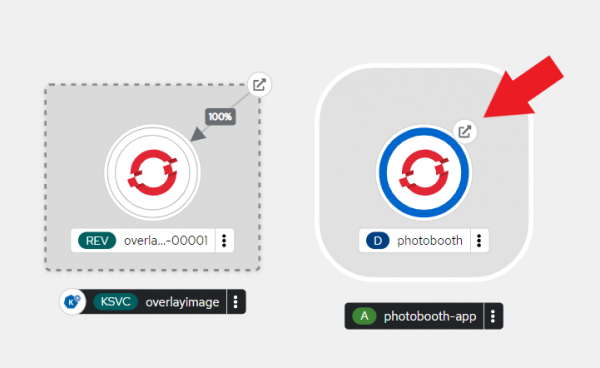
Open the Photobooth application in your default web browser by clicking on the external route arrow in the OpenShift dashboard (Figure 1).

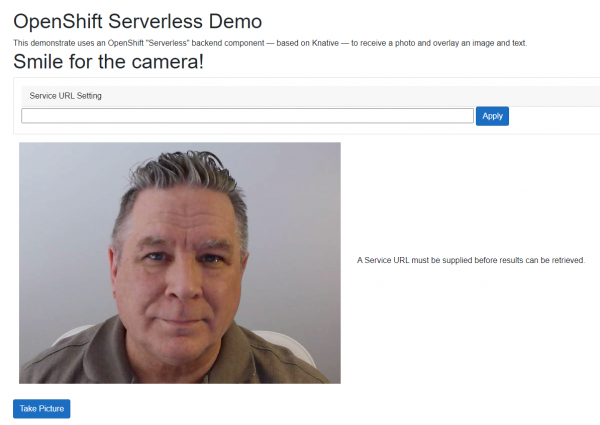
Your image will look like Figure 2.

Before you can successfully use the Photobooth application, you need to tell it the correct URL for the service. The URL is the path to the service using the overlayImage route.
Info alert: The route is case-sensitive.
Get the serverless URL
At the command line, run the following command and copy the route:
oc get ksvcHere’s an example of the output:
NAME           URL                                                                                        LATESTCREATED        LATESTREADY          READY   REASON

overlayimage   https://overlayimage-rhn-engineering-foobar-dev.apps.sandbox.x8i5.p1.openshiftapps.com   overlayimage-00001   overlayimage-00001   True
Paste the URL into Photobooth
Paste the URL with the appended /overlayImage route into the Photobooth web page and select Apply (Figure 3).

Take a picture and wait for the results
Now, click Take Picture and wait for the results to appear. It might take 10 to 15 seconds as the serverless function is scaled from zero to one. Figure 10 shows an example of the output.
Info alert:The image you see will be of your face, not mine.

Take another picture
Immediately take another picture. Notice that this time, the results are almost instantaneous. This is because the serverless function is awake and serving requests. This will continue until one minute of inactivity, after which the serverless function will scale to zero again.
Wait...then take a third picture
After waiting for more than 60 seconds, take another picture. Again, there will be a delay a delay until the serverless function scales to one. This cycle of scaling up and down is the essence of a serverless function; it uses CPU cycles only as needed.
Congratulations. That's it. You now know how to create a serverless function. Review the notes below for more resources.
Developer notes
- When considering a serverless function, you must decide if the slight delay to scale from zero to one is appropriate for the application.
- The back-end application, image-overlay, is written in Java.
- The front-end application, Photobooth, is written in C# using the Blazor WASM framework.
- The image overlay is a 640-480, mostly transparent, PNG file.
- The text (“Serverless!”) is passed from the front-end application.
Move it, remove it, improve it
Now that you know how to create an OpenShift Serverless function from the command line and the dashboard, here are some other ideas to try.
Move it
You can download all of the YAML files associated with this application and use them to move the app to another OpenShift instance by using the Export Application button in the upper-right corner of the OpenShift dashboard.
Remove it
You can remove parts of all of this activity by using one of the following commands:
To remove only the
overlay-imagefunction:oc delete all -l sandbox-serverless=overlayTo remove only the Photobooth application:
oc delete all -l sandbox-serverless=photoboothTo remove all of the objects associated with this activity:
oc delete all -l sandbox=serverless
Improve it
Some ideas to improve or alter this activity:
- Write your own back-end function in a different language.
- Clone the back-end code and use a different overlay image. Rebuild the image and use it instead of
quay.io/rhdevelopers/image-overlay. - Write the front end in another language. Use a server-based web engine where it reads the URL from an environment variable so it doesn’t need to be entered on the screen.
