Page
Create a front-end application in the Developer Sandbox

Let's get started. Your first step in creating a Red Hat OpenShift serverless function is accessing your Developer Sandbox account and creating a front-end application.
In order to get full benefit from taking this lesson, you need:
- A Developer Sandbox account
- The
occommand-line interface - A web browser to access the Developer Sandbox
In this lesson, you will:
- Learn how to set up your Developer Sandbox
- Learn how to start a front-end application
Access your Developer Sandbox at the command line
If you’re unsure of how to access your Developer Sandbox instance, you can find instructions here: Access your Developer Sandbox for Red Hat OpenShift from the command line
In this step, you will create the back-end serverless function from the command line. The only tool you need is the oc command-line interface. You do not need to clone or download the source code GitHub repository. You can reference the YAML file directly from our command line.
Here are the contents of the service.yaml file that you’ll be using. Take note of the labels and the containers entries:
apiVersion: serving.knative.dev/v1
kind: Service
metadata:
  name: overlayimage
  labels:
    sandbox: serverless
    sandbox-serverless: overlay

spec:
  template:
    spec:
      containers:
        - image: quay.io/rhdevelopers/imageoverlay:latest
Labels allow you to attach multiple key/value pairs to your objects. In this example, you are creating unique values that will make it easier to remove all of the objects you create.
The containers entry specifies the Linux image that you run. In order for a container to be used as a serverless function, no special coding is necessary. The Red Hat OpenShift Operator, based on Knative serving, does all the special work. The OpenShift Operator allows you to implement an existing web API application, written in the programming language of your choice, as a function.
Start the back-end serverless function
Run the following command:
oc apply -f https://raw.githubusercontent.com/redhat-developer-demos/image-overlay/master/service.yamlStart the front-end Photobooth application
In this step, we will implement a front-end application, Photobooth, by importing an existing Linux image via the OpenShift dashboard (the web interface).
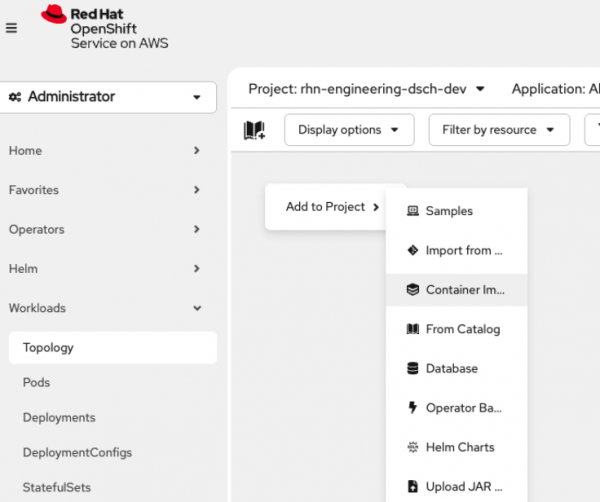
From the Topology page, right-click and select Container Image from the Add to Project menu (Figure 1):

Enter this value for the image: quay.io/rhdevelopers/photobooth:latest (Figure 2).

Near the bottom of the form, under Advanced options, select Port 8080 as the port to be used (Figure 3, Callout 1), and select Labels (Figure 3, Callout 2).

Enter the following two values for Labels (Figure 4, Callouts 1 and 2):
sandbox=serverlesssandbox-serverless=photobooth
Select Resource type. Enter Deployment (Figure 5, Callout 1) as the Resource type, then Create (Figure 5, Callout 2).

Congratulations. In this lesson, you accessed the Developer Sandbox and created a front-end application. Now it's time to open the application and get your serverless URL.
