Page
Sign and verify container image using Red Hat Trusted Artifact Signer
Now that you have deployed the Red Hat Trusted Artifact Signer (RHTAS) service, the next lesson will walk you through signing and verifying a container image.
In this lesson, you will:
- Configure your shell environment to use the RHTAS service.
- Sign a container image.
- Verify the signature of the container image.
Download the cosign binary from the Red Hat OpenShift cluster to your workstation
To download the cosign binary following these steps:
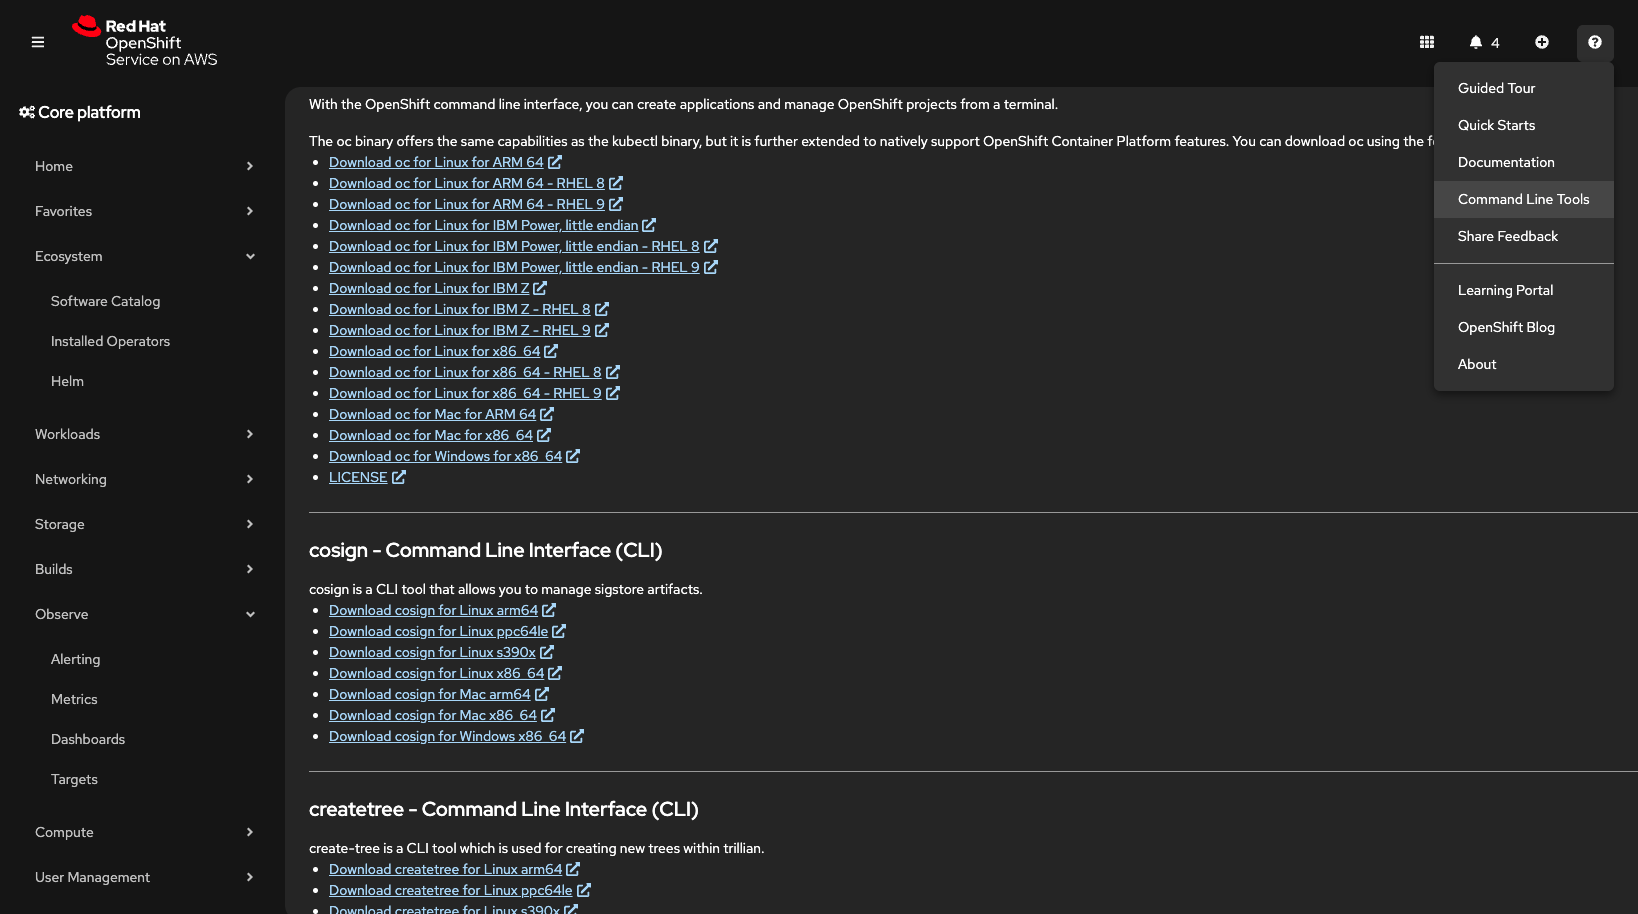
- Log into the OpenShift web console. From the home page, click the ? icon, then Command line tools. Go to the cosign download section, and click the link for your platform.
Open a terminal on your workstation, decompress the binary
.gzfile, and set the execute bit:gunzip cosign-amd64.gz chmod +x cosign-amd64Move and rename the binary to a location within your
$PATHenvironment:sudo mv cosign-amd64 /usr/local/bin/cosign
Configure your environment
Before signing and verifying a container image using your Google Cloud account, you need to configure your shell environment by following these steps:
- Open a terminal on your workstation, and log in to your Red Hat OpenShift cluster.
Switch to the
trusted-artifact-signernamespace:oc project trusted-artifact-signerConfigure your shell environment to use the RHTAS service:
export TUF_URL=$(oc get tuf -o jsonpath='{.items[0].status.url}' -n trusted-artifact-signer)
export COSIGN_OIDC_CLIENT_ID=<your-google-client-id>
export COSIGN_YES="true"
export ROOT_CHECKSUM=$(curl -s "$TUF_URL/1.root.json" | sha256sum | awk '{print $1}')
Initialize The Update Framework (TUF) system:
cosign initialize --mirror "$TUF_URL" --root "$TUF_URL/1.root.json" --root-checksum "$ROOT_CHECKSUM"
Sign and verify a container image
Sign and verify a container image, where my-google-secret contains the secret for your client ID:
Create an empty container image:
echo "FROM scratch" > ./tmp.Dockerfile
podman build . -f ./tmp.Dockerfile -t ttl.sh/rhtas/test-image:1h
Push the container image to the ephemeral registry:
podman push ttl.sh/rhtas/test-image:1hSign the container image:
cosign sign --oidc-client-secret-file=./my-google-secret ttl.sh/rhtas/test-image:1h
A web browser opens allowing you to sign the container image with your email address.Remove the temporary Docker file:
rm ./tmp.DockerfileVerify the signature for the container image:
cosign verify --certificate-identity=SIGNING_EMAIL_ADDR --certificate-oidc-issuer=https://accounts.google.com ttl.sh/rhtas/test-image:1h
ReplaceSIGNING_EMAIL_ADDRwith the email address used for signing the container image.
Great! You have configured your environment for signing and verifying container images. Now you are ready to move on to the Developer's Guide to learn about setting supply chain security. See the e-book for more information.

