Connect your services across different environments using Red Hat Service Interconnect
Red Hat Service Interconnect enables application and service connectivity across different environments through Layer 7 addressing and routing. In this activity, you will learn how to build a virtual application network (also known as a service network) and create connections across multiple clouds using Red Hat Service Interconnect.
Introduction
Based on the open source Skupper project, Red Hat Service Interconnect enables application and service connectivity across different environments through Layer 7 addressing and routing. Interconnections are created in a matter of minutes via a simple command-line interface, avoiding extensive networking planning and overhead. All interconnections between environments use mutual TLS (mTLS) to protect your organization’s infrastructure and data.
What you will do
In this activity, you will learn how to use Skupper or Red Hat Service Interconnect to access a database at a remote site (local laptop) without exposing it to the public internet.
Our example is a simple database-backed patient portal web application. The example application contains two services, illustrated in Figure 1:
A PostgreSQL database running on your local machine, which we assume is a private datacenter.
A web front-end service running on the Developer Sandbox for Red Hat OpenShift (Developer Sandbox) in the public cloud. The service uses the PostgreSQL database in the local machine or datacenter to display the names of doctors and patients.
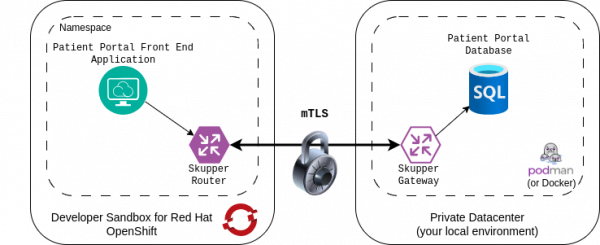
Figure 1: The example application contains a patient portal front-end and a patient portal database.
What you will learn
When you have finished this activity, you will understand how to build a service network that connects disparate services across different environments using Skupper or Red Hat Service Interconnect.
How long will this activity take?
You should budget about 30 minutes to complete this activity.
What will I need to complete this activity?
You will use the Developer Sandbox and your local laptop to deploy the front end and the database, respectively. You will also need:
Podman or Docker installed on your local machine.
A no-costDeveloper Sandbox account; follow these instructions to set up your sandbox if you haven't already done so.
If you get stuck, something isn’t working, or you simply have questions, contact us via email at devsandbox@redhat.com.

Install the front-end application on your OpenShift cluster
The first step in your process of connecting services across different environments, is to prepare your environment.
Log into the Developer Sandbox and copy the login command (Figure 2). Figure 2: Select the Copy login command option in the upper-right corner of your Developer Sandbox.
Copy the login token and paste it into your terminal to log into the cluster (Figure 3).
Deploy the front-end application on your Developer Sandbox cluster using the following commands:
oc apply -f https://raw.githubusercontent.com/rpscodes/Patient-Portal-Deployment/main/patient-portal-frontend-deploy.yaml
oc get route patient-portal-frontend -o jsonpath='{.spec.host}{"\n"}'
The last command will display the OpenShift route URL for the front-end app. Copy and paste that URL into the browser. The URL will look somewhat similar to the one below: patient-portal-frontend-vravula-redhat-dev.apps.sandbox-m4.g2pi.p1.openshiftapps.com
You should now be able to see the front end of the patient portal (Figure 4). Patient and doctor names are not currently visible because we have not established the connection with the database.Figure 4: The application front end.
Install the database on your laptop
The database contains a list of patients and doctors that will show on the patient portal front-end page once we make the connections using Red Hat Service Interconnect. In a real-world scenario, the database could be on a virtual machine, private data center, or other bare metal environment.
In this example, we will see how to use either Podman or Docker on your local laptop or computer to deploy the database. (The following steps assume that you have already installed Podman or Docker locally.)
Run the database on your local environment.
To deploy the database on Mac M1:
docker run --name database --detach --rm -p 5432:5432 quay.io/redhatintegration/patient-portal-database-arm64
To deploy the database on AMD64 or x86 environments (e.g., a Mac with an Intel chip):
docker run --name database --detach --rm -p 5432:5432 quay.io/redhatintegration/patient-portal-database
To deploy the database with Podman (e.g. on a Red Hat Enterprise Linux (RHEL) or Fedora) machine:
podman run --name database --detach --rm -p 5432:5432 quay.io/redhatintegration/patient-portal-database
Connect the database to the front end using Red Hat Service Interconnect
Now, your challenge is to enable the patient portal front end deployed on the Developer Sandbox to connect to the database. For obvious reasons, you do not want to expose the database over the public internet, so you need to set up a private, secure link between the Developer Sandbox instance and the database on your computer.
This can be accomplished with a VPN between the public cloud and the data center. However, VPNs can be hard to set up and require deep networking expertise. It also requires you to request the network admins and go through a time-consuming approval process.
Red Hat Service Interconnect, on the other hand, creates a dedicated Layer 7 service network, and it is a lot easier to set up. It lets you establish secure interconnection with other services and applications in different environments without relying on network specialists. With Service Interconnect, you can create secure virtual application networks without the cumbersome overhead, complexity, and delays that stem from traditional connectivity solutions.
Follow these steps to connect the database to the front end using Red Hat Service Interconnect:
Install Red Hat Service Interconnect by running the below command from the terminal of your local computer:
curl https://skupper.io/install.sh | sh
You should see an output similar to the one below. Export the path only if suggested in the output. export PATH="/Users/vravula/bin:$PATH"
Double-check that you are still logged in to the OpenShift cluster from your local computer by running the following command:
oc project
If you see an output similar to the one below, you can proceed. Otherwise, follow the process from Step 1 and 2 in the first section to log in. Using project "user-dev" on server "https://api.sandbox-c4.k1pi.p1.openshiftapps.com:6443
Initialize Service Interconnect in your sandbox environment namespace. Run the following command from the terminal of your local computer:
You should see an output similar to the one below:
Skupper is now installed in namespace 'user-dev'. Use 'skupper status' to get more information.
Service Interconnect provides observability out of the box and comes with its own console. The following command should display the URL for the console:
skupper status
You should see an output similar to the one below: Skupper is enabled for namespace "username-dev" in interior mode. It is not connected to any other sites. It has no exposed services. The site console url is: https://skupper-username-dev.apps.sandbox-m4.g2pi.p1.openshiftapps.com
Copy the site console URL and paste it in a new browser tab. You should be able to see the sandbox cluster namespace displayed in the console (Figure 5). At the moment, there is not a lot to see because we have only installed one side of the service network.Figure 5: The Console display, showing the Developer Sandbox cluster site.
Now that you have established a service network (with only one site at the moment), you can expose services from a local machine on the service network. A service network enables communication between services running in different network locations (sites). For example, if you run a database on a server in your datacenter, you can deploy a front end in a cluster that can access the data as if the database was running in the cluster.
Initialize the gateway
Now that you have set up your service network, it's time to initialize the gateway.
Note: How you initialize your gateway, depends on the environment you use.
If you’re using Docker on a Mac, create a file with the name simple_docker.yamland paste the following into it:<
You should see an output similar to the one below:
Skupper gateway: 'username-mac-username'. Use 'skupper gateway status' to get more information.
Your local computer should now appear in the console, as shown in Figure 6.
Figure 6: Successfully adding your local computer to your console.
Though you have linked both the cluster and your local environment, you have not exposed any services yet. By default, none of the services are exposed by Red Hat Service Interconnect, so you have to explicitly mention which services you want to expose over the service network.
Verify your services by going back to the console. Click on the Components tab (Figure 7). You should now see the Patient Portal Frontend (patient-portal-frontend) process from your namespace (your site on OpenShift) as well as the gateway process running on your local machine (the “Private Datacenter”).
Figure 7: The patient portal is displayed in the Components tab, along with the gateway.
By going to the Processes tab in the Topology section, you can see the current state of processes in our topology, including the site information (Figure 8).
Figure 8: The Processes view shows a detailed view of processes and their sites.
Expose the database service
Now expose the database service over the service network. This will allow the front end on the public cluster to connect to the database as if it was a local service. In reality, the OpenShift service is a proxy for the real service running on your computer;
Expose the database over the service network:
skupper expose service database --address database --port 5432 --protocol tcp
You should see an output similar to the one below: service database exposed as database You have now established a secure link between the sites and exposed the database as a service on your OpenShift cluster (Figure 9).Figure 9: The database is linked to the front-end application.
In the Processes tab, you can even see more detailed information about the established service connectivity (Figure 10). Note: If you don’t see the connecting arrows in the Components or Processes view right away, skip ahead to refreshing the Patient Portal front end in your browser (issuing some traffic over the connection) or wait a few moments.Figure 10: Processes view showing the established connection.Note: We are not exposing the database and payment processor service to the internet; only the services that are part of the service network enabled by Red Hat Service Interconnect can access them.
Get a list of services deployed in the sandbox namespace:
oc get service
You should see an output similar to the one below:
The database service is the proxy service created by exposing the database deployment on your local environment over the service network. After a few seconds, go back to the browser tab where you opened the patient portal front end and refresh it (Figure 11). You should now be able to see the list of patients and doctors that you have retrieved from the database. This indicates that you have successfully connected your front end to the database using Red Hat Service Interconnect.Figure 11: The patient portal now displays patient and doctor names from the database.Note: Wait a few moments for the patient data to show up. If the patient data doesn't appear after establishing the connection, and refreshing the frontend, try restarting the front-end pod.
Opening the detailed view of the processes (by clicking on them in the Processes view or listing them from the side menu), you can view the metrics of established connections in your service network:
Figure 12: Metrics for the connection between the patient-portal-frontend and the database.
Conclusion
Congratulations! You built a secure service network between services on two different environments and allowed applications to connect and communicate over the secure network using Red Hat Service Interconnect. To learn more, visit our Red Hat Service Interconnect product page.