Java is one of the most popular programming languages in the world. It has been among the top three languages used over the past two decades. Java powers millions of applications across many verticals and platforms. Linux is widely deployed in data centers, edge networks, and the cloud.
Quarkus is now available for all Red Hat Enterprise Linux (RHEL) customers. If you are running RHEL, you can easily use the Red Hat build of Quarkus in your Java applications. If you are developing applications on a Kubernetes platform like Red Hat OpenShift, you can also use the Red Hat build of Quarkus as of November 2020.
What is Quarkus, and how can you develop and deploy it on Red Hat Enterprise Linux? Read on to learn more. This article covers:
- Using the Red Hat build of Quarkus on RHEL.
- Running Quarkus in development mode.
- Creating Java native executables with and without Podman.
- Building application images with Podman on RHEL.
What is the Red Hat build of Quarkus?
If you are not familiar with Quarkus, its tagline is "supersonic, subatomic Java." And yes, Java is super fast. With Quarkus, Java is even more lightweight and straightforward for developer use.
Quarkus is a Kubernetes-native Java framework built for the Java Virtual Machine (JVM) and native compilation with GraalVM and Mandrel. Quarkus optimizes your Java code specifically for containers, making it an effective platform for serverless and cloud environments like Red Hat OpenShift. Quarkus is designed to work with popular Java standards, frameworks, and libraries, including Eclipse MicroProfile, Spring, Apache Kafka, RESTEasy (JAX-RS), Hibernate ORM (JPA), Infinispan, Apache Camel.
How to get started with Quarkus on RHEL
There are multiple ways to start using Quarkus on RHEL. The Quarkus documentation provides a list of different approaches. All you need to do is get the artifacts from Red Hat’s Maven repo.
For newbies, it’s simple to get started with the project generator using a web browser or Maven plug-in, as shown in Figure 1. Once configured, you can download the ZIP file or copy the Maven command to run Quarkus on your machine.

Figure 1 shows all of the extensions that are supported in technical preview and available for use. Quarkus has a vast ecosystem of extensions that help developers write applications, such as Kafka, Hibernate Reactive, Panache, and Spring.
An example edge application
It’s common for examples to use a CRUD application. However, we will look at an edge application that takes data from the device. This example illustrates a typical use case for Quarkus and RHEL at the network edge.
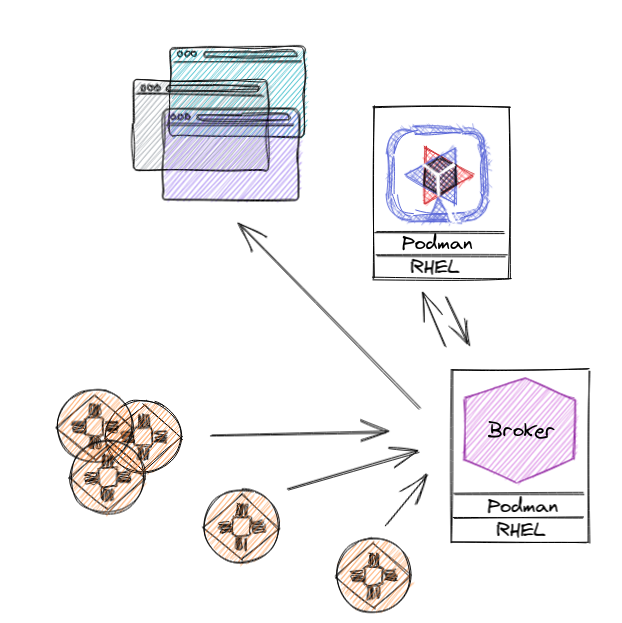
I have created a basic application that can run on a lightweight, resource-efficient RHEL server on the edge. Following is a breakdown of the data flow from devices to the front end. Figure 2 also shows the high-level architecture.
- The devices send data to an MQTT broker.
- Quarkus uses reactive messaging and channels to receive, process, and showcase those messages on a browser-based front end. Data comes in real time via a channel.
- The front end uses REST and JavaScript.
To follow along or try it out, see the source code for this application in the example repository.
Let's deploy this application on our RHEL server.
Starting the MQTT broker with Podman
RHEL has a daemonless container engine. What does this mean? RHEL uses Podman as the container engine. The Podman architecture allows you to run the containers under the user that is starting the container (the fork/exec model), and that user does not need root privileges. Because Podman has a daemonless architecture, a user running Podman can only see and modify their own containers. There is no common daemon that communicates with the command-line interface (CLI) tool.
We will use Podman throughout this example. You can learn more about Podman in this guide to Linux containers on Red Hat Enterprise Linux 8.
For this demo, we will use the Mosquitto message broker. Mosquitto is lightweight and suitable for all devices, from low-power, single-board computers to full servers. Let’s start an instance of Mosquitto using Podman:
podman run --name mosquitto \

--rm -p "9001:9001" -p "1883:1883" \

eclipse-mosquitto:1.6.2
Building our application with Quarkus
Note: This example assumes you have the latest Red Hat build of OpenJDK, OpenJDK 11.
Next, we will spin up our application. You can use any integrated development environment (IDE) to develop with Quarkus. Most IDEs allow you to use the Quarkus Tools extension, which makes it easy for developers to create Quarkus applications.
To run Quarkus in development mode, follow these steps:
- Open a terminal from your RHEL machine or any IDE.
cdinto the project directory:https://github.com/sshaaf/quarkus-edge-mqtt-demo.- Run this command:
mvn quarkus.
The output should look similar to what you see in Figure 3.
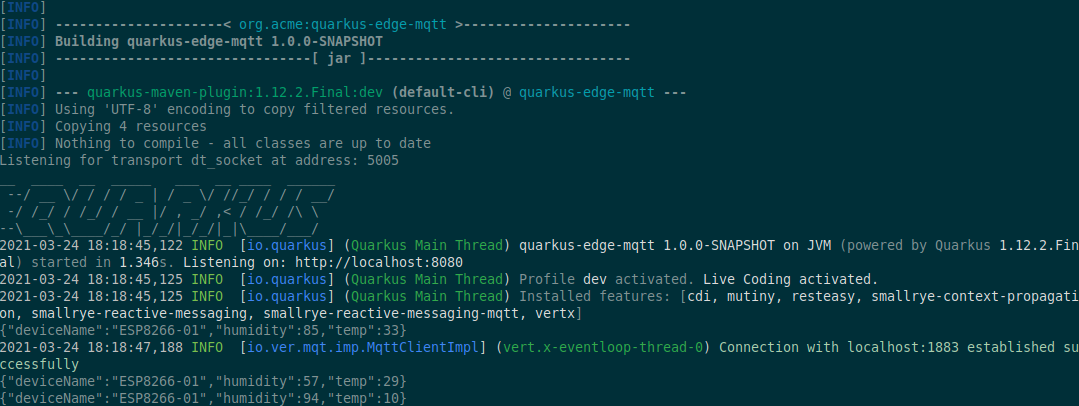
Open your browser and navigate to http://localhost:8080. You should see the main page for our application reporting real-time data from our emulated device, as shown in Figure 4. In this case, our emulated device, ESP8266-01, throws temperature and heat measurements in JSON format from the device into the MQTT broker. The JSON is then picked up as a reactive channel and throws that data out after processing into the stream. The browser reads the stream and displays the data in real time. You can easily change the emulated device to a real one; however, the data thrown must be in the correct JSON format.

Using Quarkus in development mode
Now you have a running application in development mode on your RHEL machine. What do developers gain from using Quarkus in development mode? Benefits include:
- Zero configuration, live code, and the ability to reload in the blink of an eye. If you change any of your Java files, you don’t need to reload the entire environment. Quarkus understands!
- Based on standards, but not limited.
- Unified configuration.
- Streamlined code for the 80% common usages, flexible for the 20%.
- Easy native executable generation.
The Red Hat build of Quarkus 1.11 release introduced an awesome developer console called the Quarkus Dev UI. You can access the Quarkus Dev UI in dev mode by navigating to http://localhost:8080/q/dev.
In the Quarkus Dev UI, select SmallRye Reactive Messaging Channels from the extensions shown in Figure 5.
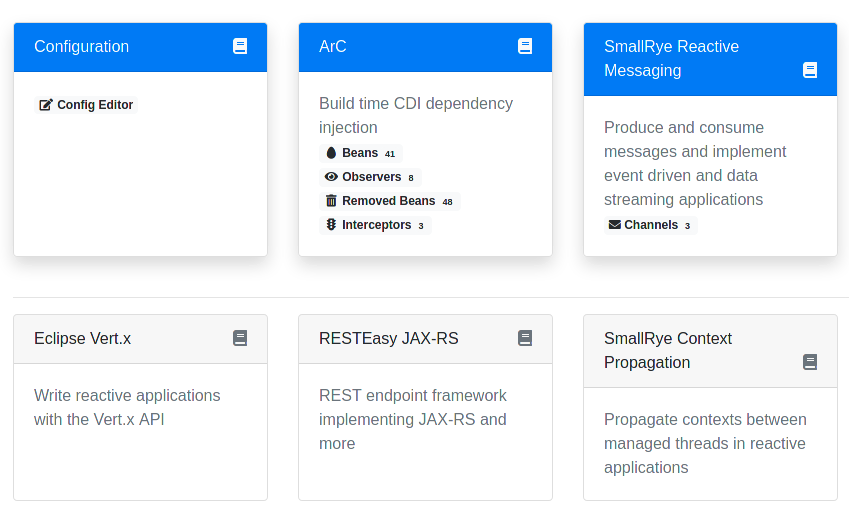
From there, you will see the reactive streams that our edge device is using (see Figure 6).

For more details about development mode, see Enhancing the development loop with Quarkus remote development.
Build the application image with Podman
You can create a native binary for your platform by running the -Pnative directive with Maven.
However, you might not have the entire compilation environment set up—for instance, you haven't installed Mandrel or GraalVM. In that case, you can use your container runtime to build the native image. The simplest way to do this is by running the following command:
mvn package -Pnative -Dquarkus.native.container-build=true -Dquarkus.native.container-runtime=podman
Quarkus will pick up the default container runtime (in this case, Podman).
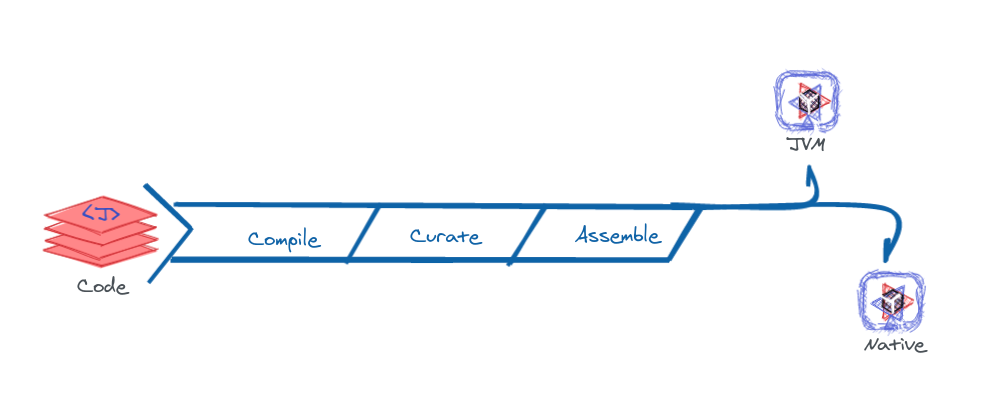
You can also specify -Dquarkus.native.container-runtime=podman to explicitly select Podman. It takes a few minutes to build the image for optimizing the Quarkus application through dead code elimination, class scanning, reflections, and build proxies. Quarkus will optimize the application not just for native images, but also for JVM mode. As a result, you will see fast startup times and a low memory footprint. Figure 7 shows the process from compilation to executables. For more details, take a look at the Quarkus performance blogs.
You can also limit the amount of memory used during native compilation by setting the quarkus.native.native-image-xmx configuration property. Note that setting low memory limits might increase the build time. You can also use Podman to create a container image with our binary.
Under src/main, Quarkus pregenerates different Dockerfiles for your application. Here, we will use the native Dockerfile because we already created a native binary. Execute the following command in our project home directory:
podman build -f src/main/docker/Dockerfile.native -t sshaaf/quarkus-edge-mqtt .
Finally, run the following command to launch the container on your RHEL machine:
podman run -i --rm -p 8080:8080 sshaaf/quarkus-edge-mqtt
Return to http://localhost:8080. You should now see the application running and displaying incoming data from our device.
Quarkus resources
Quarkus is a Java framework suitable for multiple use cases, whether you are running applications on edge gateways, creating serverless functions, or deploying on cloud environments like Kubernetes and Red Hat OpenShift. Quarkus is easy and enjoyable for developers to use, and it improves Java application performance for the cloud.
If you want to learn more about Quarkus, here are some helpful resources:
- Release notes for Red Hat build of Quarkus 1.11
- Getting started with Quarkus
- Product documentation for Red Hat build of Quarkus 1.11
- Developing with Quarkus course
- Practising Quarkus e-book
- Understanding Quarkus e-book
- Quarkus Cheat Sheet
- Quarkus DZone RefCard
- Introducing Quarkus: A next-generation Kubernetes native Java framework