Red Hat OpenShift is an enterprise-ready Kubernetes platform that provides a number of different models you can use to deploy an application. OpenShift 4.x uses Operators to deploy Kubernetes-native applications. It also supports Helm and traditional template-based deployments. Whatever deployment method you choose, it will be deployed as a wrapper to one or more existing OpenShift resources. Examples include BuildConfig, DeploymentConfig, and ImageStream.
In this article, I introduce you to OpenShift's Kubernetes-based persistent volume framework for persistent cluster storage. You will learn how to use OpenShift's PersistentVolume (PV) and PersistentVolumeClaim (PVC) objects to provision and request storage resources.
Defining persistence
In computer programming, a variable is a storage address (identified by a memory address) that is paired with an associated symbolic name. Each variable contains a known or unknown quantity of information that represents a value. A variable can temporarily hold a data value, but variables are typically stored only while running in memory, so the data will be lost when the application terminates.
Persistence occurs when a data value "continues steadfastly or firmly in some state" (definition from Dictionary.com). In contrast to values that persist, some applications programmatically access temporary variable values, which prioritize speed over longevity. These temporary values are considered ephemeral when the data lasts for only a short time.
For example, imagine your favorite game, such as Angry Birds. You would need to use persistent storage if you wanted to save certain game data to reload every time that you played. You might use ephemeral memory to store the programmatic values representing the scores for your current mission.
Understanding storage architecture
Now, let's discuss the concepts of persistent storage and ephemeral storage in an OpenShift cluster. The first thing to understand is how persistent storage differs from ephemeral storage. OpenShift treats PersistentVolume and PersistentVolumeClaim objects as resources: Like OpenShift APIs, you can use YAML or JSON configuration files to manage them.
In Figure 1, the left side of the diagram illustrates an application that is deployed to an OpenShift project namespace without defining persistent storage. In this example, the data is temporarily stored in Pod 1 and Pod 2 using ephemeral storage. The stored data will be lost when the pods are deleted. The right side illustrates an application deployed to an OpenShift namespace with persistent data storage. In this case, an administrator has provisioned persistent storage in the cluster, and a developer has issued a PersistentVolumeClaim to request that storage.
The PVC gives Pod 1 and Pod 2 each a volume reference to the persistent storage. The data storage will be referenced when you deploy the application using a DeploymentConfig or Deployment object, and the data will persist even after one or both of the pods is destroyed.

Persistent storage types
As an OpenShift architect, you decide what type of persistent storage to provide to an application's developers. The three popular storage types are file storage, block storage, and object storage.
Network File System
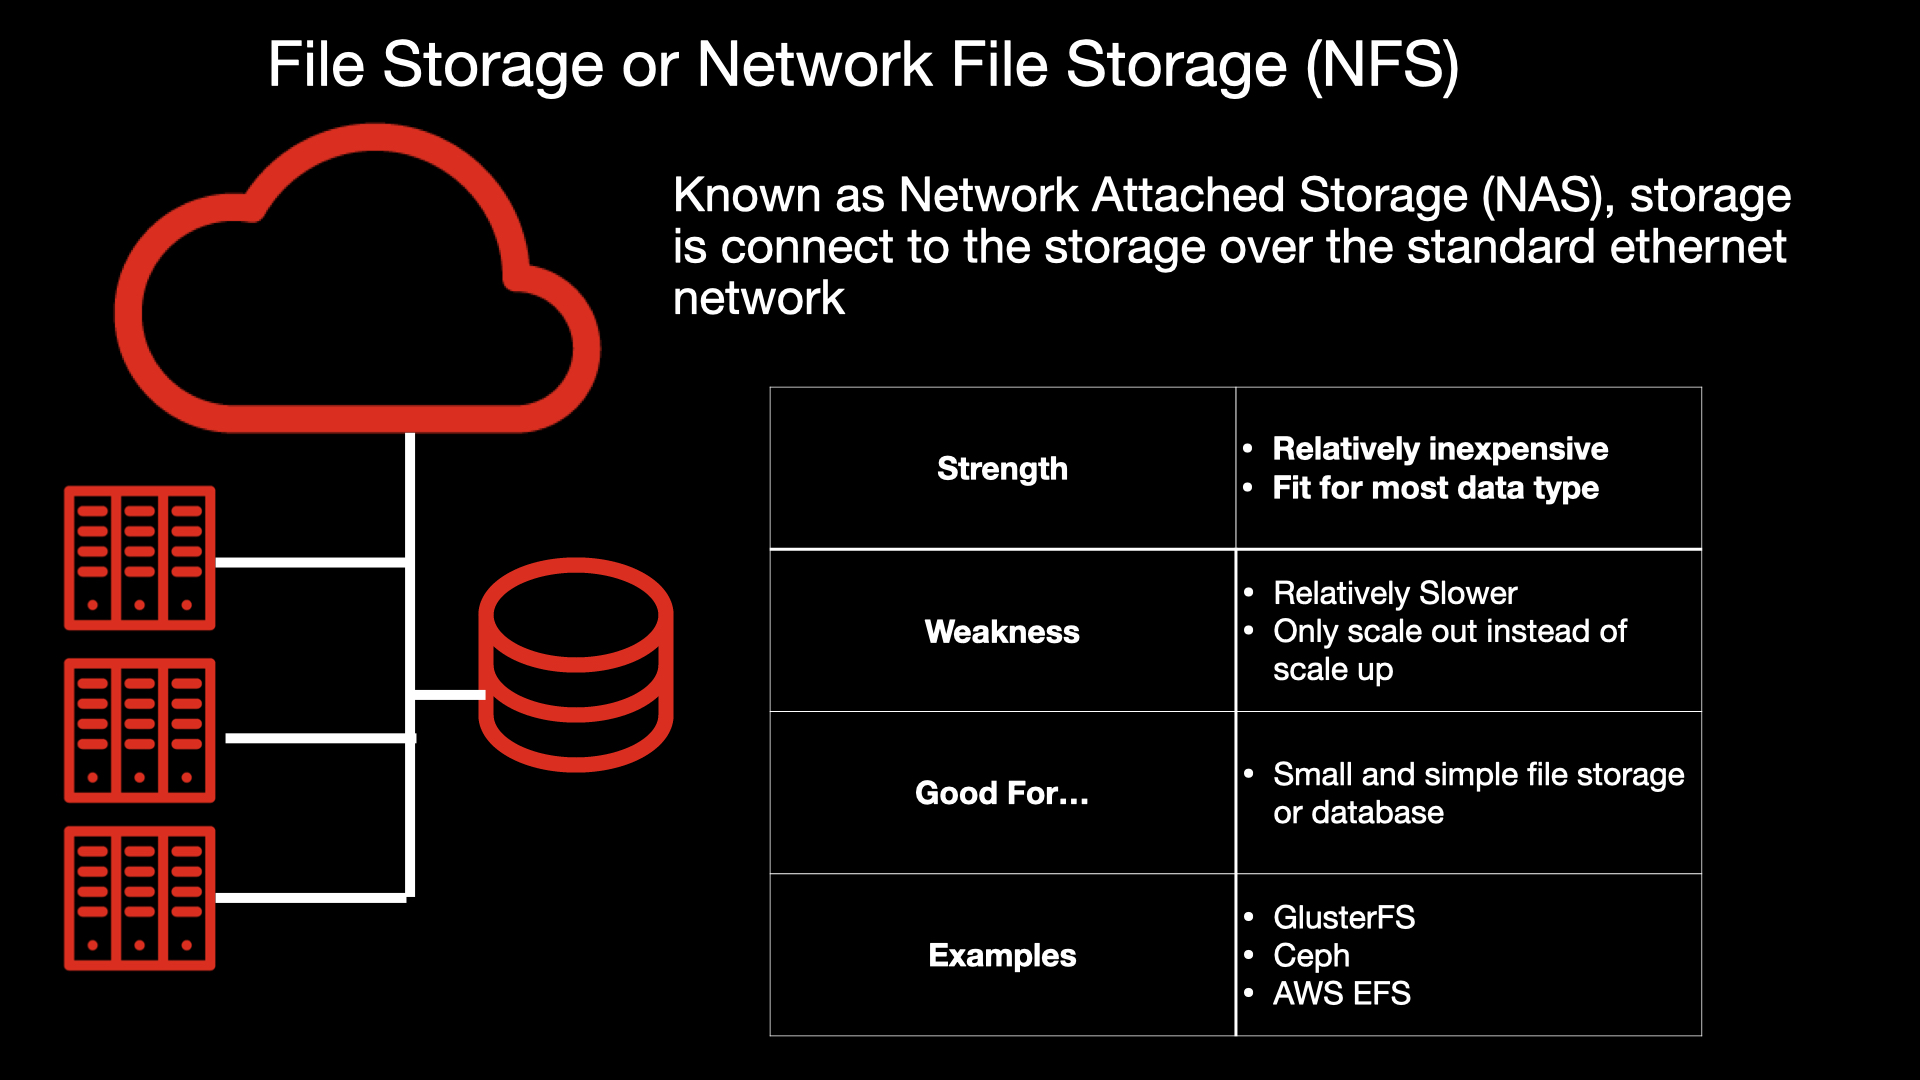
The most frequently used type of storage in the persistent volume framework is Network File System (NFS), or simply file storage. NFS is a traditional network storage type, providing a path to storage connected over a standard ethernet network. It is relatively inexpensive and is able to store compatible data types. For example, you can store media files such as JPEG and MP3, as well as MySQL or MySQL data. As noted in Figure 2, NFS works best for small and simple file storage or databases.
However, NFS is relatively slow and not the best option for complex applications requiring fast operations. Additionally, NFS expands only by scaling out; it does not scale up, which further restricts its performance. GlusterFS, Ceph, and Amazon Web Services Elastic File System (AWS EFS) are examples of NFS.
Block storage
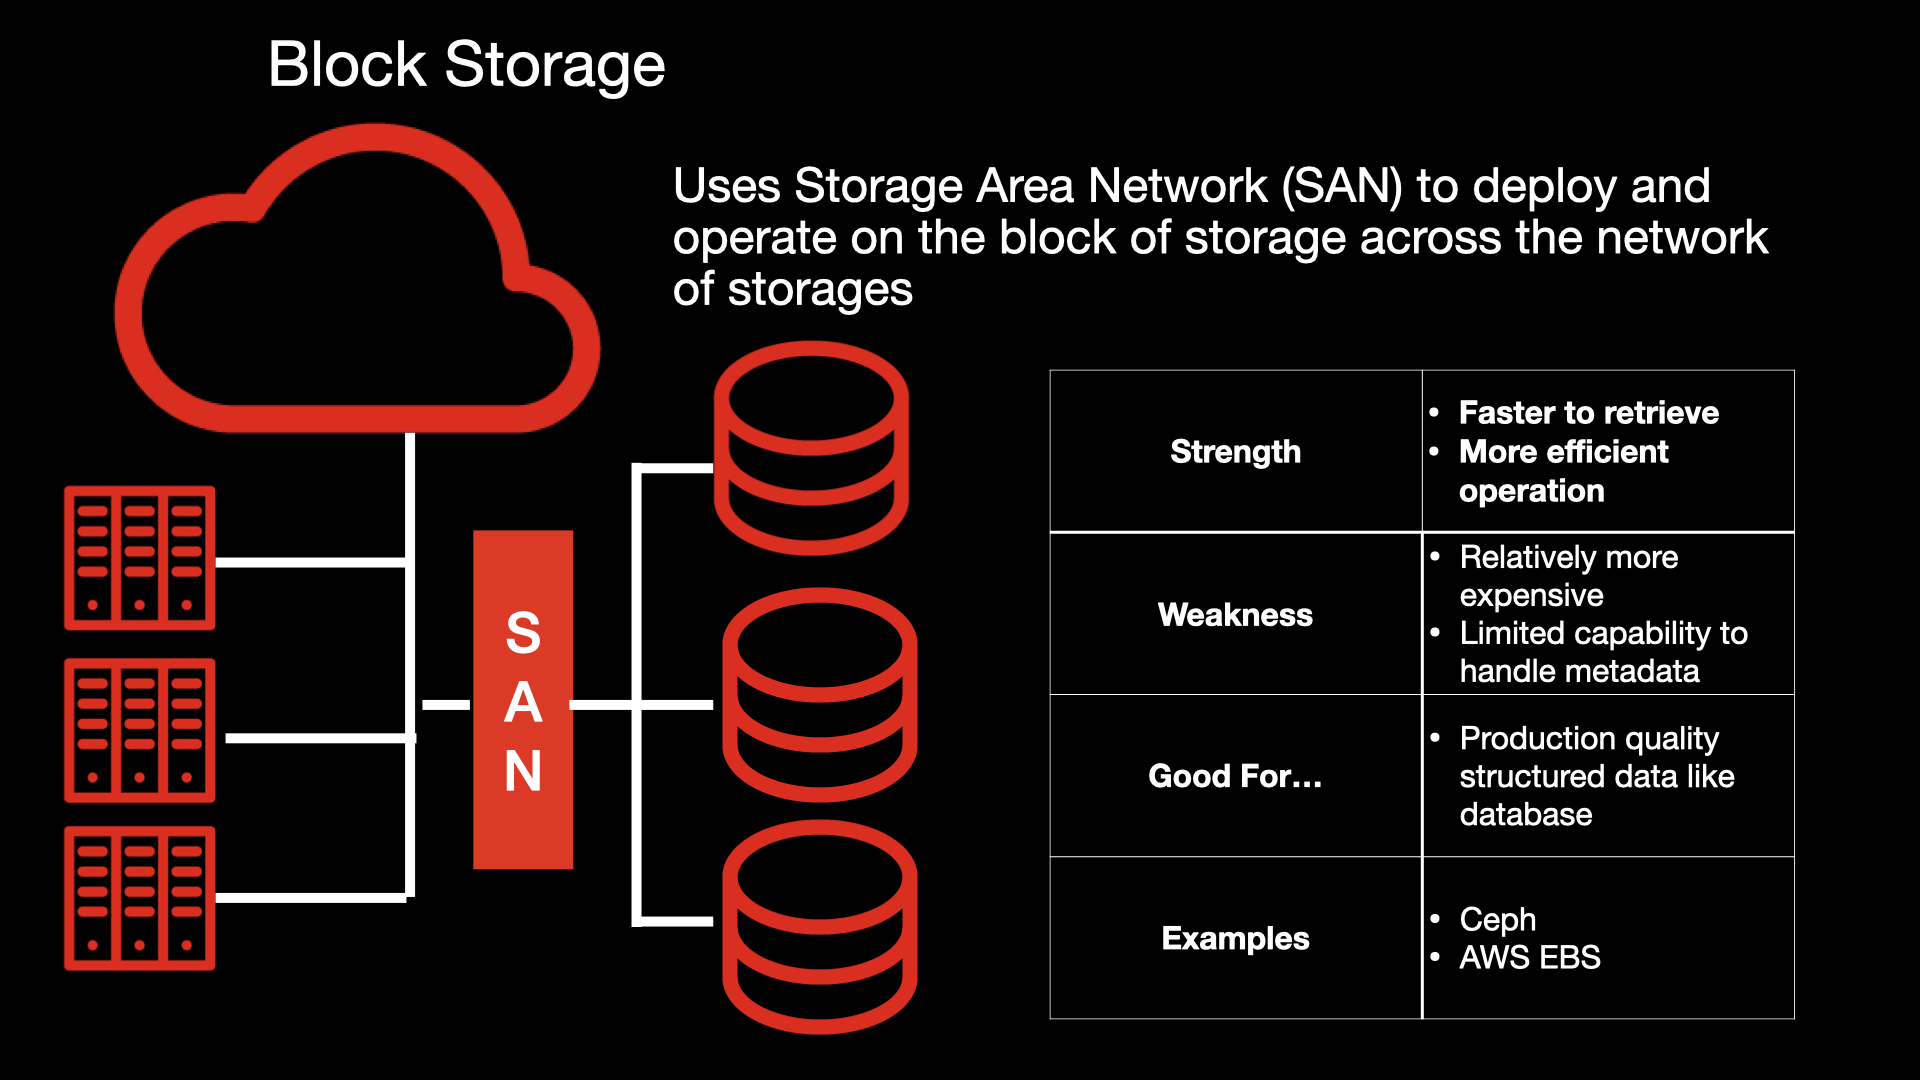
Block storage uses a storage area network (SAN) to deploy and operate on a block of storage spread across a network. SAN-enabled block storage offers faster retrieval and operation times and more efficient operation as compared to NFS. It is ideal for production-quality, structured data for databases such as MySQL and PostgreSQL.
On the downside, block storage is slightly more expensive than NFS, and it has a limited capability for handling metadata. Examples of block storage are Ceph and AWS Elastic Block Store (AWS EBS), as shown in Figure 3.
Object storage
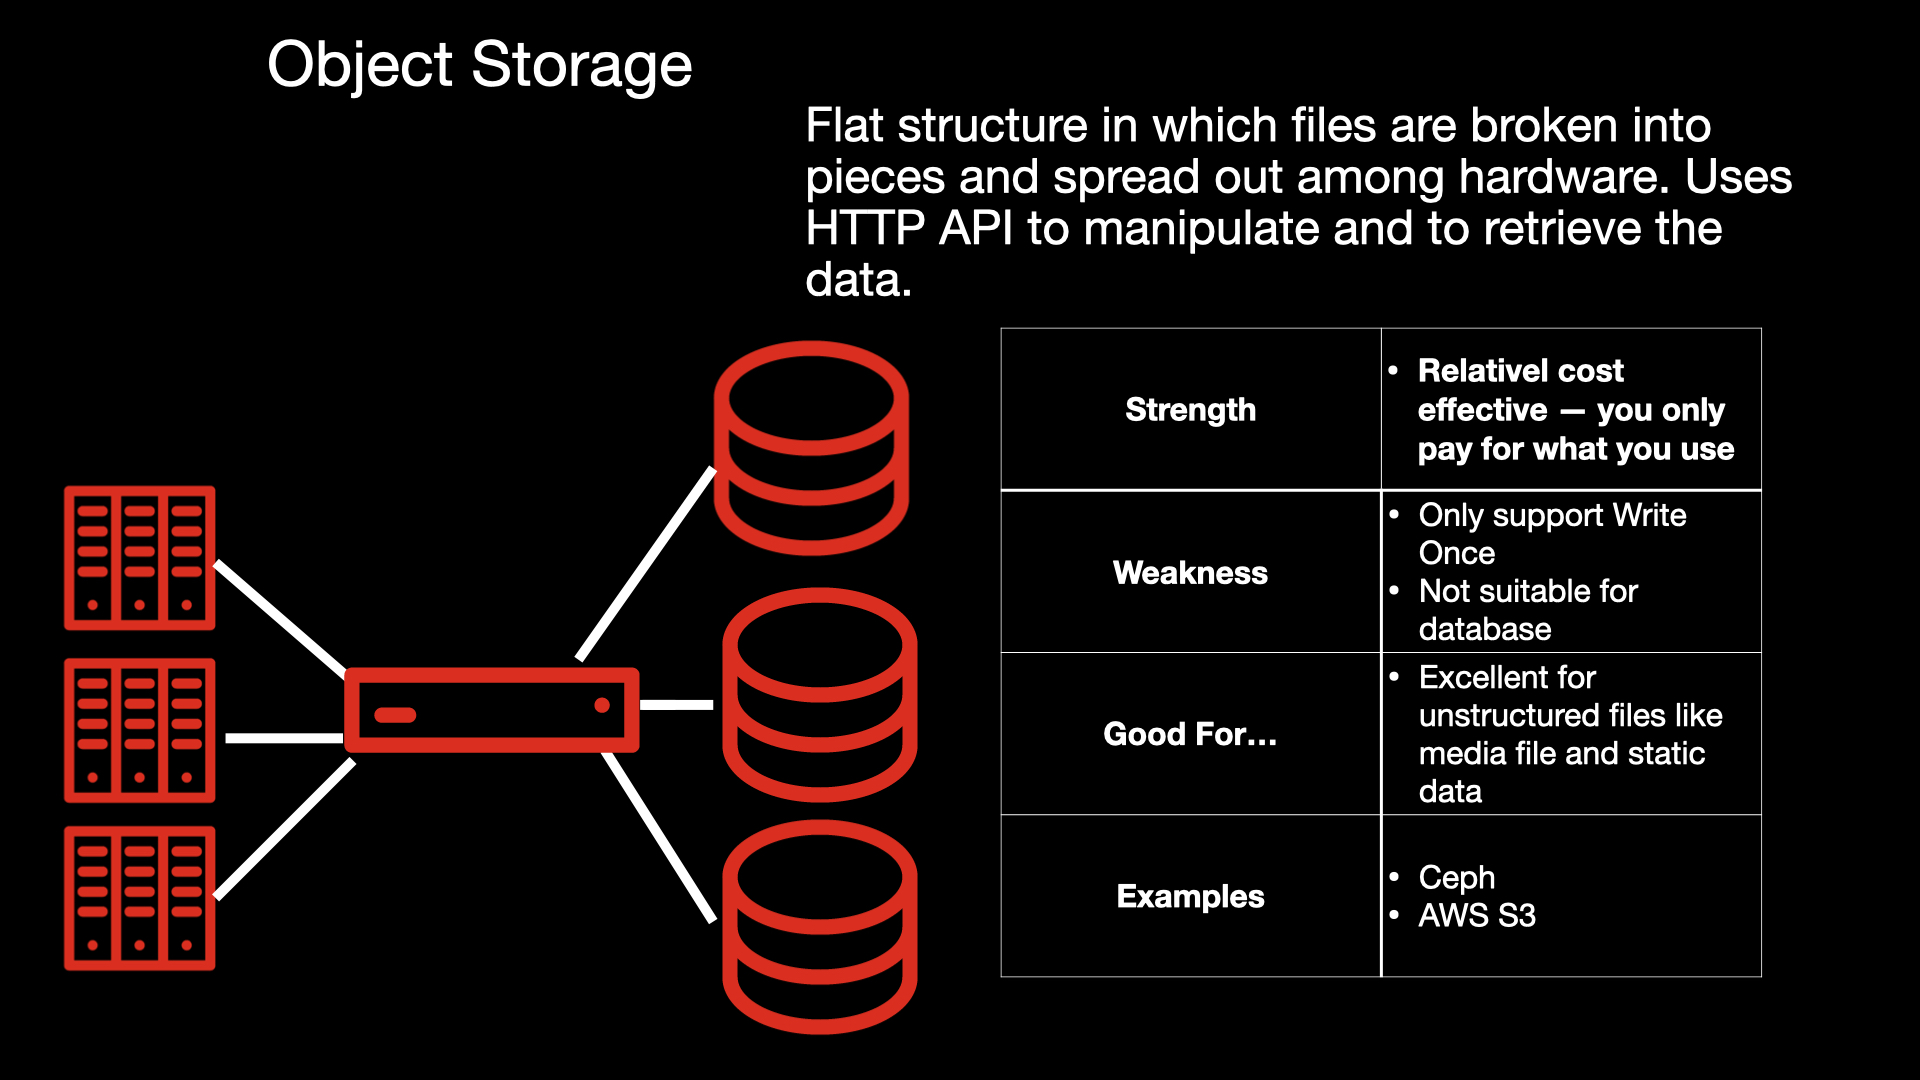
Object storage's popularity has grown exponentially due to the demand for efficient transactions on unstructured files such as photos and videos. It is designed with a flat structure, where the files are broken into pieces and spread across the hardware. Object storage uses HTTP to manipulate and retrieve data. It is highly efficient for unstructured files such as media files and static files, and it uses a pay-as-you-go cost model, which makes it affordable and cost-effective.
On the downside, you cannot use object storage with read-write-many data, so it is not suitable for a database. As shown in Figure 4, Ceph and Amazon Simple Storage Service (AWS S3) are examples of object storage.
Note: See "File storage, block storage, or object storage?" for a complete introduction to these storage types.
Demo: Persistent volume storage in a MySQL database
With those concepts out of the way, it's time for a demonstration. In the next sections, I will demonstrate the usefulness of OpenShift's persistent volume framework by deploying a MySQL database, first without and then with persistent volume storage.
For this demonstration, I assume the following about your development environment:
- You have at least developer access to a standard OpenShift 3 or higher cluster. Ideally, you should have admin access. If you don't have admin access, then you can skip Step 1 and use your own namespace instead.
- Your
ImageStreamis correctly configured with the standard MySQL container image. - You have the OpenShift command-line interface (
oc) installed, and you know how to use it.
Step 1: Set up the demo
The first thing we'll do is create a new OpenShift project under its own namespace. You can skip this step if you are assigned to a default namespace. You will be able to use your assigned namespace, but you won't be able to create a special project for this demo.
Create the OpenShift project
Log in to your OpenShift cluster using the OpenShift CLI (oc) and use the oc new-project command to create a new project. As shown in Figure 5, I recommend using the name "pvc-demo."

Verify your project defaults
By default, your OpenShift project uses the mysql ImageStream in the openshift namespace. Run the following command to verify the default (also shown in Figure 6):
oc get is -n openshift | grep mysql
Then run the following:
oc get -o yaml is/mysql -n openshift

Deploy a new MySQL application with ImageStream
Use the OpenShift oc new-app command to deploy a new MySQL application with ImageStream. Note that for this phase of the demo, we are configuring MySQL to use ephemeral storage.
At a minimum, you will need to configure the MySQL username, password, and database name using these three environment variables:
oc new-app -i mysql -e MYSQL_USER=tester -e MYSQL_PASSWORD=Pass1234 -e MYSQL_DATABASE=testdb
You can change the values for your own project, but note that when MySQL is installed, it initially sets MYSQL_DATABASE as the default database. The MySQL application deployment will fail if any of these environment variables are missing.
When the MySQL application deployment completes, load the environment variables in each pod. Figure 7 shows the MySQL application deployment with ImageStream and the MYSQL_USER, MYSQL_PASSWORD, and MYSQL_DATABASE variables.

Verify that the MySQL pod is running
Before we move on, let's check that our MySQL application is running successfully. First, run oc get all to verify that the pod's status is Running, as shown in Figure 8.

Another option is to use the OpenShift web console to check the pod's status. The pod shown in Figure 9 looks healthy.

If you open the terminal inside the web console, you can click the name of the pod to inspect its status, as shown in Figure 10.

From inside the pod, you can click Terminal to interact directly with the pod, as shown in Figure 11:

Note: For this demo, we will use the oc CLI to verify and inspect the pod. You can run the oc printenv | grep MYSQL command to verify that the environment variables that we specified when we created the pod are shown.
Step 2: Create the MySQL data with ephemeral storage
Use oc get pods to view the pod, then run the shell command inside the pod. Next, enter oc rsh pod and replace the POD_NAME variable with the name of the pod that you want to interact with:
oc rsh pod/POD_NAME
Once you are inside the pod, use printenv | grep to verify that the environment variable values are correctly populated, as shown in Figure 12.

oc rsh to interact with the pod, and verify the environment variables.">Create sample MySQL queries
Next, we'll create a file with sample MySQL queries, which will populate the MySQL data for the demo. As shown in Figure 13, I created a sample SQL query file named sample_query.sql and saved it in my VI text editor.
Figure 14 shows the sample SQL queries that I will use for this demo. If you are already familiar with MySQL, feel free to change the queries; just note that your database name must match what you defined with the MYSQL_DATABASE variable.

/var/lib/mysql.">Be sure to save this content into a separate text editor; you will need it later in the article when you reiterate the steps of deleting a pod and re-creating your MySQL data. Also, note that by default, MySQL saves the data into a path called /var/lib/mysql. We'll use this path as the reference for our PersistentVolumeClaim when we redeploy the application later.
Run the MySQL queries
Use the following command to log in to MySQL:
mysql -u$MYSQL_USER -p$MYSQL_PASSWORD -h$HOSTNAME $MYSQL_DATABASE
With the exception of $HOSTNAME, the properties starting with the $ symbol refer to the environment variables that you specified when you deployed the sample application using the OpenShift CLI oc new-app command. The $HOSTNAME environment variable refers to the MySQL hostname.
As shown in Figure 15, execute the MySQL source command to run your MySQL queries from the sample SQL file that you've just created:
source sample_queries.sql

source command to run MySQL queries from the sample file.">Finally, run the MySQL show databases command to verify that each MySQL database was successfully created. Use the use testdb command to check for the existence of the data and then validate it, as shown in Figure 16.

Delete the pod
Now, we'll delete the pod and see what happens to the data stored using ephemeral data storage. To exit from the pod, type exit twice. Then, re-enter the pod and use the OpenShift CLI oc delete pod POD_NAME command, as shown in Figure 17.

oc delete pod POD_NAME command to delete the pod.">We used a DeploymentConfig with ReplicaSet, so a new instance spins up to replace the one that we've just deleted. Wait a short time, then execute the OpenShift oc get pods command. You should see that a new pod is running. Connect to the new pod with the oc rsh command. For my example, the command is oc rsh pod/mysql pnpq4. When you log in to MySQL, check for the created database table. Unfortunately, the table is empty, as shown in Figure 18.

Because we configured the pod to use ephemeral storage, we've lost all of our data.
Next, we'll deploy the application with a persistent volume claim (PVC).
Step 3: Create a MySQL application with persistent volume storage
As I explained at the beginning of this article, we can use a YAML file to define a PersistentVolumeClaim (PVC) for our MySQL application. To start, create a new file named sample-pvc.yaml, as shown in Figure 19. (You can name the file whatever you want, as long as the file extension is the same.)

Then, run the following to create the PVC:
oc apply -f sample-pvc.yaml
Enter the oc get pvc command to verify that you've just created a PVC definition, as shown in Figure 20.

oc get pvc command to verify that you created a PVC definition.">We will use this new persistent volume claim soon to modify the MySQL application's DeploymentConfig. But first, let's make a slight improvement to the application.
Create an OpenShift Secret
You might remember that when we created the MySQL application, we defined the core environment variables (MYSQL_USER, MYSQL_PASSWORD, and MYSQL_DATABASE) in a plain text file. Storing secret or sensitive data as plain text values is a security risk, so let's fix that now.
As an alternative to plain text, we can use OpenShift secrets to store our MySQL environment values. Secrets use Base64, which provides a basic encryption.
Note: Another option would be to store the MySQL values using an optimally secure solution such as Vault. I won't describe that option in this article.
The first step to storing the MySQL environment values in a secret is to create a new file with key-value pairs. Then, use the following command to create an OpenShift secret to store the MySQL credential data on the file containing key-value pairs:
oc create secret generic mysql-sec --from-env-file=mysql-cred.env
Note that in my example, mysql-sec is the OpenShift secret name and mysql-cred.env is the file that contains the MySQL key-value pairs.
Run the oc get secret and oc get -o yaml secret/mysql-sec commands to verify that the OpenShift secret was successfully created, as shown in Figure 21.

Modify the DeploymentConfig
Now that we've added a secret, we are ready to redeploy the MySQL application with persistent volume storage. One way to redeploy the MySQL application is to modify the application's DeploymentConfig file. Be aware, however, that the DeploymentConfig file requires a specific format. An easier option is to use the OpenShift CLI's oc patch command.
Start by running the oc get dc and oc edit dc/mysql commands, as shown in Figure 22.

oc get dc and oc edit dc/mysql commands to redeploy the DeploymentConfig file.">Next, replace the direct reference to MySQL's environment variable values (under spec.template.spec.containers.env) with the new secret. Update the value to valueFrom and use the new secretKeyRef, as shown in Figure 23. (See the OpenShift secrets documentation for further reference.)

Implement the persistent volume claim
Finally, we've come to our glorious moment: We will make two changes to implement our persistent volume claim.
First, under spec.template.spec.containers, add a new line after terminationGracePeriodSeconds. Enter volumes: and a reference to the persistent volume claim, for instance mysql-volume.
Next, introduce a new line after terminationMessagePolicy. Enter volumeMounts: and add a mountPath with the value set to /var/lib/mysql. Enter mysql-volume, which is the volume name that you created in the previous step.
Figure 24 shows these updates. Note that /var/lib/mysql is the default path that MySQL uses to store its SQL data.

Test the pod
Once the new pod is running, run get pods to see the new pod in its running state.
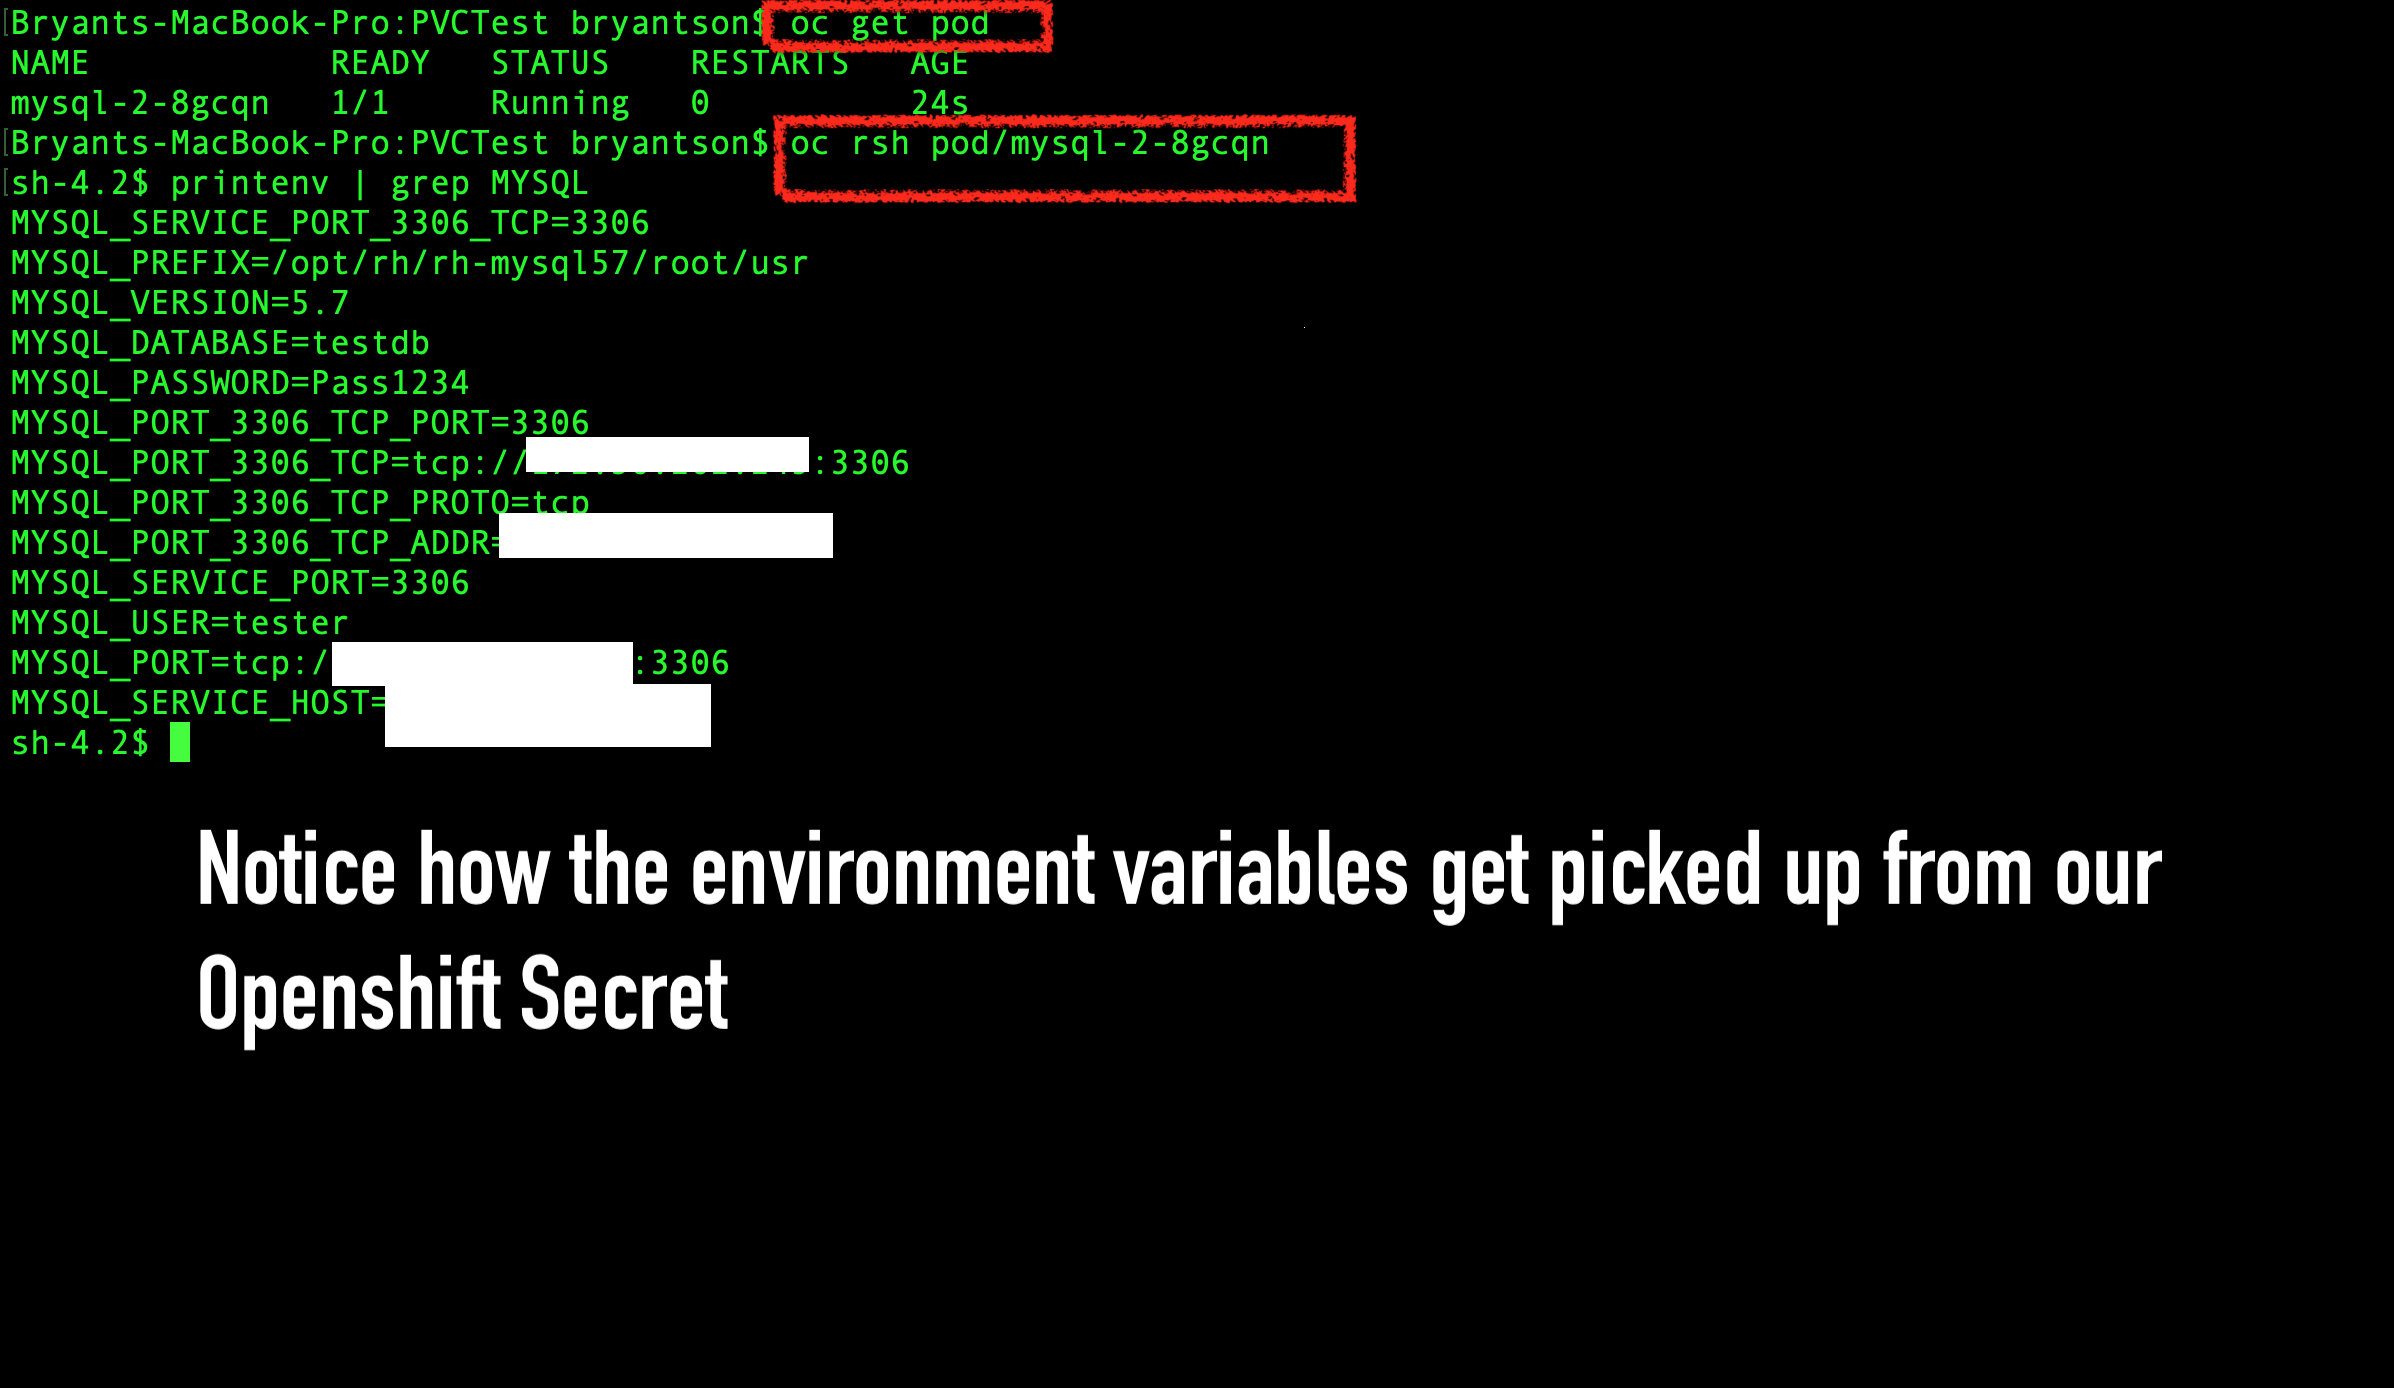
Use the rsh pod/POD_NAME command again to ssh into the pod, then enter printenv | grep MYSQL. As shown in Figure 25, you should see that the environment variables were successfully picked up from the secret.
Create and populate a sample MySQL file
Now, repeat the sequence from Step 2 to create the sample MySQL file again, as shown in Figure 26.

Log in to the MySQL application and repeat the process for recreating the MySQL data with the source command. This time, because we have persistent data storage, we won't lose the data.

Verify the MySQL queries
In the MySQL shell, use the show databases, show tables, and SELECT commands to verify that the MySQL queries work. As shown in Figure 28, you should see that MySQL data was successfully recreated.

Step 4: Test your application's data persistence
With the persistent volume for storage, we should be assured that our data is secure. To test the application's data persistence, exit from the pod and delete it, as shown in Figure 29.

When you reconnect to the new pod and check the MySQL database, verify that the data is still there. As shown in Figure 30, you should see that the MySQL data persists, even after we've deleted the pod.

Conclusion
In this article, you learned the basics of persistent storage and the different storage types that you can use. You also saw a demonstration of OpenShift's persistent volume storage in action.
I hope that this article has helped you to understand OpenShift's persistent volume storage framework and how to use PersistentVolumeClaim objects for persistent storage in your OpenShift clusters. Please leave a comment if you have questions about the demonstration in this article.
