In this article, we will integrate Red Hat AMQ 7.7 with the ApacheDS LDAP server. However, any version of the AMQ 7.x series can be integrated with the steps mentioned in this article.
For this example integration, we'll use Apache Directory Studio, which is an LDAP browser and directory client for ApacheDS. You will learn how to set up the ApacheDS LDAP server from scratch, and how to integrate the new LDAP configuration changes that are required in AMQ 7.7. Finally, we'll test the integration with an AMQ 7.7 shell-based client, using Hawtio as a graphical user interface (GUI). This will be helpful to system administrators and developers as they can quickly create a proof of concept for LDAP and AMQ integration. This will help in enabling role-based access control(RBAC) for accessing AMQ 7.7.
Note: Our example is based on security-ldap, which shows how to configure and use a secure Java Message Service (JMS) application layer with ActiveMQ Artemis and the ApacheDS LDAP server. This example ships with all AMQ 7.x distributions. I have tested the integration in Fedora 32 and the OpenJDK version of Java 8 (1.8.0_252).
Part 1: Create the ApacheDS LDAP server with Apache Directory Studio
The first thing we'll do is to create an ApacheDS server instance using Apache Directory Studio:
- Download Apache Directory Studio and unzip it.
- Once it has been extracted, from the Linux terminal execute
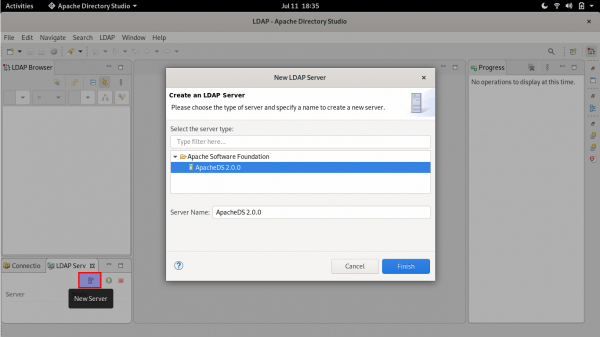
ApacheDirectoryStudio/ApacheDirectoryStudio. - Create the LDAP server by selecting New Server ->Finish, as shown in Figure 1.

Setup New Ldap Server Figure 1: Create the new LDAP server in Apache Directory Studio.
Set up the new LDAP server
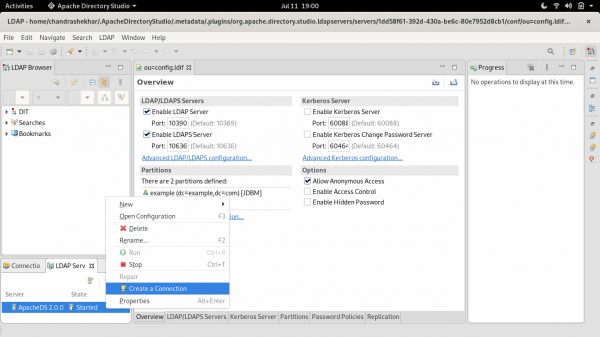
Before we start the server, we have the option to change its port. Right-click on the server and select Open Configuration. I've kept the default port. You can use Ctrl+S to save any changes that you make.

Click the Run button at the bottom left of this screen to start the LDAP server.
Create a new connection
Next, we'll create a new connection, as shown in Figure 3.

After creating the connection, you will observe a directory tree in the LDAP browser. The tree is shown in the left-side panel in Figure 4.

Create a server partition
Next, we want to import the example.ldif file from the security-ldap example. Before doing that, we have to create a partition.
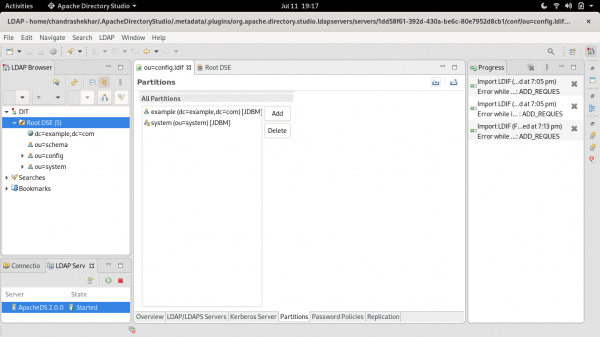
Right-click on the LDAP server and select Open Configuration to open the Partitions tab, which is shown in Figure 5.

Figure 6 shows the dialog to add a new partition. Enter activemq as the partition ID with the suffix of dc=activemq,dc=org. Enter Ctrl+S to save your changes.

If you want to see the reflected changes, try the F5 key.
Import example.ldif
Now, we are ready to import the example.ldif file, as shown in Figure 7.

example.ldif file.Figure 8 shows the import configurations for the file.

example.ldif file.To complete the import, stop the LDAP server and start it again so that the changes are reflected. After restarting, you will see that the example.ldif file has uploaded, as shown in Figure 9.

example.ldif file has uploaded.Test the LDAP server connection
We're almost done setting up the LDAP server. Our last step is to test the LDAP server connection. The following command requests a search for the user andrew:
$ ldapsearch -H ldap://localhost:10390 -x -b "uid=andrew,dc=activemq,dc=org"|less
The output provides the following user details, which also ensures that LDAP connectivity is fine:
# extended LDIF
#
# LDAPv3
# base <uid=andrew,dc=activemq,dc=org> with scope subtree
# filter: (objectclass=*)
# requesting: ALL
#

# andrew, activemq.org
dn: uid=andrew,dc=activemq,dc=org
objectClass: top
objectClass: simpleSecurityObject
objectClass: account
userPassword:: e1NTSEF9RnQzOGppd3pKVWUwWElsN0VBbm5aQWUxTXJCOWlBUWg0YTRkM2c9PQ=
=
uid: andrew

# search result
search: 2
result: 0 Success

# numResponses: 2
# numEntries: 1
Part 2: Integrate AMQ 7.7 with ApacheDS
In this section, we'll integrate AMQ 7.7 with the ApacheDS LDAP server. I'll also guide you through the required configuration changes for AMQ 7.7.
Download and install AMQ 7.7
To start, we'll download and install AMQ 7.7.
- Download AMQ 7.7 from the Red Hat download portal. Alternatively, you could download the latest version of Apache Artemis, which is the AMQ community distribution.
- Unzip the distribution that you have selected. Create a new folder
AMQ_INSTANCE_770alongside the extracted distribution. - Change the directory to
AMQ_INSTANCE_770and create an AMQ Broker instance calledbrokerInstanceldap:$ ../amq-broker-7.7.0/bin/artemis create brokerInstanceldap Creating ActiveMQ Artemis instance at: /home/chandrashekhar/Development/AMQ_RH/AMQ_INSTANCE_770/brokerInstanceldap --user: is a mandatory property! Please provide the default username: admin --password: is mandatory with this configuration: Please provide the default password: --allow-anonymous | --require-login: is a mandatory property! Allow anonymous access?, valid values are Y,N,True,False Y Auto tuning journal ... done! Your system can make 5.68 writes per millisecond, your journal-buffer-timeout will be 176000
Configure the new AMQ 7.7 instance
You will find the complete configuration in the Git repository for this article. Enter the following to clone this repository and get the files that you need:
$ git clone https://github.com/1984shekhar/Artemis_POC
Copy these files from the Git repository into your AMQ_INSTANCE_770/brokerInstanceldap/etc folder:
Note: The broker configuration files are located in the Artemis_POC/ldapIntegration/etc folder. You can also find them in the Git repository.
Configuration details
See the following files for the configuration details:
- The
login.configfile has the LDAP server integration details. - The
broker.xmlfile has security settings. These settings allow the roles ofuser,europe-user,news-user, andus-userto access, produce, and consume to and from various queues, which are also listed in the file. - The
example.ldiffile holds the definition of the LDAP server roles and their associated users and passwords.
Additional configurations
In addition to the LDAP server roles, we have to define a special role to access Hawtio, which we do in the artemis.profile configuration. In this case, we replace the default of amq with -Dhawtio.role=user.
We also want to configure the LDAP server operations for verbose logging, so we set the following in the logging.properties file:
loggers=[default entries],org.apache.activemq.artemis.spi.core.security
logger.org.apache.activemq.artemis.spi.core.security.level=DEBUG
Also, note that the Hawtio GUI uses the Java Management Extensions (JMX) framework for various operations. So, we also have to provide role-based access control (RBAC) configurations for JMX. You will find the following RBAC config in the management.xml file:
<match domain="org.apache.activemq.artemis">
            <access method="list*" roles="amq,user"/>
            <access method="get*" roles="amq,user"/>
            <access method="is*" roles="amq,user"/>
            <access method="set*" roles="amq,user"/>
            <access method="*" roles="amq,user"/>
</match>
Part 3: Test the LDAP integration with AMQ 7.7
Our final step is to test the integration.
Assuming that the configuration files are copied in the Artemis_POC/ldapIntegration/etc folder, enter the following command to start the broker:
$ ./artemis run
In a different Linux terminal, send and receive messages with the following commands:
$ ./artemis producer --user andrew --password activemq1 --destination queue://news.europe.europeTopic --message-count 1
Connection brokerURL = tcp://localhost:61616
Producer ActiveMQQueue[news.europe.europeTopic], thread=0 Started to calculate elapsed time ...

Producer ActiveMQQueue[news.europe.europeTopic], thread=0 Produced: 1 messages
Producer ActiveMQQueue[news.europe.europeTopic], thread=0 Elapsed time in second : 0 s
Producer ActiveMQQueue[news.europe.europeTopic], thread=0 Elapsed time in milli second : 87 milli seconds
$
$ ./artemis consumer --user frank --password activemq2 --destination queue://news.europe.europeTopic --message-count 1
Connection brokerURL = tcp://localhost:61616
Consumer:: filter = null
Consumer ActiveMQQueue[news.europe.europeTopic], thread=0 wait until 1 messages are consumed
Consumer ActiveMQQueue[news.europe.europeTopic], thread=0 Consumed: 1 messages
Consumer ActiveMQQueue[news.europe.europeTopic], thread=0 Elapsed time in second : 0 s
Consumer ActiveMQQueue[news.europe.europeTopic], thread=0 Elapsed time in milli second : 27 milli seconds
Consumer ActiveMQQueue[news.europe.europeTopic], thread=0 Consumed: 1 messages
Consumer ActiveMQQueue[news.europe.europeTopic], thread=0 Consumer thread finished
$
$ ./artemis producer --user frank --password activemq2 --destination queue://news.europe.europeTopic --message-count 1
Connection brokerURL = tcp://localhost:61616
Producer ActiveMQQueue[news.europe.europeTopic], thread=0 Started to calculate elapsed time ...

javax.jms.JMSSecurityException: AMQ229032: User: frank does not have permission='SEND' on address news.europe.europeTopic
at org.apache.activemq.artemis.core.protocol.core.impl.ChannelImpl.sendBlocking(ChannelImpl.java:467)
at org.apache.activemq.artemis.core.protocol.core.impl.ChannelImpl.sendBlocking(ChannelImpl.java:361)
at org.apache.activemq.artemis.core.protocol.core.impl.ActiveMQSessionContext.sendFullMessage(ActiveMQSessionContext.java:552)
at org.apache.activemq.artemis.core.client.impl.ClientProducerImpl.sendRegularMessage(ClientProducerImpl.java:296)
at org.apache.activemq.artemis.core.client.impl.ClientProducerImpl.doSend(ClientProducerImpl.java:268)
at org.apache.activemq.artemis.core.client.impl.ClientProducerImpl.send(ClientProducerImpl.java:143)
at org.apache.activemq.artemis.core.client.impl.ClientProducerImpl.send(ClientProducerImpl.java:125)
at org.apache.activemq.artemis.jms.client.ActiveMQMessageProducer.doSendx(ActiveMQMessageProducer.java:483)
at org.apache.activemq.artemis.jms.client.ActiveMQMessageProducer.send(ActiveMQMessageProducer.java:193)
at org.apache.activemq.artemis.cli.commands.messages.ProducerThread.sendMessage(ProducerThread.java:125)
at org.apache.activemq.artemis.cli.commands.messages.ProducerThread.run(ProducerThread.java:91)
Caused by: ActiveMQSecurityException[errorType=SECURITY_EXCEPTION message=AMQ229032: User: frank does not have permission='SEND' on address news.europe.europeTopic]
... 11 more
Now, browse to the console login (http://localhost:8161/console/login) and enter the user name andrew and the password activemq1.
You should now be able to send a message through the Hawtio GUI, as shown in Figure 10.

Sending the message verifies that the integration is complete.
Conclusion
I hope that you liked this article and that it has helped you to better understand LDAP authentication with Red Hat AMQ 7.x and Apache ActiveMQ Artemis.
Last updated: November 17, 2023