You might not need Secure Socket Layer (SSL)-based communication between microservices in the same cluster, but it's often a requirement if you want to connect to a remote web service or message broker. In cases where you will expose a web service or other endpoints, you might also have to use a custom keystore in a microservice deployed on Red Hat OpenShift, so that external clients only connect with a specific truststore.
In this article, I show you how to configure a keystore and a truststore for a Java-based microservice built with Spring Boot. I used the Apache Camel and CXF libraries from Red Hat Fuse to develop the microservice. I used a source-to-image (S2I) deployment and tested the examples in Red Hat OpenShift 4.3.
About the example applications
The first example application is a REST-based web service deployed in OpenShift 4.3 and communicating via SSL. The second example application is a client that connects with the remote secure web service. I've hosted both applications and all of the example files for this article on GitHub.
Our task is to modify the microservice's deployment-config so that we can mount the volume using a keystore or truststore. The keystore is for back-end services, and the truststore is for clients. For two-way SSL communication, we might want to use both mechanisms. Figure 1 shows the client application configured with a truststore.

We'll go through the process to secure and deploy a REST-based web service in OpenShift 4.3. Note that these instructions work for either a new OpenShift project or an existing one. I will use the example applications that I've just introduced.
Secure and deploy a REST-based web service
To secure and deploy a REST-based web service to OpenShift 4.3, start by creating the keystore and truststore. Then add them to your project's secret (rest-keystore), as shown:
$ keytool -genkey -alias mydomain -keyalg RSA -keystore keystore.jks -keysize 2048
$ keytool -export -alias mydomain -file mydomain.crt -keystore keystore.jks
$ keytool -import -trustcacerts -alias mydomain -file mydomain.crt -keystore clientkeystore.jks
$ oc create secret generic rest-keystore --from-file=keystore.jks
Next, add the SSL configuration to your src/main/resources/application.properties file (follow the config link for more details):
server.port=8080
server.ssl.key-password=password
server.ssl.key-store=/mnt/secrets/keystore.jks
server.ssl.key-store-provider=SUN
server.ssl.key-store-type=JKS
Note: The keystore's path is server.ssl.key-store. Later, we will modify the Spring Boot microservice's deployment-config to mount a volume with this keystore.
Define the web service
Next, in src/main/resources/endpoint.xml, you will define the CXF-based JAX-RS web service. Note the inbound and outbound interceptors that are configured to log requests and responses.
Note: The operation described in HelloServiceImpl.java is invoked externally from clients.
This example microservice is initiated from SampleRestApplication. Note the annotations SpringBootApplication and ImportResource. The SpringBootApplication annotation is the same as declaring a class together with @Configuration, @EnableAutoConfiguration, and @ComponentScan annotations. The ImportResource annotation imports the bean definition from the resource's endpoint.xml.
Deploy the web service
Do the following in your OpenShift 4.3 GUI:
- Select the Developer perspective.
- Select Add -> From Catalog -> Search and look for CXF JAX-RS with Spring, shown in Figure 2. In this case, we're using S2I to deploy both the web service and client applications in OpenShift.

Search from Catalog Figure 2. Search the developer catalog for shared apps, services, and S2I image builders.

Next, do the following:
- Select the CXF JAX-RS with Spring template and click Instantiate Template.
- Set the Git Repository URL and branch it.
- Take note of the version and Service Name. The other entries will remain the same.
- Click Create at the bottom of the page, as shown in Figure 3.

- Wait a few minutes for OpenShift to create the
build-config,deployment-config, and (finally) the pods.
Note: In some cases, OpenShift might not have the templates that you need. See the Red Hat Fuse documentation to add or update a template to the latest version.
Mount a volume with the keystore
Now you will mount a volume with the keystore. To do this, add two entries to your deployment-config: volumeMounts and keystore.jks.
Adding volumeMounts to deployment-config creates the mount path. Once that's done, you can use your rest-keystore secret to add the keystore.jks entry to the mount path.
Two ways to add a keystore
There are two ways to add these entries to your deployment-config. Your first option is to edit the deployment-config file and add the entries manually, as shown in Figure 4.

Your second option is to add the rest-keystore secret to your project workload, as shown in Figure 5.
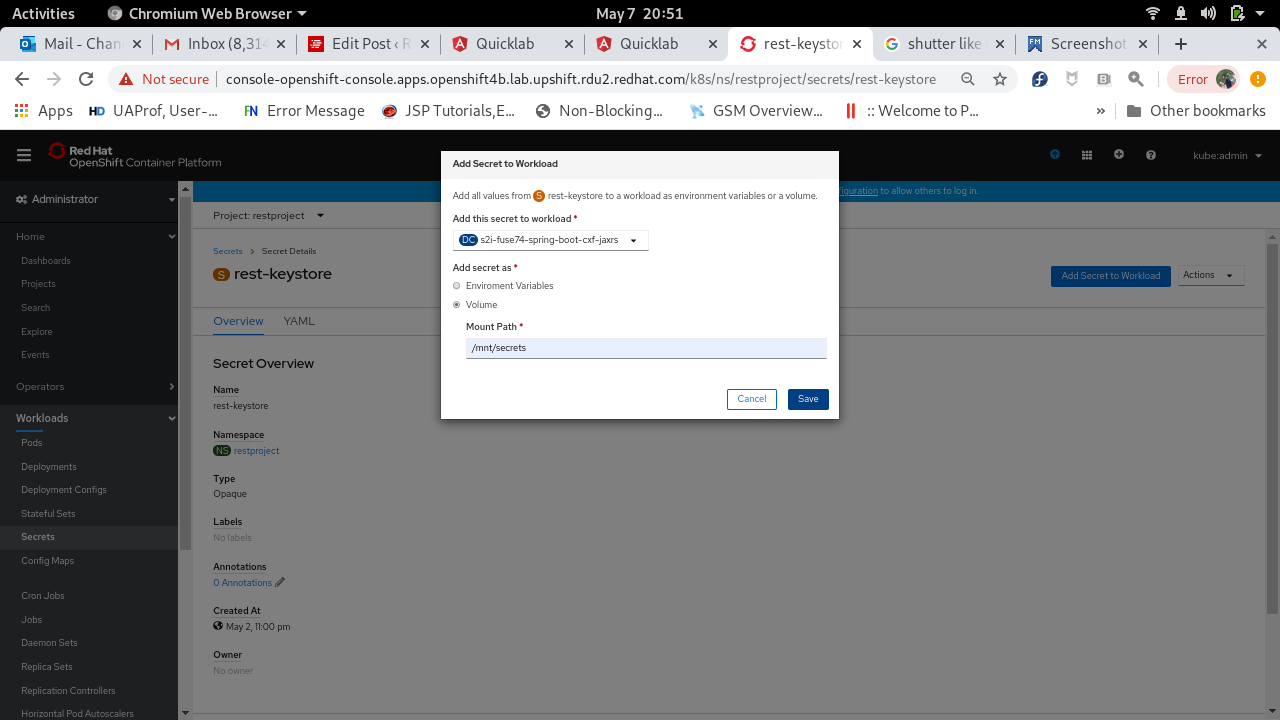
If you choose the second option, check the deployment-config after saving your work. You will find entries showing that the keystore is volume-mounted from the rest-keystore secret. You will still have to edit the configuration so that it exactly matches volumeMounts and keystore.jks. Nonetheless, I prefer using the secret because it leads to fewer typos and YAML formatting issues.
Note: I had to set the scheme as HTTPS for the readiness and liveliness probes.
Accessing the microservice
After you've completed these configurations, you should find you have a running and healthy pod:
$ oc get pods
s2i-fuse74-spring-boot-cxf-jaxrs-8-dq4zd 1/1 Running 0 3d7h
To access this microservice from an external client, you will need to create an OpenShift route with passthrough termination:
$ oc get svc
NAME TYPE CLUSTER-IP EXTERNAL-IP PORT(S) AGE
ssl-cxf-jaxrs ClusterIP None  9413/TCP 4d6h

$ oc create route passthrough --service ssl-cxf-jaxrs

$ oc get route
NAME HOST/PORT PATH SERVICES PORT TERMINATION WILDCARD
ssl-cxf-jaxrs ssl-cxf-jaxrs-restproject.apps.openshift4b.lab.upshift.rdu2.redhat.com ssl-cxf-jaxrs passthrough None
ssl-cxf-jaxrs-route ssl-cxf-jaxrs-route-restproject.apps.openshift4b.lab.upshift.rdu2.redhat.com ssl-cxf-jaxrs None
Finally, access the route ssl-cxf-jaxrs, which is a passthrough.
With that, you have configured SSL for the web service, as this output shows:
$ curl -k https://ssl-cxf-jaxrs-restproject.apps.openshift4b.lab.upshift.rdu2.redhat.com/services/helloservice/sayHello/FIS
Hello FIS, Welcome to CXF RS Spring Boot World!!!
Next, I'll quickly introduce the client application, which you can set up to connect to your one-way SSL web service application.
A client for the secure REST-based web service
My example for the client application is an Apache Camel SSL-based microservice (camel-client-ssl). I deployed the microservice in OpenShift using the same S2I approach I just demonstrated for the web service.
For this example, I've also written a special version of the web service that you can run standalone in your local laptop or a virtual machine (VM). To run the example, you just need to ensure that your OpenShift cluster is reachable from your VM or notebook. The first time you run the application, use mvn spring-boot:run from the pom.xml.
Example setup
I won't go through the entire process of configuring the client to interact with your web service. I'll just point out a few essential details.
- First, notice the
application.propertiesfor the Spring Boot-based microservice. You will use this file to define the IP and port of the service you want to connect to, and the details of the truststore. - Use the
camel-http4component with your truststore configuration andNoopHostnameVerifier, so thathostnameisn't validated. (I used a self-signed keystore and truststore.) - The client is a Camel route with an
camel-httpendpoint used for the producer or HTTP client. - For the example to work, you must deploy the client microservice using S2I. Search for Camel XML DSL with Spring Boot in your OpenShift developer catalog. Instantiate the template with the Git URL pointing to the
camel-httpendpoint. - Once you've deployed the client microservice, modify the
deployment-configas described in the previous section:- Add a
volumeMountsentry to yourdeployment-configto create the volume mount path. - Add a
keystore.jksentry to the volume-mount path. I recommend using therest-keystoresecret rather than directly modifying thedeployment-configfile.
- Add a
That's it! With these steps, you should be able to use a truststore to connect to an external SSL web service or HTTPS endpoint from your client application.
Conclusion
I have described the steps to configure a keystore for a remote web service or HTTP endpoint, and how to configure a truststore for a web service client, HTTP client, or messaging client. I hope that you will find the instructions helpful for creating microservices using certificates, or for creating an HTTP or messaging client to connect to an external HTTPS REST endpoint or message broker. I've also provided instructions for migrating and deploying an existing application to OpenShift 4.3.
Last updated: August 8, 2023