Redhat Developers  Logo
  • Products

    Featured

    • Red Hat Enterprise Linux
      Red Hat Enterprise Linux Icon
    • Red Hat OpenShift AI
      Red Hat OpenShift AI
    • Red Hat Enterprise Linux AI
      Linux icon inside of a brain
    • Image mode for Red Hat Enterprise Linux
      RHEL image mode
    • Red Hat OpenShift
      Openshift icon
    • Red Hat Ansible Automation Platform
      Ansible icon
    • Red Hat Developer Hub
      Developer Hub
    • View All Red Hat Products
    • Linux

      • Red Hat Enterprise Linux
      • Image mode for Red Hat Enterprise Linux
      • Red Hat Universal Base Images (UBI)
    • Java runtimes & frameworks

      • JBoss Enterprise Application Platform
      • Red Hat build of OpenJDK
    • Kubernetes

      • Red Hat OpenShift
      • Microsoft Azure Red Hat OpenShift
      • Red Hat OpenShift Virtualization
      • Red Hat OpenShift Lightspeed
    • Integration & App Connectivity

      • Red Hat Build of Apache Camel
      • Red Hat Service Interconnect
      • Red Hat Connectivity Link
    • AI/ML

      • Red Hat OpenShift AI
      • Red Hat Enterprise Linux AI
    • Automation

      • Red Hat Ansible Automation Platform
      • Red Hat Ansible Lightspeed
    • Developer tools

      • Red Hat Trusted Software Supply Chain
      • Podman Desktop
      • Red Hat OpenShift Dev Spaces
    • Developer Sandbox

      Developer Sandbox
      Try Red Hat products and technologies without setup or configuration fees for 30 days with this shared Openshift and Kubernetes cluster.
    • Try at no cost
  • Technologies

    Featured

    • AI/ML
      AI/ML Icon
    • Linux
      Linux Icon
    • Kubernetes
      Cloud icon
    • Automation
      Automation Icon showing arrows moving in a circle around a gear
    • View All Technologies
    • Programming Languages & Frameworks

      • Java
      • Python
      • JavaScript
    • System Design & Architecture

      • Red Hat architecture and design patterns
      • Microservices
      • Event-Driven Architecture
      • Databases
    • Developer Productivity

      • Developer productivity
      • Developer Tools
      • GitOps
    • Secure Development & Architectures

      • Security
      • Secure coding
    • Platform Engineering

      • DevOps
      • DevSecOps
      • Ansible automation for applications and services
    • Automated Data Processing

      • AI/ML
      • Data Science
      • Apache Kafka on Kubernetes
      • View All Technologies
    • Start exploring in the Developer Sandbox for free

      sandbox graphic
      Try Red Hat's products and technologies without setup or configuration.
    • Try at no cost
  • Learn

    Featured

    • Kubernetes & Cloud Native
      Openshift icon
    • Linux
      Rhel icon
    • Automation
      Ansible cloud icon
    • Java
      Java icon
    • AI/ML
      AI/ML Icon
    • View All Learning Resources

    E-Books

    • GitOps Cookbook
    • Podman in Action
    • Kubernetes Operators
    • The Path to GitOps
    • View All E-books

    Cheat Sheets

    • Linux Commands
    • Bash Commands
    • Git
    • systemd Commands
    • View All Cheat Sheets

    Documentation

    • API Catalog
    • Product Documentation
    • Legacy Documentation
    • Red Hat Learning

      Learning image
      Boost your technical skills to expert-level with the help of interactive lessons offered by various Red Hat Learning programs.
    • Explore Red Hat Learning
  • Developer Sandbox

    Developer Sandbox

    • Access Red Hat’s products and technologies without setup or configuration, and start developing quicker than ever before with our new, no-cost sandbox environments.
    • Explore Developer Sandbox

    Featured Developer Sandbox activities

    • Get started with your Developer Sandbox
    • OpenShift virtualization and application modernization using the Developer Sandbox
    • Explore all Developer Sandbox activities

    Ready to start developing apps?

    • Try at no cost
  • Blog
  • Events
  • Videos

Designing an event-driven process at scale: Part 2

February 20, 2020
Maurizio Carioli
Related topics:
Event-DrivenJava
Related products:
Developer Tools

Share:

    In the first article in this series, Designing an event-driven business process at scale: A health management example, Part 1, we began by defining the business use case and data model for a concrete example from the health management industry. We then began implementing the example in jBPM (an open source business automation suite) by creating our trigger process.

    Now, in the second article in this series, we will focus on creating the Task subprocess and its many components. In our case, these are:

    • The Expired? gate
    • The Suppressed? gate
    • The human task
    • The Reminder subprocess
    • The "What type of close?" gate
    • The Hard Close embedded subprocess
    • The Escalation subprocess

    The Task subprocess

    Now you can create the Task subprocess with the properties shown in Figure 1.

    jBPM Diagram properties section, Process subsection

    Figure 1: Create the Task subprocess.">

    The Task subprocess needs the variables shown in Figure 2 to be defined.

    jBPM Process Data section, defining process variables

    Figure 2: Define the variables for your Task subprocess.">

    Note: The type com.jbpm.document.Document of the variable sSupplementalData is available out of the box.

    Now, draw the diagram for the Task subprocess, as shown in Figure 3.

    Create your Task subprocess diagram
    Figure 3: Create your Task subprocess diagram.

    Figure 3: Create your Task subprocess diagram.">

    Once the process variables are initialized in a script task, a user task must be completed. A reminder is set for the completion of the user task and an escalation is defined. Both the reminder and the escalation are implemented with timers that lead to subprocesses that you need to implement. See below for a note concerning timers from a scalability perspective.

    Note: We implemented the task suppression requirement using a timer as well.

    The hard close requirement is realized as an embedded subprocess that is simply catching a signal. Following the requirements, the escalation occurs due to a timer on this subprocess.

    The Expired? gate

    The Expired? exclusive gate should have two branches configured using the expirationDate attribute of the Task class, as shown in Figure 4.

    jBPM diagram showing the expired gate in place

    Figure 4: Checking if the task is expired.">

    To configure the Yes branch, set up the condition expressions shown in Figure 5.

    jBPM settings for what to do if the task is expired.

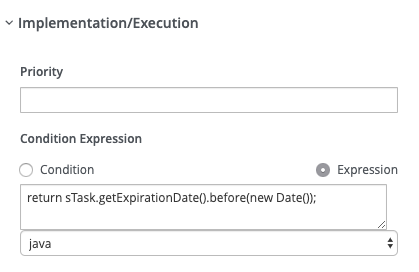
    Figure 5: Defining the behavior if your task is expired.">

    The Suppressed? gate

    The Suppressed? exclusive gate's two branches should be configured using the suppressed boolean attribute of the Task class, as shown in Figure 6.

    Defining behavior depending on whether or not your task needs to be suppressed.
    Figure 6: Defining behavior depending on whether or not your task needs to be suppressed.

    Figure 6: Defining behavior depending on whether or not your task needs to be suppressed.">

    Figure 7 shows the configuration for the Yes branch.

    jBPM configuration for suppressing a task

    Figure 7: Entering the Yes branch.">

    The suppression of the task is accomplished by a timer. The timer causes the process to wait for the period specified in the Task object's suppressionPeriod attribute, as shown in Figure 8.

    Defining the suppression timer

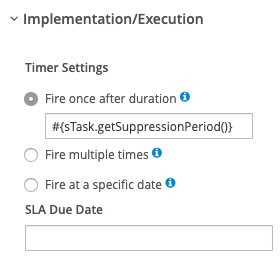
    Figure 8: Defining the suppression timer.">

    The human task

    Now, let's focus on the human task, as shown in Figure 9.

    Defining the human task.
    Figure 9: Defining the human task.

    Figure 9: Defining the human task.">

    Configure the human task using the settings shown in Figure 10.

    jBPM showing task actor setup

    Figure 10: Implementing the human (actor) task.">

    The task actor is resolved from the task actor assignment process variable.

    Next, there are a couple of abilities you will want: To capture text as well as supplemental uploaded documentation and to complete the task with a Not Applicable or Not Available response. These requirements can be satisfied by configuring the task parameters as you see in Figure 11.

    JBPM Data Outputs and Assignments section filled in for this task.

    Figure 11: Defining the task's parameters to capture the types of data you need.">

    You also need to satisfy the requirement of sending a periodic reminder to the task actor. There is a built-in notification capability in jBPM that allows sending email to notify groups and individuals to complete a task. For example, you could configure notifications for the Task activity as you see in Figure 12.

    jBPM Notification configuration for task state type not completed.
    Figure 13:
    Figure 12: Reminding your humans to complete their tasks.">

    In many cases, the built-in notification capability may be adequate. However, there are cases where one would need more control over the notification process. The advantage of using timers for this purpose allows you to design as complex a reminder process as you want. In this example, you will implement timer-based reminders.Configure the timer on the task border, which will trigger the first reminder after the period of time defined in the reminderInitiation attribute of the Task object as shown in Figure 13.

    jBPM implementing the first task reminder
    Figure 13: Triggering the first reminder.">

    The Reminder subprocess

    Now you should configure the subprocess Reminder, as shown in Figure 14. Notice that both the properties "Independent" and "Abort Parent" must be left unchecked while "Wait for Completion" is checked. If you don't configure it in this way the Reminder subprocess will not stop as it should.

    Creating the Reminder subprocess.
    Figure 14: Creating the Reminder subprocess.
    Figure 14: Creating the Reminder subprocess.">

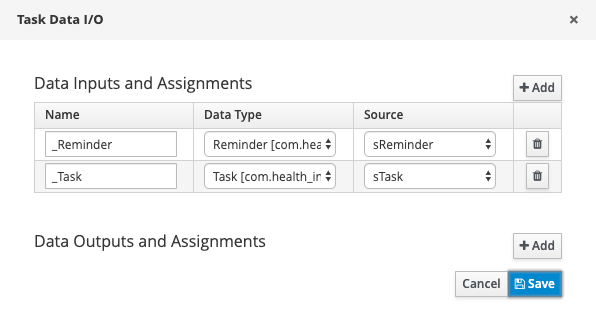
    Set the subprocess parameters to be the Reminder and Task objects, as shown in Figure 15.

    Configuring the subprocess
    Figure 15: Configuring the subprocess.">

    After completion of the task, a signal should be sent to stop the reminder subprocess, as shown in Figure 16.

    Creating the stop signal.
    Figure 16: Creating the stop signal.
    Figure 16: Creating the stop signal.">

    The "What type of close?" gate

    An exclusive gate decides if the task close state should be soft or hard. The soft close branch of the gate looks like what you see in Figure 17.

    jBPM setting up for the value SOFT
    Figure 17: Configuring the soft-close branch.">

    And the hard-close branch is shown in Figure 18.

    jBPM setting up for the value HARD.
    Figure 18: Configuring the hard-close branch.">

    The Hard Close embedded subprocess

    If the task close is hard, the process must wait for a confirmation signal coming from an external system. You have to configure this in an embedded subprocess because of the escalation requirement.

    This subprocess is simple. There is just an intermediate signal catch, as shown in Figure 19.

    jBPM catching the hard close signal.
    Figure 19: Catching the signal for a hard close.">

    You also need to implement an escalation subprocess if the task is not closed in a given time. Again, jBPM has a built-in capability to reassign a task if it is not completed in a timely fashion. For example, you could configure how to reassign the task as you see in Figure 20.

    jBPM's Reassignment section set to escalate a task that was not completed in time.
    Figure 20:
    Figure 20: Escalating (reassigning) a task that wasn't completed in a timely fashion.">

    However, you need to base the reassignment after receiving confirmation from an external system that the task was closed. Moreover, the period must be configurable as a variable, because this value depends on the specific task. Because of these reasons, you need to implement the escalation as a timer-triggered subprocess.

    A border timer determines when an escalation is needed based on the value of the escalationTimer attribute of the Task object, as shown in Figure 21.

    jBPM setting the task to fire once when it's time.
    Figure 21:
    Figure 21: Configuring the escalation border timer.">

    There is yet another way to implement SLA escalations. The ProcessEventListener interface has two methods that capture the event of an SLA violation and can be implemented with custom code specifying what to do in such an event, as you can see in this example implementation:

    /** 
     * @param event
     */
    public void beforeSLAViolated(SLAViolatedEvent event) {
        System.out.println(
               "Process <<"+
                       event.getProcessInstance().getProcessName()+
                       ">>-<"+
                       event.getProcessInstance().getId()+
                       "> ->SLA <<"+
                               event.getNodeInstance().getNodeName()+">>-<"+
                               event.getNodeInstance().getNodeId()+">-<"+
                               event.getNodeInstance().getId()+
                               "> SLA is about to be violated."
        );
    }
    
    /** 
     * @param event
     */
    public void afterSLAViolated(SLAViolatedEvent event) {
        System.out.println(
                "Process <<"+
                        event.getProcessInstance().getProcessName()+
                        ">>-<"+
                        event.getProcessInstance().getId()+
                        "> ->SLA <<"+
                                event.getNodeInstance().getNodeName()+">>-<"+
                                event.getNodeInstance().getNodeId()+">-<"+
                                event.getNodeInstance().getId()+
                                "> SLA has been violated."
        );
    }

    The Escalation subprocess

    Now, configure the Escalation subprocess, as shown in Figure 22.

    Creating the Escalation subprocess.
    Figure 22: Creating the Escalation subprocess.
    Figure 22: Creating the Escalation subprocess.">

    Then define the parameters of the subprocess. You need to pass the Task and the TaskActorAssignment objects, as you can see in Figure 23.

    Figure 23: Defining the data the Escalation subprocess uses.">

    Conclusion

    So far in this series, we have defined the business use case for our health management event-driven business process, and have created our data model, trigger process, and task subprocess with all of its components. In the next installment, we will complete our example configuration.

    Last updated: February 13, 2024

    Recent Posts

    • How Kafka improves agentic AI

    • How to use service mesh to improve AI model security

    • How to run AI models in cloud development environments

    • How Trilio secures OpenShift virtual machines and containers

    • How to implement observability with Node.js and Llama Stack

    Red Hat Developers logo LinkedIn YouTube Twitter Facebook

    Products

    • Red Hat Enterprise Linux
    • Red Hat OpenShift
    • Red Hat Ansible Automation Platform

    Build

    • Developer Sandbox
    • Developer Tools
    • Interactive Tutorials
    • API Catalog

    Quicklinks

    • Learning Resources
    • E-books
    • Cheat Sheets
    • Blog
    • Events
    • Newsletter

    Communicate

    • About us
    • Contact sales
    • Find a partner
    • Report a website issue
    • Site Status Dashboard
    • Report a security problem

    RED HAT DEVELOPER

    Build here. Go anywhere.

    We serve the builders. The problem solvers who create careers with code.

    Join us if you’re a developer, software engineer, web designer, front-end designer, UX designer, computer scientist, architect, tester, product manager, project manager or team lead.

    Sign me up

    Red Hat legal and privacy links

    • About Red Hat
    • Jobs
    • Events
    • Locations
    • Contact Red Hat
    • Red Hat Blog
    • Inclusion at Red Hat
    • Cool Stuff Store
    • Red Hat Summit

    Red Hat legal and privacy links

    • Privacy statement
    • Terms of use
    • All policies and guidelines
    • Digital accessibility

    Report a website issue