The latest bundle of Red Hat supported Spring Boot starters was recently released. In addition to supporting the popular Red Hat products for our Spring Boot customers, the Red Hat Spring Boot team was also busy creating new ones. The most recent technical preview added is a group of Eclipse Vert.x Spring Boot starters, which provide a Spring-native vocabulary for the popular JVM reactive toolkit.
Let’s quickly go through the main concepts to get everybody on the same page before looking into an example.
A reactive system as defined in the Reactive Manifesto is responsive, resilient, elastic, and message-driven. These properties guarantee easy replication, non-blocking communication with high system resources utilization and great fault tolerance. At the latest stage of software evolution, with cloud-first, low-latency, and highly data-intensive applications, reactive systems provide a great value for money.
In our newest release, we have introduced a few Spring WebFlux extensions for Vert.x. With these extensions, you can build your application the way you’re used to—using WebFlux and Project Reactor—while network communications will be handled by the Vert.x servers and clients.
Implementation of a reactive HTTP layer will get you one step closer to a fully reactive system, but don't stop there. In an ideal scenario, your whole system would be reactive. Inter-component communication, data access, cache, and other utilities should support reactive streams and back-pressure to guarantee that your application can withstand whatever is thrown its way. Vert.x provides reactive clients for all of these types of technologies, and we will gradually introduce them into our Vert.x Spring Boot starters bundle.
Let’s look at a few code examples to see how Vert.x could be used in a WebFlux application.
Message Board Example
To demonstrate Vert.x WebFlux in action, let's create a simple messaging board application. This application consists of two services: messages and dashboard.
Messages service uses a makeshift broker to publish and subscribe to new messages. These two operations are exposed via HTTP REST API as GET and POST operations. GET endpoint returns a JSON objects stream that is updated every time a new message arrives.
Dashboard service uses an HTTP client to request new messages from the messages service and displays them in a dashboard. The dashboard web page is updated live when new messages arrive.
The good news is that Vert.x Spring Boot HTTP starter doesn’t require any code changes for the majority of scenarios, as compared to a default WebFlux application. Our auto-configuration handles beans creation and registration with WebFlux SPI. Thus, the only change needed is a Maven dependency update.
Add our BOM and starter to your application’s pom.xml.
<dependencyManagement>
  <dependencies>
    <dependency>
      <groupId>me.snowdrop</groupId>
      <artifactId>spring-boot-bom</artifactId>
      <version>2.1.6.Final</version>
      <type>pom</type>
      <scope>import</scope>
    </dependency>
    <!-- Other application specific dependencies -->
  </dependencies>
</dependencyManagement>
<dependencies>
  <dependency>
    <groupId>dev.snowdrop</groupId>
    <artifactId>vertx-spring-boot-starter-http</artifactId>
  </dependency>
  <!-- Other application specific dependencies -->
</dependencies>
Message Service
There are two ways to define HTTP endpoints in a WebFlux application. Messages service uses functional endpoints, which allow a functional programming style. Dashboard, however, uses traditional Spring MVC style annotated controllers.
When working with functional endpoints, we need to define handler functions that are then invoked by a router function. First, let's implement a GET handler, which will subscribe to a broker and return a stream of messages.
private Mono<ServerResponse> getHandler(MessagesBroker broker) {
    return ok()
        .contentType(APPLICATION_STREAM_JSON)
        .body(broker.subscribe(), Message.class);
}
Then, let’s define a POST handler, which will receive new messages and publish them to the broker.
private Mono<ServerResponse> postHandler(ServerRequest request,
        MessagesBroker broker) {

    Mono<Message> messageMono = request
        .bodyToMono(Message.class)
        .doOnNext(broker::publish);
    return accepted()
        .contentType(APPLICATION_JSON)
        .body(messageMono, Message.class);
}
Finally, let’s create a router function, which will map HTTP requests to the correct handlers.
@Bean
public RouterFunction<ServerResponse> router(MessagesBroker broker) {
    return route()
        .GET("/", accept(APPLICATION_STREAM_JSON), r -> getHandler(broker))
        .POST("/", request -> postHandler(request, broker))
        .build();
}
As you can see in this code example, handlers delegate message handling to a broker component which implements the main logic of messages distribution. For this example, it is just a simple Flux generator. In a real-world scenario, however, it would be replaced by an actual message broker, such as Red Hat AMQ.
Dashboard
Dashboard implements two controllers using the Spring MVC style. The first one renders an HTML page with the message board. The second controller provides a GET endpoint, which is used by the HTML page to receive messages as server-sent events.
Here’s a controller for the index page.
@Controller
public class DashboardController {
    @GetMapping("/")
    public String home() {
        return "index";
    }
}
The messages endpoint is a little bit more complex. It injects a web client builder and creates a Vert.x WebFlux web client. It uses this client to retrieve new messages from the messages service and forwards them to the web page.
Here’s the implementation of the messages controller.
@RestController
public class MessagesController {
    private static final String MESSAGES_SERVICE_URL = "http://localhost:8081";
    private final WebClient webClient;

    public MessagesController(WebClient.Builder webClientBuilder) {
        this.webClient = webClientBuilder
            .baseUrl(MESSAGES_SERVICE_URL)
            .build();
    }

    @GetMapping(path = "/messages", produces = TEXT_EVENT_STREAM_VALUE)
    public Flux<Message> getMessages() {
        return webClient
            .get()
            .accept(APPLICATION_STREAM_JSON)
            .retrieve()
            .bodyToFlux(Message.class);
    }
}
If you start both applications and open your browser at http://localhost:8080, you would first see an empty page. Leave it open and send a few messages from your terminal. Note that our demo broker doesn’t provide persistence, so only messages received while the dashboard is open will be presented.
Post a couple of messages from your terminal.
$ http POST :8081 sender=John text="Hello, World"
$ http POST :8081 sender=John text="Hello again"
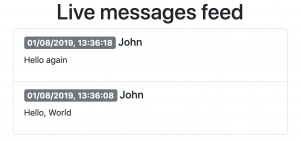
Now the dashboard should have two messages in it.

Conclusion
Please check out the Vert.x Spring Boot project at our GitHub repository. We would appreciate your input and pull requests. The latest release also includes features that are not covered in this article, such as WebSockets and mail client, so check out the samples to learn more.
In the upcoming releases, we plan to introduce AMQP 1.0 and Kafka clients to provide reactive messaging between your services.
See more
- Full example code: https://github.com/gytis/vertx-spring-boot-message-board-example
- Project repository: https://github.com/snowdrop/vertx-spring-boot
