This article explains how to configure a Python application running within an OpenShift pod to communicate with the Red Hat OpenShift cluster via openshift-restclient-python, the OpenShift Python client.
tl;dr
The code sample below is a sample application running within a pod, which connects to an OpenShift cluster and prints a list of projects:
import os
import sys
import yaml
from kubernetes import client, config
from openshift.dynamic import DynamicClient

config.load_incluster_config()
k8s_config = client.Configuration()
k8s_client = client.api_client.ApiClient(configuration=k8s_config)
dyn_client = DynamicClient(k8s_client)

v1_projects = dyn_client.resources.get(api_version="project.openshift.io/v1", kind="Project")

print(v1_projects.get())
Running locally
Using openshift-restclient-python from your laptop is relatively easy. This OpenShift dynamic client extends the standard Kubernetes Python client. The first step is to install openshift-restclient-python, which will pull in the kubernetes dependency:
$ pip install openshift
Next, we load a Kube configuration. The Kubernetes function new_client_from_config() searches for the file ~/.kube/config. The new_client_from_config() function is similar to the load_kube_config() function, but also returns an ApiClient to be used with any API object. This task allows the caller to concurrently talk with multiple clusters.
The code example below uses the OpenShift dynamic client to list every project the user can access:
#!/usr/bin/env python3

from kubernetes import client, config
from openshift.dynamic import DynamicClient

k8s_client = config.new_client_from_config()
dyn_client = DynamicClient(k8s_client)

v1_projects = dyn_client.resources.get(api_version='project.openshift.io/v1', kind='Project')

project_list = v1_projects.get()

for project in project_list.items:
    print(project.metadata.name)
Running locally after logging into OpenShift works as expected:
oc login -u user https://ocp.lab.example.com

./cmdlineclient.py
ProjectA
ProjectB
Running within Red Hat OpenShift
However, running the same code with an OpenShift pod will result in a TypeError, as shown below:
oc rsh api-gateway-dfs3
cd /opt/app-root/src/
./cmdlineclient.py

Traceback (most recent call last):
  File "./cmdlineclient.py", line 6, in <module>
    k8s_client = config.new_client_from_config()
  File "/opt/app-root/lib/python3.6/site-packages/kubernetes/config/kube_config.py", line 667, in new_client_from_config
    persist_config=persist_config)
  File "/opt/app-root/lib/python3.6/site-packages/kubernetes/config/kube_config.py", line 645, in load_kube_config
    persist_config=persist_config)
  File "/opt/app-root/lib/python3.6/site-packages/kubernetes/config/kube_config.py", line 613, in _get_kube_config_loader_for_yaml_file
    **kwargs)
  File "/opt/app-root/lib/python3.6/site-packages/kubernetes/config/kube_config.py", line 153, in __init__
    self.set_active_context(active_context)
  File "/opt/app-root/lib/python3.6/site-packages/kubernetes/config/kube_config.py", line 173, in set_active_context
    context_name = self._config['current-context']
  File "/opt/app-root/lib/python3.6/site-packages/kubernetes/config/kube_config.py", line 495, in __getitem__
    v = self.safe_get(key)
  File "/opt/app-root/lib/python3.6/site-packages/kubernetes/config/kube_config.py", line 491, in safe_get
    key in self.value):
TypeError: argument of type 'NoneType' is not iterable
Unfortunately, the current documentation provided by openshift-restclient-python is lacking. It does not explain how to connect to OpenShift or Kubernetes from within a pod.
After much searching, I found a section within the Kubernetes documentation which states that when accessing the Kube API from a pod, locating and authenticating the API server are somewhat different. They recommend using one of the official client libraries, which I was already doing. These libraries should automatically discover the API server and authenticate.
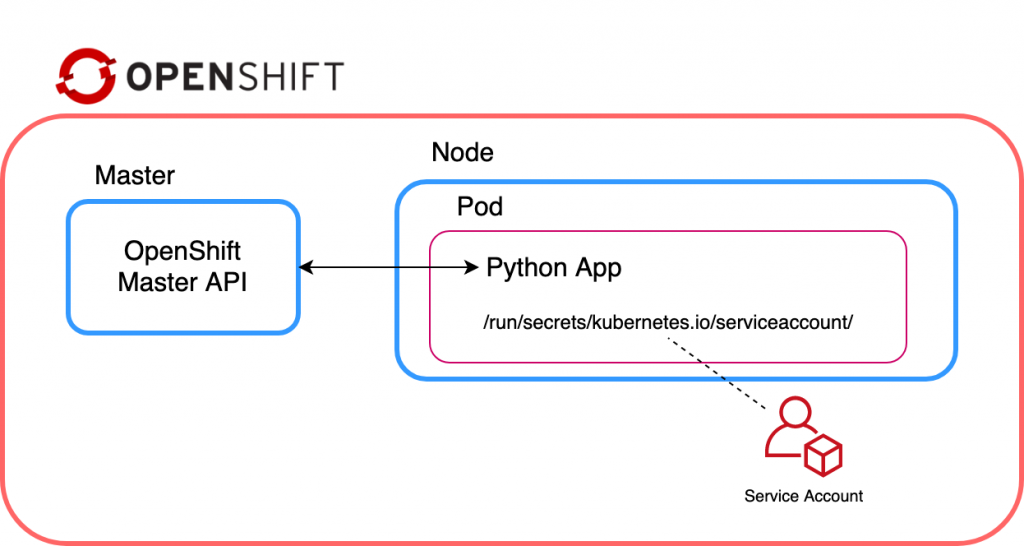
The Kubernetes config library also has the function load_incluster_config(). This function uses a combination of environment variables and a token to authenticate the API server. The recommended way to do this is to associate a pod with a service account. When the pod is started, a token for the service account is placed into the filesystem tree of each container in that pod, at /var/run/secrets/kubernetes.io/serviceaccount/token.
That all sounds simple enough. But, before updating the cmdlineclient, we need to create a service account, assign it a role, and then associate it with a pod (via a deployment config). The following instructions outline how to use the oc client to achieve this:
oc create serviceaccount robot

oc policy add-role-to-user admin -z robot

oc patch dc/api-gw --patch '{"spec":{"template":{"spec":{"serviceAccountName": "robot"}}}}'

oc rsh api-gw-9-kzrhn
(app-root) sh-4.2$ ls -al /var/run/secrets/kubernetes.io/serviceaccount/token
lrwxrwxrwx. 1 root root 12 Jul 14 06:13 /var/run/secrets/kubernetes.io/serviceaccount/token -> ..data/token
Now that we confirmed that a token is being injected within the pod, we need to update our function to use load_incluster_config(). However, remember that new_client_from_config() returns an ApiClient. We need to ensure we do this update before passing the ApiClient to the OpenShift dynamic client. Another undocumented step relates to the OpenShift dynamic client requiring a client.configuration object within the Kubernetes ApiClient object.
Lastly, we should also ensure that our code will work both within OpenShift and on our laptop. The updated cmdlineclientv2.py (below) determines if the client is running within OpenShift before calling the load_incluster_config(). It will also fall back to reading ~/.kube/config, which enables the program to run locally:
#!/usr/bin/env python3

import os
import sys

import yaml
from kubernetes import client, config
from openshift.dynamic import DynamicClient

# Check if code is running in OpenShift
if "OPENSHIFT_BUILD_NAME" in os.environ:
    config.load_incluster_config()
    file_namespace = open(
        "/run/secrets/kubernetes.io/serviceaccount/namespace", "r"
    )
    if file_namespace.mode == "r":
        namespace = file_namespace.read()
        print("namespace: %s\n" %(namespace))
else:
    config.load_kube_config()

# Create a client config
k8s_config = client.Configuration()

k8s_client = client.api_client.ApiClient(configuration=k8s_config)
dyn_client = DynamicClient(k8s_client)

v1_projects = dyn_client.resources.get(api_version="project.openshift.io/v1", kind="Project")

project_list = v1_projects.get()

for project in project_list.items:
    print("Project Name: %s" % (project.metadata.name))
When running cmdlineclientv2, notice that although we have assigned the admin role to the service account, it is only admin within the ProjectA namespace:
./cmdlineclientv2.py
namespace: ProjectA

Project Name: ProjectA
I hope you found this post helpful. Comments and questions are welcome.
Last updated: March 28, 2023