Redhat Developers  Logo
  • Products

    Featured

    • Red Hat Enterprise Linux
      Red Hat Enterprise Linux Icon
    • Red Hat OpenShift AI
      Red Hat OpenShift AI
    • Red Hat Enterprise Linux AI
      Linux icon inside of a brain
    • Image mode for Red Hat Enterprise Linux
      RHEL image mode
    • Red Hat OpenShift
      Openshift icon
    • Red Hat Ansible Automation Platform
      Ansible icon
    • Red Hat Developer Hub
      Developer Hub
    • View All Red Hat Products
    • Linux

      • Red Hat Enterprise Linux
      • Image mode for Red Hat Enterprise Linux
      • Red Hat Universal Base Images (UBI)
    • Java runtimes & frameworks

      • JBoss Enterprise Application Platform
      • Red Hat build of OpenJDK
    • Kubernetes

      • Red Hat OpenShift
      • Microsoft Azure Red Hat OpenShift
      • Red Hat OpenShift Virtualization
      • Red Hat OpenShift Lightspeed
    • Integration & App Connectivity

      • Red Hat Build of Apache Camel
      • Red Hat Service Interconnect
      • Red Hat Connectivity Link
    • AI/ML

      • Red Hat OpenShift AI
      • Red Hat Enterprise Linux AI
    • Automation

      • Red Hat Ansible Automation Platform
      • Red Hat Ansible Lightspeed
    • Developer tools

      • Red Hat Trusted Software Supply Chain
      • Podman Desktop
      • Red Hat OpenShift Dev Spaces
    • Developer Sandbox

      Developer Sandbox
      Try Red Hat products and technologies without setup or configuration fees for 30 days with this shared Openshift and Kubernetes cluster.
    • Try at no cost
  • Technologies

    Featured

    • AI/ML
      AI/ML Icon
    • Linux
      Linux Icon
    • Kubernetes
      Cloud icon
    • Automation
      Automation Icon showing arrows moving in a circle around a gear
    • View All Technologies
    • Programming Languages & Frameworks

      • Java
      • Python
      • JavaScript
    • System Design & Architecture

      • Red Hat architecture and design patterns
      • Microservices
      • Event-Driven Architecture
      • Databases
    • Developer Productivity

      • Developer productivity
      • Developer Tools
      • GitOps
    • Secure Development & Architectures

      • Security
      • Secure coding
    • Platform Engineering

      • DevOps
      • DevSecOps
      • Ansible automation for applications and services
    • Automated Data Processing

      • AI/ML
      • Data Science
      • Apache Kafka on Kubernetes
      • View All Technologies
    • Start exploring in the Developer Sandbox for free

      sandbox graphic
      Try Red Hat's products and technologies without setup or configuration.
    • Try at no cost
  • Learn

    Featured

    • Kubernetes & Cloud Native
      Openshift icon
    • Linux
      Rhel icon
    • Automation
      Ansible cloud icon
    • Java
      Java icon
    • AI/ML
      AI/ML Icon
    • View All Learning Resources

    E-Books

    • GitOps Cookbook
    • Podman in Action
    • Kubernetes Operators
    • The Path to GitOps
    • View All E-books

    Cheat Sheets

    • Linux Commands
    • Bash Commands
    • Git
    • systemd Commands
    • View All Cheat Sheets

    Documentation

    • API Catalog
    • Product Documentation
    • Legacy Documentation
    • Red Hat Learning

      Learning image
      Boost your technical skills to expert-level with the help of interactive lessons offered by various Red Hat Learning programs.
    • Explore Red Hat Learning
  • Developer Sandbox

    Developer Sandbox

    • Access Red Hat’s products and technologies without setup or configuration, and start developing quicker than ever before with our new, no-cost sandbox environments.
    • Explore Developer Sandbox

    Featured Developer Sandbox activities

    • Get started with your Developer Sandbox
    • OpenShift virtualization and application modernization using the Developer Sandbox
    • Explore all Developer Sandbox activities

    Ready to start developing apps?

    • Try at no cost
  • Blog
  • Events
  • Videos

Create your first Quarkus project with Eclipse IDE (Red Hat CodeReady Studio)

May 9, 2019
Jeff Maury
Related topics:
JavaQuarkus
Related products:
Red Hat build of Quarkus

Share:

    You've probably heard about Quarkus, the Supersonic Subatomic Java framework tailored for Kubernetes and containers. In this article, I will show how easy is it to create and set up a Quarkus project in an Eclipse IDE based environment.

    Please note that even if we use Red Hat CodeReady Studio in this article, any Eclipse IDE can be used assuming it has the tooling for Java-based development. So, you can also use the Eclipse IDE for Java Developers package or the Eclipse IDE for Enterprise Java Developers package.

    Install IDE

    If you don't already have an IDE on your workstation, you must download and install one. You can use Red Hat CodeReady Studio or one of the Java packages from the Eclipse Foundation.

    Once the IDE is installed, launch it and open a new workspace or reuse an existing workspace based on your preferences.

    Create your first Quarkus project

    Although it is possible from within the Eclipse-based IDE to create a Maven-based project using the new Maven project wizard, we will not use this path. It is based on the concept of Maven archetypes, and the Quarkus project does not provide a Maven archetype to bootstrap a new project but rather provides a Maven plugin to create a new project.

    So, we will follow the Quarkus Getting Started Guide recommendation on how to bootstrap a Quarkus project.

    Using a terminal, go into a folder where you want your first Quarkus project to be stored and type the following command:

    mvn io.quarkus:quarkus-maven-plugin:create

    You will be asked for the groupId for your project:

    Set the project groupId [org.acme.quarkus.sample]:

    Press the ENTER key to accept the default value.

    You will be asked for the artifactId for your project:

    Set the project artifactId [my-quarkus-project]:

    Press the ENTER key to accept the default value.

    You will be asked for the version for your project:

    Set the project version [1.0-SNAPSHOT]:

    Press the ENTER key to accept the default value.

    Then, you will be asked if you want to add a REST endpoint in your application.

    Do you want to create a REST resource? (y/n) [no]:

    Enter yes and press the ENTER key.

    Then, you will be asked for the class name of the REST endpoint.

    Set the resource classname [org.acme.quarkus.sample.HelloResource]:

    Press the ENTER key to accept the default value.

    Then, you will be asked for the path of the REST endpoint.

    Set the resource path [/hello]:

    Press the ENTER key to accept the default value.

    At this point, your first Quarkus project has been created on your local workstation, let's import it into our IDE.

    Import the first Quarkus project into IDE

    From the IDE main window, open the File -> Import -> Existing Maven Projects menu:

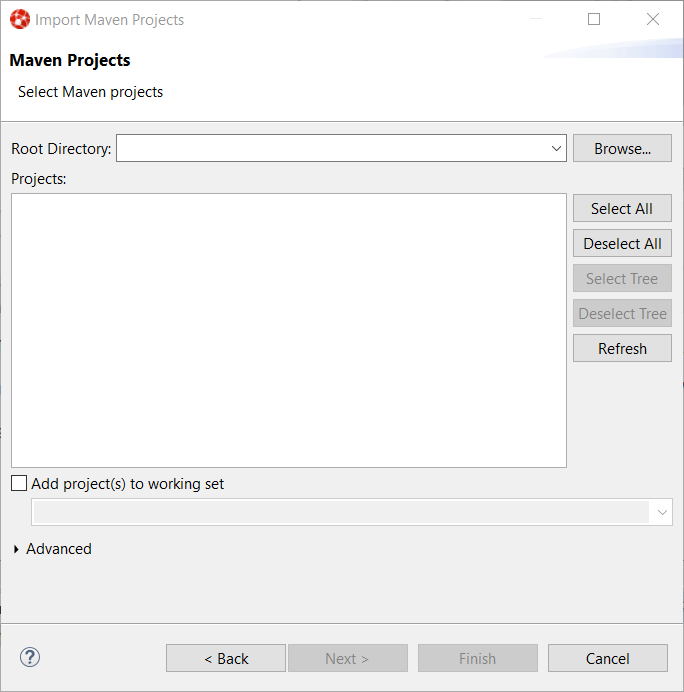
    Using the Browse button, select the folder where your first Quarkus project has been generated:

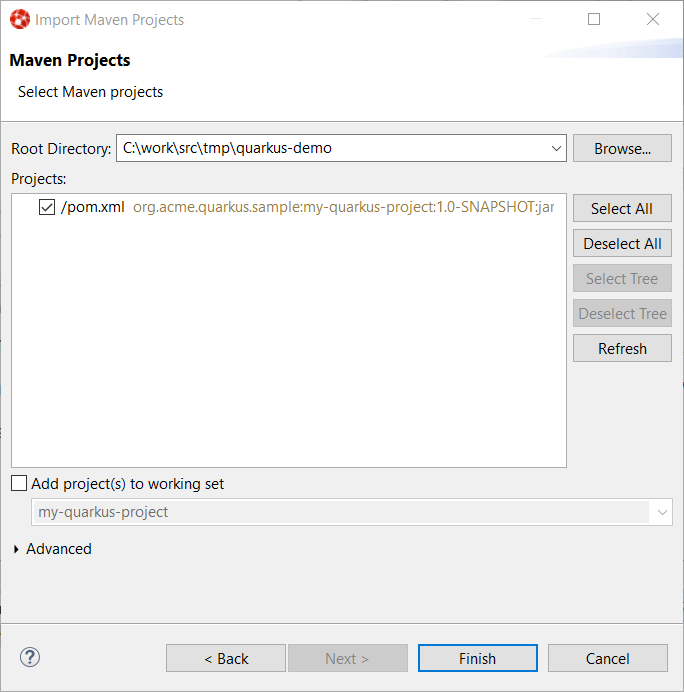
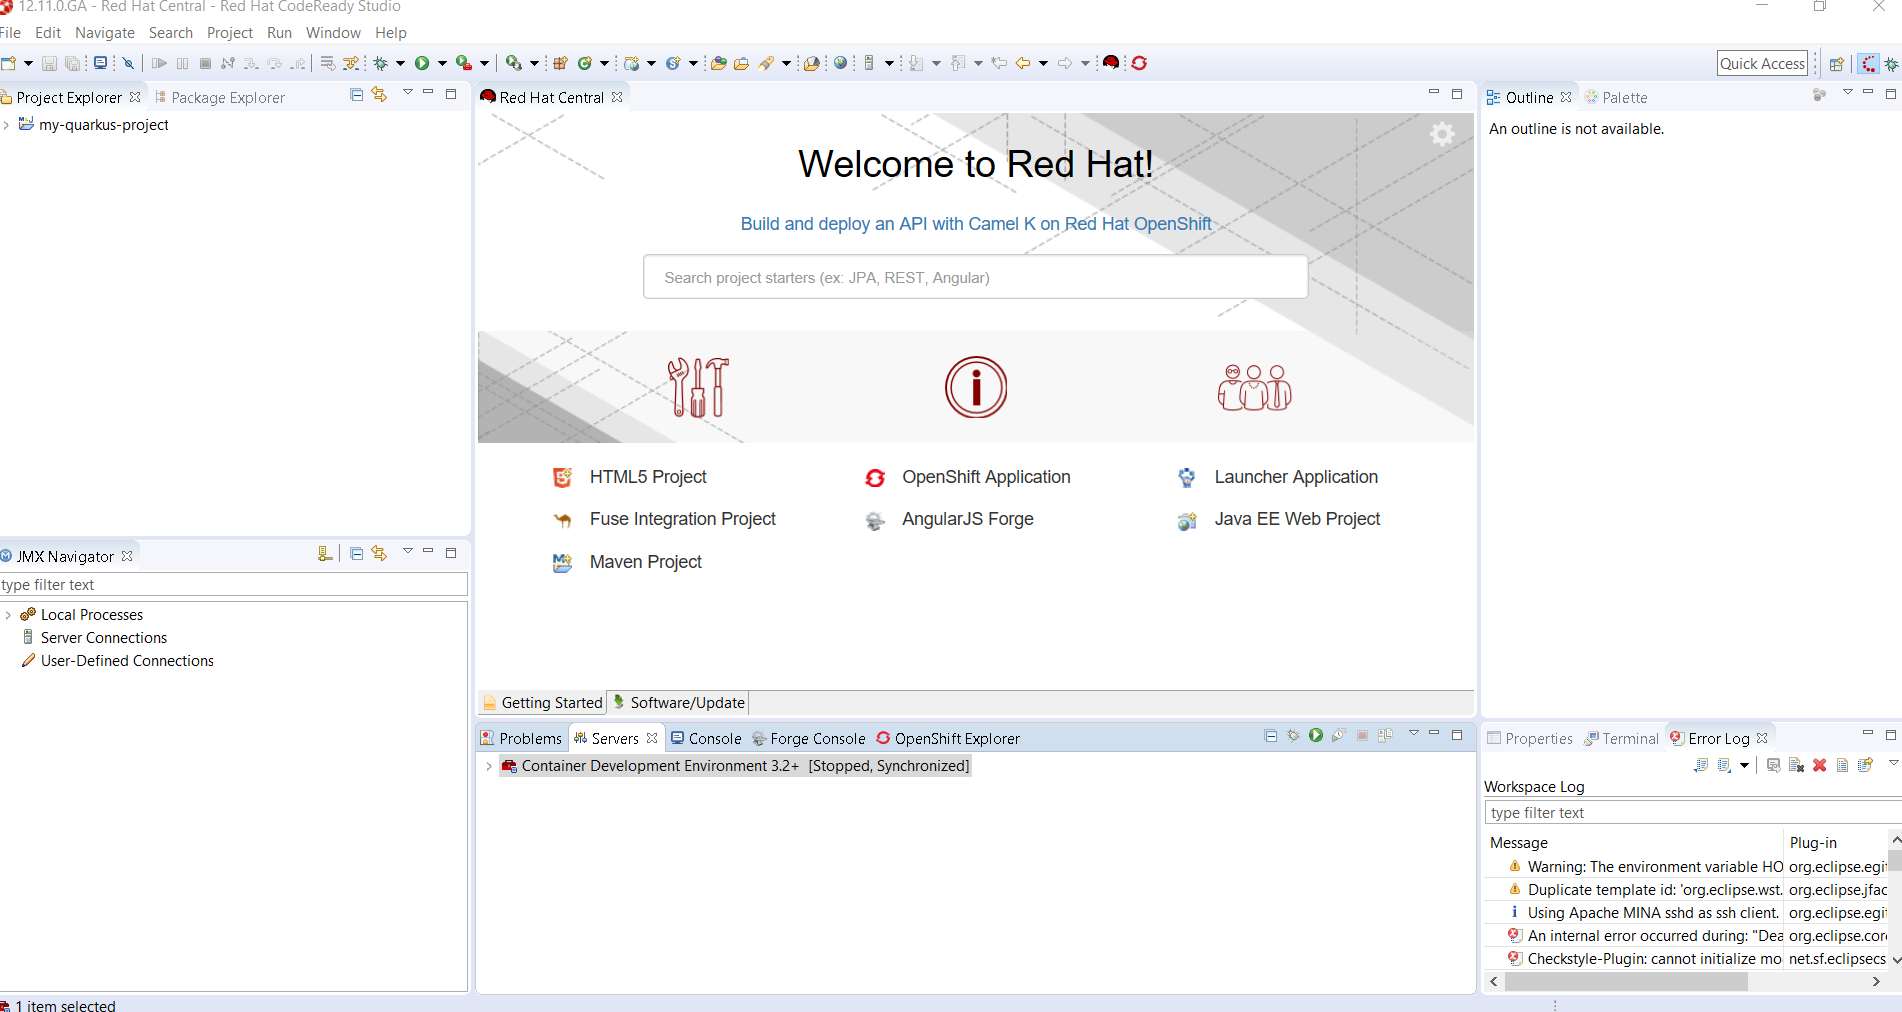
    Press the Finish button, you should now see a new project in the Project Explorer window (please note that it may take a while, as Maven will download some Quarkus dependencies if this is the first time you have built a Quarkus project on your workstation):

    Launch your first Quarkus application

    From the Project Explorer window, select your Quarkus project (my-quarkus-project), right-click the Run As -> Maven build... menu:

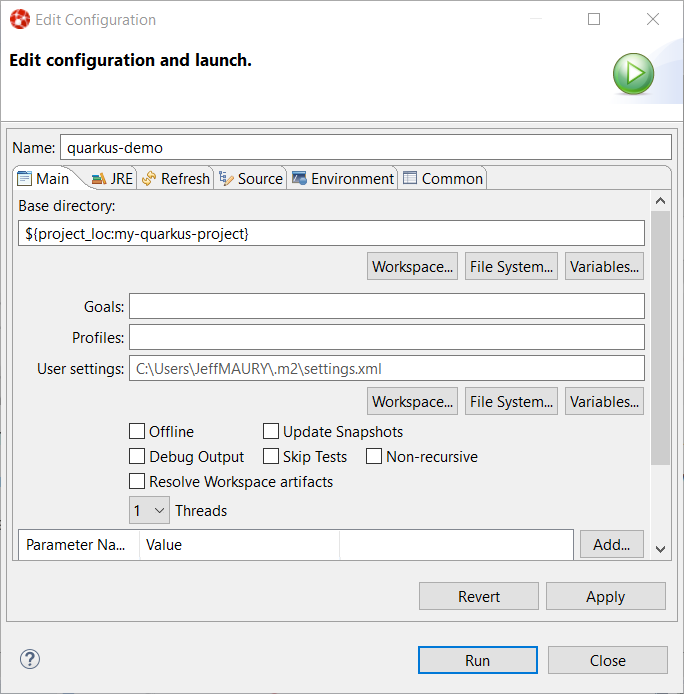
    In the Goals field, enter compile quarkus:dev:

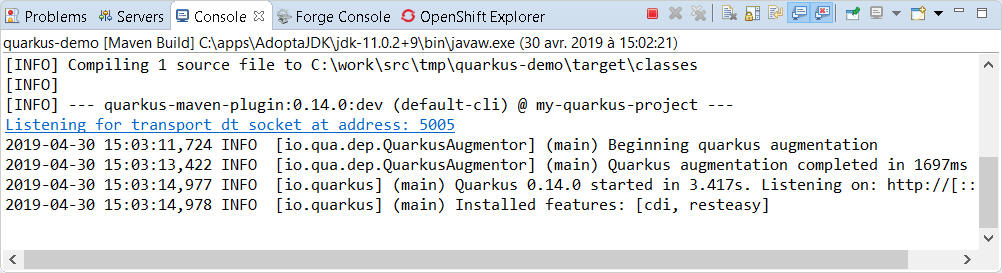
    Press the Run button. Your Quarkus application will start, and you should see the following output in the Console window:

    At this point, your Quarkus application is started, and you should be able to access it from the following URL: http://localhost:8080/hello

    Debug your first Quarkus application

    Although Quarkus has nice hot reload capabilities for developers, debugging is a key tool. Let's see how to set up debugging on our Quarkus application and then start a debugging session.

    As you have probably noticed, we started the Quarkus application with the dev mode, which means that any changes in the application source code will be hot reloaded the next time your Quarkus application will process a request.

    Another nice thing about the dev feature from Quarkus is that the Java virtual machine that is running the Quarkus application has been launched in debug mode. So, to debug our Quarkus application, we only need to connect a debugger.

    If you're familiar with the Java development tools in Eclipse, you know that you can easily launch a Java debugger against a running JVM that has been started in debug mode, assuming you know the debug port the JVM is listening on.

    If you looked at your Quarkus application output, you noticed the following message:

    This is the message generated by the JVM when running in debug mode, and it gives us the information that the port used is 5005.

    Now you can create a remote Java debugger. Even better, because the message has been recognized by the Eclipse Java development tools, you just need to click on the list associated with the message and Eclipse will magically create a remote Java debugger and connect it to your Quarkus application!

    After clicking on the hyperlink, you will see nothing because the remote Java debugger has been launched in the background and it connected to your Quarkus application. However, you can check it if you switch to the Debug perspective. To do that, open the Window -> Perspective -> Open Perspective -> Debug menu and select the Debug view. You should see something similar to:

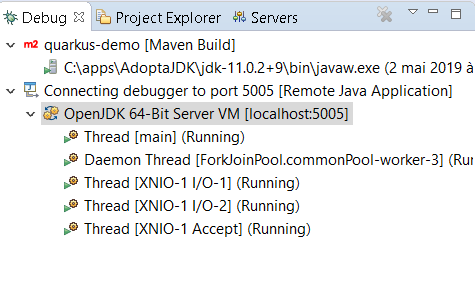
    As you can see, the debugger is connected to the Quarkus application. That means you can add breakpoints in your application source code and, next time you send a request, the Quarkus JVM will stop and the Eclipse IDE will step to the code in which you set a breakpoint.

    Last updated: February 11, 2024

    Recent Posts

    • More Essential AI tutorials for Node.js Developers

    • How to run a fraud detection AI model on RHEL CVMs

    • How we use software provenance at Red Hat

    • Alternatives to creating bootc images from scratch

    • How to update OpenStack Services on OpenShift

    Red Hat Developers logo LinkedIn YouTube Twitter Facebook

    Products

    • Red Hat Enterprise Linux
    • Red Hat OpenShift
    • Red Hat Ansible Automation Platform

    Build

    • Developer Sandbox
    • Developer Tools
    • Interactive Tutorials
    • API Catalog

    Quicklinks

    • Learning Resources
    • E-books
    • Cheat Sheets
    • Blog
    • Events
    • Newsletter

    Communicate

    • About us
    • Contact sales
    • Find a partner
    • Report a website issue
    • Site Status Dashboard
    • Report a security problem

    RED HAT DEVELOPER

    Build here. Go anywhere.

    We serve the builders. The problem solvers who create careers with code.

    Join us if you’re a developer, software engineer, web designer, front-end designer, UX designer, computer scientist, architect, tester, product manager, project manager or team lead.

    Sign me up

    Red Hat legal and privacy links

    • About Red Hat
    • Jobs
    • Events
    • Locations
    • Contact Red Hat
    • Red Hat Blog
    • Inclusion at Red Hat
    • Cool Stuff Store
    • Red Hat Summit

    Red Hat legal and privacy links

    • Privacy statement
    • Terms of use
    • All policies and guidelines
    • Digital accessibility

    Report a website issue