Need to lock down your Docker registry? Keycloak has you covered.
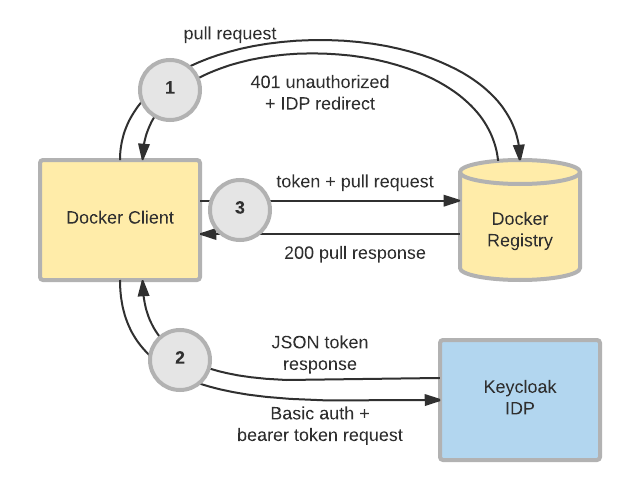
As of version 3.2.0, Keycloak has the ability to act as an "authorization service" for Docker authentication. This means that the Keycloak IDP server can perform identity validation and token issuance when a Docker registry requires authentication. Administrators may now leverage the same user base, audit controls, and configuration mechanisms in Keycloak to extend their SSO ecosystem past OpenID Connect and SAML to cover Docker registries. The chart below illustrates how this flow works:
This article will walk through how to set up a local Keycloak IDP and Docker registry to demonstrate the Docker authentication capability. Note that the configuration used in this tutorial is for demonstration purposes only, and should never be run in a production environment. Also, be advised that Docker authentication remains a community-supported feature. It is not covered by a support subscription.
Configure the Keycloak Client and a Docker Registry
Begin by spinning up a Keycloak instance. Note that the docker feature must be explicitly enabled:
docker run -p 8080:8080 -e KEYCLOAK_USER=admin -e KEYCLOAK_PASSWORD=password jboss/keycloak -Dkeycloak.profile.feature.docker=enabled -b 0.0.0.0
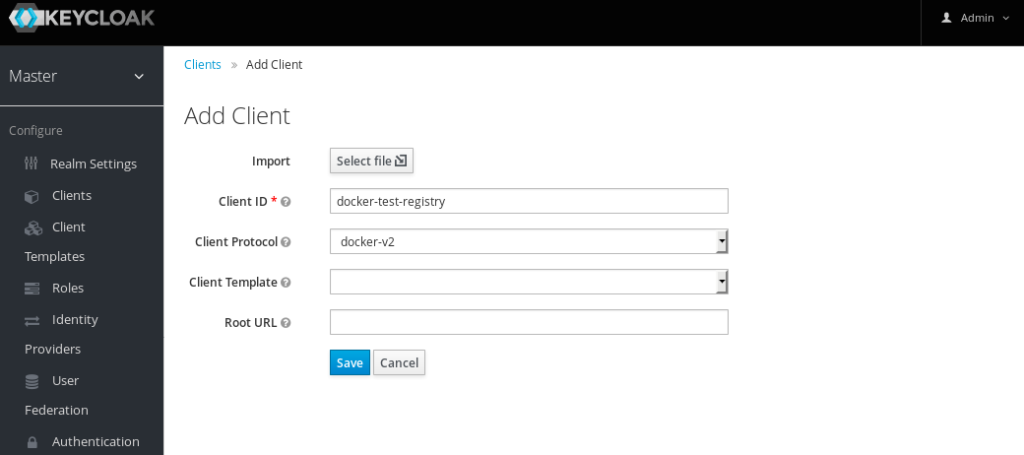
Once the container boots up, open your web browser and head to the Keycloak admin console. For the sake of this demonstration, we're going to use the master realm. However, in most real-world use cases, Docker registries will be configured against the primary realm or realms. Create a client for a Docker registry with the following steps. Don't worry about having a registry container or server handy yet; we'll get to that part in a bit.
- Browse to the admin console at http://localhost:8080/auth/admin/master/console/and login with the credentials specified in the above command.
- Choose Clients from the menu on the left side, and click the Create button.
- Enter a meaningful name for ClientID, choose docker-v2 as the Client Protocol, and click Save.
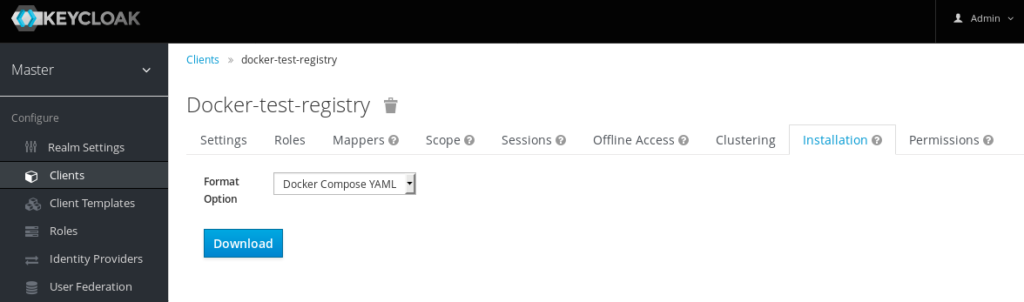
A message will pop up indicating that the client was successfully created. At this point, the IDP is ready to interact with a Docker registry, so let's spin one up. Thankfully, Docker Compose can automate the process of creating and configuring a Docker registry to interact with our IDP.
- Navigate to the Installation tab
- Choose Docker Compose YAML as the Format Option
- Click Download.
Save the .zip to the desired location, and then unzip the archive. After unzipping, the resulting directory should look like this:
keycloak-docker-compose-yaml
├── certs
│   ├── localhost.crt
│   ├── localhost.key
│   └── localhost_trust_chain.pem
├── data
├── docker-compose.yaml
└── README.md
From the keycloak-docker-compose-yaml directory, simply execute the following command to spin up a local registry:
docker-compose up
Test Authentication
Now that both the Keycloak IDP and the Docker registry have been configured and stood up locally, we can demonstrate authentication using the local Docker client. First, validate that the registry is protected by authentication:
# docker pull localhost:5000/busybox
Using default tag: latest
Error response from daemon: Get https://localhost:5000/v2/busybox/manifests/latest: unauthorized: Invalid username or password.
Note that the pull was unsuccessful because our client has not been authorized to access the registry. Now, log in with the same credentials previously used to gain access to the Keycloak console and observe a different message:
# docker login -u admin localhost:5000
Password:
Login Succeeded

# docker pull localhost:5000/busybox
Using default tag: latest
Error response from daemon: manifest for localhost:5000/busybox:latest not found
Observe that a new error message is presented - namely that the manifest could not be found. This is due to the container and data volume start with an empty registry. Simply tagging and uploading an image will resolve this error message:
# docker pull busybox
Using default tag: latest
latest: Pulling from library/busybox
03b1be98f3f9: Pull complete
Digest: sha256:3e8fa85ddfef1af9ca85a5cfb714148956984e02f00bec3f7f49d3925a91e0e7
Status: Downloaded newer image for busybox:latest

# docker tag busybox:latest localhost:5000/busybox:latest

# docker push localhost:5000/busybox:latest
The push refers to a repository [localhost:5000/busybox]
6a749002dd6a: Pushed
latest: digest: sha256:030fcb92e1487b18c974784dcc110a93147c9fc402188370fbfd17efabffc6af size: 527

# docker pull localhost:5000/busybox
Using default tag: latest
latest: Pulling from busybox
Digest: sha256:030fcb92e1487b18c974784dcc110a93147c9fc402188370fbfd17efabffc6af
Status: Image is up to date for localhost:5000/busybox:latest
The docker client can now perform operations against the registry, as it has authenticated against the Keycloak IDP Server.
For more information on how to use Keycloak with Docker, see the relevant sections in the server administration guide and the securing applications guide.
Whether you are new to Containers or have experience, downloading this cheat sheet can assist you when encountering tasks you haven’t done lately.
Last updated: October 26, 2017