This tutorial is designed for developers and who are managing cloud-native applications on Red Hat OpenShift. If you're looking to enhance data availability and resilience across multiple clusters, this guide will walk you through the process of setting up S3-compatible multi-cluster replication using OpenShift Data Foundation's NooBaa. By following these steps, you'll be able to ensure data is replicated across clusters, improving redundancy and fault tolerance in your infrastructure.
Red Hat OpenShift Data Foundation is a comprehensive storage solution that integrates with OpenShift to provide persistent storage for containerized applications. It supports a variety of storage types, including block, file, and object storage, and is designed to be highly scalable and resilient. OpenShift Data Foundation simplifies storage management, automates data protection, and enables multi-cloud and hybrid cloud deployments.
This article outlines the procedure to implement a solution based on replication between NooBaa buckets deployed on two OpenShift clusters.
Figure 1 illustrates the involved resources, there are 2 OpenShift clusters, the s3 resources to be created, and the sync functionality between the buckets:
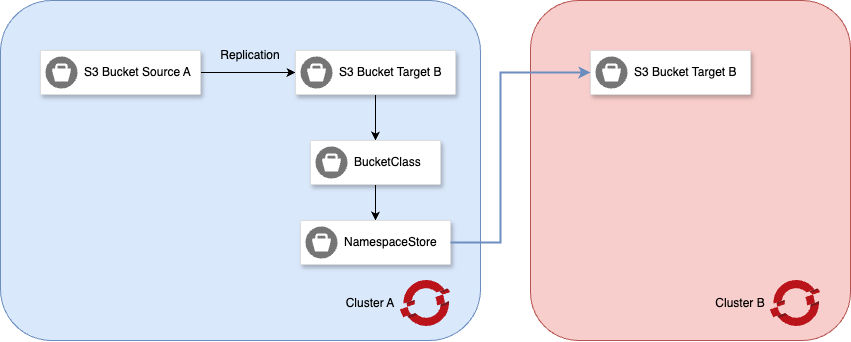
This implementation provides a bucket, referred to as Bucket Source A in the diagram, where data can be both read and written. Data written to Bucket A, through BucketClass and NamespaceStore objects, is replicated to two Bucket Bs (present on both Cluster A and Cluster B). All buckets and their respective data are accessible from both Cluster A and Cluster B.
It's important to note the following limitations of the solution:
- Replication is unidirectional: Data written to Bucket Source A is replicated to Bucket Target B, but not vice versa.
- Replication is asynchronous: Data replication from Bucket Source A to Bucket Target B is not synchronous and takes time.
- Replication only involves data writing, not deletion. Syncing delete operations will be available only with OpenShift version 4.14.
Also, before activating sync, the Target Bucket B created on Cluster B should not contain data.
The following sequence of activities needs to be performed:
- Create Bucket Target B on Cluster B
- Create NamespaceStore on Cluster A
- Create BucketClass on Cluster A
- Create Bucket Target B on Cluster A
- Create Bucket Source A on Cluster A
Step 1: Create Bucket Target B on Cluster B
Firs, proceed to create the NooBaa bucket referred to in the diagram as Bucket Target B on Cluster B. The resource to create is of type ObjectBucketClaim, and you can use the following manifest, suitably populated:
apiVersion: objectbucket.io/v1alpha1
kind: ObjectBucketClaim
metadata:
  name: <BUCKET_NAME>
  namespace: <NAMESPACE>
  labels:
    app: noobaa
spec:
  additionalConfig:
    bucketclass: noobaa-default-bucket-class
  generateBucketName: <PREFIX>
  storageClassName: storage-object
The fields in the manifest that need to be filled are:
name: Enter the desired name for the resource.namespace:ObjectBucketClaimis a namespaced resource, so indicate the namespace name where it will be created.generateBucketName: ThebucketNameassigned to the Bucket is generated using the prefix in this field.
Verify that the bucket has been created by executing the following command:
oc get obc -n <namespace>Check which bucketName has been assigned to the bucket by running the following command:
oc get obc -n <namespace> -o yamlMake a note of the bucketName, which will be used in the next activity. A Secret is automatically generated within the namespace where the Bucket was created. The Secret contains access credentials to the bucket (encoded in base64). These credentials will be used in the next activity.
Step 2: Create NamespaceStore on Cluster A
Proceed to create a NamespaceStore on Cluster A. The NamespaceStore is an object that only contains a reference to another bucket. The NamespaceStore points to the bucket created in the previous activity, identified by the bucketName.
The NamespaceStore requires the creation of a secret, which can be generated using a manifest like the one shown below:
apiVersion: v1
data:
  AWS_ACCESS_KEY_ID: <>
  AWS_SECRET_ACCESS_KEY: <>
kind: Secret
metadata:
  name: <>
  namespace: openshift-storage
type: Opaque
The fields in the manifest that need to be filled are:
AWS_ACCESS_KEY_ID: Copy theAWS_ACCESS_KEY_IDstring from the Secret present in the Namespace where the bucket was created (see previous activity).AWS_SECRET_ACCESS_KEY: Copy theAWS_SECRET_ACCESS_KEYstring from the Secret present in the Namespace where the bucket was created (see previous activity).name: Enter the desired name for the Secret.
For the creation of the NamespaceStore, you can use the OpenShift graphical interface or the following example manifest:
apiVersion: noobaa.io/v1alpha1
kind: NamespaceStore
metadata:
  name: <NAMESPACESTORE_NAME>
  namespace: openshift-storage
  labels:
    app: noobaa
spec:
  s3Compatible:
    endpoint: 'https://s3-openshift-storage.apps.<FQDN_CLUSTER_CLUSTER_B>'
    secret:
      name: <SECRET_NAME>
      namespace: openshift-storage
    targetBucket: <TARGETBUCKET_NAME>
  type: s3-compatible
The fields in the Manifest that need to be filled are:
name: Enter the desired name for the resource.endpoint: Enter the Endpoint of Cluster B. The Endpoint always has the formathttps://s3-openshift-storage.apps.<FQDN_CLUSTER>name(secret): Enter the name of the Secret.targetBucket: Enter the reference to the bucket created in the previous activity. The bucket is identified by thebucketName.
Step 3: Create BucketClass on Cluster A with a reference to the NamespaceStore
Proceed to create the BucketClass on Cluster A. The BucketClass contains a reference to the NamespaceStore created in the previous activity. The Policy set in the BucketClass is single.
Creation of this resource requires approval from the exercise team as it requires the cluster-admin role.
For the creation of the BucketClass, you can use the OpenShift graphical interface or the following example manifest:
apiVersion: noobaa.io/v1alpha1
kind: BucketClass
metadata:
  name: <BUCKETCLASS_NAME>
  namespace: openshift-storage
  labels:
    app: noobaa
spec:
  namespacePolicy:
    single:
      resource: <NAMESPACESTORE_NAME>
    type: Single
The fields in the manifest that need to be filled are:
name: Enter the desired name for the resource.resource: Enter the name of theNamespaceStorecreated in the previous activity.
Step 4: Create Bucket Target B on Cluster A
Proceed to create the Bucket Target B on Cluster A.
For the creation of the bucket, you can use the following manifest:
apiVersion: objectbucket.io/v1alpha1
kind: ObjectBucketClaim
metadata:
  name: <BUCKET_NAME>
  namespace: <NAMESPACE>
  labels:
    app: noobaa
spec:
  additionalConfig:
    bucketclass: <BUCKETCLASS_NAME>
  bucketName: ''
  generateBucketName: <PREFIX>
  storageClassName: storage-object
The fields in the manifest that need to be filled are:
name: Enter the desired name for the resource.namespace:ObjectBucketClaimis a namespaced resource, so indicate the name of the namespace where it will be created.bucketclass: It's important to note that thebucketclassto be inserted is the one created in the previous activity.generateBucketName: ThebucketNameassigned to the bucket is generated using the prefix in this field.
Step 5: Create Bucket Source A on Cluster A
Proceed to create Bucket Source A on Cluster A. Inside the bucket, a replicationPolicy and a reference to Bucket Target B present on the same cluster will be configured.
For the creation of the bucket, you can use the following manifest:
apiVersion: objectbucket.io/v1alpha1
kind: ObjectBucketClaim
metadata:
  name: <BUCKET_NAME>
  namespace: <NAMESPACE>
  labels:
    app: noobaa
spec:
  additionalConfig:
    bucketclass: noobaa-default-bucket-class
    replicationPolicy: |
      {
        "rules": [
          {"rule_id":"rule-1", "destination_bucket":"<BUCKETNAME>" }
        ]
      }
  generateBucketName: <PREFIX>
  storageClassName: storage-object
The fields in the manifest that need to be filled are:
name: Enter the desired name for the resource.namespace:ObjectBucketClaimis a namespaced resource, so indicate the name of the Namespace where it will be created.replicationPolicy: Inside thereplicationPolicy, it's necessary to specify thebucketNamerelated to Bucket Target B, created in the previous activity.
In case you want to sync also for delete operations, you have to add the "sync_deletions": true flag to replicationPolicy, available only OCP 4.14:
apiVersion: objectbucket.io/v1alpha1
kind: ObjectBucketClaim
metadata:
  name: <BUCKET_NAME>
  namespace: <NAMESPACE>
  labels:
    app: noobaa
spec:
  additionalConfig:
    bucketclass: noobaa-default-bucket-class
    replicationPolicy: |
      {
        "rules": [
          {"rule_id":"rule-1", "sync_deletions": true, "destination_bucket":"<BUCKETNAME>" }
        ]
      }
  generateBucketName: <PREFIX>
  storageClassName: storage-object
Step 6: Enabling bidirectional replication (optional)
Figure 2 represents the bi-directional sync flow of two buckets, placed on two different clusters:

If bidirectional replication is required, enabling reverse operations can achieve this.
Steps:
- Create a
NamespaceStoreon Cluster B pointing to Bucket Source A on Cluster A. - Create a
BucketClasson Cluster B with a reference to theNamespaceStorecreated in step 1. - Create a bucket with replication rule on Cluster B utilizing the BucketClass from step 2.
Once these steps are completed, data written to Bucket Source A on Cluster A will be replicated to Bucket Target B on Cluster B, and data written to Bucket Target B on Cluster B will be replicated back to Bucket Source A on Cluster A. This establishes bidirectional data replication between the clusters.