When users have to choose a middleware technology to communicate different software components, they often pick Robot Operating System 2 (ROS 2) due to its features like efficiency and reliability. These components can be deployed locally (i.e., same host, or remotely, different hosts), and they communicate by following a service-oriented pattern.
For example, a software component that reads data from a sensor would publish the sensor values whereas another software component that processes that data would subscribe to it. ROS 2 takes care of sending the data between the components and ensures that data arrives on time. ROS 2 relies on a DDS as its middleware, which is a specification that is implemented by different vendors, e.g., Eclipse Cyclone DDS, OpenDDS. DDS is used in a wide variety of systems, including air-traffic control, jet engine testing, railway control, medical systems, naval command-and-control, smart greenhouses, and much more. However, when using a DDS to communicate software components that are deployed in virtual machines (VMs), the latency can vary in unpredictable ways, thus making the communication unreliable.
In this article, we demonstrate the real time capabilities of virtual machines under CentOS Stream 9 for the Cyclone DDS. We present how to set up two CentOS Stream 9 guests on top of CentOS Stream 9 host to communicate over Eclipse Cyclone DDS with low latency.
How to benchmark latency
To benchmark the Cyclone DDS, we have chosen the latency-test benchmark that is based on the ddspeft tool. The measuring of latency requires two instances of the ddsperf tool, one in each host/guest. The first instance is the sender that sends a given amount of data at a given rate. The second is the receiver that sends back the same amount of data to the sender in a ping-pong scenario. The sending action is triggered by the ping option. The receiving behavior is triggered by the pong action. The sender measures the round-trip time and computes the latency as half of the round-trip time. For a given payload, the benchmark executes several round trips and then gets the median and the maximum latency among other parameters. The benchmark is launched by running the following command line:
./latency-test -i enp1s0 -I enp1s0 root@guest-1
Benchmarked configurations
We have launched the benchmark in two different setups. The first is by running the benchmark between two physical hosts. This can be seen as a base reference to compare with the virtualized system. The second is by running the benchmark between two VMs in the same host. In the following examples, we detail each setup.
Host-to-host
For the host-to-host communication, we set up each host with a RT kernel, i.e., 5.14.0-410.el9.x86_64+rt and 5.14.0-407.el9.x86_64+rt (CentOS Stream 9). To install an RT kernel, we use dnf:
dnf install kernel-rt-kvm
We isolate two cores to run the benchmark. To do this, we use the realtime-virtual-host profile. Note that the isolated cores shall belong to the same NUMA node. To do this, we first edit /etc/tuned/realtime-virtual-host-variables.conf to define the isolated cores, and then we activate the profile:
tuned-adm profile realtime-virtual-host
The launching of the benchmark is done by using the taskset command that allows to set up the affinity to a group of cores. At the end of the benchmark, the following graph is displayed, as shown in Figure 1.
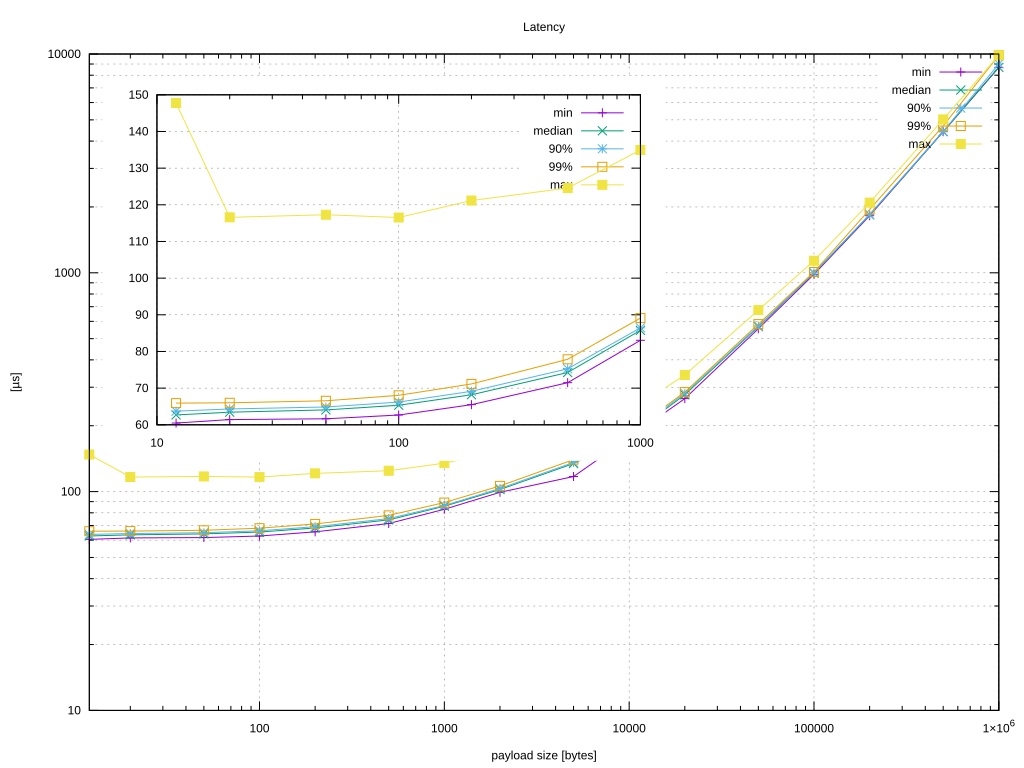
In yellow, Figure 1 shows the maximum latency with different payloads. We can see that the latency generally increases with the payload but the increase gets more pronounced when payload gets bigger than MTU (i.e., 1500 bytes).
Guest-to-guest
For guest-to-guest communication, we have built two CentOS Stream 9 guests and we have set up a RT kernel for each guest. To install a RT kernel, you can simply run the following command after the first boot of the guest:
dnf install kernel-rt
The host also is a KVM/RT kernel (we have set up this host in the previous configuration). For each of the guests, we isolate three cores to run the vCPUs and one extra core for the kthread that handles the virtio-net network card. This deployment thus requires four isolated cores in the host for each guest. To isolate these cores on the host, we rely on the realtime-virtual-host profile as we did for the host-to-host configuration. Note that the cores that are assigned for a VM shall belong to the same NUMA node. For each guest, we set the affinity for the vCPUs and the kthread by using virsh. Also, we have disabled the Virtio memory balloon device. To do this, we use the virsh edit [nameoftheguest] command to edit the guest configuration and set the affinity. For example, in our case, each guest configuration would look like the following:
<vcpu placement='static'>3</vcpu>
<cputune>
  <vcpupin vcpu='0' cpuset='25'/>
  <vcpupin vcpu='1' cpuset='27'/>
  <vcpupin vcpu='2' cpuset='29'/>
  <emulatorpin cpuset='33'/>
  <vcpusched vcpus='0' scheduler='fifo' priority='1'/>
  <vcpusched vcpus='1' scheduler='fifo' priority='1'/>
  <vcpusched vcpus='2' scheduler='fifo' priority='1'/>
</cputune>
Note that the cpuset parameter would depend on the guest and indicates to which CPU in the host the vCPU is pinned.
In the guests, we use one vCPU for housekeeping and the other two vCPUs to run the benchmark. To set up this configuration, we activate the realtime-virtual-guest profile in each guest. To do this, we edit /etc/tuned/realtime-virtual-guest-variables.conf and then we apply the profile:
tuned-adm profile realtime-virtual-guest
Also, we set up the affinity of virtio-net IRQs to the cores that run the benchmark. This is important, because otherwise the kernel might decide to use IPI to handle the IRQs by a different core. Also, the housekeeping vCPU may become very busy if it handles all the IRQs thus interfering with one another. For example, if the virtio-net input IRQ is the 54, then, we can set the affinity to the 1 and 2 vCPUs by running:
echo 06 > /proc/irq/54/smp_affinity
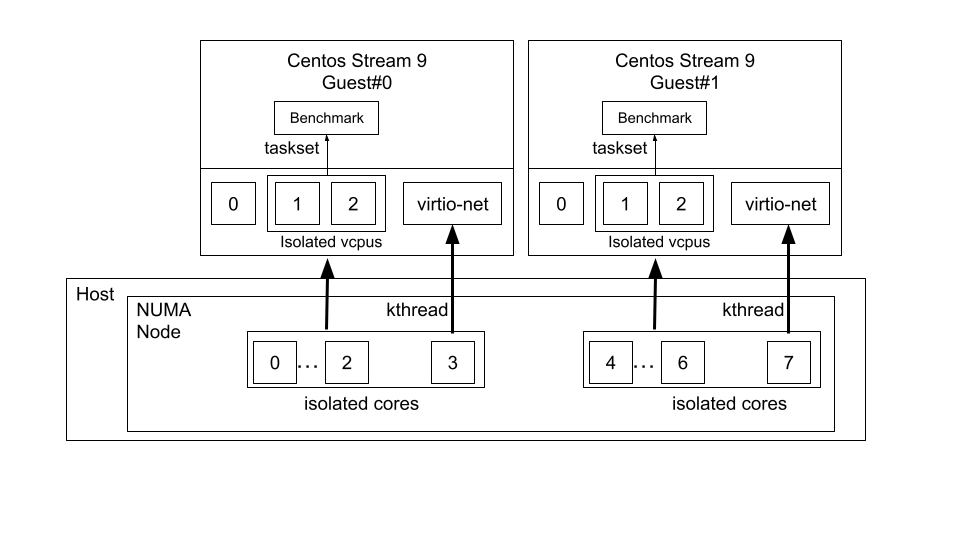
The benchmark runs in the guest by using the taskset on the isolated cores. Figure 2 illustrates the overall configuration of the host and the guests regarding affinity and isolation.
For networking between the guests, we let virsh use the default bridge and we choose vhost-net for each guest.
The graph in Figure 3 is when running the benchmark without any affinity configuration.
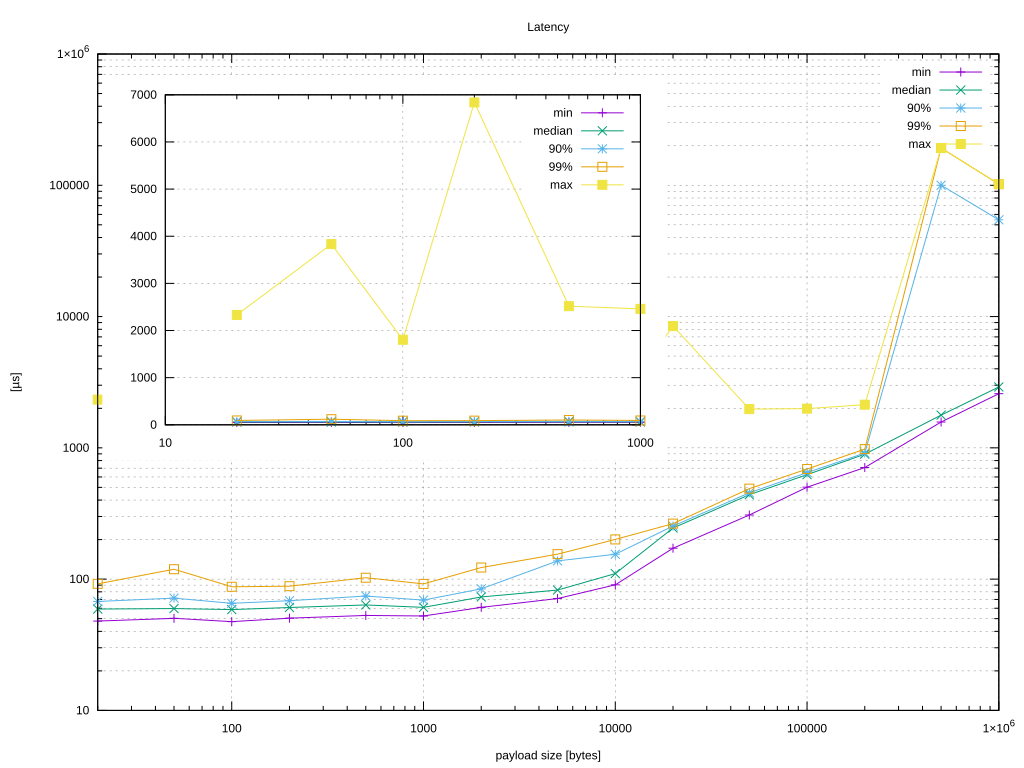
Figure 3 shows that even though that median latency looks good the maximum latency varies in an unpredictable way. Let’s configure the guests and the host to get results similar than the physical host (see Figure 4).
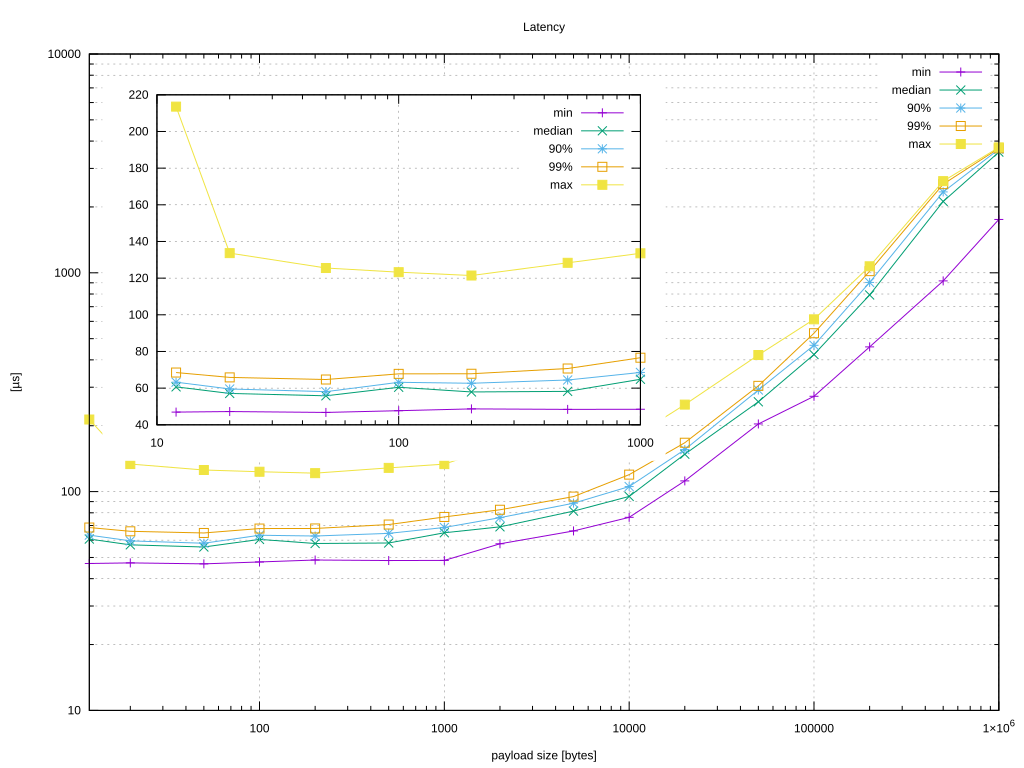
Figure 4 shows that, after configuring the host and the guest and launching the benchmark, we achieve a lower max latency that is tightly to the median.
We want to highlight that the improvement of latency also requires understanding the workload of the benchmark. We use strace to understand where time in the benchmark is spent. This investigation results in realizing that the benchmark is based on two threads one for reception and another for processing the requests. These threads exchange data by relying on a few futexes. Forcing these threads to run in the same core would increase contention in critical sections. To reduce such a contention, we make each thread run in a different core thus resulting in a reduction of latency.
Conclusion
This article has presented how it is possible to reduce the latency when communicating VMs by using the CycloneDDS. To achieve this, we have configured the kernel host and the kernel in each guest. By doing so, we have presented results that are similar when deploying the DDS between physical hosts.
