In today's rapidly evolving cybersecurity landscape, securing your Red Hat Enterprise Linux (RHEL) system is paramount. With the rise of sophisticated threats, manual security configurations are no longer sufficient. This is where automation tools like Ansible come into play.
In this technical article, we will explore how to use Red Hat Ansible Automation Platform to enhance the security of your RHEL servers and workstations.
Important policies for RHEL
Security policies for RHEL include the following:
- Targeted: This is the default policy for RHEL. It confines a limited set of system services and daemons, providing security without affecting the overall system performance significantly. It also provides strict access controls for system services and daemons while allowing user-level processes more freedom.
- Custom policies: Some organizations might develop their own custom SELinux policies tailored to their specific needs. These policies can be highly customized to provide granular control over access to resources and services on the system.
- HTTPd or NGINX: This boolean allows the Apache HTTP Server (HTTPd) to make network connections. It's useful when you want to enable web applications served by Apache to communicate with external services or resources.
- Samba server: When enabled, this boolean allows Samba to share user home directories. It's useful for setting up file sharing between Windows and Linux systems while keeping SELinux in enforcing mode.
- MySQL database connectivity: This boolean allows MySQL to connect to any network port. Enabling this boolean can be useful if you have a MySQL server that needs to communicate with clients on various ports.
Prerequisites and dependencies
Before we dive into securing RHEL using Ansible, make sure you have the following prerequisites in place:
- Ensure you have RHEL installed and configured.
- Install Ansible Automation Platform on your management system; you can follow the article for installation instructions.
- SSH key authentication between your automation controller node and the target RHEL systems to facilitate secure communication.
- Familiarize yourself with Ansible playbooks, which are essential for automating tasks.
- Understand the basics of SELinux (Security-Enhanced Linux) and its policies. SELinux is a security framework integrated into RHEL to provide mandatory access control.
- Ensure that your RHEL system has access to the required repositories for updates and package installation.
Secure RHEL with Ansible Automation Platform
Ansible Automation Platform streamlines Red Hat Enterprise Linux security. It automates tasks such as SSH hardening, firewall setup, and user management, ensuring consistent security configurations. RHEL systems remain compliant with standards like CIS benchmarks, bolstering their security. This platform provides centralized control, real-time visibility, and quick responses to threats, simplifying complex security tasks. It fortifies RHEL systems while making security policy management more efficient.
Step 1: Inventory configuration
The Ansible inventory file is an inventory file that consists of a list of hosts that can be launched against. There are groups of inventory items, and these groups contain the actual hosts.
- Navigate to Inventories under Resources in the left menu.
- Click Add, then select Add Inventory. Provide a name for the inventory and select the organization.
- Access the Add Host option located in the top navigation bar (in frame), then proceed to the Hosts tab.
- Select Add and proceed to specify the host's IP address or URL.
- To save changes, click the Save button.
Step 2: Create Ansible playbooks
These Ansible playbooks provide policies for securing connections or setting up access to specific dedicated services on a RHEL server, such as an HTTPd server, a Samba server, FTP, custom policy, etc.
To validate the playbook, use the ansible-lint tool.
---
- name: Linux hardening
  hosts: rhel_servers
  gather_facts: yes

  tasks:
    - name: Set SELinux mode to targeted
      selinux:
        policy: targeted
        state: enforcing

    - name: Allow Apache to connect to the network
      seboolean:
        name: httpd_can_network_connect
        state: yes

    - name: Allow Samba to read user home directories
      seboolean:
        name: samba_enable_home_dirs
        state: yes

    - name: Allow FTP to write files to home directories
      seboolean:
        name: ftpd_full_access
        state: yes

    - name: Copy custom policy module to the server
      copy:
        src: /path/to/custom_policy.pp
        dest: /etc/selinux/targeted/modules/active/modules/custom_policy.pp

    - name: Load the custom policy module
      shell: semodule -i /etc/selinux/targeted/modules/active/modules/custom_policy.pp

    - name: Allow cron jobs to change user content
      seboolean:
        name: cron_can_relabel
        state: yes

    - name: Allow MySQL to connect to the network
      seboolean:
        name: mysql_connect_any
        state: yes

    - name: Allow PostgreSQL to connect to the network
      seboolean:
        name: selinuxuser_postgresql_connect_enabled
        state: yes
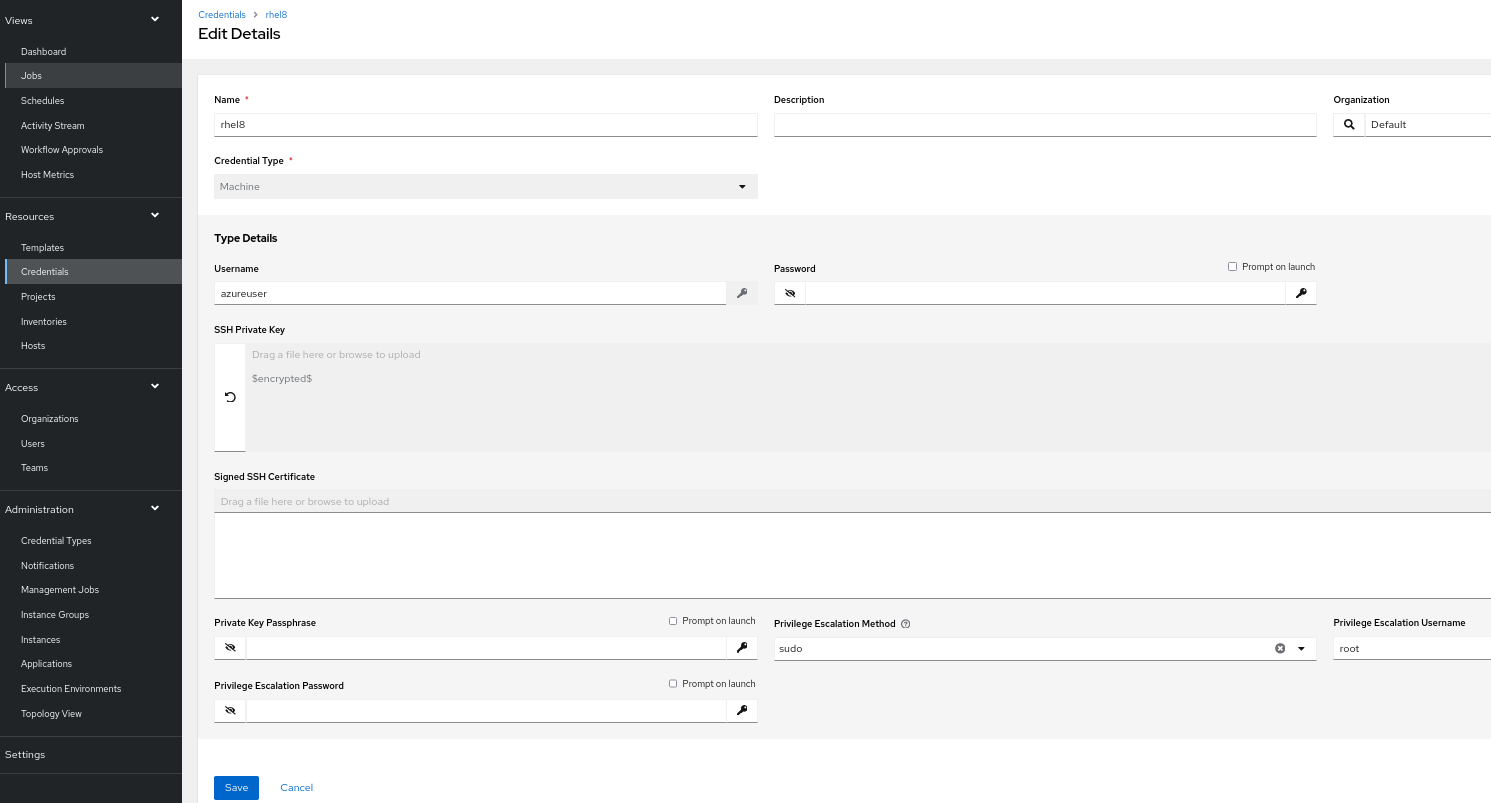
Step 3: Machine credentials
The automation controller can invoke Ansible on hosts under your management using machine credentials (Figure 1). Similar to using Ansible on the command line, you can specify the SSH username, password, SSH key, and key password, or even have the automation controller ask for the password during deployment.
- From the Ansible Automation Platform console, navigate to Credentials under the Resources section in the left menu.
- Click the Add button, then assign a name to the credentials, specifying Machine as the Credential Type.
- In the Type Details section, enter the appropriate username and, if applicable, the corresponding password for your server.
- To add an SSH private key, you can either drag-and-drop the key file or paste its contents.
- In the Privilege Escalation Method drop-down menu, choose sudo and set the Privilege Escalation Username to root.
- Click Save.
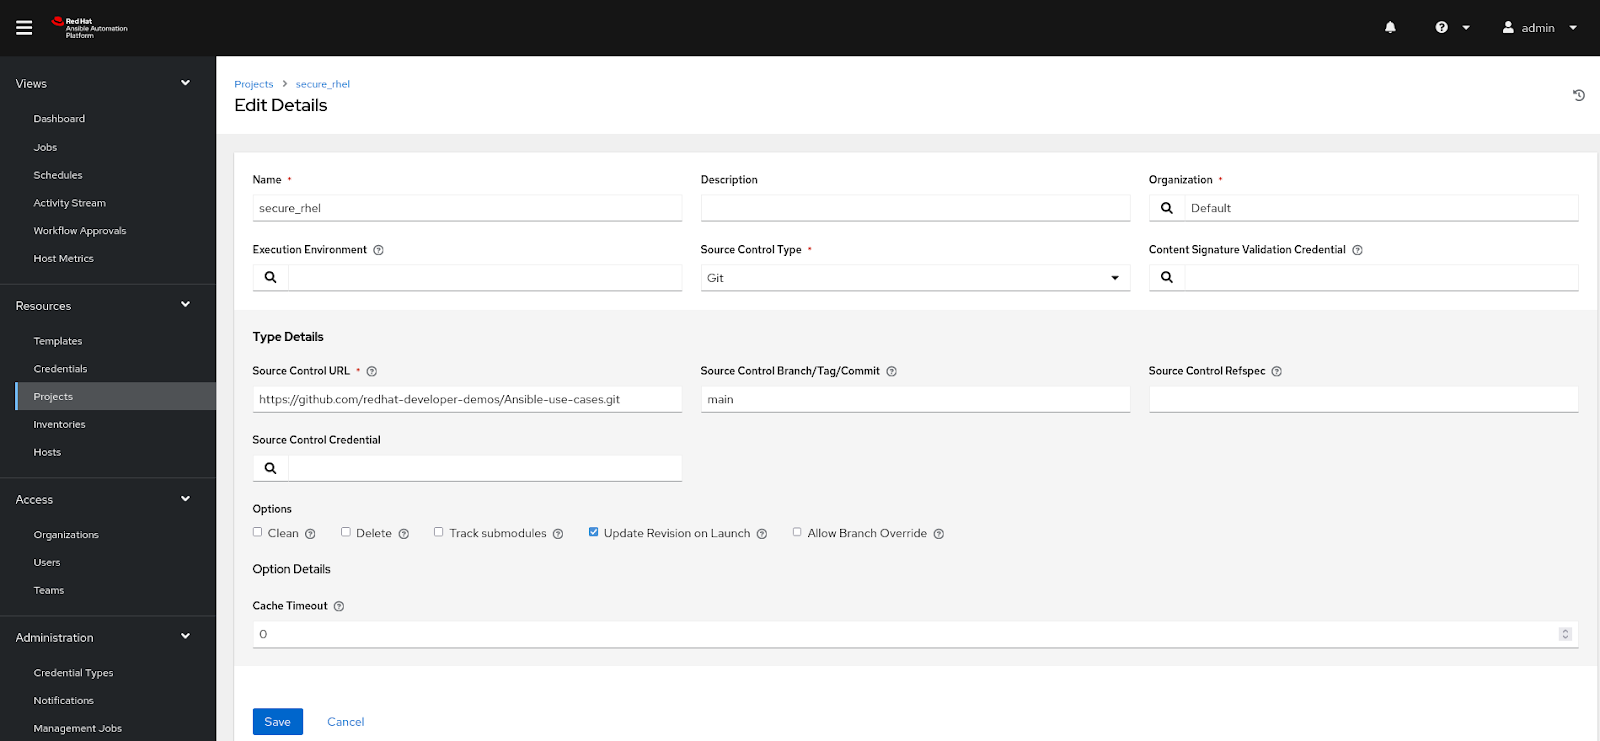
Step 4: Project
In the controller, a Project represents a logical collection of Ansible playbooks.
You can manage playbooks by placing them manually under the Project Base Path on your controller server or by putting them into a source code management program.
- To create a new project, navigate to the Project option in the left menu under the Resources section.
- Click the Add button to proceed.
- Provide a project name and designate an organization as the default.
- In Source Control Type, select a Git option.
- Under Type Details:
- In the Source Control URL field, add the GitHub repository URL.
- Add the repository branch name in Source Control Branch/Tag/Commit as
main. - Under Options, check the box for Update Revision on Launch.
- Click Save or Sync to fetch the remote repository locally (see Figure 2).
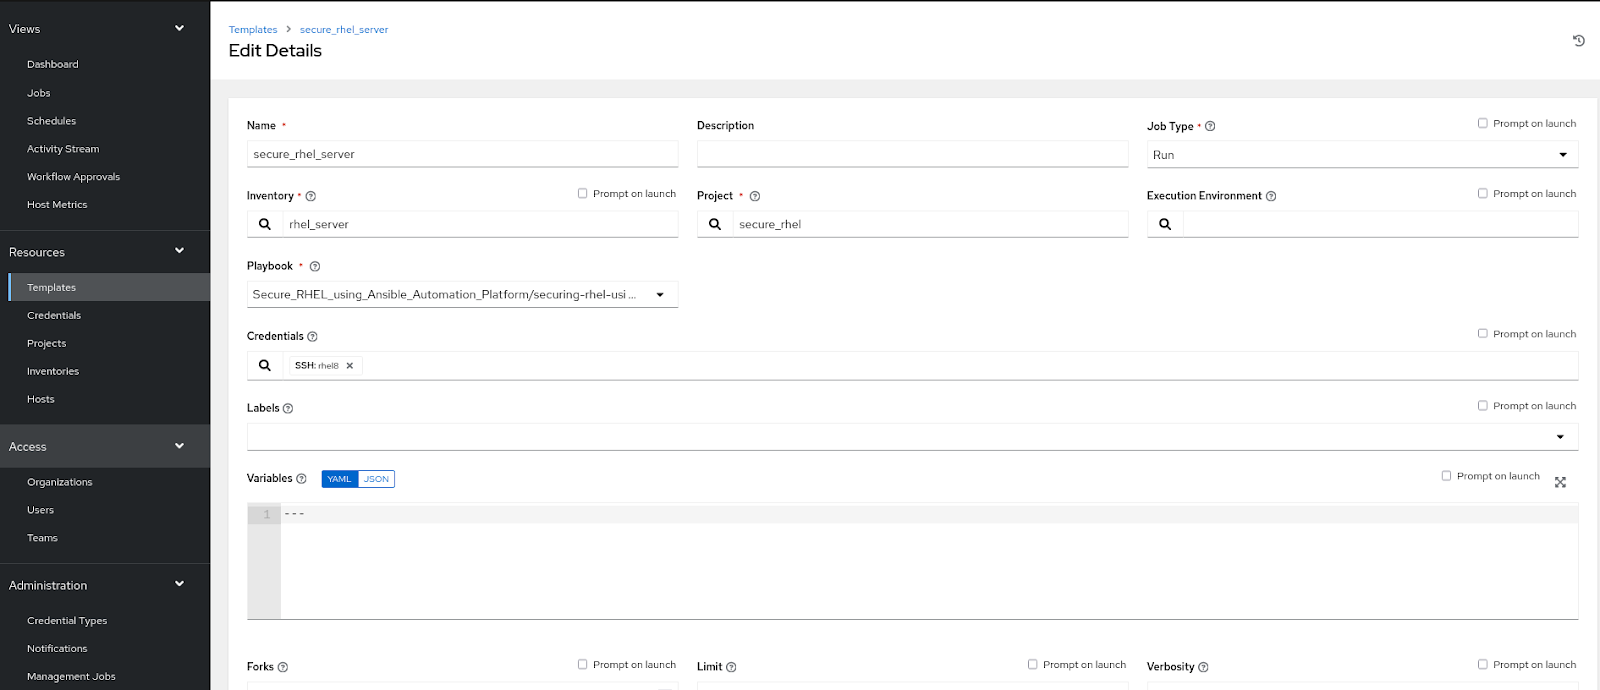
Step 5: Template
The job template defines the parameters for running an Ansible job. The use of job templates is useful for reusing the same job over and over again. As a result of job templates, Ansible playbook content can also be reused and teams can work together more effectively.
Create a template, so that template will be responsible for executing the job.
- From the left menu, go to Resources and choose Templates. Click Add, then select Add Job Template.
- Provide a name for the Template.
- Choose the inventory that was created earlier from the available options.
- Under Credentials, select the Machine credentials.
- Select the project.
- Select the Ansible playbook under Playbooks:
Secure_RHEL_using_Ansible_Automation_Platform/securing-rhel-using-aap.yml - Scroll down to the bottom, and under the Options section, check the box for Privilege Escalation.
Finally, click Launch to execute the playbook (Figure 3).
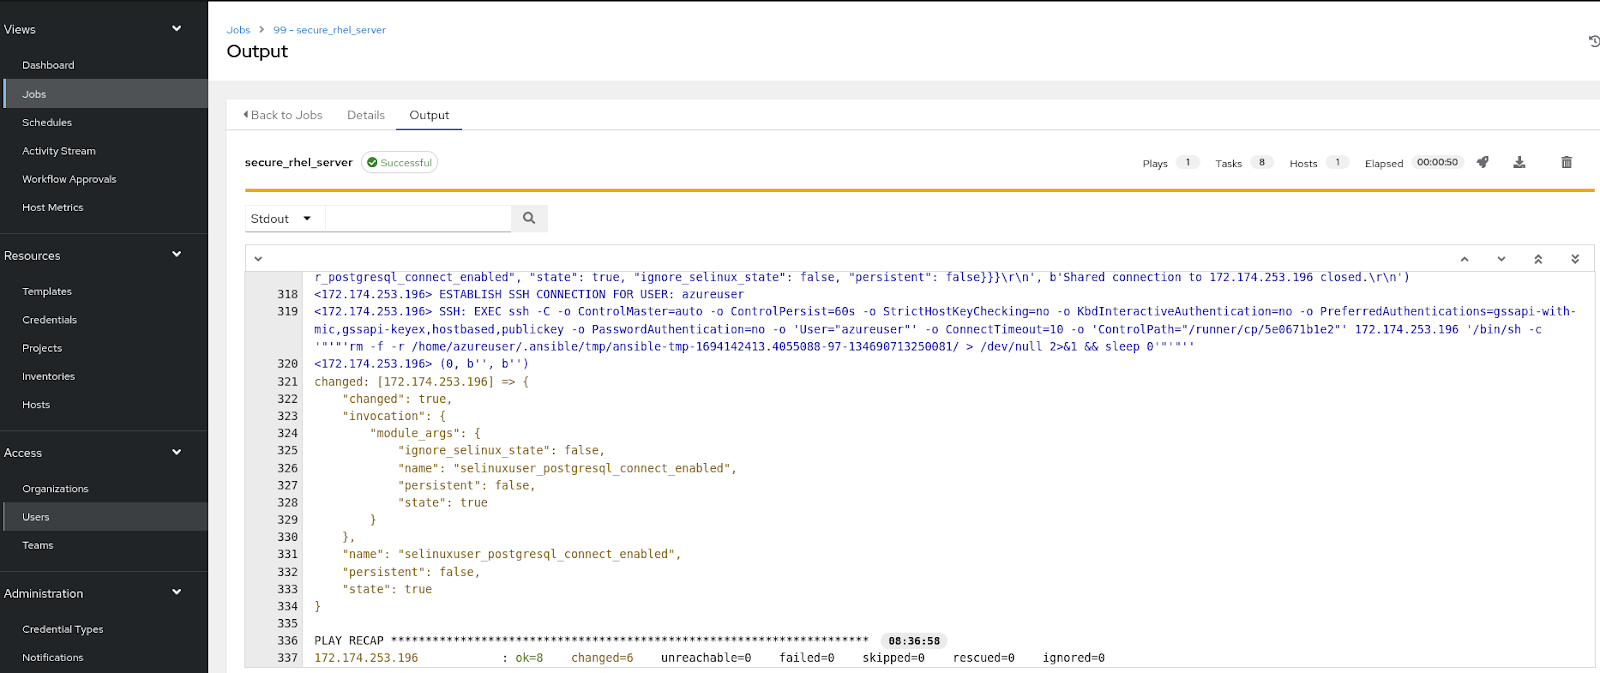
After the successful execution of a job on the RHEL server, you will get output on your screen as shown in Figure 4.
Find more resources
In this article, we have enhanced the security of Red Hat Enterprise Linux systems by implementing SELinux basics and custom policies and deployed these policies using Ansible Automation Platform.
For a deeper and practical understanding of Red Hat Enterprise Linux, you can engage in thoughtfully curated hands-on labs by Red Hat. Red Hat Universal Base Images (UBI) are container-based operating system images with complementary runtime languages and packages. Try Red Hat UBI on the curated Red Hat UBI hands-on lab.
Furthermore, you have the option to obtain tailored Red Hat Enterprise Linux images designed for AWS, Google Cloud Platform, Microsoft Azure, and VMware, facilitating their seamless deployment on your chosen platform.