Redhat Developers  Logo
  • AI

    Get started with AI

    • Red Hat AI
      Accelerate the development and deployment of enterprise AI solutions.
    • AI learning hub
      Explore learning materials and tools, organized by task.
    • AI interactive demos
      Click through scenarios with Red Hat AI, including training LLMs and more.
    • AI/ML learning paths
      Expand your OpenShift AI knowledge using these learning resources.
    • AI quickstarts
      Focused AI use cases designed for fast deployment on Red Hat AI platforms.
    • No-cost AI training
      Foundational Red Hat AI training.

    Featured resources

    • OpenShift AI learning
    • Open source AI for developers
    • AI product application development
    • Open source-powered AI/ML for hybrid cloud
    • AI and Node.js cheat sheet

    Red Hat AI Factory with NVIDIA

    • Red Hat AI Factory with NVIDIA is a co-engineered, enterprise-grade AI solution for building, deploying, and managing AI at scale across hybrid cloud environments.
    • Explore the solution
  • Learn

    Self-guided

    • Documentation
      Find answers, get step-by-step guidance, and learn how to use Red Hat products.
    • Learning paths
      Explore curated walkthroughs for common development tasks.
    • Guided learning
      Receive custom learning paths powered by our AI assistant.
    • See all learning

    Hands-on

    • Developer Sandbox
      Spin up Red Hat's products and technologies without setup or configuration.
    • Interactive labs
      Learn by doing in these hands-on, browser-based experiences.
    • Interactive demos
      Click through product features in these guided tours.

    Browse by topic

    • AI/ML
    • Automation
    • Java
    • Kubernetes
    • Linux
    • See all topics

    Training & certifications

    • Courses and exams
    • Certifications
    • Skills assessments
    • Red Hat Academy
    • Learning subscription
    • Explore training
  • Build

    Get started

    • Red Hat build of Podman Desktop
      A downloadable, local development hub to experiment with our products and builds.
    • Developer Sandbox
      Spin up Red Hat's products and technologies without setup or configuration.

    Download products

    • Access product downloads to start building and testing right away.
    • Red Hat Enterprise Linux
    • Red Hat AI
    • Red Hat OpenShift
    • Red Hat Ansible Automation Platform
    • See all products

    Featured

    • Red Hat build of OpenJDK
    • Red Hat JBoss Enterprise Application Platform
    • Red Hat OpenShift Dev Spaces
    • Red Hat Developer Toolset

    References

    • E-books
    • Documentation
    • Cheat sheets
    • Architecture center
  • Community

    Get involved

    • Events
    • Live AI events
    • Red Hat Summit
    • Red Hat Accelerators
    • Community discussions

    Follow along

    • Articles & blogs
    • Developer newsletter
    • Videos
    • Github

    Get help

    • Customer service
    • Customer support
    • Regional contacts
    • Find a partner

    Join the Red Hat Developer program

    • Download Red Hat products and project builds, access support documentation, learning content, and more.
    • Explore the benefits

How Ansible automates Linux server user and group management

October 11, 2023
Himanshu Yadav
Related topics:
Automation and managementLinux
Related products:
Red Hat Ansible Automation Platform

    Due to the day-to-day activities of developers, system administrators need to automate the management of users and groups. Red Hat Ansible Automation Platform simplifies this process with the help of Ansible Playbooks. In this article, we will demonstrate user and group management on managed node instances using Ansible Automation Platform.

    How to automate user/group management

    We will create a playbook to run the automation task. First, we will create three different groups that identify three kinds of users with access to our Linux system:

    1. Admins
    2. Developers
    3. Quality Assurance

    We will add groups to our system. Let's define our groups in our playbook file. Create an playbook.yml and include the following:

    ---
    - hosts: localhost
      become: true
      tasks:
        - name: Create admin group
          group:
            name: admin
            state: present
        
        - name: Create developers group
          group:
            name: developers
            state: present
        
        - name: Create quality assurance group
          group:
            name: quality_assurance
            state: present
    

    Next, we will add a few users to these groups. Add users ad1 and ad2 to the admin group, users dev1 and dev2 to the developer group, and users qa1 and qa2 to the quality assurance group. Add the following content to the previously created YAML file:

    - name: Add ad1 and ad2 to admin group
      user:
        name: "{{ item }}"
        groups: admin
        password: "{{ 'admin' | password_hash('sha512') }}"
      with_items:
        - ad1
        - ad2
        
    - name: Add dev1 and dev2 to developers group
      user:
        name: "{{ item }}"
        groups: developers
        password: "{{ 'dev' | password_hash('sha512') }}"
      with_items:
        - dev1
        - dev2
        
    - name: Add qa1 and qa2 to quality assurance group
      user:
        name: "{{ item }}"
        groups: quality_assurance
        password: "{{ 'test' | password_hash('sha512') }}"
      with_items:
        - qa1
        - qa2

    Finally, we will grant certain privileges to these groups which will enable the users of these groups with those same privileges:

    - name: Grant admin group sudo privileges
      lineinfile:
        path: /etc/sudoers
        line: "%admin ALL=(ALL) NOPASSWD: ALL"
        state: present
        
    - name: Grant developers group access to /opt/myapp
      file:
        path: /opt/myapp
        owner: root
        group: developers
        mode: "0755"
        state: directory
        
    - name: Grant quality assurance group access to /var/log/myapp
      file:
        path: /var/log/myapp
        owner: root
        group: quality_assurance
        mode: "0740"
        state: directory
    

    The final YAML will look like this:

    ---
    #######  creating groups ######
    - hosts: localhost
      become: true
      tasks:
        - name: Create admin group
          group:
            name: admin
            state: present
        
        - name: Create developers group
          group:
            name: developers
            state: present
        
        - name: Create quality assurance group
          group:
            name: quality_assurance
            state: present
    
    #######  Adding Users in Group ######
        
        - name: Add ad1 and ad2 to admin group
          user:
            name: "{{ item }}"
            groups: admin
    	  password: "{{ 'admin' | password_hash('sha512') }}"
          with_items:
            - ad1
            - ad2
        
        - name: Add dev1 and dev2 to developers group
          user:
            name: "{{ item }}"
            groups: developers
            password: "{{ 'dev' | password_hash('sha512') }}"
          with_items:
            - dev1
            - dev2
        
        - name: Add qa1 and qa2 to quality assurance group
          user:
            name: "{{ item }}"
            groups: quality_assurance
            password: "{{ 'test' | password_hash('sha512') }}"
          with_items:
            - qa1
            - qa2
    
    #######  Setting up permissions to Groups ######
        
        - name: Grant admin group sudo privileges
          lineinfile:
            path: /etc/sudoers
            line: "%admin ALL=(ALL) NOPASSWD: ALL"
            state: present
        
        - name: Grant developers group access to /opt/myapp
          file:
            path: /opt/myapp
            owner: root
            group: developers
            mode: "0755"
            state: directory
        
        - name: Grant quality assurance group access to /var/log/myapp
          file:
            path: /var/log/myapp
            owner: root
            group: quality_assurance
            mode: "0740"
            state: directory
    

    Run Ansible Playbooks

    Run the playbook using the following command:

    ansible-playbook playbook.yml

    Now head over to your managed node and log into the dev user from the terminal using the following command:

    su - dev1

    On the prompt, enter the password: dev. Check the permissions on the /opt/myapp folder as follows: drwxr-xr-x (read and execute for developers and others, write permission reserved for user). Change the permissions to your needs accordingly in the playbook file.

    Now, we will use Ansible Automation Platform to run these playbooks. Install the latest version of Ansible Automation Platform. You can also refer to the Ansible Automation Platform 2.3 installation guide for a RHEL 9 system. After the installation is complete, navigate to the dashboard on https://localhost.

    Create new project

    A project is a collection of Ansible Playbooks which perform a certain set of automated tasks. Here, our project will contain our single playbook.

    Steps to create a new project:

    • Head over to the Projects tab (Figure 1).
    • Click on the Add option and select a name for the project and select the default organization.
    • Add the GitHub URL to the Source Control URL field: https://github.com/4molybdenum2/ansible-automation-demos/tree/main/user_mgmt.
    • Save the project.
    Projects
    Figure 1: Project Page

    Steps to create an inventory

    • Create an inventory from the Inventories tab and add a group named webstack (Figure 2).
    Inventory
    Figure 2: Inventory Page
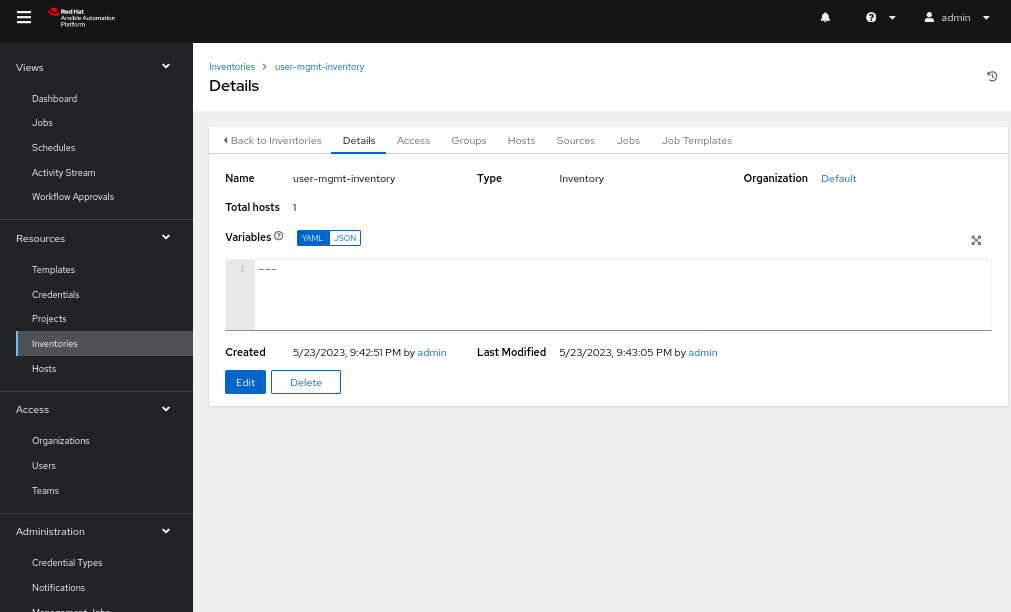
    • Head back to the inventory edit page and navigate to the Hosts tab. 
    • Add a host with the name as the IP address of the node on which the playbook will run (Figure 3).
    Hosts
    Figure 3: Host Page

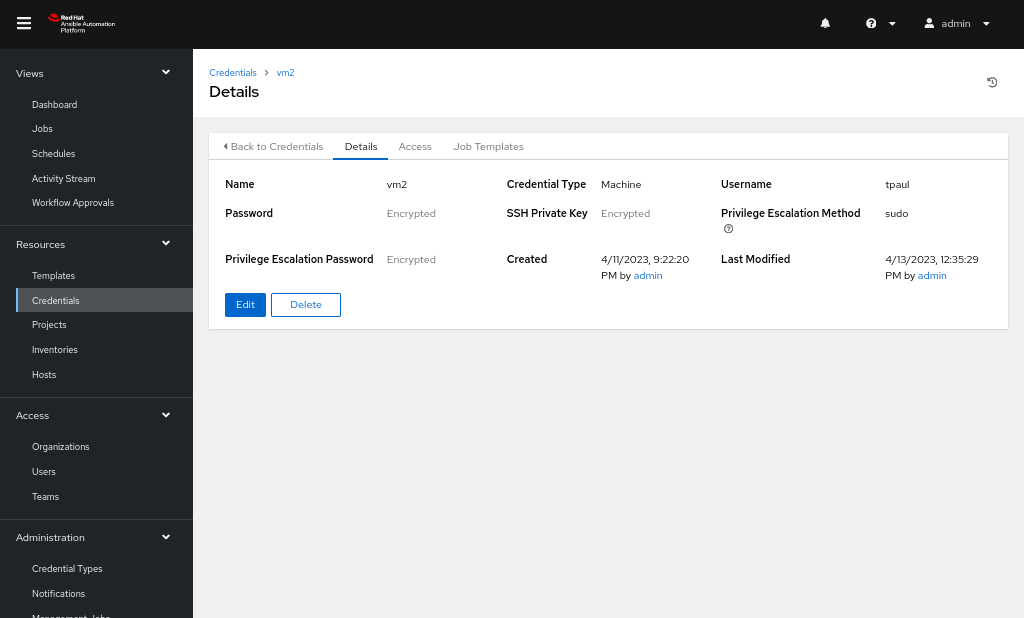
    Steps to add a credential

    • Navigate to the Credential tab and add a credential with type Machine, username and password as that of our managed node, and private key as copied over from control node file: ~/.ssh/id_rsa (Figure 4).
    • Fill the Privilege Escalation password with the password for our managed node which will run the commands as a sudo user.
    Credentials
    Figure 4: Credentials Page

    Steps to create a template

    • Head over to the Templates tab and create a new template.
    • Add the project that we created and select the playbook from our GitHub or any other source control repository where we uploaded the playbook.
    • Add the Inventory, Credentials, and the Execution Environment as Default execution environment (Figure 5). 
    Templates
    Figure 5: Templates Page
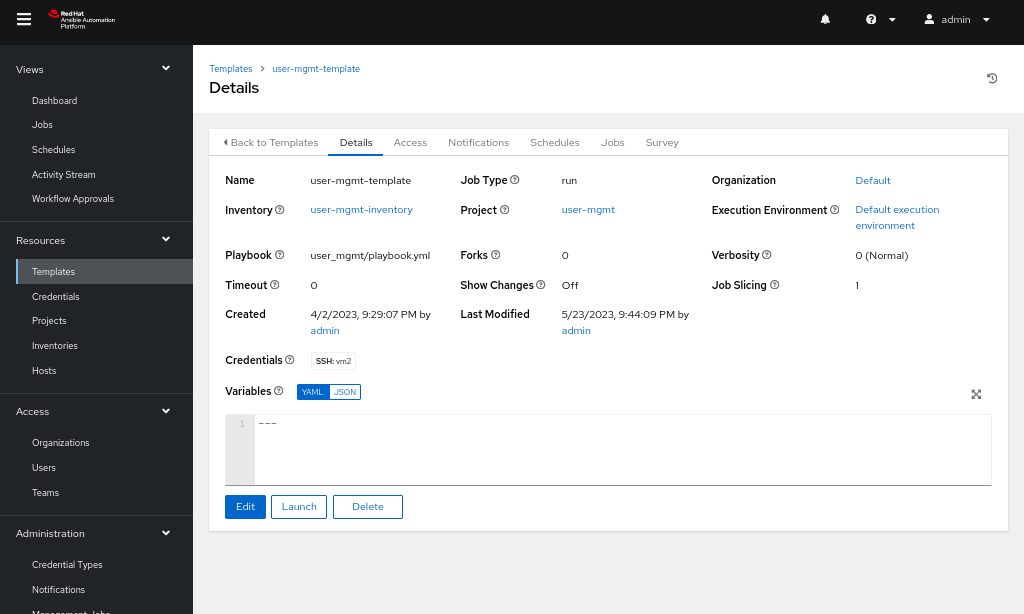
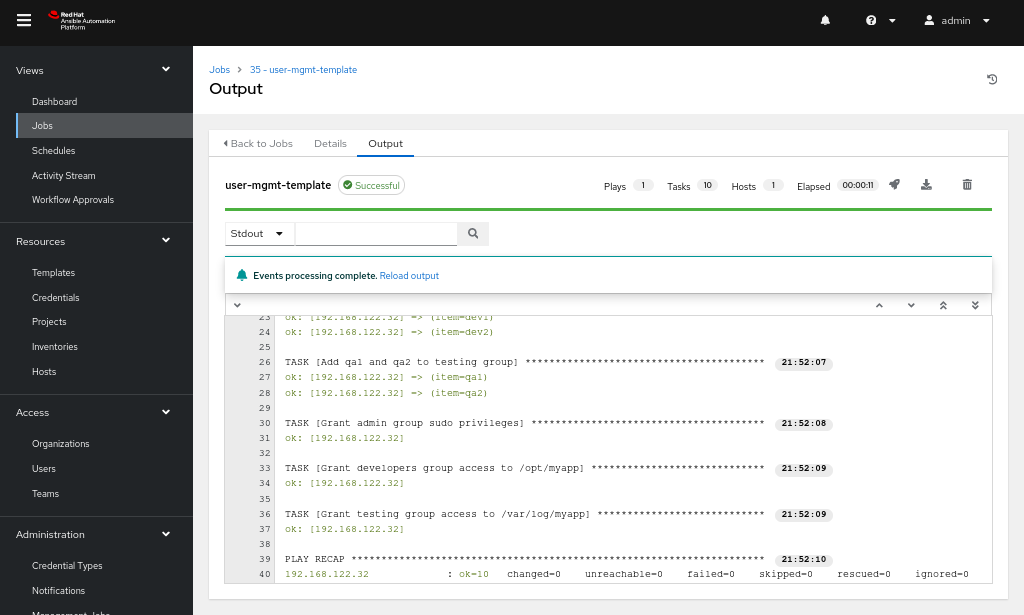
    • After the template has been created, you can launch it, and the job will be visible under the Jobs tab, as shown in Figure 6.

    Jobs
    Figure 6: Jobs Page

    Continue your automation journey with Ansible Automation Platform

    You can get started with the Ansible Automation Platform by downloading at no cost and exploring interactive labs at Red Hat Developer.

    Related Posts

    • What's new in Ansible Automation Platform 2.4

    • The benefits of deploying Ansible Automation Platform on AWS

    • Automate workshop setup with Ansible playbooks and CodeReady Workspaces

    • 6 steps to install Ansible Automation Platform 2.3 on RHEL

    Recent Posts

    • Installing Red Hat Enterprise Linux 10 from a bootc image with bootc

    • Why your database benchmarking data is probably wrong (and how I fixed mine)

    • Type what you want to break: AI-assisted chaos engineering with Krkn

    • Understanding evaluation collections in EvalHub

    • An overview of confidential containers on OpenShift bare metal

    What’s up next?

    Why automate? Which tool do I use? Choosing an automation tool dives into various automation options, how they work, what to automate, and the benefits of each tool.

    Get the e-book
    Red Hat Developers logo LinkedIn YouTube Twitter Facebook

    Platforms

    • Red Hat AI
    • Red Hat Enterprise Linux
    • Red Hat OpenShift
    • Red Hat Ansible Automation Platform
    • See all products

    Build

    • Developer Sandbox
    • Developer tools
    • Interactive tutorials
    • API catalog

    Quicklinks

    • Learning resources
    • E-books
    • Cheat sheets
    • Blog
    • Events
    • Newsletter

    Communicate

    • About us
    • Contact sales
    • Find a partner
    • Report a website issue
    • Site status dashboard
    • Report a security problem

    RED HAT DEVELOPER

    Build here. Go anywhere.

    We serve the builders. The problem solvers who create careers with code.

    Join us if you’re a developer, software engineer, web designer, front-end designer, UX designer, computer scientist, architect, tester, product manager, project manager or team lead.

    Sign me up

    Red Hat legal and privacy links

    • About Red Hat
    • Jobs
    • Events
    • Locations
    • Contact Red Hat
    • Red Hat Blog
    • Inclusion at Red Hat
    • Cool Stuff Store
    • Red Hat Summit
    © 2026 Red Hat

    Red Hat legal and privacy links

    • Privacy statement
    • Terms of use
    • All policies and guidelines
    • Digital accessibility

    Chat Support

    Please log in with your Red Hat account to access chat support.