Redhat Developers  Logo
  • AI

    Get started with AI

    • Red Hat AI
      Accelerate the development and deployment of enterprise AI solutions.
    • AI learning hub
      Explore learning materials and tools, organized by task.
    • AI interactive demos
      Click through scenarios with Red Hat AI, including training LLMs and more.
    • AI/ML learning paths
      Expand your OpenShift AI knowledge using these learning resources.
    • AI quickstarts
      Focused AI use cases designed for fast deployment on Red Hat AI platforms.
    • No-cost AI training
      Foundational Red Hat AI training.

    Featured resources

    • OpenShift AI learning
    • Open source AI for developers
    • AI product application development
    • Open source-powered AI/ML for hybrid cloud
    • AI and Node.js cheat sheet

    Red Hat AI Factory with NVIDIA

    • Red Hat AI Factory with NVIDIA is a co-engineered, enterprise-grade AI solution for building, deploying, and managing AI at scale across hybrid cloud environments.
    • Explore the solution
  • Learn

    Self-guided

    • Documentation
      Find answers, get step-by-step guidance, and learn how to use Red Hat products.
    • Learning paths
      Explore curated walkthroughs for common development tasks.
    • See all learning

    Hands-on

    • Developer Sandbox
      Spin up Red Hat's products and technologies without setup or configuration.
    • Interactive labs
      Learn by doing in these hands-on, browser-based experiences.
    • Interactive demos
      Click through product features in these guided tours.

    Browse by topic

    • AI/ML
    • Automation
    • Java
    • Kubernetes
    • Linux
    • See all topics

    Training & certifications

    • Courses and exams
    • Certifications
    • Skills assessments
    • Red Hat Academy
    • Learning subscription
    • Explore training
  • Build

    Get started

    • Red Hat build of Podman Desktop
      A downloadable, local development hub to experiment with our products and builds.
    • Developer Sandbox
      Spin up Red Hat's products and technologies without setup or configuration.

    Download products

    • Access product downloads to start building and testing right away.
    • Red Hat Enterprise Linux
    • Red Hat AI
    • Red Hat OpenShift
    • Red Hat Ansible Automation Platform
    • See all products

    Featured

    • Red Hat build of OpenJDK
    • Red Hat JBoss Enterprise Application Platform
    • Red Hat OpenShift Dev Spaces
    • Red Hat Developer Toolset

    References

    • E-books
    • Documentation
    • Cheat sheets
    • Architecture center
  • Community

    Get involved

    • Events
    • Live AI events
    • Red Hat Summit
    • Red Hat Accelerators
    • Community discussions

    Follow along

    • Articles & blogs
    • Developer newsletter
    • Videos
    • Github

    Get help

    • Customer service
    • Customer support
    • Regional contacts
    • Find a partner

    Join the Red Hat Developer program

    • Download Red Hat products and project builds, access support documentation, learning content, and more.
    • Explore the benefits

Enhance Ansible development experience with Lightspeed

August 22, 2023
Himanshu Yadav
Related topics:
Artificial intelligenceAutomation and management
Related products:
Red Hat Ansible Automation Platform

    Ansible Lightspeed is a generative AI tool that provides an efficient way for developers to create Ansible content and automation tasks for Ansible playbooks. In this article, we will explore how to install and use Ansible Lightspeed in Visual Studio Code. This makes it easy to create Ansible content; you can simply type in plain English descriptions and Ansible Lightspeed will generate the code recommendations for you.

    Prerequisites

    Before proceeding through this tutorial, make sure you have installed the following:

    • Visual Studio Code (VS Code)
    • Python 3.9+
    • Ansible Automation Platform 2.x (see How to install Ansible Automation Platform 2.4 on RHEL 9.1).

    1. Install Ansible extension in VS Code

    The Ansible extension offers intelligent code completion, syntax highlighting, and error checking for YAML and Ansible-specific files. The extension allows users to execute Ansible tasks and playbooks directly from the editor and view the real-time output. With built-in support for Ansible Vault and Galaxy, developers can efficiently manage secrets and access a vast library of community-contributed roles.

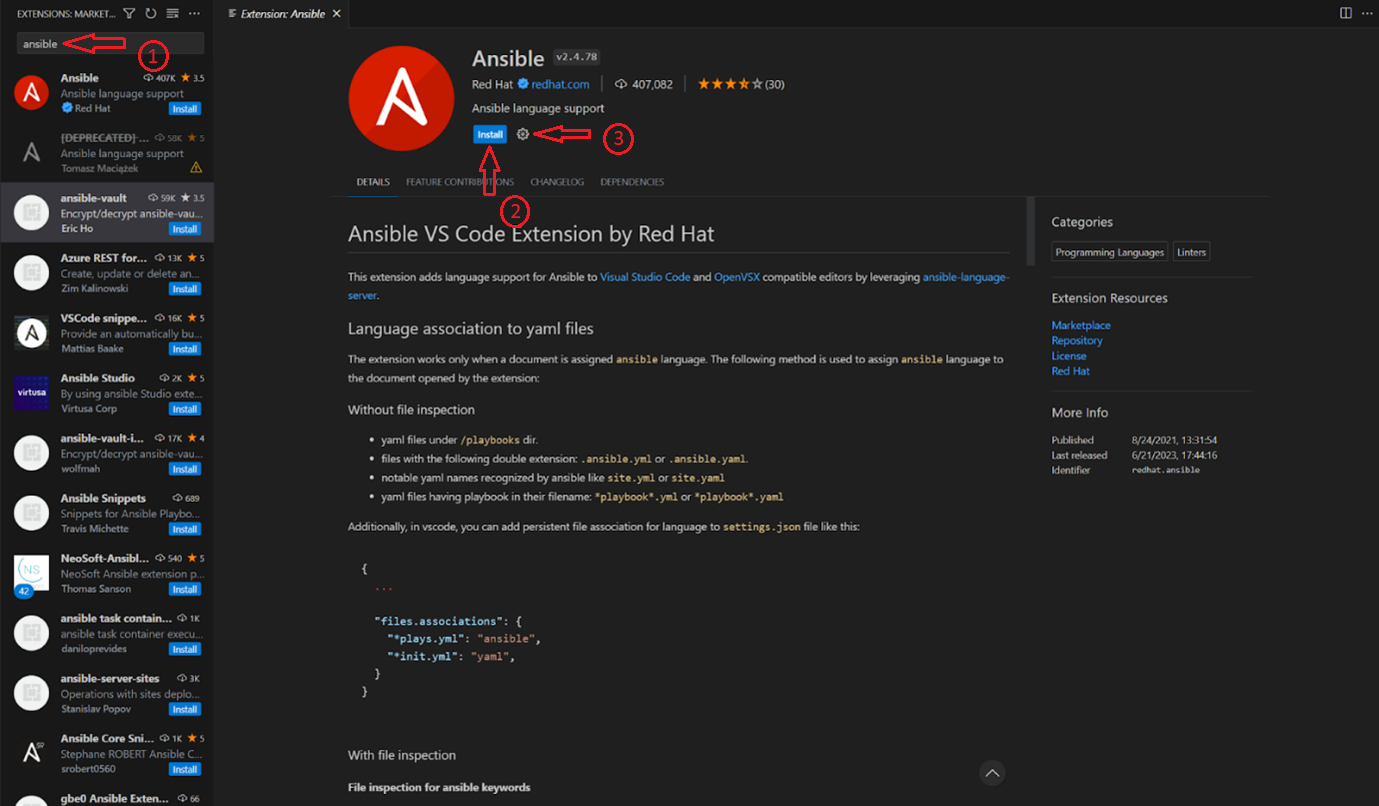
    1. In VS Code, click the extension icon in the left menu. In the search field, type Ansible to bring up the Ansible extension by Red Hat.

    2. Click the Install button. 
    3. After installing the Ansible extension in the integrated development environment (IDE), click on the little gear icon beside the Install button and select the Extension Setting option, as illustrated in Figure 1.
    Vs code extention
    Figure 1: Installing the Ansible extension in Visual Studio Code.

    2. Enable Ansible Lightspeed in VS Code

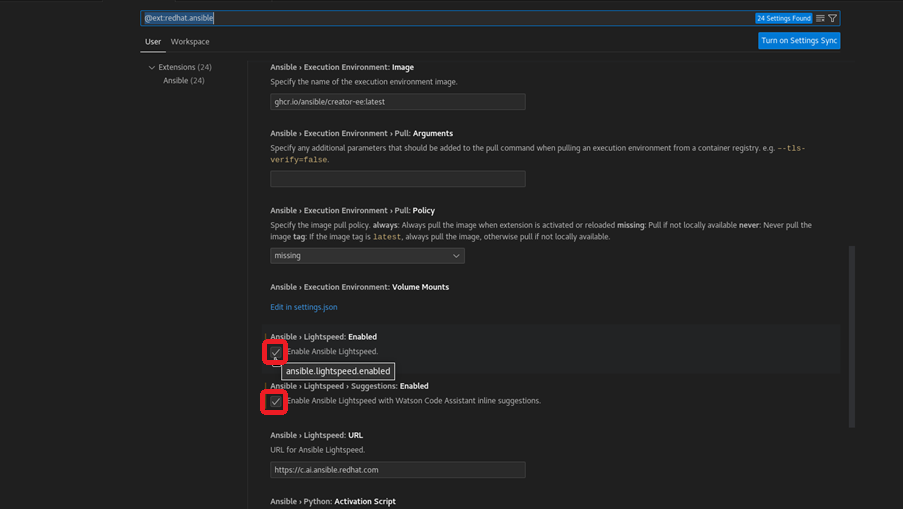
    You will get the following settings page of Ansible Extension, from which you can make changes to execution environment image, container registry, Ansible lint, and many more. This article only covers Lightspeed, so we will just enable the Ansible Lightspeed option and Ansible Lightspeed with Watson Code Assistant inline suggestions. Please refer to Figure 2 to set the configuration.

    enable it
    Figure 2: Enable Lightspeed and Watson Code Assistant.

    Note: If you get the error "Ansible-lint is missing," use the following commands to install it. There are two methods to install: pip and dnf.

    1. Install using pip:
      pip3 install ansible-lint
    1. Install with the dnf package manager:
      dnf install ansible-lint

    3. Authenticate Lightspeed with GitHub

    Click on the Ansible extension icon on the left bar. You will see the Connect button, as shown in Figure 3.

    connect
    Figure 3: Connect Ansible to authenticate.

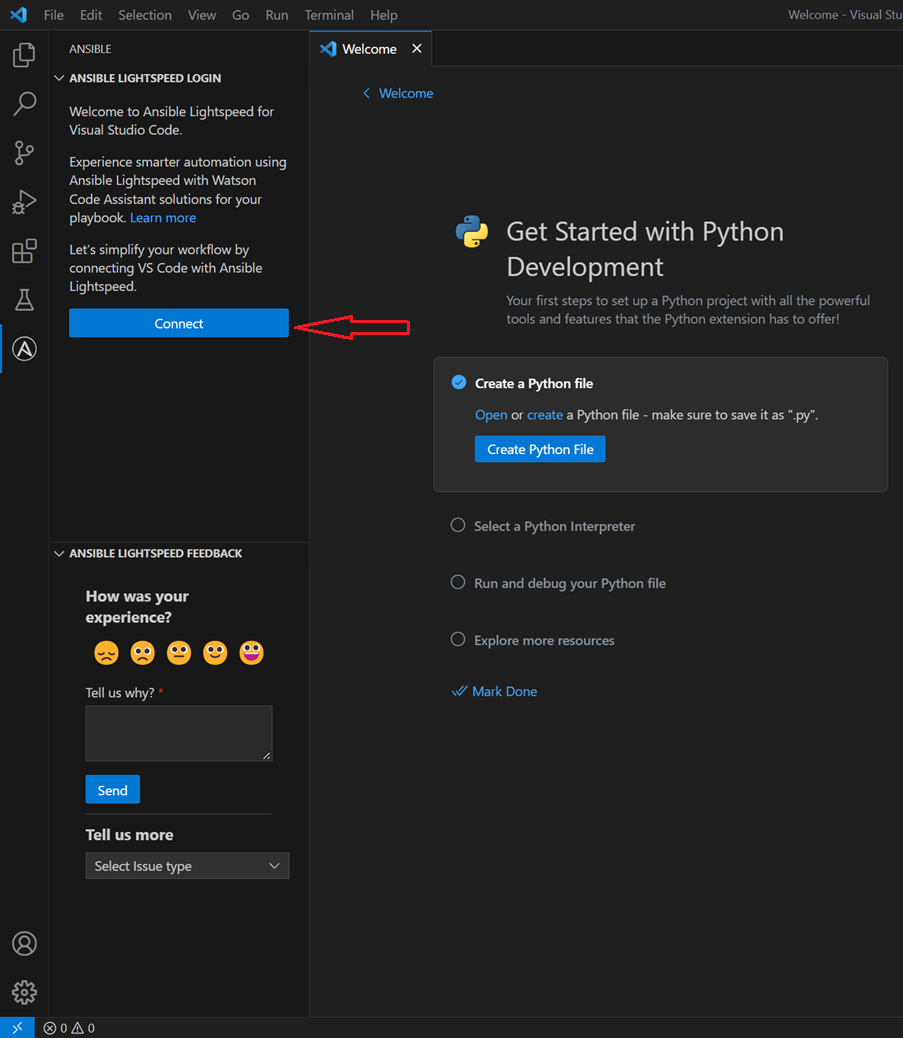
    It will redirect to your default browser and open the GitHub login page. 

    Ansible Lightspeed requires GitHub authentication. Sign in using your GitHub credentials and follow the prompts. Once done, you will be redirected to VS Code and the Connect button should now be replaced with your GitHub ID.

    4. Validate Ansible Lightspeed

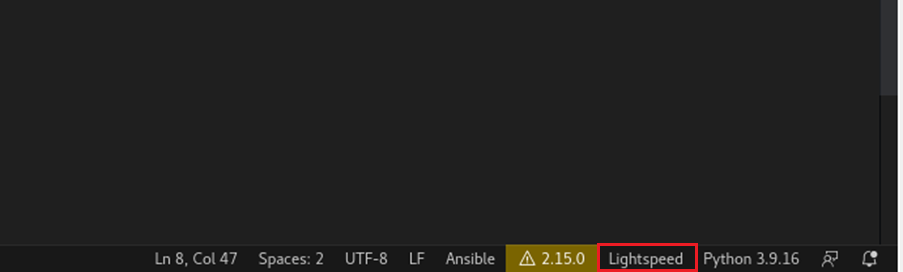
    On the bottom-right corner, you should see Lightspeed (Figure 4). Ansible Lightspeed is ready for you to write playbooks.

    lightspeed
    Figure 4: Lightspeed reflected on Visual Studio Code.

    5. How to trigger Ansible Lightspeed

    Lightspeed will recommend context based on the text you type in the name field in the playbook section. Once you hit the Enter key, you will get the suggestion as faded text. Hit the Tab key if everything looks good to you.

    The first example is "Installing Minikube on an RHEL server." To generate a playbook (Figure 5), make sure you have the format of the playbook as shown below, like defining hosts, permissions of become value, and so on:

    - name: Lightspeed_demo
      hosts: rhel
      become: true
    
      tasks:
        - name: Install apache httpd server and enable it
          ansible.builtin.package:
            name: httpd
            state: present
    
        - name: Install minikube on rhel server
          ansible.builtin.package:
            name:
              https://storage.googleapis.com/minikube/releases/latest/minikube-latest.x86_64.rpm
            state: present
    playbook-1
    Figure 5: Trigger Ansible Lightspeed to generate the playbook.

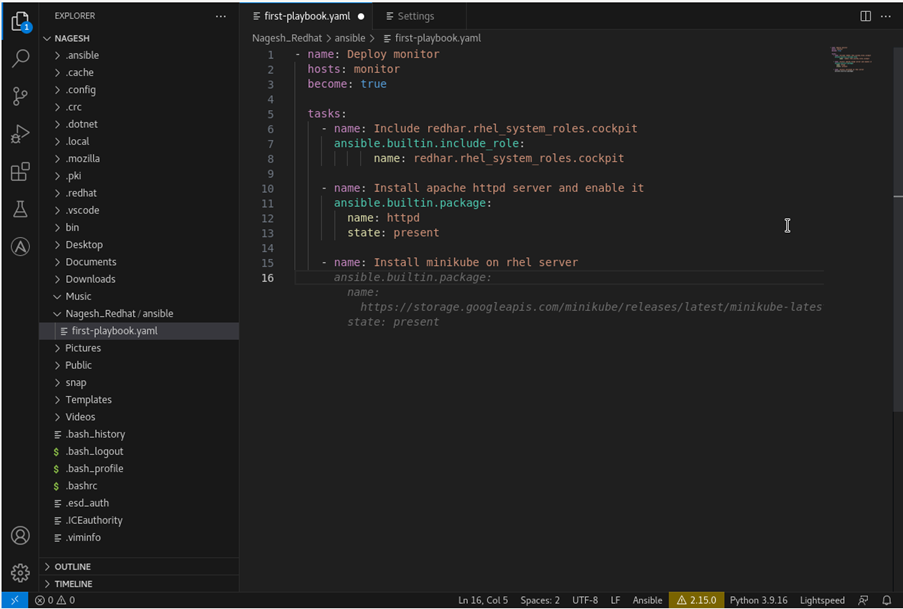
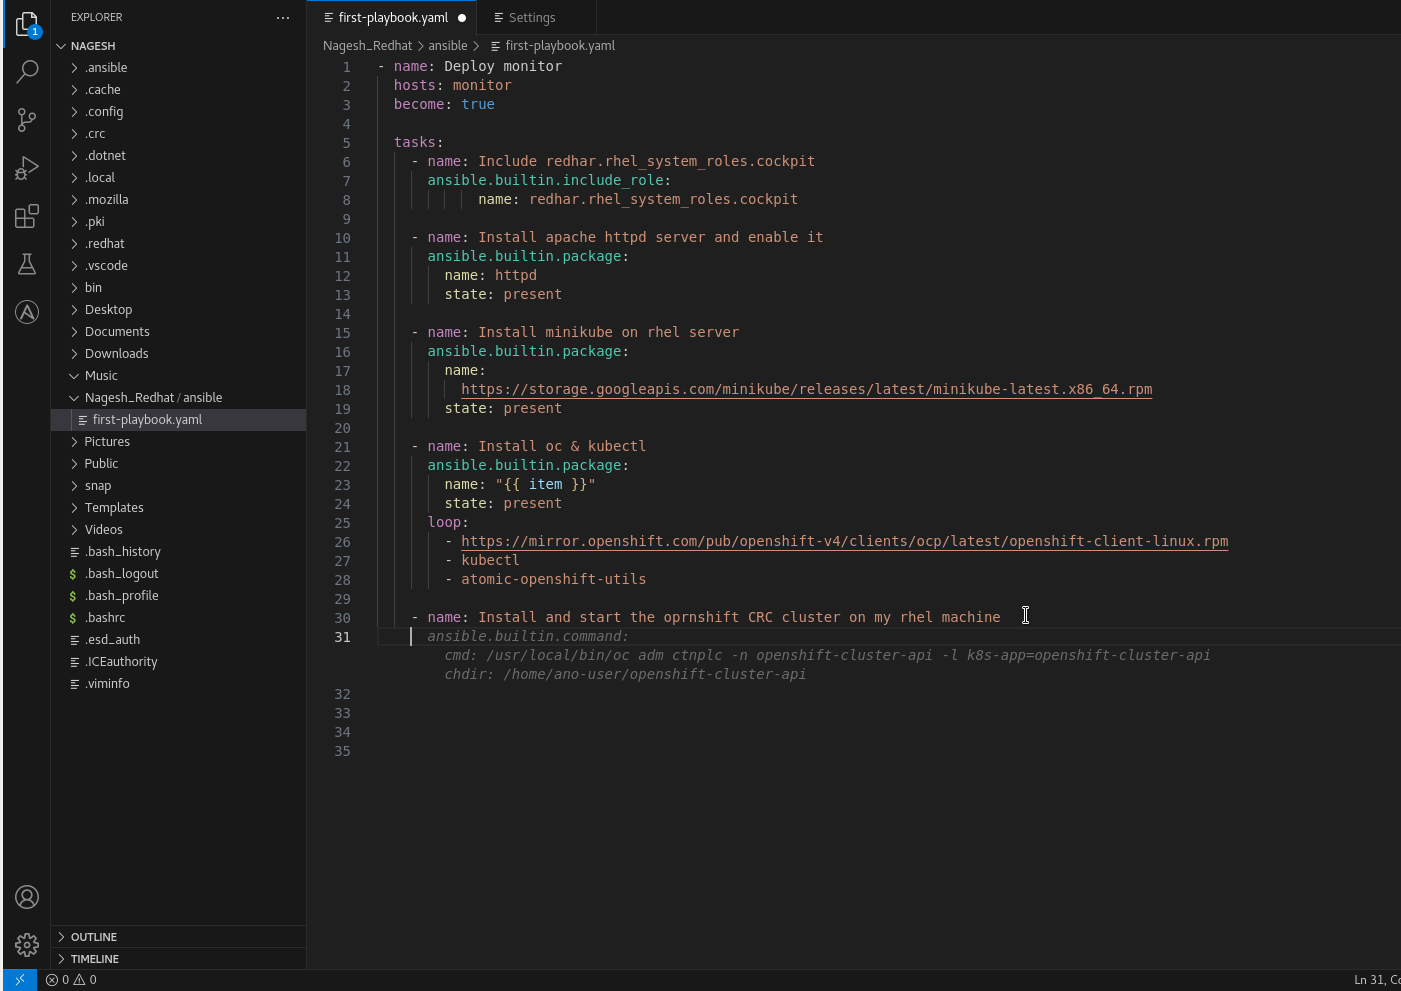
    The second example is installing the kubectl and oc command-line interface (CLI) tools on a server. As in the previous example, we are defining topics about requirements in the name field, Ansible Lightspeed is generating and suggesting to us the context of Ansible playbook. If you are fine with the suggestion, press the Tab key to accept.

    - name: Lightspeed_demo
      hosts: rhel
      become: true
    
      tasks:
        - name: Include redhar.rhel_system_roles.cockpit
          ansible.builtin.include_role:
                name: redhar.rhel_system_roles.cockpit
    
        - name: Install apache httpd server and enable it
          ansible.builtin.package:
            name: httpd
            state: present
    
        - name: Install minikube on rhel server
          ansible.builtin.package:
            name:
              https://storage.googleapis.com/minikube/releases/latest/minikube-latest.x86_64.rpm
            state: present
    
        - name: Install oc & kubectl
          ansible.builtin.package:
            name: "{{ item }}"
            state: present
          loop:
            - https://mirror.openshift.com/pub/openshift-v4/clients/ocp/latest/openshift-client-linux.rpm
            - kubectl
            - atomic-openshift-utils
    
        - name: Install and start the openshift CRC cluster on my rhel machine
          ansible.builtin.command:
            cmd: /usr/local/bin/oc adm ctnplc -n openshift-cluster-api -l k8s-app=openshift-cluster-api
            chdir: /home/ano-user/openshift-cluster-api
    playbook-2
    Figure 6: Red Hat OpenShift Local cluster install using Ansible Lightspeed.

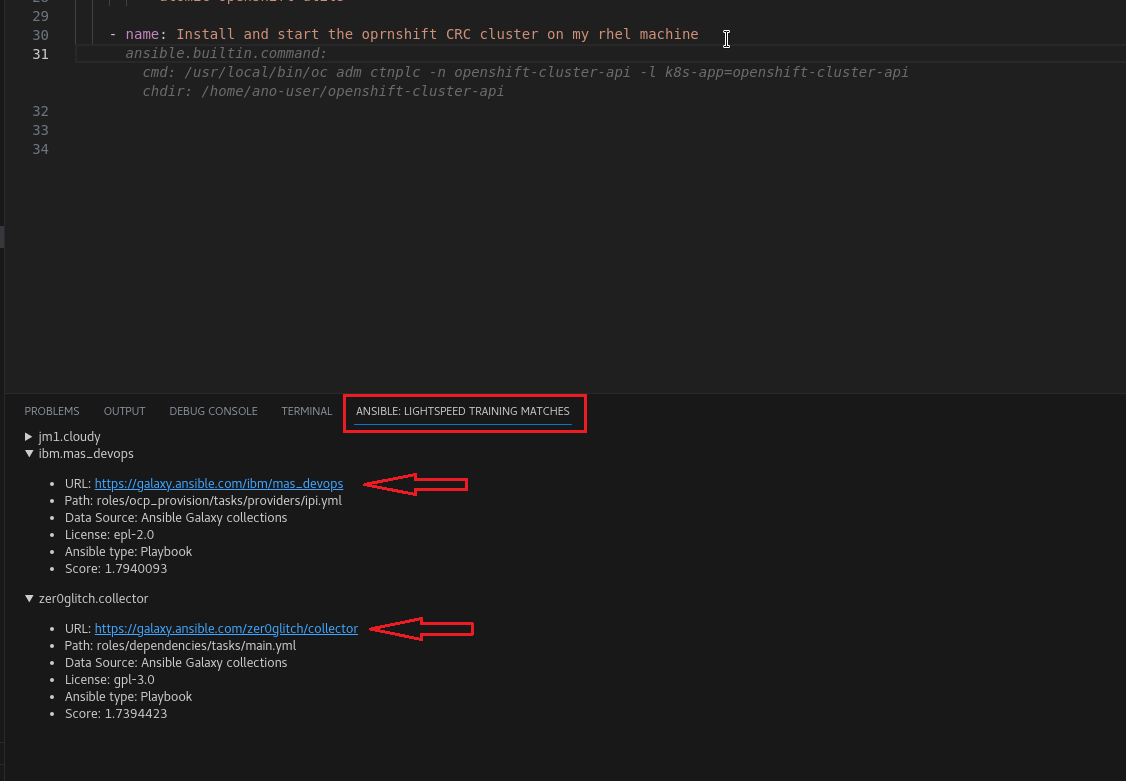
    Lightspeed also provides source code recommendations in the debugging window beside the terminal. It shows more information if you extend it, as shown in Figure 7.

    lightspeed source
    Figure 7: Ansible Lightspeed code recommendation sources.  

    Continue your automation journey with Ansible Automation Platform

    Get started with Ansible Automation Platform by exploring interactive hands-on labs. Download Ansible Automation Platform at no cost and begin your automation journey today.

    Last updated: September 28, 2023

    Related Posts

    • The benefits of deploying Ansible Automation Platform on AWS

    • How to use Ansible Automation Platform from Azure Marketplace

    • How to create an EC2 instance in AWS using Ansible automation

    • How to deploy apps in a K8s cluster via automation controller

    • How to install Microsoft SQL on RHEL using ansible-navigator

    • How to deploy a MSSQL database using Ansible Vault

    Recent Posts

    • Confidential virtual machine storage attack scenarios

    • Introducing virtualization platform autopilot

    • Integrate zero trust workload identity manager with Red Hat OpenShift GitOps

    • Best Practice Configuration and Tuning for Linux and Windows VMs

    • Red Hat UBI 8 builders have been promoted to the Paketo Buildpacks organization

    What’s up next?

    Discover how automation at the edge can help your organization improve scalability, security, agility, and overall efficiency. This e-book describes seven use cases and examples demonstrating automation at the edge of the network.

    Get the e-book
    Red Hat Developers logo LinkedIn YouTube Twitter Facebook

    Platforms

    • Red Hat AI
    • Red Hat Enterprise Linux
    • Red Hat OpenShift
    • Red Hat Ansible Automation Platform
    • See all products

    Build

    • Developer Sandbox
    • Developer tools
    • Interactive tutorials
    • API catalog

    Quicklinks

    • Learning resources
    • E-books
    • Cheat sheets
    • Blog
    • Events
    • Newsletter

    Communicate

    • About us
    • Contact sales
    • Find a partner
    • Report a website issue
    • Site status dashboard
    • Report a security problem

    RED HAT DEVELOPER

    Build here. Go anywhere.

    We serve the builders. The problem solvers who create careers with code.

    Join us if you’re a developer, software engineer, web designer, front-end designer, UX designer, computer scientist, architect, tester, product manager, project manager or team lead.

    Sign me up

    Red Hat legal and privacy links

    • About Red Hat
    • Jobs
    • Events
    • Locations
    • Contact Red Hat
    • Red Hat Blog
    • Inclusion at Red Hat
    • Cool Stuff Store
    • Red Hat Summit
    © 2026 Red Hat

    Red Hat legal and privacy links

    • Privacy statement
    • Terms of use
    • All policies and guidelines
    • Digital accessibility